- Which rubber band should you choose, flat or round?
- How to choose the diameter of the elastic band to match the beads
- How to calculate the number of stones for a bracelet
- How to string beads onto an elastic band?
- How to tie the ends of an elastic band?
- How to hide a knot?
- What tools will you need?
- Do I need to glue the knot?
- Benefits of colored gum
- Does the rubber band break and how to avoid it?
- Should I attach the clasp to the bracelet with an elastic band?
- Is it worth weaving necklaces and beads with an elastic band?
- How to attach a charm to a bracelet?
- Why does the bracelet look bad?
- Which elastic band should you choose: elastic or not too elastic?
- How to extend the life of a bracelet with an elastic band?
- How to choose materials for a bracelet?
- Can bracelet elements change color?
Bracelets ideas from HandmadeMart
Elastic bracelets are quick to make and can be worn with any outfit. That is why they have held a high position in the line of jewelry trends for many seasons now.
It seems that it could be easier than stringing a few beads on an elastic band and securing it? However, beginning craftswomen often ask questions about making such bracelets. Therefore, we have created a small cheat sheet for those who want to master this type of needlework.
The first question is extremely obvious))). How to weave such bracelets? What kind of rubber band do you need? Or maybe regular fishing line will do? In no case! Simply because the line DOES NOT STRETCH. A bracelet made on a fishing line will “torture” its creator every time she puts it on until it breaks from constant tension.
Which rubber band should you choose, flat or round?
Bracelet made of glass beads
A round elastic band is stronger than a flat one. It holds its shape itself, so it does not require the use of a needle (it easily fits into the holes of the beads). A clear rubber band is essential if you plan to use clear beads in your bracelet (I think it's obvious why).
The downside is that the rubber band is quite “slippery” in its structure, so it’s difficult to secure the product properly. The only “remedy” against this scourge is practice and more practice :).
Flat elastic is more elastic. This is good, for example, for creating multi-row bracelets that fit tightly around the wrist. It wears out gradually, so the bracelet will not break overnight; an unfortunate incident can be noticed and corrected in time. Flat elastic is great for pearl beads and stones with small holes.
The disadvantage of using a flat elastic band is that in the process of creating bracelets, it must be folded at least in half and threaded into the beads using a needle or other guide.
Use of special fittings
The next master class is devoted to making a carnelian bracelet. Special fittings will be used for its assembly. You will need:
- carnelian beads;
- silicone thread;
- pin with eye – 2 pieces;
- clasp;
- chain;
- decorative metal beads and pendants;
- connecting rings – 4 pieces;
- wire cutters and round nose pliers.
Use a metal pin to mask the ends of the fishing line. To attach this part to a bead, you need to put the bead on and form a loop from the open end using pliers. Carefully bite off the remaining wire tail and crimp it carefully so that it does not injure your hand when worn.
Related article: Jacquard patterns for knitting
Prepare another bead using the described method. The string for the set is attached to the eye of the bead.
The size of the decorative metal bead that will be placed next should be such that the eye of the pin is completely hidden inside.
Attach the silicone thread with a double knot to the eye beads. String the required number of beads and decor and align the ends of the lines in the middle of the bracelet. Tie them with a straight knot. Pass the ends of the fishing line to the eye of the pin and duplicate the knots. Cut off excess thread. The knots will be securely hidden under the metal beads.
Now you need to attach the clasp. It will be easily adjustable due to the chain. Attach three links to one of the bracelet's ears, and attach 7-8 links to the second. The structure is attached using connecting rings.
Attach a clasp and add beautiful pendants to the ends of the product.
The stylish carnelian bracelet is ready.
How to choose the diameter of the elastic band to match the beads
The larger the beads, the heavier the stones, the thicker and more durable the elastic you need to choose. It is also important to pay attention to the size of the hole in the beads so that the elastic fits easily into it. For beads 6-7 mm, an elastic band of 0.6 mm is suitable, for beads 8 - 10 mm - an elastic band of 0.7 - 0.8 mm.
Of course, there are exceptions. For example, small beads may have a large hole or be very heavy. Or vice versa. In such cases, you just have to use the good old trial and error method.
Simple DIY bracelet
The easiest way is to make a bracelet with your own hands from laces and pendants. Such a bracelet does not require any special skills and abilities, and also takes a minimum of time to work. As a lace, you can use a strong thread, braid, a thin strip of leather, a tourniquet...
You can buy a pendant in a hardware store of any design or size. Attach the pendant to the base of the lace and tie the ends with a bow or secure with special fasteners.
How to calculate the number of stones for a bracelet
It all depends on the diameter of the beads, the size of the wrist and the chosen weaving pattern. Below is a table that shows the average number of beads needed to create a bracelet for an average sized wrist.
Values may vary if you use unusually shaped stones or make the bracelet tighter (loose). It is also worth remembering that the beads may vary slightly in size.
The table is good for designing bracelets from identical beads. If you choose a material of different shapes or sizes, the numbers will change.
This is where trays for making bracelets come to the rescue. They are versatile and very convenient for quickly and easily creating bracelets for wrists of any circumference.
https://blog.royal-stone.pl/wszystko-co-chcialabys-wiedziec-o-robieniu-bransoletek-na-gumce-ale-balas-sie-zapytac/
Threading method
Threading can be considered the easiest way to make a bracelet. What could be easier than putting pebbles on a string? But even in this simple activity there are a number of nuances. Let's look at an example of creating a bracelet from noble agate. To complete it you will need:
- agate beads with a diameter of 10 mm;
- silicone thread or rubber band;
- nippers, scissors;
- accessories.
Related article: Crochet pineapple: pattern in a circle with motifs and patterns
Let's take a closer look at the last item on the list. There are various decorative accessories to create jewelry. It will not only help make the decoration convenient, but will also add some zest to it.
For example, huggers. These are metal elements that are sometimes called caps. They cover the bead, creating a beautiful frame.
A bail is a metal connecting element equipped with an eye (or several ears) for pendants.
A rondel is a type of bead that most often has a concave shape.
Pendants are attached to bails and add zest and a finished look to the finished product.
A connector is a part that connects two parts of a bracelet.
To make a bracelet from natural cameos, you need to correctly calculate their quantity. Take your wrist measurement and add some extra size for comfortable wearing. For small beads it will be 0.5-1 cm, and for large ones up to 2.5 cm. Place beads on a prepared silicone thread and tie its ends with a straight knot. Cut off the excess thread, leaving tails 0.5 cm long. Tuck them inside the bead. This is what a regular low top looks like.
In the photo below you can see how decorative fittings can transform a boring bracelet into a fashionable accessory.
And this picture illustrates the correct tying of a straight knot.
How to tie the ends of an elastic band?
Beads for the bracelet
After stringing all the necessary beads, leave about 40 cm of elastic. Connect the ends, pull well and tie a tight knot without releasing the tension. After this, move the ends of the elastic in different directions and stretch them, tightening the knot. The stones on the bracelet should become closer to each other, and the product should shrink. After this, the elastic band must be cut very close to the knot, and the knot itself must be hidden in a bead.
Types of weaving
You can weave a beautiful bracelet in different ways. There are two types of weaving: oblique and straight. The first variety is simpler, while the second is more complex.
In straight weaving, knots are tied at the very beginning of the work, after which the threads are woven into delightful patterns in straight rows. But the simplest baubles are made differently: here you don’t need to tie any knots at all. The threads are simply intertwined with each other, forming a pigtail.
To make it clearer, it is worth considering the types of weaving in more detail.
Oblique weaving
It is considered easier, so novice bauble creators should use this option. There are practically no difficulties here, so making a multi-colored bracelet will not be difficult.
Here is an approximate instruction for a bauble with oblique weaving:
- Take threads of six different shades. These should make twelve identical segments, about a meter in size. Material consumption can be calculated by multiplying the required length of the product by four. You can make a narrower or wider decoration, but be sure to remember: the threads must be in pairs.
- Fasten the material in any way you like, leaving the ends eight to ten centimeters long. Place the threads symmetrically to each other: for example, a pair of yellow ones in the center, a pair of green ones on the two edges of them, etc.
- You should start weaving with the help of the leftmost thread. It is slightly retracted to the left edge, and then intersects with the nearby one. You will need to thread the tip of the working thread into the resulting hole. Then the procedure is repeated a second time, and the working thread remains the same. In the same way, a knot is created from the right edge, but now you need to do everything in reverse.
- On the left side, continue making knots with the working thread, moving more and more to the right. You need to braid nearby threads located on the right side of the main one. The same procedure is done on the other side. When both main threads meet in the middle of the bauble, you will need to tie the same knot from both of them.
- Now change the main threads: this time they will be those that are located on the left and right sides of the bracelet. You need to weave until the decoration reaches the required length. As a result, the pattern of the accessory will resemble a herringbone.
At the end of the work, you need to tie all the threads into one knot, and weave the ends into a braid.
Tip: if you make a mistake in your work, carefully untie the incorrect knot with a needle or thin hook.
Straight weave
This method is good because the patterns can be very diverse and display almost any pattern. In addition, with direct weaving you can create a bauble with an interesting picture. You can even make a bracelet with a word (for example, a name) or even a portrait. Weaving this way is more difficult than weaving it obliquely, but it’s worth it.
The most convenient way to start working is to cross the threads with each other and make a loop on top. The main thread is attached to one side. After this, the entire loop is braided with knots from the working thread.
Then you can begin to create the image indicated in the diagram. The working thread for straight weaving must be very long. You need to use it to braid all the threads from left to right in turn. After this, the direction changes: you need to go from right to left.
To create a pattern, you need to weave the main thread with the correct color. After this, you should leave it free and change direction. Sometimes the correct length of the main thread cannot be calculated and it ends, but this is fixable. It is enough to do the following:
- Bring the remaining end of the thread to the wrong side. It should be enough to form a nodule.
- Attach the new thread to the tip of the old one.
- Tie it with a simple double knot.
- On the wrong side, tie the tip of the old thread to the new one. Then the connection will not be visible.
Why does the bracelet look bad?
https://blog.royal-stone.pl
It is best to make elastic bracelets using simple round beads. Stones of complex shapes, beads with large holes and other delights can simply “not settle down”, move out when worn, or rub the fragile base with sharp edges. In such cases, it is worth replacing the elastic band with fishing line or thread and making gaps between large stones (for example, inserting connecting beads).
Delicate lace
Other materials are also used to create bracelets. They can be made from ribbons and beads, as in the photo:
Related article: Sweater with deer knitting needles for girls with photo patterns
Made from lace and beads using glue.
Weaving into a chain.
Or weaving lace from beads.
How to choose materials for a bracelet?
You can choose one type of stone and add connecting beads or crystals of contrasting color to it. For a set, it is good to choose bracelets in the same color scheme, but from stones of different textures. You can complement the set with bracelets made using the soutache technique, macrame, cords, leather or jewelry mesh filled with small rhinestones.
History of the Shambhala bracelet
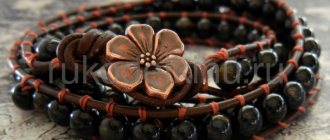
Before we learn how to weave a bracelet from beads and cord, let’s get acquainted with the history of this jewelry.
Shambhala is, at the moment, a non-existent country in the mountains of Tibet, which is described in many legends and tales not only of the peoples of Asia, but also of the indigenous inhabitants of Altai.
It is believed that the first bracelets were worn by Tibetan monks; they wove beads, precious stones, and gems into the lace. Such an amulet reliably protected its owner from the evil eye, poison, bad thoughts and enemies.
It is reliably known from ancient Russian chronicles of that time that residents of the Altai Territory and nearby settlements wore bracelets of this type.
This bracelet was introduced into the modern fashion industry by two brothers: Mads and Mikel Cornerup. Since 1994, such jewelry made of precious metals and stones began to be produced under their brand. The brothers combined Scandinavian, Asian folk art, yoga practices and Indian symbols in their collections.
But you can weave such a bead bracelet with your own hands. Let's find out how to do this quickly and easily, and the master class will help us!