Beginning of work
We printed the required shapes in Word in different diameters: from the largest to the smallest, so that they fit all devices. I then cut out blanks from paper and used them as a template for the tree. The charging station is designed for 5 devices, so that's how many stands you'll need. The wooden divider will allow you to simultaneously charge your laptop, player, and phone.
To make the tabs, I cut indentations in the wood using a wood router and a round chisel to remove the rough edges for a better look. We assembled the stand starting from the front.
First we drilled pilot holes for the countersunk screws so that the next piece of wood would be attached tightly but discreetly. You need to repeat this sequence until you reach the largest part. We then drilled a small round hole for the cord to pass through.
Moto Guzzi has made major updates to the classic V7 model
Oksana always helped her mother, but it wasn’t enough for her. A trip to the village changed everything
The girl found out about her boyfriend's infidelity when he brought home a glass of coffee
Putting things in order
The last story mission from the DLC. We talk with Ada and install a satellite module on her on the workbench. After this, we go to the Mechanist’s lair indicated on the map - the RobCo sales and service office. Go downstairs and ask Ada to open the lock. We go forward, open the massive doors and turn off the traps.
Next, a cybernetic robotic eye will appear, through which the Mechanist will say that he is not very happy to see you, after which he will begin to attack. Several more robots will come running to his aid. We deal with them and unlock the door on the right with the help of Ada. Further the path is quite linear. Going down, several robots will attack you. Destroy them, and then go forward to a room with a robot workbench. If you want, you can use it to improve Ada. After that, go up the stairs on the right. After walking a little along the corridor, we find ourselves in a room with conveyors. After destroying several robots and moving forward a little, the gate will open and a tankbot will attack you. We deal with him and go up to the bridge. Click on the red button to move parts of the bridge and move on.
Along the way, a robotic eye will fly up to you again and, after a short monologue, will attack you. Next, reinforcements will come, and among them will be the legendary junkbot. Be careful - it will explode after death. We go down, finding ourselves in a corridor full of water, and go straight. We find ourselves in a room with carriages. We destroy the robots and go up the stairs at the far right end of the room. We listen, and then kill another robotic eye and stand on the part of the bridge with the red button. Click on it and start moving to the opposite side. We pass by the cameras, press the button to open the gate, and then take the elevator down. We pass under the “shower” and turn left.
There we destroy the turrets and the robots that attacked you. After this, we take the medical terminal password from the servo-driven robotic brain. Use it to open the door. Having walked a little forward, we finally get to the Mechanist.
After a short dialogue, many robots will attack you. Beware of the robot eyes, they will start to explode at a certain moment (watch what the mechanist says). Having dealt with them, there will be a little time to rest while the Mechanist delivers his speech. Then there will be another wave of endlessly appearing assorted robots. This will continue until the power goes out, so keep an eye on the percentages the supercomputer says. When the power turns off, you will have a conversation with the Mechanist. With a sufficiently high level of charisma, everything can be resolved peacefully. We receive the password for the complex and use it to take control of the complex by entering it on the computer highlighted with a marker. After this, we talk with Ada and the Mechanist, if he is still alive, of course. That's it, the addition is completed. Radiant quests to find and destroy robots will now become available.
The Robot Eye Dock is a Fallout 4 object added in the Automatron add-on.
After completing the DLC story, the player will have access to the “Robo-Eyes Dock Scheme”, located in the last location in the add-on story – the Mechanist’s Lair (on the table in the rest room). Having picked it up, you will be able to build eyebot service stations (Eyebot pod) in your settlements, allowing you to organize a search for various resources throughout the map.
The most popular wireless charger models
Not everyone has the opportunity to create their own charger. Today this is not a problem, since there are many modifications of similar accessories on sale, produced under different brands.
Overview of the characteristics of the most popular wireless charging models:
- The Samsung PG920 device is designed specifically for smartphone models such as S6 Edge and Galaxy S6. The gadget is also compatible with other devices. It features fast charging. The battery can replenish capacity to 100% within 2 hours;
- RAVPower Wireless Charging Pad is a charging pad that is wireless in the full sense of the word. It is equipped with a powerful 5 thousand mAh battery. This resource is sufficient to replenish the battery capacity of several devices that support the Qi standard;
- Woodpuck FAST Edition Bamboo Qi Wireless Charging Pad is a device model that is characterized by fast battery charging. Its body is made of several materials, one of which is bamboo. The device does not have LEDs to indicate the charging process. They are replaced by a sound signal. Due to its uniqueness, the product is not cheap. Its price fluctuates around $40. In this price category, this is the best charger that supports the Qi standard;
- Wireless Charger PowerPort Qi Wireless Charging Pad from Anker is a reliable wireless device with a stylish design.
It is equipped with a temperature sensor that protects the mechanism from overheating during charging. Another advantage of the model is protection against overcharging the battery. In this case, energy is saved, and the device switches to “sleep” mode. The cost of the accessory is approximately $17; This wireless phone charger differs from others due to its unusual shape, due to which the phone charges in an unusual position - QI Wireless Charger from Aukey, a company that produces many accessories for mobile devices, is on the list of the most popular wireless devices. The cost of this model is affordable for a wide range of consumers. Its distinctive feature is the body material, which protects against slipping;
- Tylt Vu differs from analogues in the ability to interact with a smartphone in an almost vertical position. This allows you to use the device without interrupting the “recharge” process. The accessory is made in the form of a stand, which can accommodate not only a smartphone, but also a tablet. The high price of the gadget is justified by its modern design and ease of use;
- Qi Wireless Charging Station is another device from Samsung. It's inexpensive. The price fluctuates around $12. The charging process with this accessory does not last as quickly as, for example, in the previous model. However, the manufacturing company has extensive experience in producing various devices, so there is trust in the quality of the presented model;
- Nokia DT-903 is a model distinguished by its minimalism. It has a stylish backlight, and in combination with Lumia smartphones it performs additional functions. For example, the DT-903 model is equipped with a missed calls and SMS sensor.
How wireless charging works
The presented device cannot be called completely wireless, since it is in any case connected to the electrical network. The device that requires recharging the battery is placed on top of the charger. The principle of its operation is electromagnetic induction. The battery receives voltage due to the electromagnetic field generated in the charger when electric current flows through a special induction coil.
Wireless phone chargers have recently appeared on the market.
The force field can operate at a distance of four centimeters. It occurs when a signal is transmitted about the appearance of one of the compatible devices. The smartphone can generate these alerts using the Near Field Communication feature. Next, energy is transferred to the battery due to the current generated by the voltage in the winding built into the device being charged.
Expert opinion
Making a wireless charger with your own hands is not such a difficult task. All materials and elements are easy to obtain - plastic and wire for the coil, transistors, etc. can be found in specialized stores and even in markets. The main thing is not to try to experiment with new smartphones right away; First, it’s better to practice on old models.
Konstantin Kotovsky
Smartphone as a desktop
Today, no one can be surprised by a smartphone with a 64-bit processor, RAM from 4 to 6 GB and a built-in storage of 512 GB or more. This means that the characteristics of mobile devices are approaching those of laptops and personal computers. Increasingly, manufacturers are trying to replace the desktop PC with a mobile device.
The development of the concept of “transforming” a smartphone into a PC is developing in different ways: this is the development of technology companies, and the development of enthusiasts, and various startups that raise funds for development on various crowdfunding platforms.
There are several already implemented concepts for turning a phone into a compact laptop computer. Each of them develops in its own way:
Choice
Once you have decided on the type of device you need, there are a few other important factors to consider. The station must be suitable for working with yours, and have a suitable type of power and data transmission method - wired or wireless
The station must be suitable for working with yours, and have a suitable type of power and data transmission method - wired or wireless.
This will determine whether you will have to carry a lot of cables with you and how quickly your device will drain.
Next, study the functionality of the station in detail - it can differ quite significantly for models of different price categories. Although it may not be obvious, universal stations that are identical at first glance can differ quite significantly in the capabilities they provide. Decide which of these features you need and which you are willing to give up.
Look at how many ports the station has and what they are. This directly determines how many devices you can connect, and whether you will have to use adapters for this - gadgets can also vary greatly in this regard
Pay attention to the presence or absence of built-in speakers
Ubuntu Touch
Canonical, which created the Linux-based Ubuntu OS, has been developing the Ubuntu Touch project since 2013. This is an adaptation of the desktop version of Ubuntu for mobile devices. Several devices with Ubuntu Touch were presented on the market: Meizu 4x, Meizu Pro5 and BQ Aquaris, but they were not widely used.
Currently, Ubuntu Edge is being developed only by enthusiasts - anyone can download the open source distribution and try to adapt it to their device. Of course, this is only possible if the user has the proper competence.
Charging station made of plywood
I've been missing a simple stand for my phone for a long time, so I decided to make something myself. A limited amount of materials and the presence of good friends who helped me with production allowed me to make a simple charging stand.
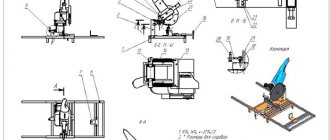
Step 1. Cutting the material with a laser cutter
I asked a friend to cut out all the details for me from the material I provided (wood 64 cm long). I gave him a file with diagrams of each part and he cut them out for me.
I then took all the prepared pieces and secured the pieces with wood glue. I haven’t installed the small sides yet - I’ll still have to climb inside.
The laser cutter is the most important tool in the entire job.
Step 2. Blocks for greater stand strength
Using small pieces of wood, I made small blocks, then installed them inside the structure and glued them together. According to my idea, they will not only become a support for the corners, but will also help raise the back panel, which serves as a stand for the phone.
Blocks are the main thing that will need to be installed inside
Step 3. Small walls
Now that I have installed the blocks inside, I can trace one of the sides. The other one should be left open. Why? This will make it easier to access the charging cable if it slips out of place and ends up inside the box.
One of the sides must be closed
wood glue
Step 4: Install the plate at the back
The last step is to install the back panel into the large cut out slot at the top. The support from below will be the blocks located inside.
When I was done, all I had to do was insert the cable and place the phone. Now it can be charged. Simplicity of assembly and ease of use makes my stand a rather interesting budget option. This way I can protect the cord from wear and tear, and it’s easier to charge my phone this way.
This is how the docking station turned out
Modern charging stations combine not only a pleasant appearance, but also very good functionality. Simple for wired charging and cool for wireless charging - they are all equally useful. And it’s especially great that you can make them yourself.
Do-it-yourself docking stations for charging phones: simple and convenient
Today, when people use a large number of devices, difficulties arise with where to charge them. You can, of course, use standard docking stations or just put your phone somewhere, but today you can use more modern options.
Subscribers of our group on vk.com suggested a couple of interesting ideas. Georgy I. will talk about a wireless charging station, Valentin B. will talk about a docking station made of wood, and Alexey K. will talk about making a charging station from plywood. Next - the author's text and photos.
Unusual do-it-yourself docking stations
? Another mega feature of Tabula Sense: legs with electric lift
In recent years, the trend for standing desks has been gaining momentum. I dreamed of these for many years when I was freelancing, and I’m not alone.
Standing desks get your blood flowing, tone you up, and prevent you from hunching over and sticking your face to the screen out of an old bad habit. There are many advantages, but it is correct to use such tables in addition to regular ones. I'll see how you stand still for 4 hours.
Rather, it should be a la warm-up, a boost of energy without loss of productivity.
And therefore Tabula Sense Light is available in an additional version with an electric lift.
I also saw and tested the electric legs. Powerful, heavy, capable of lifting and lowering up to 120 kg, remaining stable without tremor or shaking of things.
Two lift control buttons are located down on the left and are marked with arrows for blind adjustment. The table can be raised almost one and a half meters - that is, people of any height can work at it while standing.
It turns out that Tabula Sense Light with electric legs is two tables in one. And if you remember the other bells and whistles, then there are more than 5 gadgets...
MaruOS. Do it yourself
Maru OS - the operating system combines Android as a mobile OS and a full-fledged Linux-based desktop Debian for operation when connected to a monitor. The first release of Maru 0.4 was released in 2016 in the form of firmware for the Nexus 5 smartphone. The project is being finalized by enthusiasts and is still being developed.
On March 7, 2022, Maru OS received update 0.6 and began working with Android 8.1 Oreo. This firmware is not tied to any specific device. But since there are not so many developers, the main supported platforms can be considered Nexus 5 and Nexus 5x.
Before proceeding with the installation of Maru OS, the user must carefully study technical issues and installation features, since the process of installing the firmware requires special knowledge. Detailed guidance can be found on the project website.
Source
How to order Tabula Sense Light?
Tabula Sense Light is up for pre-order today. The table itself is ready, it is not a “prototype” or a set of promises. Those who don’t believe can go and watch them live in Moscow even today.
The creators of the table use crowdfunding as a PR tool and a convenient interface for those who want to place an order. Essentially doing the same thing Pebble did before. And you can make a powerful profit from this.
The version for 29,990 rubles includes regular legs. A model with electric legs already costs 69,990 rubles, because legs of this level are themselves expensive and are ordered in Denmark.
And then for 70 thousand upon pre-order you can get the cheapest sit-stand desk in Russia with wireless charging, a dock for gadgets and built-in USB ports. Not to mention, improve your well-being during your work sessions.
You have to grab it before the discount ends. For 29,990 rubles you will not find anything else in Russia with similar characteristics and capabilities.
PS There are other table models on the official website. For example, take a look at the second generation Tabula Sense (2.0). There is also a sale of the first generation of the table - timed to coincide with the anniversary of the project.
PPS The working prototype of Tabula Sense Light can be viewed live in the Pushastore showroom, located in the Roomer shopping center at the address: Moscow, Leninskaya Sloboda 26. m. Avtozavodskaya. Central entrance, second floor, on the left hand immediately as you go up the escalator. Opening hours: from 10.00 to 22.00, seven days a week. Showroom phone number
Total: 5
iPhones.ru
You stood up and he stood up.
New threat
You need to get to, located not far from the castle (the corresponding marker will appear on the map). There will be quite a few robots here that you will have to fight. Once inside, go left and either hack the terminal on the far wall to open the door, or through the hole on the second level of this room. We find ourselves in a room where there will be several ordinary robots, and a legendary robot will soon join the battle. We go up to the second floor along the stairs opposite the entrance to the room and turn around the corner, where there are several unfriendly robots behind a locked door. You can also attack them through the bars, this way you can avoid hand-to-hand combat. Having dealt with everyone, open the door using the terminal and take the mechanic’s device from the integral robotic brain.
After this, talk to Ada and move to any settlement where you want to build a workbench for robots. Talk to Ada again and at the workbench install a direction finder on Ada in the special modifications section. Talk to Ada again, the current task will end and you will be given the next one.
Ready-made solutions - universal receivers for wireless charging
Making wireless charging with your own hands is not difficult, but if you don’t have free time and skills in assembling circuits, you can easily find it in any electronics store. Most models of new smartphones already have a receiver installed by the manufacturer. Therefore, the user does not need to buy anything additional. In rare cases, the package does not include a transmitter (docking station).
Although smartphones that support wireless charging are no longer uncommon, some manufacturers for some reason ignore this technology. To determine whether the gadget can be charged in this way, you need to look for the “Qi” designation in the model description. Also, all information can be obtained from the instructions or on the manufacturer’s website.
Cases that support wireless charging are available for the most popular models. This is due to the complexity of production and considerable cost. When using the charging case, you do not need to disassemble the smartphone.
Receivers are available in two types:
- With special contacts that supply energy directly to the battery. Sold by gadget manufacturers as additional items. Can only be used for smartphones that have the appropriate contacts inside.
- Universal receivers installed under a cover or placed under a cover. Energy is supplied to the charging port.
After choosing a wireless charging kit, you need to disassemble the phone, connect the receiver to the port or special contacts, and the base to the USB adapter. When the gadget comes into range of radiation, an indicator turns on, indicating that the battery is receiving energy.
Wireless chargers are increasingly popular among users who value their time and do not want to bother with wires. These devices are inexpensive, and everyone can choose the right model for themselves. If desired, you can easily do the charging yourself, spending a minimum of time and effort.
Currently reading:
What phones can be charged with wireless charging - list of models
How wireless charging works - device and principle of operation
How to quickly charge your phone on Android
Is it possible to charge a smartphone without a charger or without a cord?
What to do if the phone does not charge even if it is properly charged
Transforming devices
The first attempts to create a laptop based on a smartphone were made by Motorola in 2010. Then, as an addition to the Motorola Artix 4G smartphone, Lapdock was released - a laptop-shaped device consisting of a touchpad, keyboard, battery and display, to which the smartphone was connected via a special port. Later, the model was improved - Lapdock 100 began to work with the then advanced Motorola Photon 4G and Droid Bionic.
How wireless charging works
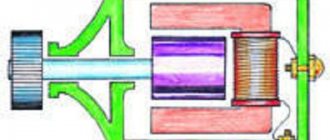
The operating principle of this wireless charging scheme is quite simple. The role of the charger is played by the transmitting circuit; the device itself consists of two circuits - a transmitter and a receiver.
The receiving circuit (flat coil) is located in the phone itself, the transmitter is made in the form of a small stand, inside of which the transmitting coil is hidden.
Wireless charging circuit
Electricity is transferred from one circuit to another by induction; the current generated in the second circuit is first rectified and supplied to the battery. Literally any low-power Schottky diode can be used as a rectifier.
Let's start assembling wireless charging with our own hands from the transmitter.
Transmitter
The transmitter circuit is simple and clear. A typical blocking oscillator circuit using one transistor. The frame for winding the transmitting coil is at your discretion. It is advisable to take a frame with a diameter of 7-10 cm. We wind 40 turns of copper wire with a diameter of 0.5 mm onto the frame. The winding has a tap from the middle. First, we carefully wind 20 turns, then we twist the wire, make a branch, and wind the remaining 20 turns in the same direction. Is everything clear with the coil? Let's move on.
Absolutely any transistor, I tried both field-effect and bipolar ones, with field-effect ones it charges a little faster. You can use field keys of the IRFZ44/48, IRL3705, IRF3205 series (I indicate only those that I used myself), but you can use literally any. Of the bipolar ones, you can use domestic ones: KT819, 805, 817, 815, 829. The choice is not critical. You can also use direct conduction transistors, but in this case you will have to change the polarity of the power supply.
The value of the base resistor is not critical (22 Ohm-830 Ohm).
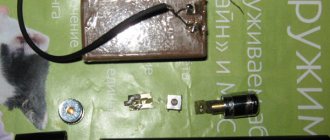
Receiver
The receiving circuit was running for half an hour. The coil is flat, consists of 25 turns of wire 0.3-0.4 mm. It is convenient to wind the circuit on a small piece of plastic; the coils need to be gradually strengthened with superglue; the work is quite dirty and time-consuming. After winding, we separate the circuit from the plastic stand on which it was wound. This is convenient to do with a mounting knife or blade.
Next, the circuit was connected to the battery through an SS14 diode, the latter is a high-frequency silicon diode in SMD design.
In my case, the charging connector on the phone did not work, so I connected the charger directly to the battery. This solution is inconvenient because the sensor will not show that the phone is charging. Everything is done with the phone, now you need to install the back cover.
The charging time directly depends on the power of the power source; in my case, the factory charger of the experimental phone was used. The device provides an output voltage of 5V at a current of 350mA.
This wireless phone charger works flawlessly; with this arrangement of components, the mobile phone is fully charged in 7 hours, it takes a long time, but it charges. You can speed up the charging time only by making the circuit stronger - use a more powerful power supply and wind the circuit with a thicker wire.
Material – aluminum and glass
The docking station looks solid from any angle.
Unlike many docking stations, the ReVolt A1 has a rich look: made of polished aluminum. The color is noble, like MacBooks - gray. So the accessory looks stylish even on a bedside table or on an office desk.
The main thing is that instead of three wires, there is only one USB-C, which goes from the docking station to the outlet. There are several advantages to this: there is no confusion and mess of cables, and only one outlet is occupied, not three.
Hey guy! Do you want me to charge your iPhone?
On the back there is one USB-C output and a dedicated channel for routing the Apple Watch charging cable.
The wireless charging areas are made of dark glass. There are two of them - for a smartphone and for AirPods Pro. Moreover, you can charge wirelessly not only the iPhone, but also any other smartphone that supports the Qi standard.
Characteristics:
The bottom part is also aluminum, but with a rubber pad to prevent the docking station from sliding on the table. Next to it is a cover that covers the compartment for the Apple Watch charging cable.
The wires inside can be laid more neatly. But you don’t have to bother, it’s still not visible.
Yes, if you have AirPods of the first generation, or second, but without a case with wireless charging, you can connect the Lightning cable to charge the headphones via wire.
A special hole for charging AirPods wired.
From the outside, everything looks just as beautiful, and there is still only one power outlet.
Both wires, for the Apple Watch and the first generation AirPods, are hidden in a special compartment.
How wireless charging works
The Qi battery charging standard is based on the principle of wireless energy transfer over a short distance. This technology is not fundamentally new. Network access points, Wi-Fi and Bluetooth sensors, radio signal modules - all this allows you to receive and transmit information without the use of wires.
What does it consist of?
A wireless charger, easily made at home with your own hands, consists of several elements:
- a base connected to a network source of electricity;
- transmitter;
- receiver located in the smartphone.
To recharge, the device is placed on the surface of the device. In this case, the principle of electromagnetic induction is triggered between a pair of flat coils (transmitter and receiver) by analogy with the principle of operation of transformer windings. After a change in the magnetic flux in a closed circuit, an electric current appears through it.
When a smartphone is detected, the base checks it for the presence of a Qi-compatible device. After receiving a signal from the gadget and determining its optimal position, charging begins. To regulate the power level, the Qi device sends data packets and when the maximum charge is reached, the base operation stops.
The advantages of using wireless devices to recharge the battery of a smartphone or tablet are obvious:
- Ease of use. The gadget only needs to be placed on the Qi device, charging starts automatically.
- Modernity. Despite the fact that wireless devices have not been around for long, many companies have already started developing their own models.
- Versatility. Any Qi wireless charging is compatible with any gadget that has a Qi receiver-receiver.
- Safety. The magnetic field created by the device is absolutely safe and is transmitted over a distance not exceeding 50 mm.
- Convenience and comfort. There is no need for wires that get lost, tangled or broken. The micro-USB connector is no longer used; it can simply be closed from external influence.
Adapted operating systems
In 2015, Microsoft introduced Continuum, a Windows Mobile feature that made it possible to get the familiar interface of the desktop version of the OS. By connecting a monitor, keyboard and mouse, the smartphone turned into a mini-PC. It was assumed that the user would be more accustomed to working with applications on a large screen. This option was also supported by the Microsoft Lumia 950 and 950XL, Acer Liquid Jade Primo, HP Elite X3 and some others.
To connect peripheral devices to the phone, a Display Dock was used, equipped with three USB ports for connecting a keyboard, a mouse, an HDMI port and a DisplayPort for connecting a TV or monitor.
Despite the almost one hundred percent resemblance to Windows 10, this device supported only mobile applications adapted to work on a large screen.
Windows 10 Mobile was not widely adopted due to a series of major marketing failures from Microsoft. From December 10, 2019, the company is gradually ceasing support for this project.
A simple technology for modifying a push-button mobile phone
To improve your mobile phone, you need to perform a number of simple steps. After updating the gadget, problems such as failure of the charging socket, tangled wires, etc., will become insignificant.
To implement wireless charging, you will need a couple of meters of thin copper wire. The conductor must be wound into a coil. The optimal number of turns is 15 pcs. It is advisable to secure the spiral with glue or double-sided tape to maintain its shape. In this case, a few centimeters of wire are left for soldering the contacts. To connect to the charger socket, a pulse diode and a capacitor are used, attached to different ends.
In order to create a wireless charging transmission circuit, turns of 1.5 cm in size are formed. The diameter of the coil after twisting should be 10 cm. Both ends should be free. The rest of the structure is held together using electrical tape or adhesive tape.
Next, 30 turns of thinner copper conductor are wound for the transmitter. A transistor and a capacitor are used to close the circuit. By placing the device equipped under the receiver cover in the area of the transmitting ring with the display facing up, you can achieve wireless charging of the phone.