What is made from the shell of an egg?
The material is considered environmentally friendly, so it can be used in creative activities. The shell has a fairly hard surface, which allows you to make crafts from it such as:
- panels using the craquelure technique;
- semantic images;
- mosaic on any surfaces;
- decoration for vessels.
The technology of action is different in all cases. For example, preparing a wooden surface is very different from a plastic one. The finish may also vary. Only the material used as the basis remains similar.
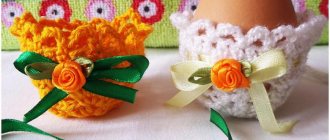
Decorating the shell
Quilling is a type of needlework in which paintings, panels or animal figures are created from thin strips of paper twisted into a spiral. But using the quilling technique, you can also decorate an egg.
To do this you will need thin strips of paper, glue and decorative elements. These can be beads, rhinestones, ribbons and so on. With this technology, a thin strip of paper is twisted in a spiral and fixed.
Then you can use both circles and give the paper different shapes. For example, petals or triangles. It all depends on the composition you choose. You can find a lot of ideas on this topic on the Internet.
It is also worth paying attention to such techniques as embroidery on an egg. This is a truly masterpiece technique that requires accuracy and great patience. To work you will need:
- Long thin needle.
- Micro drill and drill for it.
- Special threads (viscose).
The technique is quite complex, so if you decide to do it yourself, it’s better to watch master classes.
But embroidery on a shell is no different in appearance from embroidery on fabric, and that’s why it’s so amazing.
Collection and preparation of material
First you need to collect eggshells for crafts. Moreover, this should be done gradually, saving the material after each cooking. It is important that it dries thoroughly and does not have a thin film inside.
The finished whole shell must be painted in different colors. There are a couple of convenient options for this. So, you can paint the shell with a brush dipped in paint, or dip it in a dye solution. After half an hour, the shell will become bright and rich.
After coloring the egg peel with dye, it must dry thoroughly. After a day, it is placed for storage in a linen bag. If creativity is needed, the shell is taken out for creative activities.
What can be made from this material
As a first step, you can try decorating eggs with mother of pearl. Add painting or decoupage on the white surface of the material.
Embroidery is gaining popularity. Moreover, they use various additional means: ribbons, beads. Such works look original and do not leave anyone indifferent.
Many needlewomen create small pots for grass from this material. It turns out unusual, simple and practical.
Decorating a vase or box
You will need a wooden object. First, it is processed using simple sandpaper to make the surface smooth. Next, a layer of primer is applied to the product. Then the object is coated with any color, taking into account that it will be noticeable between the mosaics. Thus, patterned contours remain on the surface of the product.
The next step is gluing the crushed shells. Remaining glue can be removed with a clean cloth. When the product dries, it is advisable to apply a varnish base to it. Finally, all that remains is to glue the decorative elements.
Egg painting
For work you will need the following tools and materials:
- Egg shells;
- PVA glue;
- Brush;
- Cardboard (or any other surface, everything will depend on what exactly you want to do);
- Tweezers;
- Wooden stick;
- Varnish;
- Acrylic paints;
- Napkin for decoupage.
Step-by-step instructions for doing the job:
- First you need to make a template according to which the eggshells will be laid out. Draw it on a simple sheet of paper, or for those who don’t know how to do this, just take any drawing and print it out.
- You need to glue a sheet with a pattern onto a sheet of cardboard.
- Let's move on to applying the shell. We do it as follows: grease a small area of the picture with glue and place the shell on it. If the size of the shell is very large, then take a stick and press it on it. Because of this, it will crack and crumble into several small fragments. The distance between the shells should be the same.
- With this action we fill the entire drawing completely.
- We put it out of the reach of children and wait for it to dry completely.
- After the drawing is completely dry, decorate it with paints.
- At the end of the work it is necessary to coat it with varnish.
Related article: Crochet lace border with roses
This concludes the master class.
Decorative bottle
It’s not difficult to make a similar decoration for your home from eggshells. The first step is to prepare the bottle. It must be perfectly clean, so all remnants of paper and glue are removed from it.
You need to gradually glue pieces of napkins onto a dry and grease-free surface, then lay out a mosaic of shells on it and cover it with napkins again. Finally, a thin layer of primer is applied. The craft should dry well. If desired, the egg shell can be easily painted in any color.
Family Bunch
Good afternoon, today I decided to upload a selection of ideas for crafts made from eggshells. Here you will find the simplest and most interesting egg crafts suitable for children. They are easy for children to make with their own hands, if they get a little help from adults. The crafts presented below can be taken for a creative competition in kindergarten and school. You can create tabletop theaters from egg crafts (this will be discussed below). And of course decorate the festive table for the bright holiday of Easter. All this will be discussed in our article.
So let's see what eggshell crafts you can make.
Idea #1
Nest with birds.
We take wrapping paper and cut it into small narrow strips , crumple this paper cutting - and from such dry blades of grass we form a nest. Glue the beak and wings onto the eggshell. Draw the eyes.
This is the simplest egg craft available for young children. Unless, of course, you convince them in advance not to test the empty eggs for strength, not to press them with your finger or squeeze them with your palm.
And here’s a little trick for you (look at the photo below) . There are large and small eggs on sale. If you buy both sizes, you can paint the small ones yellow and leave the large ones white . And then insert yellow painted ones into large white shells and decorate them as yellow chicks hatching from white eggs.
You can develop this idea of chicks and add a mother hen . We make chickens from eggs painted yellow - we place them in an egg cassette. We make a chicken from salt dough, dry it in the oven, and decorate it with gouache. And we sit the chickens from the eggs behind. We decorate the craft with green grass (cut green paper or green thread). Add watercolor-painted feathers from the pillow.
You can have roosters in a chicken family. With a paper comb and a fluffy tail. Strips of paper for the tail are cut with scissors and twisted around a cylindrical object (bottle, hairspray can).
QUESTION: What glue is used to glue paper to eggshells?
ANSWER: PVA glue will do (stationery or construction glue, it doesn’t matter, the composition is the same, only the second one is 2 times cheaper).
DOUBLE SIDED duct tape is also suitable - this holds the paper on the shell best.
You can use pieces of cardboard egg cassettes. We cut out a cell from a cassette box and play with its shape in order to bring it closer to something similar to a bird.
A chicken craft made from eggs can be decorated with PLASTICINE parts. Sculpt the scallop, beak and paws. If you make cockerels, you can also fashion a tail from plasticine (from a thin, lightweight plasticine plate). And the cockerels can be placed on high legs (make holes in the bottom of the shell and insert cocktail tubes) - or without holes, simply attach the tubes to plasticine.
Another great idea is to buy small QUAIL EGGS in the store. They are just the right size for baby chicks. You need to paint the quail shells yellow. And plant these small eggs inside large chicken shells. The result is a chicken family - a rooster, a hen and babies that have just hatched from the eggshell.
Idea No. 2
BIRDS from eggs.
And other birds can also be made from eggshells - TOUCANS, PARROTS, PEACOCKS, PENGUINS, BUFFINS, TITMS.
These are the owls you get if you paint their shells into different painting zones. And decorate the borders between zones with beads (for beauty and contrast). And if you don’t have the strength to tinker with beads (we’re not Faberge), then you can decorate the boundaries of the zone with DOTS WITH a simple THICK MARKER, stick them and that’s it - we’ll get the same bead effect only cheaper and faster.
Then add eye stickers and stick the wings behind (everything is attached perfectly to double-sided tape).
Or the owl egg craft design can be more simple. It looks quite beautiful if the owl’s wings have a patterned color (cut from a piece of wallpaper or gift wrapping). It’s also beautiful when the eyes are shaped like a flower with petals. Legs for an owl from eggs can be fashioned from plasticine or cut out of thick cardboard or thick felt.
Crafts from eggs.
Idea No. 3
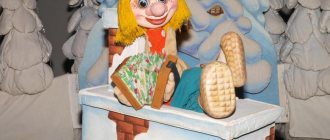
TABLE THEATER.
If you take cardboard rolls and insert an egg into the top socket of the roll. Then we will get a blank for a character in a tabletop theater. You can take a ready-made roll of toilet paper and wrap it in colored paper. And then decorate our character
Depending on the color and design of the egg and paper roll, we will get a GREEN frog, a SPOTTED cow, a BROWN dog, a YELLOW chicken, etc. (see photo of egg crafts below).
You can make any characters out of eggs. Try to make them resemble mussel personalities and play small TV shows in the tabletop theater.
Instead of cardboard rolls, you can use ready-made plastic egg cups (as in the photo of crafts below).
You can find small plastic cups on sale and use them as the basis for theatrical crafts.
Eggshells for egg crafts can be painted with GOUACHA and then covered with nail polish or sprayed with hairspray - this will make the color BRIGHTER and the surface of the egg will become shiny and smooth like plastic.
You can make crafts with Christmas themes from eggs (as in the photo below).
You can act out your favorite fairy tales by preparing special decorations for your character. In such an interesting environment, your children will play with their crafts with great delight.
You can make a tropical island and populate it with animals from hot countries. Make one character every evening... your child will be intrigued by which animal will be next, and will look forward to creative gatherings with colored paper, a hardworking mom and a gambling dad.
But I liked the idea below, where a double-leaf egg cassette turns into an island zone and a sea zone. And from eggs we make crafts - characters inhabiting the earth’s firmament and the depths of the sea (photo below). A very original and long-lasting egg craft for children.
Idea No. 4. Crafts from eggs
with fluffy wire.
And here’s another idea that fluffy wire can be an additional visual medium for making crafts from eggshells. Fluffy wire is good for making tails for mice, cats and pigs. The wire brushes can be the tentacles of a crab, or the eyes on the legs of a snail or the same crab.
Here are some more springs that are used as the feet and ears of hares.
Idea No. 5
HARNES made from shells.
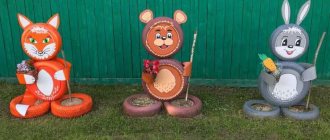
And here is a cheerful family of white rabbits. White bunnies with pink ears are the cutest egg craft. Regular markers help to draw the face, and the ears are made of paper.
You can depict a bunny by placing the egg on its side - stick it on a cardboard backing, and stick a muzzle on the front - a nose made of plasticine or a decorative pom-pom.
The stand for such an egg craft can be short pieces of plastic tubes (or strips of paper twisted into a tight tube) - the legs are attached to hot glue or plasticine, or double-sided tape (the left craft in the photo below).
A low ring made of cardboard can serve as a stand for the hare (right photo below).
Parts for the eggshell hare can be cut out of colored felt. The result is a bright, elegant craft for children.
Idea No. 6
Shell animals
Crafts for children made from eggs most often depict animals - forest or domestic. Here are some cute eggshell pigs. It is better to make piglets from dark eggs from speckled hens.
But we make a cow from a white shell and draw spots on it with a black marker.
Crafts made from eggs - PENGUIN and PANDA - look beautiful in black and white colors.
I also like tricks with bug-eyed crafts. Bulging eyes on egg crafts look good not only on frogs, but also on cockerels and bunnies.
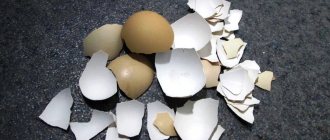
Crafts from broken shells.
If your shells are damaged, then this is not a reason for tears - this is the first step to a new egg craft idea.
These are the kind of original crafts you can come up with for children from shells with a damaged barrel.
Podkli from eggs.
FOR BOYS.
All boys will love the divers theme.
You can make a pot-bellied submarine craft from eggs. And make several enemy boats that will lie at different depths of your underwater world, made from a TV box.
You can make a sea out of blue cellophane and throw a toothy shark into it.
You can also build a flying saucer out of a basin and populate it with little green men. Cute aliens with three eyes will be your boys' favorite toys for a long time.
And girls will love playing town made of eggs. Little Kinder Surprise dolls will stroll along the streets of such a cozy town and have picnics in cozy gardens in the backyard.
And girls also like cats. If we make Kitty’s head with a white egg and put it on a roll of cardboard (like the aliens from the photo above), then we will get a favorite toy for your daughter.
You can ALSO make a neat hole in the egg, pour liquid wax from a candle into it and insert a stick - this way we’ll get a theatrical craft on a stick. And it will be possible to act out puppet-egg theater performances behind a screen, holding a character on a stick (photo below). Kids really like this craft for children; they enjoy playing with such toys on sticks.
And thanks to the hardened wax inside the shell, such a craft will be even stronger and more durable.
SPRING CRAFTS from eggs.
The spring season is rich in Easter egg crafts. Therefore, egg shells have become a holiday decor item during the Easter season.
You can use your wits yourself and come up with your own spring crafts from eggs. In the meantime, I will show you the ones I managed to find.
Here are shell vases for miniature bouquets of spring flowers - crocuses, coltsfoot, snowdrops, primroses.
You can insert a cocktail straw into an egg shell. And wrap the egg in crepe paper. And we get a tulip on a stem. Add juicy green leaves and form a spring craft - a bouquet of eggs.
You can put skirts made of petals on egg shells (photo below) and also decorate a spring bouquet of eggs. This egg craft is suitable for children 5 years old . We fold a sheet of paper into a triangle as for cutting out a snowflake - but instead of snowflake patterns, we draw 2 oval petals (with a heart) on it and give it to the child. He cuts out the petals and cuts the center corner of the folded triangle along a rounded line. We unfold it and get a petal circle with a hole for putting on the egg.
Skirts with petals can be cut out of felt - this material is lighter than cardboard and bright in color.
You can make a series of cacti from eggs. An excellent craft made from eggs, accessible for children - simply paint the eggs with green gouache and draw the needles with white paint.
Here are some ideas for crafts made from empty egg shells.
Good luck with your creativity.
Olga Klishevskaya, especially for the “Family Kuchka” website.
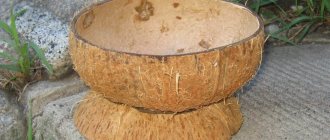
Decorating a flower pot
In every home there is an empty flower pot. It’s easy to make a decorative item for your home from such an item using a simple eggshell.
In creative work, glue (on the glass surface) and shells are useful. Apply the adhesive composition to the container and carefully attach the small shell. After the glue has dried, the craft should be decorated with acrylic or decorated using the decoupage technique.
What else can you do with eggshells?
You can preserve the beauty of a whole eggshell by painting it. Of course, you can’t give a shell as an Easter egg, but you can create a real work of art that will delight your eye for a long time. You can paint on the surface of the egg using regular acrylic paint and thin brushes.
Recently there has been a trend towards using the eggshell embroidery method. You can embroider on whole eggshells using many different techniques. Using ribbon embroidery and beads, you can create a real decorative piece. The resulting craft will truly surprise you and your baby with its beauty. In addition, such an activity will require remarkable accuracy, which should be developed in children at any age.
Eggshells look great as little pots for herbs. Making such a flower garden can be extremely easy. Just pour some soil inside and plant some ornamental grass. Having made a dozen of these crafts and placed them on a stand, you can proudly place the resulting flower garden on your windowsill. Don't forget about watering if you decide to plant any miniature flowers!
Technology for performing decoupage on shells
We will describe a master class on making a wooden box from eggshells.
- Using sandpaper, sand the surface of the wooden product, then degrease it with alcohol.
- We coat a small area of the box with adhesive base and glue fragments of eggshells onto it. As we work, we move them apart a certain distance from each other.
- We glue the entire surface of the box in this way and apply a layer of PVA glue on top.
- Next, the craft must be painted white in several layers.
- The next step is gluing the napkins to the decoupage.
- In your work, you should use three-layer napkins, and specifically only their top layer with ornaments.
- Apply PVA glue to the surface of the workpiece. On large or round objects, it is advisable to apply a napkin cut into several parts, and apply an adhesive base on top.
- So the box is glued on each side. Then the craft is given time to dry and then varnished.
Products with mosaics
The shell has gained its popularity among decoupage lovers. When split, it recreates the effect of cracks. To do this, attach the fragments to the surface with PVA glue with a minimum amount of space between them. When dry, cover with primer or acrylic.
After this step, you can stick on your favorite images, pictures, napkins, adding details. Don't forget to apply a protective layer of varnish. This product is durable and can withstand wet cleaning.
Children's jewelry
Eggshells can be useful for creating crafts for a child's room. Thanks to their shape, the shell of the eggs is perfect for making fairy-tale animals. They will become children's favorite toys.
First you need to empty the egg of its internal contents. To do this, do not break its shell. Make a couple of small holes at each end using a pin.
Pour in the liquid white and yolk, and peel the shell and paint it any color. This eggshell craft is perfect for little kids.
Craft “Chicken from an egg”. Peculiarities
If you want to make a craft from an egg with your own hands, then know that there is nothing complicated here; you will need to take into account some useful recommendations.
First of all, you should prepare several raw eggs, yellow knitting threads, PVA glue, but also, of course, wooden skewers.
An egg can be pierced without much difficulty; for this purpose, a thin needle is used, which should be pierced first on one side, then the other, blowing out the liquid contents.
Next, you will need to cut the threads, doing this in a small way, lubricating the egg with glue, using a brush, and then sprinkle it on all sides with various threads, and you need to try to gently press them, then they will be able to stick well.
From the bottom of the egg, into the hole that you previously prepared, you need to carefully insert a skewer; if the hole is large, then try to coat the joint with glue, this will ensure that the chicken can sit firmly on the skewer. The scheme for beginners will definitely help you avoid common mistakes, creating a craft without problems and difficulties.
Do not forget that you will definitely need to glue the eyes of the chickens - beads, beaks made of red cardboard. This is the final stage of making this craft, which means you will definitely cope with this work.
It is worth noting that you can always decorate the Easter table or children's room with such chickens. Such simple instructions will always allow you to easily implement such ideas, you don’t even have to doubt it.
Homemade candlestick
This original homemade thing will become natural in every home. Recycled egg shells can be used as the base for mini candle holders.
It's not difficult to make such a thing. You just need to light the candle. Carefully pour the liquid wax into the shell. To obtain a beautiful shape, you need to divide the egg shell into two equal parts. It would be great if they were painted in a bright color.
Fruits and vegetables from eggs
From eggs you can make not only funny little animals, but also fruits and vegetables. For example, exotic pineapple. For work, prepare:
- Paints. Acrylic or watercolor.
- Egg shell preparation.
- Green paper.
- PVA glue or double-sided tape.
- A strip of cardboard.
Paint the finished shell bright yellow and let dry. Using black, using a thin brush, paint stripes arranged crosswise and similar to diamonds. Let dry. Then fill the space in the black diamonds with orange.
When the product is dry, glue the leaves to the top. The foliage is cut out of colored paper in the shape of long, sharp leaves.
The product can be coated with colorless varnish or sprayed with hairspray. This will add shine to the craft and extend its life.
Carrots from the shell
Carrots from the shell of an egg are made using the same algorithm as pineapple, only different colors are used:
- Paint the carrots themselves orange. When the paint has dried, use a black felt-tip pen to draw short horizontal lines arranged in a chaotic manner. Then attach the tops and varnish.
- To create a strawberry, paint the shell red, add black dots in the form of droplets and attach leaves. To create a watermelon, paint half the shell green and the other half pink.
- On the green color, draw black stripes, on the pink half, draw black bones. Make stands from strips of cardboard and your still life is ready.
Candle in a shell
You can create original candles from egg shells. You will need:
- Bright colors, acrylic is best.
- Decorative candles.
- Several eggs.
Start by breaking raw eggs in half, rinsing the halves and drying them. Paint the halves in different bright colors and dry. Now melt the wax and remove the wick using tweezers.
Pour the melted wax into the shell halves and lower the wick into it. Hold the wick for a while and let the wax cool. With such candles, a romantic evening is guaranteed.
Tulips from the shell
This type of craft can be done not only by adults, but also by children. In the latter case, it is recommended to purchase egg cartons made of polystyrene foam or cardboard.
The shell halves must be painted with dye and allowed to dry. Moreover, you should dip the entire shell into the dye so that its inside is also colored.
After the paint has dried, you need to make a small hole at the bottom and insert a tube into it. Place homemade tulips in a vase; they will become an original decoration in a child’s room.
Making a mosaic by removing the shell
All work is carried out on separate boards, which serve as the basis of the mosaic set - the backing. The prepared shell is cut into polygons with straight sides (Fig. 2, a). At the same time, they try to ensure that they have right angles whenever possible. This will make it easier to fit them onto the base. One side of the board is completely covered with shell, carefully adjusting the cut out polygons to each other. Each polygon is pressed as tightly as possible to the base with a smoothing iron.
Then, on the shell glued to the board, draw the contours of the intended image with a simple pencil (Fig. 2, b). The figure shows the sequence of making a mosaic set with an image of an elephant. In areas where there should be a background, excess shells are removed with various cutting tools. To drill blind holes, use gimlets or a small drill. Carving, as well as chipping of the shell, is done with a scalpel or a blunt knife. The engraving is applied with stichels. The work begins with drilling (Fig. 2, c1), then engraving is carried out along pencil lines (Fig. 2, c2), after which they begin to chip away the shell in the areas reserved for the background. Having completed the mechanical processing, remove the tissue paper glued to it from the surface of the shell. First, the paper is carefully moistened with water using a brush (Fig. 2, d1). After some time, the soaked paper is easily separated from the shell (Fig. 2, d2). Sometimes small seams remain at the joining points, into which small shells are glued.
At the next stage of work on the mosaic set, we begin to identify the craquelures. In this case, the background is painted in some color, for example, black, dark brown, dark blue (Fig. 2, d3). It is convenient to use mascara for these purposes. The mascara contains an alcohol solution of shellac, dyes, glycerin, bile and antiseptics. Thanks to the presence of bile, a surfactant, mascara easily penetrates into the smallest cracks, carrying all other components with it. Having filled the cracks between the individual shells, the ink not only colors them, but also holds them together. This is facilitated by shellac, which after drying does not dissolve even with water.
For reference: Crackle
- a network of thin cracks on any surface, a technique for visually aging interior items using special varnishes, additional processing or the use of shells.
Craquelure
(French craquelure) is a crack in the paint layer or varnish in a work of painting or the varnish coating of an object of decorative and applied art.
After making sure that the mosaic set is painted evenly, use a slightly damp cloth or swab to remove excess ink from the surface of the shell (Fig. 2, e1). After waiting until the remaining ink has completely dried, they begin sanding the mosaic with fine-grained sandpaper mounted on a wooden block (Fig. 2, e). They sand the surface of the shell very carefully - after all, the eggshell is so thin that in some places it can be easily removed completely. After finishing sanding, replace the sandpaper with regular writing paper. It also has abrasive properties due to the presence of koalin and chalk in it. The polished surface of an eggshell acquires a soft shine and vaguely resembles old ivory or marble. The dark matte background emphasizes and enhances the expressiveness of the mosaic set (Fig. 2, f).
Frame
Small shells can be used to decorate a regular photo frame, giving it a unique appearance. The shell particles are glued to a store-bought glass frame, or to a homemade one made from thick cardboard.
If you liked the ideas for making crafts from natural materials, go for it! Everything will definitely work out!
Creative manicure
During the creative process, tiny crumbs remain that can be used to decorate your nails in an unusual way. This manicure is suitable for bold fashionistas who prefer experiments. First you need to process your nails and give them the desired contours. The next step is applying clear varnish. Until it dries, you need to scatter the shells over the surface, creating a pattern.
It’s better to first determine what kind of design you want to see on your nails . Then you need to thoroughly crush the shell so that all the particles are approximately the same and very small. In addition to transparent, varnish of a rich color is suitable, then you will get a contrasting combination. Don't be upset if you didn't manage to get a beautiful manicure the first time. If unsuccessful, remove the cover and try again.
Photos of crafts made from eggshells
Mosaic with multicolor background
The background can not only emphasize the beauty and expressiveness of the material used in the mosaic, but also actively participate in the color scheme of the composition. In this case, the parts made from the shell will serve as partitions, separating one section of the background from another (Fig. 4, a).
Mastic of three colors - brown, black and red - is prepared in different jars. First, fill the background areas with brown (Fig. 4, b) and then with dark red mastic (Fig. 4, c). To obtain a speckled background, black mastic is mixed with shells crushed in a mortar (Fig. 4, d). To prevent the mastic from spreading, edges made of thin cardboard are glued to the edges of the board with the mosaic set. After the mastic has hardened, the sides are removed, the mosaic set is carefully leveled with a file and the remaining tissue paper is removed. The shell is covered with black ink. As soon as it penetrates deep enough into the cracks of the shell, its excess is removed with a slightly damp cloth. After a few minutes the ink has dried and the set is sanded with fine-grit sandpaper mounted on a wooden block and then polished. The black speckled background of the mosaic will appear to be made from many individual shells. The use of a particular shade of shell will depend on the nature of the image and the task facing the artist.
"Chick"
To make chickens, you need very few materials: eggs, thick yellow knitting thread, PVA and scissors.
- First you need to blow out the egg. Using a thin needle, pierce the egg from one end, then from the other, then blow out the inside of the egg, wash it, dry it, and after that you can start creating.
- Finely cut the yellow threads with scissors into short pieces.
- The egg needs to be coated with PVA glue. It is better to do this with a soft brush so as not to accidentally damage the shell.
- Sprinkle the egg with threads, carefully pressing and distributing the “feathers” with your hands.
- We make the beak from a triangular piece of pink cardboard, and the eyes from black beads.
- You can decorate the chickens with bows or hats made of colored paper.
Eggshells as a tool for unusual creativity
Medieval artists came up with the idea of using eggs to create paintings. Paints based on natural materials formed the basis of the most outstanding works of art. This master class offers a look at the egg as a tool for creativity from a new perspective. This time the shell will be used.
For the project you will need:
- eggshell;
- gouache of different colors;
- water;
- brushes for paint and varnish;
- clear varnish;
- tweezers;
- acetone;
- PVA glue
First you need to prepare the eggshells. If the eggs have traces of dirt, it is better to wash them before cracking. Dry the eggs with a towel and crack into two halves. Let the shell dry. Apply gouache to the dry shell halves. Fresh paint does not need to be diluted with water so that the layer is dense and uniform. Since you need different colors, make sure you have a napkin or towel on the table that you can use to wipe up traces of different colors.
Paint the entire shell. It is better to prepare it with a reserve. Instead of gouache, you can use acrylic paint, especially if you want to get a gold or silver shell. Wait until the paint is completely dry before applying varnish. Lift the shell halves with tweezers to avoid damaging the color and coat them with varnish. If you use aerosol varnish, you can spray all the shells directly on the table. If pieces break off during the process, cover them with varnish and paint - they will be useful for mosaics. When finished, wash the varnish brush and tweezers in acetone. Leave the varnish to dry.
After the shells are completely dry, break them into small pieces. It is important that they are almost flat. All that remains is to choose the surface that will be decorated. This could be a cardboard base with a printed design, a vase, or even a mug.
PVA glue is well suited for such mosaics. Apply the base and let it dry a little. Then apply glue to the colored piece of shell, holding it with tweezers. Post your chosen drawing.
You can also decorate large objects with shells, such as vases or flower pots.
You can complement the mosaic with other types of decor. On vases, pots and other objects that perform not only a decorative function, it would be a good idea to additionally coat the mosaic with varnish.
The mosaic made using this technique looks original on costume jewelry.
You can try to imitate the pattern of natural stone.
You can create interesting panels on any topic. For example, such a picture can decorate a bathroom. But for a damp room an additional layer of varnish is required.
You can take a color drawing as a basis, or create it directly as you work.
Create works of any level of complexity.