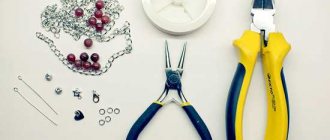
Bracelets from small silicone rubber bands can be woven using various devices, for example, a special machine for weaving rubber bands, a regular crochet hook, a slingshot, a table fork, and even using your fingers. Today we will tell you how to weave a bracelet from rubber bands on a slingshot, which some craftswomen called a mini-frame. A plastic slingshot for weaving can be purchased at any specialized store, but you can also easily make it yourself. For this, an ordinary twig of a suitable shape and size is suitable, which is cleared of bark and debris.
Creating original bracelets from bright multi-colored rubber bands is a pleasant and very useful activity. It gives the child the opportunity to develop hand motor skills, attention, imagination, perseverance, patience and much more. A slingshot for weaving is a plastic handle with two or four branches for throwing rubber bands. There are many patterns for creating jewelry: dragon scales, French braid, quadrofish (tube), sidewalk, fishtail, angel hearts. Having mastered the basic technique, it is possible to complicate your own crafts by adding decorative elements and various beads.
For beginning needlewomen, we suggest that in this article we focus on a more detailed study of simple, but no less original weaving techniques: dragon scales, angel heart and pavement.
Fishtail bracelet pattern on fingers
- Place a figure eight rubber band on your fingers.
- Add 2 more elastic bands, you should have 3 figure eights on your fingers.
- Swap the middle and bottom elastic bands without removing them.
- Throw it into the center.
- Put on the next elastic without twisting it.
- Throw the bottom elastic band into the middle.
- Repeat these steps until you reach your desired bracelet size.
I recommend watching the video: how to weave a fishtail rubber band bracelet on your fingers!
Weaving bracelets from rubber bands... fish tail
Patterns on a fork
In the implementation of various kinds of objects similar to animals, you first need to master the technique using a regular kitchen appliance. Sometimes it works better with a fork than with a plastic holder.
How to use a kitchen appliance:
- Remake the thing like a number 8 and put it on the tip.
- Repeat and place around the edges.
- Repeat a third time.
- Then tighten it to secure it.
- Catch the bottom one and pull it.
- Repeat with the second center.
- Do it until there is enough volume.
- At the end of the part from below, lift up.
- Then flip the tip over and attach the clasp.
Scheme of a French braid bracelet on a slingshot
You will need: rubber bands of two colors - for example, red and blue, a slingshot, a hook.
- Take the slingshot in your left hand, the two columns should point upward with the notches facing you.
- Place a figure eight on the first red elastic band.
- Put on in the usual way, without twisting the next two elastic bands, alternating colors (for example: blue-red).
- Hook the bottom left elastic band, then remove it from the post and lower it between the posts.
- Hook the bottom right elastic band, then remove it from the post and lower it between the posts.
- Place the next rubber band on the posts, changing the color.
- Use your hook to slip the middle red elastic from the left post.
- Use your hook to slip the bottom blue elastic from the right post.
- Weave in this way until you reach the desired size of your bracelet. Then, when the last two elastic bands remain on the posts, remove the bottom elastic bands one by one using a hook.
- Throw the last elastic band from the left post onto the right column, hook two elastic bands with one of the hooks on the clip, then remove the bracelet from the slingshot.
- Hook the initial figure eight rubber band with the second hook of the clip.
- Connect the bracelet into a ring.
I recommend watching the video master class!
French braid bracelet made of elastic bands. How to weave a French braid bracelet from elastic bands.
Technique and main types
Today, rubber bling can be created using your fingers. If you attach a fastener, you can create a shape similar to a necklace. There are many techniques, differing in structure and tools. Guys with experience often use:
- Fingers:
- fork;
- machine and more.
If you use a fork or your own fingers, you can create tempting accessories. When you want to use your creativity and create various patterns, you will have to learn how to weave rubber bands onto a slingshot. It’s easier to buy a ready-made machine in a store in one set.
When creating complex structures that involve connecting nodes to each other, you cannot work without columns. It is usually sold in stores, made of plastic. It is advisable to use a platform that includes at least three fasteners.
Diagram of a “dragon scales” bracelet on a three-row machine
You will need: a classic loom with 4 posts, elastic bands of two colors, a hook, an S-shaped clasp.
- Move the middle row of the three-row machine one post.
- Put two rubber bands on the posts.
- Start with the bottom row of the first column, and the second row of the middle column which is offset one to the left.
- Place the elastic on the second row of the first stitch, on the bottom row of the third stitch, on the bottom row of the second stitch, and on the middle row of the third stitch.
- Complete two rows.
- Turn the machine over.
- Place an elastic band, twisted in half, onto the middle outer post.
- Remove the bottom elastic band from the middle outer post.
- Place the elastic on the post on which it is attached on the reverse side.
- Remove all the rubber bands and put them on the posts where they are attached.
- Secure the weave.
- Put on the hook clasp.
I recommend watching this video!
How to make a bracelet from rubber bands. Style Dragon Scales on the Rainbow Loom machine
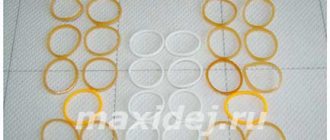
Model "Tail"
An excellent scheme, suitable for beginners. The process lasts depending on the desired length of the bracelet. A beginner will only need his fingers and a lot of rubber things of different colors. For convenience, you can use tools.
Recommendations: This idea is the easiest, but there are nuances. If the Rainbow parts are old, pulling too hard may tear them. This applies to any job.
To make a decoration, you need to prepare eight rings and put them on your fingers. The bottom side needs to be pulled to the middle by moving both rings up. Repeat everything, but without folding. Raise the bottom part again to the middle and repeat until the desired length.
Note!
Wood burning for beginners: tips and secrets for burning pictures
Plasticineography - interesting options for creating pictures from plasticine on cardboard for children
DIY scrapbooking for beginners: what it is and how to do it. What you need to create a beautiful album or notebook (photo + video)
Double "dragon scales" on a slingshot
You will need: a slingshot with 4 posts, a hook, a clasp, 86 black and 42 colored elastic bands.
Master Class
- Position the slingshot with the indentation facing you.
- Place a figure eight of red elastic on the 2 middle posts.
- Place a figure eight of black elastic on the right and left posts.
- Throw the red rubber band behind the post.
- Place a pair of pink elastic bands on the middle posts, wrapping them twice.
- Remove the lower middle black elastic bands by the columns.
- Fold the black elastic band in half, then place it in a figure eight on the right posts. Do the same with the left columns.
- Throw the bottom row of rubber bands behind the columns.
- Continue weaving in the same pattern and do not forget to alternate the colors of the rubber bands.
- Finish weaving when there are black elastic bands left on 4 columns, then remove the elastic bands from the outer columns to the middle ones.
- Weave by throwing the bottom elastic bands over the posts.
- Transfer the elastic bands from one column to another, then put on the S-shaped clasp and connect the ends of the bracelets.
The double rainbow “Dragon Scale” on the slingshot is ready! I recommend watching the video master class!
Bracelet made of rubber bands Double Dragon Scales on a slingshot of 4 columns (mini-machine)
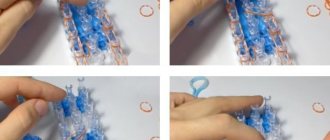
Figurine "Jumper"
A bouncy ball can amuse little children. It is done in 10-15 minutes. To create it you will need a cotton pad and a sufficient number of rubber bands.
First you need to bend the cotton pad into a ball shape. Then take the ball and wrap it three times around one element. You should end up with three strong lines. The second element will come out across the first. Resembles the shape of a cross. Now all that remains is to put on the outer shell, only in the free places, in order to completely fill the space of the cotton ball.Recommendations: The straight jumping ability of the ball depends on the thickness of the outer shell. If greater jumping ability is required, it is recommended to apply a larger layer. Old material is not desirable. It will tear and fly off at the moment of the rebound.
Weaving rubber bands on a slingshot will help you train your hand and get used to needlework.
Mermaid braid bracelet pattern
You will need: elastic bands of two colors, a plastic hook, a transparent clip, a slingshot or a cocktail tube bent in half.
- Put on a light green elastic band in a figure eight shape.
- Place a pink elastic band on the right post of the slingshot, twisting it 2 times.
- Place the light green elastic band over the two posts in the usual manner without twisting.
- Use a hook to hook the bottom light green elastic band through the pink elastic band.
- Move the loop to the center of the top light green elastic band.
- Place the next pink elastic band on the left post of the slingshot, twisting it 2 times.
- Place the next light green elastic band over two posts in the usual manner without twisting.
- Crochet the bottom two light green elastic bands through the pink elastic band.
- Move the loop to the center of the top light green elastic band.
- Place the next pink elastic band on the right post of the slingshot, twisting it 2 times.
- Place the next light green elastic band over two posts in the usual manner without twisting.
- Pull 4 loops (2 pink and 2 light green) through the pink elastic band.
- Place them in the center of the weave.
- Place the next pink elastic band on the left post of the slingshot, twisting it 2 times.
- Place the next light green elastic band over two posts in the usual manner without twisting.
- Remove 4 loops from the left column in the center.
- Place the next pink elastic band on the right post of the slingshot, twisting it 2 times.
- Place the next light green elastic band over two posts in the usual manner without twisting.
- Remove 4 loops from the right column in the center.
- Weave the entire bracelet in this way.
- Place the clear plastic clip over the first and last stitches.
I recommend watching the video master class!
MERMAID BRAID bracelet made from Rainbow Loom Bands | Bracelet Rainbow Loom
History of appearance and features
The rainbow was invented in 2011 in Michigan. It was invented by Malaysian Chung Chhun Ng, the developer of the seat belt. He once noticed his daughters weaving bracelets from rubber rings on their fingers. Ng tried to do it himself, but could not, his hands were too slow for delicate work, so he invented a special loom using 15th century technology.
The daughters were amazed at the complex models this machine produced. Ng further improved his invention into a plastic version of the device, which became the basis of his business empire - a set of plastic boxes, bags with multi-colored rubber rings, a hook or a loom. If the buyer does not operate a machine, he can make models using pencils, fingers and even clothespins.
The basis of weaving is the following approach:
Weaving begins by transferring the elastic band, twisted in a figure eight, to the slingshot, and is completed by pulling the elastic band onto both columns without twisting, and the loops from the columns of the slingshot are transferred to the center.- The latter are thrown onto a column and decorated with a special fastener called a clip.
- Do the same with the first loop of the model.
- Next, weaving is carried out according to the pattern, strictly according to the instructions.
In this process, there is no limit to creativity and imagination, and even products made according to the same pattern become designer jewelry, thanks to the multicolored shapes.
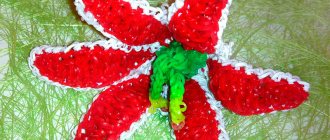
Butterfly and caterpillar made of rings
Craftsmen make different figures with rubber bands to decorate weaving and keychains for girls. They are easy to make, so children will enjoy playing with fun crafts. Execution algorithm:
- To form the body of the butterfly, take a black garter and apply it three times to the hook.
- Then take two more black elastic bands and push them through the center, separating them with the main elastic band. One side will be A, the other will be C, and the center will be B.
- Since the figure is made of two ribbons separated by a central one, you need to install the two ends on a large hook. Pass one end through the center of the other and pull out.
- Do the same thing, put the two ends on the hook and pass one end through the center of the other, pull, thus creating the “skin” of a butterfly or caterpillar.
- Leave it while the butterfly wings or caterpillar body are being completed.
- Crochet the colored ribbon three times. Take two more rubber bands and go through them. Repeat this step until 4 equal loops are formed.
- Take the butterfly body obtained in the previous step and place the loop on the hook.
- Since there is a loop end set on the hook and butterfly wing links, the rest of the body is done so that the chain is secured and closed.
- The butterfly is finished.
Bracelet made of rubber bands “Hearts”
Photo: mycrafts.ru
Take a slingshot, Chinese sticks or two pencils and erasers: 10 transparent, 20 pink and white. Twist the white elastic band onto the sticks in a figure eight and put the transparent one on top. Hook the clasp, put on another white elastic and pull out the bottom one.
Add a pink one and take out a transparent elastic band on one side, and put the pink one on the other side on this one. Do the same with the next pink one, but on the other side. The new layer is white, and pull the lower white loops through the pink ones and take them out. Drop the middle pink loops, put on the white elastic and drop the rest of the pink ones.