How to make an alcohol turbo burner up to plus 1500 degrees, with your own hands
A burner is not the most necessary thing in everyday life, but sometimes it is impossible to construct a single thing without it. Buying it and then putting it in a closet for many years is pointless, but making it yourself in 5 minutes is possible.
If you want to make a homemade turbo burner, where the flame temperature will reach 1500 thousand degrees, then follow the step-by-step further explanations.
Before starting the burner manufacturing process, let's watch the video:
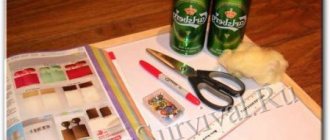
In order to make a burner we need:
— a stand taken from a homemade fandyushnitsa; - candle; - an aluminum can of drink, always unopened. We only need the jar itself, and we will drain the drink in a slightly different way; — 98% medical syringe; - matches; - syringe.
First of all, we need to drain the drink from the jar into some container. To do this, we pierce the side of the jar with a syringe and pour the contents of all the jars into the mug. If you are unable to drain the liquid this way, then you can help yourself by draining it with a syringe.
Next, we must turn the key-opener on the jar, since pressure will be created there. The most vulnerable part of the jar, it turns out, will be the closed window through which we drink lemonade. To give the window a little support, you just need to turn the key 180 degrees.
For a 0.33 liter jar, 10 cubes of alcohol will be enough for us. Under no circumstances should you add more alcohol. No, the jar will not explode, because the weakest point of the jar is the lid, which can fly out. When working correctly, the lid will open slightly and all the pressure will escape through a small gap into the lid.
Through the previously made hole in the jar, we pour 10 cubes of medical alcohol into it.
Let's move on to testing: light a candle.
We put it inside on the stand of a homemade fandy maker, and put our jar on top, and wait until the alcohol starts to boil.
All that remains is to present a match to the hole so that the burner begins to function.
The burner works great, and you can test your experience on a needle, just by seeing how quickly it heats up. In a couple of seconds, the burner needle turns red.
Source
Homemade alcohol burner similar to a blowtorch
The good thing about homemade products is that they are very cheap and practical, and they are quite easy to assemble. It all works very simply; when the alcohol vapor is set on fire, it creates pressure in the container, and the fuel independently comes out through the nozzle and burns. That is, everything works approximately the same as in a blowtorch, only simpler, since you do not need to pre-pump the air.
Materials and tools for assembling the burner: - copper tube with a diameter of 8-10 mm; - a small aerosol can or another cylinder with a diameter of 30-40 mm; - a small glass jar with a metal lid (must close tightly); - a bunch of thread or cotton fabric; - alcohol; - sand.
The following tools will be needed: a drill, a hacksaw, an awl, a hammer, a soldering iron or torch, solder, and a vice will not be superfluous.
How to assemble an alcohol burner:
Step one. Making the base for the burner
The basis for the burner is an element in the form of a spiral, which is made of a copper tube. The length of the tube should be slightly less than 40 cm, and its diameter should be 8-10 mm. The sharp edges of the tube must be carefully processed with a file.
You need to make a spiral from the tube yourself. To prevent the tube from bending, it must be filled with sand. To do this, you need to plug one end with a stick, pour sand into the tube, and then plug the other end in the same way. To make a spiral you will need a cylinder with a diameter of 30-40 mm. An aerosol can is perfect for these purposes; almost everyone can find one at home. The copper tube needs to be looped around the cylinder one and a half turns. There is no need to rush.
There should be a distance of a couple of millimeters between the turns of the tube. This directly determines the size of the flame when the burner is operating. Ideally, the flame should pass through the gap between the two tubes and touch them at the same time.
Step two. Burner wick
To operate the burner you need a wick, it is done very simply, you need any cotton fabric, knitting threads are also suitable. The length of the wick should be such that it touches the beginning of the bend of the tube. On the other hand, the wick should stick out a couple of centimeters. As for the thickness of the wick, it is selected experimentally.
If the burner spits fire when starting up, the wick needs to be made smaller or the size of the nozzle increased.
To install the spiral, you need to drill two holes in the lid along the diameter of the tube. It should fit into the lid with minimal clearance. Next you can start soldering. The cover must first be cleaned of paint, otherwise the solder will not stick. You can solder from the bottom and top to ensure maximum tightness and strength.
Step five. Burner tests
To test the burner, you need to pour alcohol into it; gasoline will also work; you need to experiment with other types of fuel. Next, the lid must be screwed on tightly so that no fuel vapors escape from the can, otherwise the device will not work.
Starting the burner is very simple; you just need to use matches or a lighter to heat the tube in the area of the hole. Heat will begin to spread through the tube, while the fuel on the wick will evaporate and create pressure, which in turn will force the fuel out of the can towards the nozzle. As a result, a closed cycle is formed; the burner will burn as long as there is fuel in the can.
If you want to assemble something much more powerful, then the video below shows a flamethrower, which you can also assemble with your own hands. Enjoy watching.
Source
Burner design
A standard homemade burner functions this way. Gas is supplied under pressure through a special hose from the cylinder. Most often, propane is used as such gas. The volume of gas supplied is changed by a regulating operating valve located on the cylinder. Therefore, installation of an additional reduction gearbox is not required.
The shut-off valve is located behind the main valve and is mounted on the gas cylinder. It is used to open or close the gas supply. All other adjustments (length and intensity of the flame) of the burner itself are carried out using the so-called working tap. The gas supply hose through which gas is supplied is connected to a special nozzle. It ends with a nipple. It allows you to set the size (length) and intensity (speed) of the flame. The nipple together with the tube is placed in a special liner (metal cup). It is in it that the creation of a combustible mixture occurs, that is, the enrichment of propane with atmospheric oxygen. The created combustible mixture under pressure flows through the nozzle into the combustion area. To ensure a continuous combustion process, special holes are structurally provided in the nozzle. They perform the function of additional ventilation.
The design of such gas devices is developed taking into account ease of operation, prevention, and repair. Therefore, they must be easily disassembled. This simplifies the maintenance and repair process.
Based on this standard design, you can develop your own design. It will consist of the following elements:
- housing (usually made of metal);
- a reducer, which is attached to the cylinder (use a ready-made device);
- nozzles (made independently);
- fuel supply regulator (optional);
- head (the shape is selected based on the tasks being solved).
The burner body is made in the shape of a glass. The material used is ordinary steel. This shape allows for reliable protection against possible blowing out of the working flame. A handle is attached to the body. It can be made of various materials. The most important thing is that it provides convenience when working. Previous experience shows that the most optimal length of such a handle is in the range from 70 to 80 centimeters.
Gas burner device
A wooden holder is attached to the top. A gas supply hose is placed in its body. This allows you to give the structure a certain strength. The flame length can be adjusted in two ways. Using a reducer located on the gas cylinder and a valve installed on the tube. The gas mixture is ignited using a special nozzle.
DIY alcohol burner from an aluminum can
The idea of an alcohol burner made from a tin or aluminum can is not new. Such a device has long been used by hunters and fishermen in the wild to warm up a mug of tea or cook food without starting a fire, and at home, an alcohol lamp for the same purposes often comes in handy during a power outage. An alcohol burner from a can is very simple to make, and if you experiment with its modification, you can adjust the height of the flames, the duration of combustion, and the amount of heat released during fuel combustion. You can learn more about how to make a burner with your own hands.
Gasoline blow torch
To operate such a burner, a gasoline-air combustible mixture is used.
- How to find water on a site - a review of the most effective methods from experienced professionals
- DIY cage: master class on making decorative and functional cages (115 photos)
- Installing interior doors with your own hands (step-by-step instructions from A to Z)
You can make a gasoline burner yourself. In addition to the burner you need:
- fuel barrel for gas mixture (aluminum cans are suitable);
- instead of a gas cylinder, you need a receiver (canister with a stopper);
- air compressor (old car inner tube);
- gasoline hoses.
There are many options, you need to choose the right one, stock up on time and patience.
DIY beer can burner
The two identical parts of the cans thus obtained must be connected by inserting one into the other. Since they have the same diameter, the connection can be difficult because you need to insert one into the other so that there is no gap between them. Since aluminum is easily deformed, before cutting off the second blank, you can stretch the cut, finished part of the future alcohol lamp onto the bottom of the whole jar, thus expanding its edges to the desired diameter.
After both parts are connected, you need to make holes around the perimeter of the upper part of the alcohol lamp with an awl or a 1-2 mm drill. There can be 18-20 of them with the same distance between them. In order for the flames to rise upward, the edges of the holes need to be slightly bent upward. At the top of the burner you need to make several holes 3 mm in diameter to pour alcohol and adjust the internal pressure of the container.
You can simply pour alcohol inside the burner, or you can place a cotton pad there so that it is saturated with it.
A DIY beer can burner works very simply: 30 ml of alcohol is poured inside, the inlet holes in the center of the top are closed with a coin. The bottom of the alcohol lamp is heated with a match, the alcohol vapor ignites, forming flames emerging from holes made around the perimeter.
Beer can burner
To make it convenient to heat water or food on the burner, you need to make a stand for dishes. To do this, you need to use a slightly larger jar, for example, a canned jar. You need to mark two lines on it: one at the height of the burner, the second at a height twice the length of the burner. The top of the jar is cut off, and its walls are divided into 12 vertical cuts. Of this number, you need to leave six pieces, cutting off the extra ones after one. In the center of the bottom you need to make a hole for heating, and bend the remaining strips inward towards the bottom. The stand is ready, all that remains is to place the alcohol burner inside it.
Can burner
Homemade alcohol burner: features
There are two types of DIY alcohol burner: open and closed. The manufacturing methods of the second type are described above. The open one differs from the closed one in that it does not have a top cover, and the fuel is ignited without preheating. Disadvantage of an open alcohol stove: high fuel consumption. Disadvantages of a closed burner: slow heating, side flames can be blown away by the wind, care is required when handling to avoid tipping over.
To use it for its intended purpose, you will need to make a stand for dishes. This can be easily done using ordinary wire. A stand for the boiler and other utensils is necessary in the winter, when cold dishes can extinguish the burner. If the burner without a stand is made of aluminum, it will only effectively heat aluminum cookware.
Now we’ll talk about how to make an alcohol burner at home. Used materials are enough for this. there is nothing to buy. The alcohol burner is very environmentally friendly and safe. And besides, a very indispensable thing in hunting and fishing. It can also be used in a tent. So, let's start simple. You need to empty the first jar of its contents, rinse and dry thoroughly, and then cut off the bottom. You can immediately empty the second jar, but you can do this later.
Next step: Cut off the bottom of the can. The cut off part will serve as the bottom of the future burner. We will further insert the top into this part. Based on this, we insert our second jar on top (still whole). In order for the upper part to fit easily, it needs to be stretched a little. We insert it very carefully so that in the future we can easily disassemble our structure. A sufficient depth of about seven millimeters.
After this, we begin to manufacture the future upper part. After emptying, drill holes around the entire perimeter. For greater effect, use a thinner drill bit.
After these steps, we proceed to the next ones. Remove the entire middle of the bottom and cut off the entire top of the can. This is what the design should look like.
From the remaining parts of the jars we make the inner side. We will need to cut out a strip. To do this we need a special formula for us. The length we need must correspond to the height of half the jar plus the height of the narrow part of the second half of the jar. Simply put, our resulting length should be much greater than the width of the board we use.
In the lower part we make several cutouts in the shape of triangles, the height of which should be approximately three millimeters. These cutouts are necessary so that our fuel flows into the inside of the burner.
To complete our equipment we will need several steps. To make the folding process even easier, we use the remains of the jar. We cut out a small mount from them. And on the top of the jar we make a small cut, about six millimeters.
Our alcohol lamp turned out great. The alcohol itself is poured into the largest hole at the top. To boil 500 milliliters of water, we only need twenty-five grams of alcohol. Next, through the same larger hole, we ignite the alcohol. The combustion process begins, after a couple of minutes the alcohol begins to boil and alcohol vapor seeps through small holes and it is ignited from the central flame.
Alcohol burners are often found in equipment stores. A homemade alcohol burner will be no worse, and the main thing is that everyone has the material to make it. It (the material) is also available in any landfill. Such a burner can be made from pasture material in the field and used where it is not desirable to burn a fire, for example, in a shelter or so as not to attract undue attention. After all, the fire can be seen from several kilometers away. On such a homemade burner you can easily boil water for tea or bum packet (instant noodles).
Burners can, in principle, be made from any cans of stewed meat, coffee, condensed milk, etc. We will consider the option of making them from cans of carbonated drinks (beer), which are very common in any landfill:) cans. Cut a hole in the bottom of the jar as in the picture below.
It turns out something like this. Drill holes as shown in the picture. To ensure that the holes are located symmetrically, we use a lined stencil. In field conditions, of course, you can do without a stencil and pierce holes, for example, with a small nail or whatever comes to hand. It is advisable to make the holes small. We cut off the cans. One at 30mm and the other at 20mm. The result was the following parts of the future burner. From one of the remaining cans we cut out a blank like the one in the picture below. We make holes in this blank. After cutting the workpiece, the next part of the burner is obtained. Next, we insert the final part obtained into the previously prepared part. Let's look at the picture, everything is basically clear there.
We put the remaining part on the resulting structure and get the finished product. Before doing this, it is advisable to coat the inside of the blue part with some kind of adhesive-sealing solution. It is best to refuel the burner with alcohol. In extreme field conditions, it can be filled with other flammable liquids. Before ignition, a burner filled with alcohol must be slightly warmed up so that the alcohol begins to evaporate, because in our burner it is not alcohol that burns, but alcohol vapor. Further, vapors will appear on their own as a result of heating the burner during its combustion.
If you are in the country where there is no access to a gas main, then you have probably encountered the need to use a device of this type. Quite often, people use stoves or stoves that are powered by cylinders. An alternative solution can be a homemade device that operates on liquid fuel. If you are the owner of a suburban area, and periodically try to solve the problem of heating rooms and cooking, then, quite possibly, an alcohol burner is suitable for you. It can also become an indispensable attribute if you prefer to go on overnight hikes in your free time.
How to achieve safety
To make a gas burner safe to operate and not waste fuel, the golden rule should be: no scaling or any changes to the prototype drawings at all!
Here the matter is in the so-called. Reynolds number Re, showing the relationship between flow speed, density, viscosity of the flowing medium and the characteristic size of the region in which it moves, for example. cross-sectional diameter of the pipe. From Re one can judge the presence of turbulence in the flow and its nature. If, for example, the pipe is not round and both of its characteristic sizes are greater than a certain critical value, then vortices of the 2nd and higher orders will appear. There may not be physically distinguished “pipe” walls, for example, in sea currents, but many of their “tricks” are explained precisely by the transition of Re through critical values.
Note: just in case, for reference, for gases the value of the Reynolds number at which laminar flow becomes turbulent is Re>2000 (in the SI system).
Not all homemade gas burners are accurately calculated according to the laws of gas dynamics. But, if you arbitrarily change the dimensions of the parts of a successful design, then the Re of fuel or sucked air may jump beyond the limits that it adhered to in the author’s product, and the burner will become, at best, smoky and voracious, and, quite possibly, dangerous.
Injector diameter
The determining parameter for the quality of a gas burner is the cross-sectional diameter of its fuel injector (gas nozzle, nozzle, nozzle - synonyms). For propane-butane burners at normal temperatures (1000-1300 degrees), it can be approximately taken as follows:
- For thermal power up to 100 W – 0.15-0.2 mm.
- For a power of 100-300 W - 0.25-0.35 mm.
- For a power of 300-500 W - 0.35-0.45 mm.
- For a power of 500-1000 W - 0.45-0.6 mm.
- For a power of 1-3 kW - 0.6-0.7 mm.
- For a power of 3-7 kW - 0.7-0.9 mm.
- For power 7-10 kW – 0.9-1.1 mm.
In high-temperature burners, the injectors are made narrower, 0.06-0.15 mm. An excellent material for the injector would be a piece of needle for a medical syringe or dropper; from them you can select a nozzle for any of the indicated diameters. Needles for inflating balls are worse; they are not heat resistant. They are used more like air ducts in supercharged microburners, see below. It is sealed into the injector cage (capsule) with hard solder or glued with heat-resistant glue (cold welding).
Power
Under no circumstances should you make a gas burner with a power exceeding 10 kW. Why? Let's say the burner efficiency is 95%; for an amateur design this is a very good indicator. If the burner power is 1 kW, then it will take 50 W to self-heat the burner. A 50 W soldering iron can get burned, but it does not threaten an accident. But if you make a 20 kW burner, then 1 kW will be superfluous; this is an iron or electric stove left unattended. The danger is aggravated by the fact that its manifestation, like Reynolds numbers, is threshold - either simply hot, or flares up, melts, explodes. Therefore, it is better not to look for drawings of a homemade burner for more than 7-8 kW.
Note: industrial gas burners are produced with a power of up to many MW, but this is achieved by precise profiling of the gas barrel, which is impossible at home; see one example below.
Armature
The third factor that determines the safety of the burner is the composition of its fittings and the procedure for using it. In general the scheme is as follows:
- Under no circumstances should the burner be extinguished using the control valve; the fuel supply is stopped using the valve on the cylinder;
- For burners with a power of up to 500-700 W and high-temperature ones (with a narrow injector, excluding the transition of Re gas flow beyond the critical value), powered by propane or isobutane from a cylinder up to 5 liters at an external temperature of up to 30 degrees, it is permissible to combine control and shut-off valves in one - standard on the cylinder;
- In burners with a power of more than 3 kW (with a wide injector), or powered from a cylinder of more than 5 liters, the probability of “overshooting” Re beyond 2000 is very high. Therefore, in such burners, between the shut-off and control valves, a reducer is required to maintain the pressure in the supply gas pipeline within certain limits.
Can burner
In addition to using aluminum beer cans, a spirit lamp can be made from an ordinary tin can. A burner made from a tin of coffee or brewed tea with a tight-fitting lid would also work great.
The principle of making a burner from a can is similar to that described above:
In principle, you can make an open alcohol burner; a lid is not needed for this. To do this, you need to insert a tin plate into it, rolled into a circle with a diameter smaller than the walls of the tin can. Alcohol is poured into the resulting circle in the center and set on fire.
As with any flammable substance, handling alcohol requires caution. You cannot fill the jar to the top with it, otherwise it may explode. Apart from alcohol, it is not recommended to use other types of fuel. The burner cannot be placed on a table at home, as it may catch fire, and in general, when using an alcohol lamp at home, it is necessary to use a stand both for the burner itself and for the dishes. To put out an alcohol lamp, it is necessary to stop the access of oxygen to the burning alcohol vapor; to do this, you can cover it on top with a tin lid. The burner should not be used to heat small synthetic tents.
Fishing. Information portal "LANDFISH"
An integral part of camping life is cooking (or reheating). Beginning tourists spend a lot of time studying different methods of making fire, purchasing or making campfire equipment. But experienced travelers know that it is not always possible to make a fire, for many reasons. For example, you may not calculate the timing of the route and the parking lot will be far from trees, or everything around will be wet from the rain. In addition, there are countries where making fires is prohibited. Let's not go far, and in our state, during the dry season, a fire in the forest is prohibited. And if you don’t want to take a risk and play with the law, and first of all expose the natural heritage to the danger of dying from a fire, you should think about an alternative. And it has been there for a long time.
Gas burners have proven themselves well. But, like any human invention, this device still has drawbacks. The weight of the burner itself is small - from 20 g to 700 g. But it will not work without gas cylinders. On average, one cylinder weighs 250 g. They will have to be carried throughout the entire route. How many of them you will need depends on the number of days on the hike. There is one more significant disadvantage... In recent years, the topic of hiking has become popular on the Internet, so many manufacturers did not miss the opportunity to earn extra money from it. And not without success. By positioning the products of their brands as an integral adjective of the fashionable tourist, the “survivalists” made considerable profits. Hence, prices for tourism goods began to bite more heavily into the wallets of middle- and low-income travelers. As popular wisdom says, “the need for invention is cunning.” An alcohol burner can replace a gas burner. It's somewhat cheaper. However, an alcohol lamp can be absolutely free if you don’t disdain and pick up two identical tin (or aluminum) cans from any drink. Let's take beer bars, for example.
There are several ways to make a homemade alcohol lamp from cans, with varying degrees of sophistication. Let's stick to the simplest things. You will need:
- pushpin (alternative);
- stationery and can openers;
- round nose pliers;
- book (about 5 cm thick at the spine);
- a coin (1 kopeck) or a small bolt;
- and actually two empty beer cans.
From each jar we will need to separate a bottom of equal size. To do this, place the knife on the book so that its tip protrudes slightly beyond the edge. Next, we place the jar against the tip, not pressing too hard so as not to pierce it, and rotate it around its axis. Clockwise or counter-clockwise, depends on which side the knife is turned. You should get an even thin groove in the metal sheet. Separate the bottom of the jar by pressing on the section. Sometimes it doesn't work out right away. In this case, we make a puncture in the furrow with a stationery knife.
We repeat the same manipulations with the second jar. The result was two identical “vessels”. In one of them you need to make a 4 mm hole with a can opener, right in the middle.
The second bottom of the jar must be inserted into the first. In order to squeeze it in there, slightly reduce the diameter by corrugating. This is where pliers come in handy. We use them to bend the edge of the second half of the future alcohol burner in a “herringbone” pattern. We insert it. It turned out to be a kind of hollow puck.
All that remains is to make holes for the flame to escape. Use a pushpin to pierce the “shoulder” of the can. Each puncture is 1 cm apart. Alcohol (preferably ethyl) is poured into the large hole (in the middle) and closed with a coin or bolt.
A little alcohol needs to be poured under the burner itself and set on fire. This is a very important point; without heating, the alcohol will not evaporate at the required speed and the burner will not “work.”
The flame from alcohol gives a fairly strong temperature comparable to a gas burner. You can try placing a pot or mug directly on a burning burner, but it is better to build a stand or frame.
Preparatory work
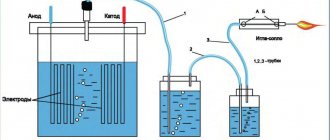
In order to make a device with your own hands, you should prepare a compressor; it is best to use a car tube, which you can borrow from a truck. It will need to be pumped up from time to time. An alternative solution is a compressor from an old refrigerator. You should prepare a receiver; a plastic canister with a volume of 10 liters or less is perfect for this. The cork should be solid, it is advisable to choose a translucent one. Such useful homemade products are made from several elements, among them the fuel tank should be highlighted; for this you need to use a two-liter steel container, into the lid of which two tubes are soldered. One of them should be long, the other short. The first one sinks to the bottom of the tank.
experimental part
The capacity of the tank can be equal to 70 milliliters, the nozzles need to be made in the amount of 16 pieces, the distance between them should be one centimeter. The estimated burning time can be 25 minutes per refill. As practice shows, the duration and intensity of combustion of such devices depends on the type of fuel. The best combustion occurs from medical alcohol vapor. If we are talking about situations where salicylic acid is used, then it does not burn as intensely. If the burner is filled with edible alcohol, it will show the shortest burning time.
The temperature of the alcohol burner is high enough to heat the tent and cook food. When using alcohol devices, solutions that contain about 50-70% ethanol should be used. This allows you to extend the operating period, although it reduces the intensity of the flame. The design has the ability to boil 0.5 liters of water in 7 minutes, which is enough to brew tea or steam instant noodles. During operation, do not overturn the device, as this may pose a fire hazard. As practice shows, if you throw cotton wool on top and then set it on fire, overheating can cause the alcohol to begin to evaporate greatly, causing the burner to simply break in half. The design of the burner is very simple, but before making it, many people wonder why use liquid alcohol when there is dry alcohol. The answer to this question will be higher heat transfer, which indicates the possibility of heating water faster.
Work safety
The main traumatic factor when using and setting up a burner is temperature.
Gas, even household gas, is also dangerous, as evidenced by accidents involving explosions or poisoning.
The power of a propane torch depends on the diameter of the injector and nozzle . We must remember: it is not the gas itself that burns, but its mixture with air (oxygen).
The larger the volume that reacts, the stronger the torch. At the same time, the danger of getting a dangerous proportion of propane with air in the injection chamber increases, and as a result, a small explosion - cotton.
Therefore, a homemade burner does not need to be too large. As a rule, the injector diameter does not exceed 3-5 cm, and the nozzle opening is 0.5 mm.
Important! Work in a ventilated area or outdoors. Use gloves to protect your hands.
Main types of alcohol burners
A homemade alcohol burner can be open or closed. Each of the above designs has its own advantages and disadvantages. If we are talking about an open type device, then you may encounter not so high efficiency; combustion will occur over a larger area. This will promote abundant evaporation of fuel. Among other things, closed-type burners do not provide the ability to control the amount of remaining fuel. Such burners require external ignition, which increases the fire hazard. However, each of the listed burners can be made independently. It is important to remember that the operation of burners is based on the combustion of fuel mixture vapors. Therefore, it is strictly forbidden to use substances that contain acetone or gasoline as fuel.
UAZ Patriot › Logbook › HOMEMADE BURNER WITH YOUR OWN HANDS
www.ludoedoff.ru/site/fire/4/Indeiskaya_svecha.jpg Indian Candles. Homemade burner or camping cooking
When hiking or traveling as a “savage”, on a picnic or fishing, the task of preparing hot food is always faced. Someone makes a venerable fire, someone carries with them a primus stove or a bag of dry fuel. I want to introduce you to one old method, or rather a device with which you can cook food, warm yourself, or light your way.
Work technology
Alcohol ones can be purchased at the store, but the design is so simple that you can make them yourself. The fuel tank should be filled with alcohol, but not more than 1/2 full. A simple filter is installed at the compressor inlet. You can do it yourself, using a funnel on which a segment is stretched. The principle of operation of the device is ensured by pumping air with a compressor, as well as its further entry into the receiver under some pressure. It smooths out pressure pulsations. The air is then sent into a container with fuel, where it is mixed with alcohol vapor. The resulting mixture goes to the burner. The combustion intensity can be adjusted using a special screw located on the burner.
Fat lamp
A grease lamp or oil lamp can be improved by using some kind of wire wick holder.
To do this, take a container and fill it with butter or melted fat. Then they take a piece of wire and twist it to form a spiral (in this form, the wick stand is more convenient and reliable). After that, we lower the wick into the oily liquid, and fix its tip on the top of the spiral. It should stick out just slightly above the surface of the oil or fat.
Thank you for your attention, if you liked it, share this article with your friends on your social network . It’s not difficult for you, but I’m very pleased. And this will be a good motivation to write further for you.
Alcohol lamp device
First, let's look at the device of the alcohol lamp. This design has only 3 parts: body, cover and glass wool filler . Well, the case is clear, this is a container into which we pour alcohol.
The lid is made from the top part of an aerosol can, so to speak, it prevents alcohol vapors from burning from above, they come out through the side holes and burn in the form of a burner, like on a gas stove.
Glass wool is needed so that the alcohol does not overheat, does not boil, and evaporates more evenly. Without glass wool, the alcohol inside the spirit lamp, when it is full, boils, begins to boil and splashes out through the side holes with strong fire.
To ensure the stability of the alcohol lamp and initial heating, you need a metal stand, such as a regular jar lid.
Final works
At the last stage, we have to make supports on which the cooking pot will be located. To do this, you should use two metal rods, which are driven in the shape of the letter P into the ground parallel to each other. During the cooking process, ensure that the device does not tip over. If you decide to make a product such as an alcohol burner with your own hands, then you should remember that such a device is disposable, since tin cans will no longer be useful for the next time.
What is necessary?
Working tools and material for the future design - this is what needs to be prepared before creating the device itself.
- Handle material. There are no strict criteria for its selection, so everything depends on the ingenuity and capabilities of the manufacturer. The handle should be comfortable and not warm up during operation. It is most reasonable to take a ready-made handle - a handle from a broken boiler or soldering station will do.
- Conducting tube. It must be steel, so the manufacturer chooses a steel tube with a diameter of no more than 1 cm and a wall thickness of 2.5 cm.
- Burner body. And it must be steel, and the divider is made of a brass rod.
- Nozzle. It is made from a metal rod.
The standard design of a gas burner will include a metal body, a nozzle, a reducer, a fuel supply regulator, a head and a unit for fixing the gas cylinder.
Tools you will need: grinder, semi-automatic welding machine, file, drill press or drill, tap, drill bit, blade, hammer, pliers, stripping and cutting wheels, metal brush, protective equipment. You don't always need everything from the list, but it is included in the standard set.
Burner manufacturing technology
An alcohol burner can be made in one of several ways. If you are new to this business, then you should choose the simplest possible method that does not involve the use of technology involves the use of two empty tin cans; they must first be cleaned and rinsed with running water. After this, the products should dry well. In the central part of one of the cans, 4 punctures should be made using nails. The same holes should be made around the perimeter of the rim of the jar. This element will become a blank for the future burner, from which a flame will burst out when used.
This part must be cut off from the can so that the length of the side is equal to three centimeters. To do this, you can use household scissors, since the tin is quite thin and can be easily cut with any sharp object. When an alcohol burner is being made, at the next stage it is necessary to cut off the bottom of the second jar; this must be done as carefully as possible so that there are no nicks. Otherwise, you will need to use a file or sandpaper.
Making a gas burner
When starting to make your own device, you need to prepare the tools for the job and select the required material. First of all, choose the material for the handle. There are no strict requirements, so everyone can use their imagination and capabilities. The main requirements for the handle are: its ease of use, so that it does not overheat during operation. Experience shows that it is advisable to use a ready-made handle. For example, a handle from a broken soldering iron, boiler or other household appliance.
Steel is used to make the supply tube. Choose a steel tube with a diameter of no more than 1 cm and a wall thickness of 2.5 mm. The prepared cutting is inserted into the prepared handle. It needs to be securely fastened there. The mounting method is selected in accordance with your capabilities.
The burner body is made of steel. The divider is made of brass rod. Several holes (usually more than four) are drilled into the divider body. This will create good oxygen circulation at the burner outlet.
After this, the divider is securely fixed in the housing. A small clearance should be provided for the inner flange. The recommended gap should be approximately 5mm. This gap will provide the necessary slowdown in the speed of gas flow that flows to the igniter. Slowing down will allow you to ignite the burner more reliably.
We recommend: Do-it-yourself floor insulation in a frame house on stilts: the right technology for a pile-screw foundation
The nozzle is made of a metal rod. It will provide gas supply to the combustion area. It is made as follows. Using a drill with a diameter of 2 mm, carefully make a blind hole in the nozzle body. Then drill a hole with a 4mm drill. It is necessary to create a jumper. They are carefully riveted and polished.
Gas burner drawing
The end of the manufactured tube is connected to the outlet of the gearbox. A flexible hose is used for connection. The material is selected from the list of approved materials for household gas systems. This may be special rubber or special fabric material. To ensure reliability and fire safety, it is more advisable to use certified material. The hose is put on the tube and secured with a standard clamp.
After completing the assembly of the entire device, you need to set the optimal pressure in the cylinder. Before igniting the burner, you should carefully check the entire gas supply system mixing with air for possible leaks. If they appear, they must be eliminated. Only after all checks can the burner be lit. The burner must provide a burning jet length of up to 50 mm.
A properly assembled burner will serve as a reliable assistant in business for a long time. It will be a tool that will help solve many everyday problems without resorting to the use of expensive tools.
What is this alcohol lamp for?
The main purpose of this small alcohol stove is to boil one mug of water for coffee or tea. You can brew coffee in a Turk or heat canned food.
Since the alcohol lamp is quite small, its power is only enough to boil water up to 0.5-0.6 liters. I tried boiling 1 liter of water on this alcohol lamp at room temperature. After some time, the water would, of course, boil, but fully filling the alcohol lamp is not enough for this. You can, of course, add more alcohol when it’s all burned out, but for such tasks it’s better to use a large alcohol stove with a large burner, just like on a gas stove.
Methodology of work
A piece of cotton wool is placed on the bottom of the burner, which should first be moistened in alcohol. Next, the structure is covered with the upper part so that it acts as a sealed lid. If you do not ensure tight contact of the parts, then in the cracks you can install strips of tin that remain from cutting the products. When you make an alcohol burner with your own hands, it must be used according to a certain principle. Alcohol should be poured onto the top of the structure where the holes are made. This must be done in such a way that the composition gets on the rim. The latter should also have holes. Next, the alcohol is set on fire, the tin is heated, and the heat is transferred to the cotton wool, which is soaked in alcohol. As a result, vapors begin to be released that will support the flame.
Third manufacturing method
If you are thinking about how to make an alcohol burner, then you will need to prepare a flat metal jar, which can be a container for canned food or cosmetic cream. You will need pumice, as well as alcohol. The mechanism of such a device is extremely simple and does not require any special effort during manufacture. To create the device, you need to pack pumice into the container as tightly as possible, and then pour a certain amount of fuel on top of everything. These manipulations must be performed as carefully as possible so that the liquid is absorbed and does not splash out. Thanks to the presence of pumice, the flame will burn for 15 minutes, since due to its porous structure it will act as a fuel distributor. Such an alcohol burner made from cans will allow you to cook food, as well as heat a fairly small room like a garage or change house. To heat food, you need to build a stand for dishes, which is made of stones, wire or other material. The main thing is to take into account the requirement that the dishes need to be stable.
Source
What needs to be done?
First the tools. Although for the most part the assembly is made from ready-made elements, the following are required:
- Hacksaw for metal.
- Drill with a set of drills.
- Pliers, screwdriver, personal files, velvet or appropriate needle files.
- Set of dies and taps with holders.
- Bench vice.
Basic materials you will need:
- Rubber or silicone hose for connecting the device to a gas cylinder.
- Two gas valves: the main one, which opens the gas supply, and the regulating valve, which serves to change the amount of gas supplied to the combustion zone.
- A tube with a thin hole at the outlet is a jet (nozzle).
Often, a gas nozzle is called a nipple, which is incorrect and contradicts the principle of operation of the device. Nipple - a threaded tube, often with a built-in valve. Used to connect parts. The jet ensures the injection of the required amount of fuel into the mixing chamber (for example, a carburetor jet).
- Tubes for the body of the product, injector chambers with a nozzle.
- Lever.
The exact list will be determined by detailed study of the drawings of a homemade gas burner, based on the blanks available.
How fuel is used:
- propane or propane-butane mixture;
- methane or natural gas;
- acetylene;
- hydrogen.
Each gas has its own characteristics. For household and home-made systems, the most convenient are acetylene, propane, and its mixture with butane.
It is quite difficult to get a hydrogen cylinder; methane has a higher pressure than household gas; it requires a reducer.