Girls and boys, and of course their parents, like stars. They are perfect for any event, be it a romantic dinner, New Year, anniversary, birthday, victory day and even May 1st.
You can not only draw a star, but also make it yourself. You can give any size, color and volume to the future product and, using our master class, make your own unique star.
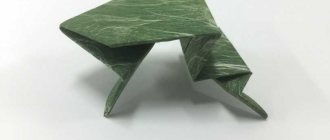
3D star
This look is perfect for decorating a room.
Take:
- cardboard
- scissors
- glue
- pencil
- braid
Instructions:
- Take out two cardboard squares, bend each in half 2 times, then 2 times diagonally.
- Unfold and use scissors to make four cuts along the fold line, not reaching halfway to the center.
- Bend the edges and apply glue to connect them so that you get 4 triangles along the edges of the workpiece.
- Do similar actions with 2 squares.
- And glue the resulting stars for volume.
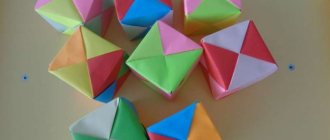
Photo ideas for original homemade stars
Sources
- https://podelochkin.ru/zvezda-trafaret-dlya-vyrezaniya-iz-bumagi
- https://new-year-party.ru/zvezda-trafaret-shablon-dlya-vyrezaniya/
- https://raspechatat-raskraski.ru/trafarety/trafaret-zvezdy/
- https://mognotak.ru/kak-sdelat-obemnuyu-zvezdu-iz-bumagi.html
- https://domodelki.ru/podelki/iz-bumagi/kak-sdelat-zvezdu-iz-bumagi.html
- https://e-ipar.ru/podelki/podelki-iz-bumagi/zvezda-iz-bumagi
- https://minyt-ka.ru/obemnaya-zvezda.html
- https://shkolarukodelia.ru/zvezda-iz-bumagi/
- https://daynotes.ru/bol_shaya_zvezda_iz_bumagi/
- https://gidrukodeliya.ru/zvezdochki-iz-bumagi
[collapse]
Unusual star made from paper bags
Take:
- paper bags
- glue
- scissors
- scotch
Instructions:
- Glue 9-10 folded bags together, coating one side of the bag.
- Using scissors, we cut off the corners of the bags on one side where we did not glue.
- We unfold our workpiece and secure the bags together with small tape.
- You can use paints to decorate it in any color for the occasion. Or initially use colorful gift bags.
Simple star
Take:
- A4 paper
- scissors
- glue
- pencil
- ruler
Instructions:
- We take a sheet of paper, fold the sheet diagonally, since the A4 sheet has the shape of a rectangle, then when folded there will be a rectangular line at the bottom, we can safely cut it off. It turns out to be a square.
- We unfold it and bend the edges of the workpiece on both sides to the formed fold line. We fix the resulting 4-gon with glue.
- Then we measure 4 cm from the edge of the folded parts and draw lines to the edges. Having cut off all the excess, we should get a design similar to an airplane.
- We cut the wings of the airplane slightly diagonally. And using a ruler we make parallel lines.
- In the middle we make small cutouts on both sides. On one side we cut off the edge. On the other we bend along the bend. We need 5 such structures.
- We collect preparations. We attach the curved edges to the 2nd piece from the inside using glue. We attach the third to the second, and the fourth to the third. After that, we put them together and make a puncture through which you can stretch the rope (or leave it like that). We fix the fourth with the fifth element and you're done!
Make your home cozier and more fun.
Briefly about the meaning and history of the Christmas star
This star is also called the Bethlehem star. According to biblical history, it was she who showed the wise men and shepherds the place where Jesus was born. For many Catholic and Protestant Christians, this is a symbol of the Holy Birth of the Savior. Often such a multi-rayed star is made as a setting for icons. But in Orthodoxy this symbol does not have such great significance. However, it is customary to make stars here too. Most often they are used as an attribute during Christmas caroling or as Christmas tree decorations, and less often as home decor.
In our article we will consider all the options for making the Star of Bethlehem from all kinds of available materials. We hope that the reader will choose for himself the most suitable and interesting way to create a star.
Big star
Take:
- whatman
- wrapping paper
- scissors
- ruler
- pencil
Instructions:
- Fold the paper in half lengthwise to mark the center.
- Bend the corners from the top towards the middle (as if we were making an airplane).
- Bend the bottom corners, despite the middle marking.
- Cut off the bottom right corners with 1 cm sides, the other part will be attached to them.
- Make five components and fasten with super glue, you can decorate with wrapping paper.
This large product is suitable for schools and preschool institutions. For use in children's performances or filming.
Stencil
Take:
- paper
- stencil
- scissors
- glue
- colored paper or with a pattern for decoration.
Instructions:
- The hardest part is finding a stencil you like.
- Print the picture and carefully cut out along the outline.
- The drawings usually indicate break lines and places where glue should be applied.
- Connect the adhesive sides. If you follow the plan exactly, the work done will give you pleasure, and you will be proud of yourself.
Garland of stars
Take:
- colored paper
- scissors
- glue
- thread
- a needle
- (possibly a stencil)
Instructions:
- Draw (if you can’t draw, you can use a printer and print stencils from the Internet).
- Cut out the star-shaped elements. Their number depends on the length of the garland you want to assemble.
- We thread the braid or thread into a needle and make punctures in the rays (as if we were collecting them on one thread) to make a long snake. You can tie a knot after each star. This will allow the elements not to accumulate or gather, but to hang each in its place. Such long garlands are easy to store in small boxes or just bags. And get it out if necessary for any holiday.
This decor will serve as a decoration above the head of the bed or decorate a boring partition in the room.
Three-dimensional star with five ends
The toy is more suitable as a home decoration or perhaps as a Christmas tree.
Five-pointed is one of the signs of Victory Day. So far, it is often used in creativity on the eve of the celebration. It's easy to create. Go! Note!
- DIY paper machine craft: various options for creating a machine
- How to make paper flowers with your own hands for children - a master class on making
How to make Minecraft figures and blocks from paper: step-by-step instructions
For this we need:
- Glue.
- Stationery knife.
- Star scan.
Step-by-step instructions:
First, prepare two stencils. You can find it online or draw it yourself if you can’t print it.
- At the second stage, they will have to be cut strictly in straight lines;
- Following. It is necessary to carefully bend the material in straight lines;
- The ears for gluing will need to be lubricated with glue and the parts of the product must be joined together.
colorful star
Take:
- colored paper (one or more colors)
- scissors
- a little bit of glue
- needle and thread (optional!)
Instructions:
- Cut out a strip of about 10 cm from colored paper.
- Fold the strip lengthwise, without pressing too hard, to mark the center.
- We make “teeth” on one of the edges of the strip. That is, we cut off the entire edge with triangles, reaching the middle.
- From two blanks you will get a star flower with ribbed rays.
- We pull the workpiece by the ends towards each other, forming a semicircle.
- We connect the two resulting half rings with glue.
- We get a wonderful craft.
Just like in the previous version, it can be connected using a needle and thread into a long chain. And decorate the space by hanging it between the walls.
Paper Christmas star
A bright and voluminous eight-pointed star, which you can make together with your child in just a few minutes, will become an appropriate New Year's decoration. The finished paper toy can be hung from the ceiling or frame on the window. It can be used to decorate a Christmas tree or any other holiday composition.
To make a Christmas star out of paper, you need to prepare the following materials:
- square colored sheets (single-sided);
- scissors;
- a simple pencil;
- PVA glue.
The process of making such a craft is very simple, the main thing is to follow the steps in the right sequence. First, fold all the corners of the colored paper so that you get an impromptu envelope. On the back of the sheet, mark the middle with a small dot (use a ruler for accurate measurements). Make small cuts along the folds until the scissor blade reaches the marks. Fold the edges of the paper to create four colored triangles. Lubricate one folded half of the star beam with glue and connect the corners together, forming a small pyramid. The result should be a three-dimensional four-pointed figure.
The second workpiece is performed in the same way. Now all that remains is to connect the two halves of the Christmas star to each other at an angle of 45 degrees using glue. The New Year's craft is ready, you just need to attach a ribbon to the top so that you can hang the toy on the Christmas tree.
A variety of stencils will help you create a real masterpiece. Falling, large and small, five and eight-pointed stars can be made with your own hands together with your child using a template, and used to decorate a room, clothes, or homemade baked goods. It is enough to arm yourself with a contour of the required size, use your imagination or find interesting ideas on the Internet.
Once upon a time, during the Christmas holidays, children dressed up in disguise walked around the villages and sang carols. Among the carolers there were those who carried a star on a pole, and sometimes there were several such children. Now old traditions are being revived, albeit not quite in their original form. But today, just like in the old days, many people make the Star of Bethlehem with their own hands. Almost any available material is suitable for this.
The Slavs have had a tradition of caroling since ancient times. Other peoples of Europe have similar customs, but Christians outside Europe do not have them. The situation is completely different among the pagans.
In the pre-Christian era, people attached great importance to the moon and the sun. This did not depend on the existence of a written calendar: the business year was determined precisely by the celestial bodies and weather. Economic and everyday practices were closely connected with certain rituals, and events such as the equinoxes and solstices had special significance in the life of a pagan.
Time and the annual cycle were interpreted mythologically. So, after the winter solstice, holidays dedicated to the young sun began. The holidays were accompanied by folk festivities and fortune telling.
Among the Slavs, the name “Kolyada” was assigned to such holidays. Apparently, this Latin borrowing penetrated into the Proto-Slavic language in antiquity. Slavic contacts with the empire were limited to the “Amber Route”; their main places of settlement were far beyond the periphery of Rome. Nevertheless, the Slavs were familiar with the Roman winter holidays, which ended on the Kalends of January. This is evidenced by the word “Kolyada” itself - it is a direct borrowing from the Latin language, bypassing Greek.
Another important event that happened during those times
, it was Christmas. The Gospel of Matthew reports the worship of the Magi. They came from the east to the place where Jesus was born. It was not easy to find him, because there were no rooms in the hotels of the city of Bethlehem, and Mary gave birth to Jesus in a camp where a flock of sheep spent the night. His first cradle was a manger. The way to the Magi was shown by a star that lit up brightly that night and stopped over the place where Joseph and Mary stopped. This happened 12 days after Christmas.
For Christians, the Star of Bethlehem became the fulfillment of a prophecy that appeared in the Book of Numbers and thus became entrenched in the Christian tradition. Iconostases were decorated with an eight-pointed star, and a four-pointed star was placed on the paten in the altar.
Thus, three traditions were combined in Christmas carols: pagan, Roman and Christian. It cannot be said that such customs are only Slavic. Walking with a star is also typical for Germans, Romanians, Finns and Scandinavian peoples. Christianity at one time did not destroy pagan customs, but adapted them to fit its calendar.
Envelope star
Take:
- paper squares 8 pieces
- glue
Instructions:
- First you need to make envelopes from squares. The easiest way to reshape paper is 3 folds.
- Place the square in front of you, pull the upper right corner to the lower left. The result is a triangle. Let's expand. Then we pull the upper left edge to the lower right and again a right angle. Let's expand.
- We turn our craft over so that there is a rhombus in front of you and fold the right and left edges towards the center. It turned out to be a little bag. And we do this 8 times.
- Then we connect all the bags into one star! We spread the edge of the ordinary side and attach it to the other, and so on clockwise or counterclockwise.
And so, you have created a heavenly miracle that will delight children and adults.
Book
For this design you will need an old book, or if you don’t want to spoil the books, you can take magazines with crossword puzzles and even color ones, it will turn out even more interesting.
Take:
- book (or magazine)
- cardboard
- glue
- scissors
- braid
- glitter (optional)
Instructions:
- To begin, draw 2 stars on paper. To do this, use a compass and draw a circle. Divide the circle into 5 parts and connect the dots. You will get a pentagram.
- Then, in the resulting pentagons in the center, from each corner we draw a line to the opposite side. Now you need to use scissors or a stationery knife to draw along these lines. This should be done only along the top layer of cardboard, without cutting all the way through. Draw from the center to the outer and inner corners. Bend the cardboard so that the edges go down and the lines drawn with scissors go up. The base is ready.
- We connect the two parts into one volumetric star. Let's move on to the book pages. Divide the sheet into 4, and from these parts make little bags (similar to the bags for seeds in childhood).
- Glue the sharp ends to the center. First to the rays, then into the concave spaces. And so on several layers. If you want a more elegant newspaper toy, for example for the New Year, then the ends of the bags should be coated with a little glue and sprinkled with glitter. Or you can use glitter polish, it’s easier and faster. Try it and you will succeed!
Openwork and original thread decorations
Maybe you have a small skein of thread left from knitting and you don’t know what to do with it to benefit your business? Try making airy, graceful, charming stars on a wire frame.
| To make such a cute fluffy star pendant you will need very few materials. | |
| Prepare the wire. | |
| Bend the wire so that 5 rays are formed. | |
| Cut the wire, leaving a small margin. | |
| Take fluffy yarn. | |
| Lubricate the frame with glue in the place where you will begin to wrap the star. | |
| Carefully wrap the thread around the entire frame. | |
| Then randomly fill in the gaps as shown in the photo. |
That's all. It will only take a few minutes to make the pendant, and you can decorate the entire Christmas tree with these toys, without even needing anything else.
What do you think of the next master class, which shows how to make a star from cardboard and twine? The original decorations are painted with acrylic paint.
| Make a template from cardboard. Draw an outline. You will need two identical parts. | |
| Cut out the frame of the future star from cardboard. | |
| Grease one half of the frame with PVA glue. | |
| A small star, which comes from the middle of a large star, can also be wrapped with thread. | |
| Glue two layers of frame for the small and large star. | |
| Coat the outside of the cardboard with PVA glue and begin wrapping it with twine. Secure the edge of the twine with glue. | |
| The star can be painted using acrylic paints and a sponge. | |
| All that remains is to tie the thread. |
An openwork star that looks like a real work of art can be created if you make a frame from matches to stretch the threads. Soak the thread itself in PVA glue, and then begin to wrap the frame: first along the contour, then in the middle, creating a fantasy pattern. Let the star dry and remove from the matches. Thanks to PVA glue, the toy will keep its shape.
Watch the video for making a star using this scheme; it will be simpler, but the technology is similar.
New Year's star
Take:
- stencil
- paper (preferably cardboard)
- glue
- scissors
- tinsel, decorations
- hole puncher
- LED strip (garland)
Instructions:
- You need a stencil with indents and a leg so that you can put the “crown” on the tree. Cut out and fold indents for gluing. If you used cardboard, then using the same templates on top, you should make patterns from wrapping paper and paste over the cardboard. Before connecting the stars, use a hole punch to make several holes. Start connecting the two cut pieces.
- Place a garland inside, you can secure it a little on the sides with adhesive tape and add two stars so that the wire passes through the leg for convenience. Now you can decorate the Christmas tree with the main decor and plug the garland into the outlet.
- A multi-colored light will shine from the holes that were made with a hole punch. It’s not a shame to show off this decoration to your friends and acquaintances who will come to your party.
We hope that our schemes will help while away the evening with your family. And they will make your home even more comfortable and bright. Be creative and add something of your own. Create fashionable photo zones. If you liked our selection, share it with your friends.
DIY Christmas balls made of threads
You will need:
Air balloons
Thick threads (for knitting, for example)
PVA glue
Plastic bowl or cup for glue (or other container that you can poke a couple of small holes in)
thick needle
Scissors.
1. Inflate the balloon to the desired size and tie a tail. If you want to make it more round, press it down with your hands.
2. Use a needle and thread to pierce a plastic bowl or cup. This should be done as close to the bottom as possible. You can also simply dip the thread into a container of glue.
3. Pour PVA glue into a container and dilute it with a small amount of water to save glue.
4. Slowly pull the thread through the glue container and begin to wind the ball with it. Since you will be removing the ball after the glue dries, it is better to leave a little space near the tail in advance to pull it out.
5. Once you have wrapped the ball tightly, cut the thread. You can leave a small tail to make a loop and hang the ball on the Christmas tree, for example.
6. Leave the ball to dry. In the natural way it will take 24 hours or a little more. You can speed up the process by placing the ball near the radiator or drying it with a hairdryer.
7. When the glue has completely hardened on all sides, pierce the ball and carefully pull it out.
8. If desired, you can decorate the ball. Try painting it, gluing plastic or paper snowflakes, sequins, or covering it with sparkles.
Another option: