Decorating is one of the many areas in which it is very necessary to apply the rule of the “golden ratio”. What is the "golden ratio"? This term is inherent in proportional division.
Interior decoration is the final stage of design. How well-chosen jewelry is appreciated. What visiting guests do is praise the tastefully designed space, and are motivated to create something similar.
The most important thing is to take into account the small details. It would seem that who cares about a flower on the windowsill or figurines with spices on an open shelf. It will be a hundred times better if the owner pays attention to the little things.
It is the consideration of small details that is the purpose of the article. Having looked through creative sites, I just want to talk about ways to decorate little things. Decoupage for your attention!
Previously, decoupage was used exclusively to add zest to furniture. In this way, an absolutely budget-friendly and spectacular interior was created. If earlier the tools were limited, then at the moment the situation is exactly different.
In the modern world, thanks to the latest materials, it is possible to decorate with absolutely any surface. The final product can become an original decoration in the apartment or an unusual gift for a loved one.
Features of decoupage bottles
Decoupage is a technique of gluing cut-out paper materials or pieces of fabric pictures onto objects. The basis of this application is usually furniture, dishes, textiles and accessories.
Perhaps the peculiarity is that the work is simple, because it does not require practically any special tools, materials or skills.
Varieties of technology allow you to create various objects. With a solid background covering, spectacular mosaic and 3D relief.
Having examined the advantages and disadvantages of decoupage, we will come to a conclusion. Pros:
- Increases your patience skill;
- A product created with your own hands gives you confidence in yourself and your capabilities;
- Beautiful things please the eye;
- Satisfaction with creativity and development in it.
Minuses:
- An activity that requires time and sufficient finances;
- Lack of nerve to work long and painstakingly;
- Varnishing and plastering with sandpaper can cause allergies.
How to make flowers from plastic bottles. Option 5.
You will need:
- decorations for flowers
- glue (preferably superglue)
- baking tray
1. Wash and dry the plastic bottle.
2. Use scissors to cut off the bottom of the bottle. Feel free to experiment with the shape, but you should still end up with a flower-like shape.
3. Make sure the area is well ventilated. Prepare an old baking sheet and place the bottoms of plastic bottles on it.
Turn on the oven and bring the internal temperature to approximately 200 degrees. At this temperature you need to hold the baking sheet with plastic flowers for about 10 minutes.
4. Remove the pan and let the pans cool. Remove them and start decorating to taste. You can use markers, or glue beads into the middle of the flower.
Materials and tools for work
First of all, you need to purchase the basic components to create the decor. Namely, the object on which decoupage will be carried out, glue. Next you should proceed based on the selected type. Secondary materials for work can be: napkin, acrylic paints.
How to make a flower from a plastic bottle. Option 6.
You will need:
- acrylic paint and brush
- glue (preferably a glue gun)
- drill (for holes)
- candle, lighter or heat gun
1. Cut the bottom of the plastic bottle to create a flower-like shape.
2. Using an awl, make 2 holes in each “flower” - the holes should be on opposite sides, on the edge of each petal. Using these holes you can connect all the flowers with rings.
3. Place the preparations on a baking sheet. Holding the flower with tweezers, begin heating the flower with a flame or heat gun. Do this carefully and don't overdo it. It is also worth remembering about safety and ventilation of the room.
During heating, the flower petals will begin to bend, so stop heating when the petals have reached the shape you want.
4. Start painting flowers with acrylic paints. Next, let the paint dry. It is not necessary to paint on both sides.
5. Make two holes in the middle of each flower to sew on buttons.
6. For the leaves, you can use green plastic bottles or regular ones, but then you will need to paint them with green acrylic paint.
7. Make a hole at the end of each leaf.
8. You can also make flowers from plastic bottle caps. Simply cut each cap into petals using a utility knife.
9. Heat your lid and straighten the petals, which then, when the lid has cooled a little, you can round with scissors.
10. You also need to make 2 holes on opposite sides of the flower and in the middle (for buttons).
11. Sew a button to the middle of each flower.
12. It's time to attach all the flowers using jump rings.
Do everything according to your taste and you will succeed!
Types of decoupage
There are five types of decoupage. Let's look below at what they are and their manufacturing techniques.
Classical
This type of decoupage is very simple. The main task is to carefully cut out the image and stick it to the surface. Carefully pay attention to dimpled and bulging areas and smooth them out as you go, trying to avoid tearing.
The surface can be coated with colored or craquelure varnish in advance. Craquelure is a crack in the paint layer in a piece of painting or any other paint coating.
Direct decoupage uses the technique of gluing a picture to the outside of an object.
Decopatch
For a decorative patch you need: a set of pieces of paper. The technique consists of gluing the surface with materials that are in demand according to the idea and recreating one continuous coating.
Decopatch is a combination of decoupage and patchwork. Patchwork is a technique of sewing things from pieces of fabric. The flaps are connected into oversized blocks according to the area of geometric shapes.
Many pieces of paper create a patchwork quilt effect and the end result is a completely filled surface.
At the end we get a brilliant mosaic.
Reverse technique
For transparent glass objects, reverse decoupage is often used. In order to sell a product with such decoration, the following requirements must be met:
- Find the desired picture;
- Paste the design on the other side of the product with the front side facing the glass;
- Make a craquelure;
- Add background;
- Apply topcoat.
The main feature of this species is its unusualness. Not everyone will think of applying a design to the opposite side and end up with visually the same decoupage as when performing other techniques.
Volume
Decoupage with volume contains “raised” components of the illustration, which become more voluminous due to the mass for modeling. A similar result can be achieved by gluing identical parts onto each other in multiple layers.
A relief surface can be created using paste, gel, shells, fabric, 3D map and putty.
Art
Smoky, also known as artistic decoupage, unconditionally imitates painting. Through colorful material and variational maneuvers in art, the boundary between the picture and the surface around the drawing is erased. There is shading and finishing of details. At the end there is a transparent haze.
You may need skills or a master class from a specialist.
LiveInternetLiveInternet
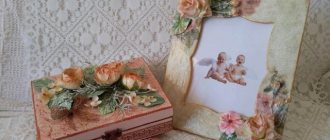
The author of the master class Mint Mood writes: I love comfortable things. But they are not always beautiful and pleasing to the eye. One of these “unpleasant things” was an olive oil bottle. Everything about it is convenient—the dispenser, the volume. But you can’t put it on the guests’ table. I had to use a jug, from which, with any awkward movement, half the oil would pour out. I decorated a lot of bottles, but I decided to make a master class out of this one. I hope it is useful to someone. Don't be put off by the 4 day duration. Most of this time the work will dry. For work, in addition to the bottle, I needed:
- PVA glue;
- acrylic primer Sonnet;
- acrylic paints (I have a hodgepodge of different manufacturers): I chose white, carbon black, burnt umber, chromium oxide, cobalt blue, ocher, yellow, gold);
- Antique Folk Art medium;
- matte acrylic varnish Tair;
- brushes: large flat No. 18, medium flat No. 6 and round penny;
- palette knife for mixing paints (not at all necessary, you can stir with a toothpick);
- a piece of sandpaper, any;
- any self-hardening clay. I use cold porcelain that I cook myself. For my purposes, I slightly undercook it so that it sticks better. You can replace it with a lot of papier mache, salt dough, or any purchased self-hardening clay.;
- stack - I stole plasticine from the children's set;
- toothpicks or awl;
- a piece of foil;
- and lastly - children's tights.
1. I take an oil bottle. I don’t do anything with it - I don’t wash it, I don’t remove the labels, and if there is any oil left, you don’t have to drain it. But it’s easier, of course, to decorate an empty bottle. If your bottle is heavily stained with oil, it is better to wash it with soap. Otherwise, nothing will stick.
2. This is where the experiment begins. I've never done this before. I always clean the bottle, wash it, scrub it, degrease it, and so on. But as smart people say: “Laziness is the engine of progress!” I turn children's tights into leggings and pull them over the bottle. Then I realized that it would be easier to soak it in PVA glue diluted 1:1 with water.
3. I leave the bottom open. I don’t touch anything that hangs over the neck, and I don’t open the bottle cap.
4. I turn the bottle upside down and coat it with a large brush with PVA glue diluted with water 1:1. I leave it to dry.
5. I cut out a patch from the tights in the shape of the bottom, and also glue it onto diluted PVA while the bottle is upside down.
6. I turn the bottle over, beautifully fold the folds at the neck, and generously spread PVA. The main thing here is not to cut the tights ahead of time and not to seal the lid. I leave it to dry for 24 hours. Then I trim off the excess tights.
7. Without the lid, I carefully trim the fabric along the edge. I try on the lid - it should screw on well. I once again went over the entire bottle with diluted PVA glue and dried it for a day. The nylon must be well glued. The folds should become firm.
Here's a small digression - why all this fuss with tights? Usually, bottles have a lot of all sorts of voluminous elements that don’t fit my ideas in any way. Therefore, the surface needs to be leveled and primed. Everything sticks to the glass disgustingly, the putty doesn’t stick and the paint doesn’t adhere well. There are different ways to prepare a glass surface. The best way is to cover it with a cloth soaked in PVA. Three-dimensional elements are perfectly glued to the fabric. She herself creates an amazing texture. You don’t even have to decorate further, but I wanted a bottle with olives!
8. Therefore, I draw them light brown directly on the tights with a simple pencil.
9. Kneading the cold porcelain.
10. Lubricate the surface with the pattern with undiluted PVA glue. I'm starting to sculpt three-dimensional elements. First, those further down are the leaves. I make a thick sausage, flatten it on the table, and form a leaf. I glue it to the desired place, make a groove with a stack and thereby press it firmly to the surface.
11. I make a branch and cuttings from thin sausages.
12. I am finishing the leaves. Everything is visible in the photo. For olives I roll ovals and glue them. If the PVA has dried out, I add more.
13. On the other side of the bottle I made another olive branch.
14. Now I will design the neck. I roll two thin cold porcelain sausages (HF).
15. I twist them together - it turns out to be a “rope”.
16. I glue this “rope” as in the photo. I make brushes from HF. I didn’t take a photo, but everything seems clear - first I make a fringe from a triangle, forming “threads” in a stack. Then a small ball knot. I make threads in a stack.
17-18. I also make “ropes” and wrap them around the neck of the bottle. I hide the ends between the turns. You can see it in the photo.
19. I make a mesh at the top of the lid.
20. I cover the entire surface of the lid with “ropes”. It's pretty wrinkled. I check to see if the lid can be unscrewed. The decor on the lid should not be combined with the decor on the neck. The bottle and cork should be separate elements, but fit together perfectly.
21. This is roughly what everything should look like.
22-24. For some reason I wanted texture on smooth walls. I take HF, smear it on the bottle and press it tightly with crumpled foil. It turns out to be a very nice texture. The HF must be dried. I leave everything for 24 hours.
25. I cover everything with primer twice. I don’t regret the soil, it becomes an additional strengthening element. Once dry, it is almost impossible to pick out the olives.
26-28 I am preparing a palette for acrylic paints. This topic has not been on YAM for a long time, so I’ll remind you. Place 3-4 layers of paper towels at the bottom of a container with a lid. I wet it with a spray bottle until very moisturized. But there shouldn't be a puddle. If you overdo it, just pour off the excess. I cut a piece of baking paper to the size of the container. I put it on the towels. Ready! I put paints on top. If you close it tightly with a lid, the paints will not dry for 2 weeks. Over time, I only change the baking paper and dampen the paper towels.
29. On paper or, like mine, on a disposable plate, I mix ocher and yellow. But I don’t stir until it’s homogeneous, just a little bit.
30. Using a large brush, apply paint to the entire surface. I try not to mix the paint, it comes out in spots. I sushi.
31. Using a medium brush, apply chromium oxide to the entire surface of the olive branch. I sushi.
32. I dilute the umber slightly with water and apply it to the branch and cuttings. Then, after drying, the blue one is also transparent on the leaves.
Another small digression. Ever since art school, the thought has been in my head - don’t mix more than 2 colors on the palette. And really, you won’t get a beautiful color. And if you lay it in translucent layers, you can achieve rich color shades. A lot has been written about this at the Masters Fair regarding oil paints. This technique also works great for acrylic. Moreover, acrylic paints dry very quickly; there is no need to dry the work for 2 weeks.
33. I paint olives using the same principle - first with soot, then with cobalt. Be sure to wait for the previous layer of paint to dry. I use medium and small brushes.
34. I cover the rope on the lid and neck with burnt umber. I leave it to dry.
35-36. After drying, I lightly scrape everything with sandpaper. In this way, I kind of combine all the work. Otherwise, it looks like a children's coloring book . I also give it a slight touch of antiquity.
37. I continue to “unite” my work. I “coat” the entire bottle with medium. In the photo the top of the bottle is not covered, but I did that later. If not a medium, take umber and mix it with an acrylic paint drying retardant, or with water.
38. Let it dry for 5-10 minutes. I wiped off the excess with a dry cloth.
39. I diluted the black paint with water and applied it to the olive branch and the lid.
40. I wiped off the excess almost immediately. Paint diluted with water dries very quickly.
41 -44. I dried it and sanded it a little more with sandpaper. I applied a little gold paint to the sponge and lightly ran the dry sponge over the neck, cap and ribs of the bottle.
45. I tidied up the junction of glass and decor. Removed excess soil with a rag. Anything that didn’t wash well was cleaned off with a toothpick. Using a thin brush, I covered the junction of the tights and the glass with black paint. The joint is not visible.
46. Same with the cork.
47. In my opinion everything is beautiful
48. I cover the bottle with 3 layers of matte acrylic varnish. It is important that the layers are thin. Otherwise, in the recesses of volumetric elements, the varnish will harden into ugly gray spots. And the olives themselves were additionally highlighted with glossy varnish!
That's all! Thank you for reading to the end
I also made myself a bottle for sunflower oil. I just went overboard with gold
Source of the message...
Experiments are welcome
It is not necessary to use the simplest options for decorating glasses. Let go of your imagination and feel free to create unique masterpieces. Juices can be replaced with melted chocolate, and natural coffee or cinnamon can be added to sugar. And then not only the appearance of the dishes will change, but also the taste of the drinks served in them. You can leave a congratulation on the children's glasses - the kids will definitely like it.
Create something exclusive with the whole family while the cakes are baking in the oven and the fish aspic is cooling in the refrigerator. Tested: New Year's anticipation instantly lifts your spirits.
How to decorate glasses with colored sugar
White sugar visually resembles frost, which is why it is so well suited for New Year's surroundings. But if you want originality (and the symbol of 2022, the water Tiger, is a lover of it), you can move away from the canons by choosing painted decor.
Photo: youtube.com
Where can I get it? You can make your own colored sprinkles. To do this, take the zest of one orange (lemon, lime) and grind it in a blender with a small amount of granulated sugar. Another option is to buy regular food coloring and add it to the sugar. Or instead of lemon, take cherry, pomegranate, blueberry, or blackberry juice. Colored drinks will color the white powder, and the color will be delicate and unusual.
Photo: youtube.com