The simplest type of crafts are applications using cereals. In every house, housewives have unused cereals. Therefore, the material is very affordable and easy to use.
To perform such crafts you do not need to have certain knowledge and skills, everything is very simple. Even a child can cope.
Cereal topiary
You will need: 1 package of green peas (split and polished), a foam ball, PVA glue and a glue gun, a package of dry moss, a clay pot, a wooden stick or skewer, a brush, floral foam or polystyrene foam, paints, a stationery knife.
Master Class
- Paint the pot and trunk to suit your taste.
- Paint half of the foam ball green and wait until it dries completely.
- Repeat the painting process with the other half of the ball and wait until it dries completely.
- Make a hole for the trunk 3 cm deep.
- Apply pva glue to a small area of the ball using a brush, then sprinkle over the peas.
- Fill the entire bowl with peas in the same way. Do this gradually - in small sections and let it dry.
- Leave the pea ball overnight to dry completely.
- When the ball is dry, fill in the gaps by gluing peas.
- Apply a bead of hot glue into the hole and insert a stick as a stem.
- Place floral foam in the pot and insert the stem.
- Fill the surface of the pot with moss.
Cereal topiary is ready!
Craft materials
Regardless of what the crafts made from grains are called, the following materials can be used to create compositions:
- various grain crops;
- legumes;
- cereals;
- coffee beans;
- seeds.
All of the listed elements can be used in their natural form or painted in the desired color, varnished, heat treated, etc.
Frame magnet for refrigerator
You will need: various cereals, cardboard, pencil, ruler, scissors, glue gun, 2 magnets.
Master Class
- Draw a frame on the cardboard.
- Cut it out.
- Cover with cereal to your taste.
- Glue the magnets on the back side.
The cereal magnet frame for the refrigerator is ready! I recommend viewing a photo gallery of ideas for decorating frames with cereals!
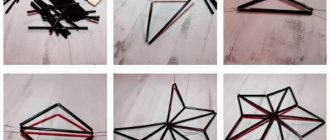
Cereal wreath
You will need: split green peas, 2 straw wreaths with a diameter of 20 cm, PVA glue, brush, foil, twine or ribbon, baking sheet.
Master Class
- Cover the baking sheet with foil, then fill with peas.
- Apply glue to a small area of the inside of the wreath using a brush, then sprinkle with peas and wait until dry.
- In the same way, fill the entire inner part of the eyelid (in sections).
- Apply glue to a small area of the outside of the wreath, roll it in the pan with the peas and wait until dry.
- Fill all parts of the wreath in the same way.
- Tie the twine to the wreath for further hanging.
The cereal wreath is ready!
Pros of crafts
Working with natural materials develops fine motor skills, promotes spatial and imaginative thinking, and helps to gain skills in handling some simple household tools. You can start playing such useful games with your child from an early age. And you can design together large volumetric canvases on a given theme from the age of 4-5.
The theme of home and family is one of the most relevant for creating crafts in kindergarten or school. It is suitable for the Autumn Festival, and for Mother's Day, and for the New Year. In the process of work, the child can express how he perceives home comfort and depict his ideas about the home in which he would like to live. Psychologists consider such activities to be very useful, because they help to better reveal and understand the baby’s inner world.
Parents traditionally help their child create crafts. Many even try to do without the help of a child. Of course, this way the work will go faster, and perhaps the result will be closer to ideal. But the essence of developmental activities is the child’s independent work on the next small project. Mom and dad should simply guide him in the right direction and suggest what his son or daughter cannot yet do on their own due to their young age.
As an object, it is better to choose something simpler, but accessible to the baby. It is also worth offering the most common materials for crafts so that the child can cope with their processing. A bean well can be such an interesting but simple-to-make item. It is sometimes created as a separate item. But more often it is part of a large complex composition into which all family members have contributed their creative skills.
Table of cereals
You will need: various grains, a ruler, a simple pencil, chipboard or plywood, liquid nails or wood glue, a large photo frame, a bar stool, a drill or drill bit, a primer, 4 small screws, a brush, paints, PVA glue, epoxy resin, film to protect the floor.
Master Class
- Separate the frame from the back panel.
- Cut a panel from plywood or chipboard the size of the frame.
- Glue the panel to the frame using liquid nails or wood glue.
- Seal the joints using wood putty.
- Place the frame on the stool and secure with 4 screws.
- Cover the floor with film.
- Cover the table with primer and wait until it dries completely.
- Paint with 2 layers of paint.
- Draw a marking for the location of the croup.
- Apply a thick layer of PVA glue to a certain area and cover with cereal.
- In the same way, fill the entire table with various cereals.
- Apply a layer of PVA on top of the cereal and leave for a day.
- Make sure the table is on a level surface, then fill the framed cereal with epoxy resin. If bubbles form, blow on them through a straw.
- Leave overnight to dry.
- Pour a second layer of epoxy resin and leave it for a day.
The cereal table is ready!
Let's try to make a panel for the kitchen from coffee beans
Who didn’t want their usual kitchen to become like an original and cozy restaurant? You can add more charm to this room with the help of an unusual panel made of cinnamon and coffee beans, which have a rich aroma and deep color.
So, to make such a panel ourselves, we will need:
- 1 liter plastic bottle
- Ground and bean coffee
- Masking (white) tape
- Rough burlap
- PVA glue and instant glue
- Cinnamon
- Dried lemon slice
- Twine thread
- Brown gouache
- Scissors, ruler, brush
When everything you need for the panel is assembled, you can start working. It starts with cutting a plastic bottle in half. Next we need a half with a neck. It is also cut into two slightly different halves. One remains with a neck, and the other without.
Half without a neck is the future cup of coffee. From cardboard you need to cut out the back wall to the size of the cup, as well as the bottom for it. Don't forget about the saucer. The cut out parts of the mug need to be glued together as in the photo below.
The resulting blank should be covered with white masking tape. This is done so that the coffee beans stick better to the paper surface. Next, the workpiece is covered with brown gouache paint. Now the gap between the grains will not be noticeable.
When the paint has dried, you can start gluing the coffee beans. To do this, grains of approximately equal size are selected, and the edge of the mug is coated with glue. It is important to cover with glue only the area to which the grains will immediately attach, and not the entire area in advance. First, the grains are glued strictly along the contour, as in the photo. Be sure to glue them so that they do not protrude beyond the edge, otherwise the workpiece will not stick to the background.
When the grains are glued along the contour, you can fill the remaining area of the mug. To your taste, you can glue the grains on one side or on different sides, but still the flat side, which has a dent, fits better on the surface.
The saucer is also covered with grains.
The main detail of the composition is a cup of coffee, ready. Now we need to take care of the background. To do this, place the base in the frame with burlap glued to it. To ensure that it sits evenly, the fabric can be ironed beforehand. A mug and a handle made from grains are glued to the burlap.
All that remains is to decorate the panel. To do this, you need to tie cinnamon sticks onto a bow with twine and glue them to the saucer, and place a slice of lemon on the other side. The final touch is steam over the mug. To do this, draw waves of steam using a generous layer of PVA glue and sprinkle them with ground coffee. After this, the ground grains must be carefully shaken off, turning the panel upside down.
Grain feeders
You will need: 3 cups of birdseed, a packet of gelatin, a quarter cup of water, molds, baking paper, saucepan, spoon, bowl, twine.
Master Class
- Bring water to a boil and add gelatin.
- Boil for 5 minutes, stirring constantly.
- Remove the mixture from the heat and mix the food.
- Place baking paper on the table and place the ramekins on it.
- Fill the molds with food and insert the twine.
- Place the figures in the freezer for 20 minutes, remove, then leave to dry for 10 hours.
- Hang food on tree branches.
Figured grain feeders are ready!
Step-by-step instructions on how to make beans from plasticine
1. To work out the surface texture of the beans, use brown and white clay.
2. Since the bean of this plant is small, you need to take a little material. Tear equal sized pieces from each block and mix together to form a ball. There is no need to achieve a uniform structure. Among the brown shade, white inclusions should be clearly visible.
3. Roll out the previously made shape into a small sausage and bend it in one direction - the body of the craft is ready.
4. Let's make shoes, for which you will need green. Place the plasticine in front of you.
5. We tear off pieces of the same size from it and turn them into balls.
6. Tear off two more parts and mold them into squares, the edges of which are slightly rounded. When finished, connect both pieces together to form a shoe.
7. Place two toothpicks in front of you and carefully apply green plasticine to their surface. We leave one end without any processing.
8. We stick toothpicks into the shoes and our feet are ready.
9. We insert the legs into the body of the bean so that the entire structure stands freely without our participation. Using the white color of the material, we make laces from thin threads.
10. We will again need green plasticine to make two sausages in the shape of elongated carrots.
11. We process the wide part by sculpting the hands. Let's use a knife to cut through the fingers.
12. Make holes in the body of the craft either with the back of a knife or with a toothpick, and insert your hands into them. Make sure they stick well and don't fly out.
13. To form the eyes, we will first make the base for them. We tear off two pieces from the white material and turn them into peas.
15. Let's use black color and sculpt the pupils out of it. Place them on a white base the same way as we did, our eyes are ready.
16. We use a brown tint to represent the nose. A small pea that should be located at the bottom of the white area.
17. Use a plastic knife to cut a smile out of the bean. If you have creative inspiration, you can dream up your facial expressions.
18. We will need just a little bit of red plasticine to make a small tongue out of it. Attach it to your mouth and move on.
19. We will make a chef’s hat from white material. There is no need to be particularly clever here. As you can see from the photo, it has a very simple shape.
20. We fix the headdress in the upper corner of the craft.
21. It will not be difficult for you to make a spoon, since it is just a small sausage that is flattened on one side. Use white plasticine for this. Place it in your hand and move to the final stage.
22. The lilac color of the material will serve as the basis for making a mug. We use yellow to indicate the presence of some kind of drink or food in it. Attach it to the second free hand and our work is ready.
Like the author
Decorative bean ball
You will need: foam ball, beans, brush, PVA glue, paint.
Master Class
- Paint the floor of the ball in the desired color and wait until dry.
- Paint the other half and wait for it to dry.
- Apply glue to part of the ball, glue the cereal and wait until it dries completely.
- Thus, fill the entire ball with cereal.
- If desired, paint the ball over the cereal.
The decorative bean ball is ready!
Crafts from different types of cereals
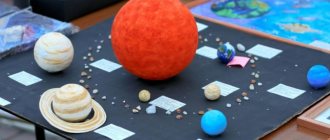
If you take different grains, both in color and texture, then you can lay out real panels with them. Moreover, its complexity is not limited by anything. There are versions of such paintings in which entire portraits from photographs are laid out in grains.
In order to facilitate the process of creating such a panel, you can print out an outline image of the desired design and then lay out the grains on it.
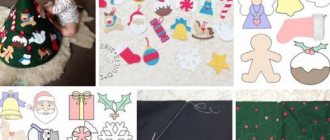
Christmas toys made from cereals
You will need: plastic balls, various cereals, PVA glue, brush, ribbons, acrylic varnish for crafts, plastic plate.
Master Class
- Place the cereal into a plastic plate.
- Cover the ball with a thick layer of PVA.
- Roll the ball in the cereal.
- Gently adjust the grain.
- It is better to make a rice ball in 2 layers, and a buckwheat ball in one.
- Dry the balls, then coat with varnish.
- Leave the balls for a day to dry completely.
- Decorate with ribbons.
Christmas tree decorations made from cereals are ready!
Christmas tree decorations
In order to create a Christmas tree decoration, you need to study the types of craft patterns for using cereals. The execution is very simple, children will really like it.
It is safest to use plastic balls, but it is realistic to use old and unnecessary plastic Christmas tree decorations as a base.
First, you need to pour the cereal into a plate. The ball-shaped blank is covered with glue. Next, you should roll it out in cereals. If you choose peas or buckwheat, then roll it once. When using rice and millet cereals, you need to make 2 layers.
Then the product is set aside to dry. At the end it is decorated with satin ribbons. You can find options on the Internet or come up with them yourself.
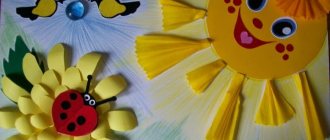
Mushroom from cereals
You will need: A4 colored cardboard, boletus mushroom template, pencil, scissors, brush, PVA glue, red lentils, corn grits, semolina, green split peas.
Master Class
- Cut out the mushroom template.
- Trace the template on colored cardboard with a simple pencil.
- Apply glue to half of the mushroom cap.
- Sprinkle in the red lentils and spread out gently.
- Apply glue to the rest of the cap and fill with lentils in the same way.
- Apply glue along the edges under the cap and sprinkle with corn grits.
- Apply glue to the stem of the fungus and sprinkle semolina.
- Apply glue under the leg and add green peas.
- Wait until completely dry.
The cereal mushroom is ready! I recommend watching the video master class!
DIY mushroom craft for kindergarten
I recommend viewing a photo gallery of ideas for creating applications from cereals!
The principle of working with the material
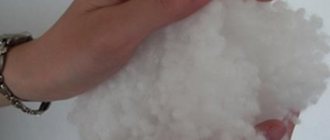
Working with cereal is simple and pleasant. To begin with, select options based on grain size and color. You can use a completely natural product or pre-paint the components. Painting a finished craft is less convenient. If this option is chosen, it is better to use acrylic paints.
For crafts, use clean dry cereal. If the grains were previously washed or dyed, then before working with the material you must wait until the components have completely dried.
Both small semolina and large beans or coffee beans are suitable for creativity. The choice depends on personal preferences, dimensions, and the specifics of the picture.
Bean painting
You will need: black and white beans, canvas, PVA glue, black and white paint, brush, pencil.
Master Class
- Draw an image.
- Color it.
- Glue the beans, taking into account the color elements of the design.
The bean painting is ready! I recommend watching the video master class!
PANNO FROM BEANS “CATS”
Using the same principle, you can create original paintings, portraits and original panels. Look through the photo gallery of cereal paintings and get inspired!
Painting
In order to make a spectacular picture with cats you will need black and white beans, a work surface, glue, a brush, and a pencil.
An image of two cats is drawn on the canvas. And there is a circle around them. Using paints and a brush, animals and the area around are painted. It will be easier for children to navigate which color of beans to glue.
The dark ones are attached to the black areas with glue, and the area around the cats is smoothed with white beans. The result is a painting that can be used to decorate a room or as a gift.
After completing this work and understanding the principle, you can create your own sketch and make a personal painting.
Decorating eggs with cereals
You will need: boiled eggs, various cereals at your discretion, PVA glue, brush, felt-tip pens if desired.
Master Class
- Apply glue to the egg or part of it using a brush.
- Dump the egg into the cereal.
- If desired, draw a face and decorate it to your taste.
The Easter egg made from cereal is ready! You can use buckwheat, rice, semolina, coffee beans, Easter sprinkles and even pasta. Fantasize and surprise everyone!
Decorating Easter eggs
Before the bright holiday, it is quite possible to decorate Easter eggs with your children. At the same time, in addition to the traditional coloring of eggs scarlet, you can paste them with cereal, which can be found on the shelves of any housewife.
This could be pasta, beans or peas. You just need to coat the boiled eggs with a brush and glue, stick on the selected cereals and leave to dry. To secure it, apply another layer of glue on top. The next morning you can give such unusual Easter eggs as a gift.
Napkin rings
You will need: various cereals, toilet paper roll, PVA glue. brush, stationery knife, paints.
Master Class
- Cut the bushing into 3 parts.
- Paint them.
- Apply a thick layer of PVA glue to a small area, sprinkle with cereal and let dry.
- Fill the entire space of the sleeve with cereal in the same way.
- Decorate to your taste.
The napkin rings are ready!
Panel
A panel is a composition in the form of a mosaic picture, most often made of cereals or grains. Making such crafts from grains with your own hands is not difficult even for a child.
The panel is created in several stages:
First of all, you will need a basis for the composition. This can be a sheet of thick paper, cardboard, canvas or a piece of plywood. Next, the prepared substrate is given some kind of background. It can also be made from grains or simply painted with paint (watercolor, gouache). Then the previously prepared sketch is applied to the surface.
Cereals and grains for mosaics must first be sorted, then take a regular brush and apply PVA glue so that it covers a separate part of the pattern without going beyond it. Then the coated area is sprinkled with prepared cereal of the same type or color.
When the glue dries a little, the excess grain is removed and PVA is applied to the next element of the sketch.
The area is sprinkled with other cereals and also allowed to dry. In this way, the procedure is repeated several times until the whole picture is formed.
Depending on the complexity of the work, the composition may consist of several layers.
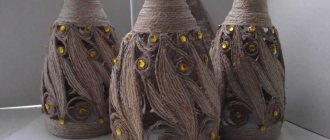
Decor with cereals
Cereals are perfect as a filler. They are used for vases, bottles, candlesticks, and other containers. Browse the photo gallery and get inspired!
I recommend watching this video!
DIY: DIY Decorative Bottle! Original Kitchen Decor!
How to paint cereal?
Each cereal has its own natural color. Of course, any grain can be dyed, but it is better to use light rice, white beans and pumpkin seeds for best results. If you want to get a rich, bright color to create crafts or unusual decor, then the next master class is just for you.
You will need: thick plastic bags or ziplock bags, alcohol or vinegar, food coloring in desired colors, cereal, plastic plates for drying, measuring cup.
Master Class
- Fill the bag with two grains of cereal.
- Add 2 tablespoons of alcohol or 4 tablespoons of vinegar to it.
- Add a couple of squirts of food coloring.
- Close the bag and shake it until all the grains are colored.
- Place the cereal on plates and leave to dry.
The cereal is colored! I recommend watching the video master class!
How to Dye Rice or Other Grains to Create Educational Sensory Bins
It is worth noting that grains in crafts go well with seeds, pasta and nuts. Create the most original crafts from cereals with your own hands. Experiment and surprise others with masterpieces!
Materials for making crafts from grains
You can make a craft from grain using:
- Coffee.
- Legumes - and these can be beans, mung beans, chickpeas, and lentils, both orange and green.
- Buckwheat.
- Rice is white, red, black and brown.
- Semolina.
- Bulgur.
- Millet.
- Sunflower seeds.
In addition, you will need glue, cardboard or high-density canvas and a frame for paintings or panels.
Other crafts will require other materials, depending on the design itself.