Handicrafts are a great hobby that allows you to have a good time, relax your soul and create beautiful paintings to decorate your apartment. You can learn at any age, because you can find very detailed instructions on how to embroider with beads pictures of any complexity. Start with simple ones, get acquainted with different types of seams, and gradually improve your skill. Very soon you will be able to take on work of any complexity.
Necessary materials and features of the right choice
How to properly organize a place, what materials to use and what the basic basics are - for beginning craftswomen, these are the main questions at the beginning of the journey. The work begins with the selection of good and necessary material. Go to a craft store and buy from the list.
Scheme for beginners
If this is your first time using a thread with beads, then it is better for you to purchase a special pattern for beginners. This way you will understand how to work on a painting correctly and gain experience.
Usually ready-made kits already have diagrams, but if you are not satisfied with their drawings, you can always buy the diagram separately. It allows you to better navigate the embroidery, and also has a color designation. That is, each cross or square on the graph means a certain color, which allows you to navigate well and not get confused.
With its help you can learn how to embroider with beads easily and simply.
Beads
The first difficulty in choosing a material may be finding the right, high-quality beads of a certain size and color. The quality of the beads must be excellent. If you make the wrong choice, the work will quickly lose its beautiful and respectable appearance.
Choose convenient containers for storing beads.
There are three types of beads:
- plastic;
- glass;
- ceramic.
All three types have bright and rich colors, they are practical and retain a beautiful appearance on the fabric for a long time. The main thing is to take into account the diameter, and it is important that it matches the density of the fabric and thread.
Thread or strong fishing line
It is better to choose cotton or silk threads. They do not stretch, do not rub, are not afraid of moisture and ultraviolet exposure, which makes it easy to sew on beads.
Polyester threads, as well as wax-impregnated products, are also excellent.
It is better to choose threads similar to the color of the beads.
Be sure to prepare a white color, because it universally matches the color of the canvas. If it’s difficult to decide on a thread, use it and you won’t go wrong.
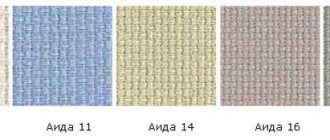
Canvas
Canvas is a special canvas made from linen fabric.
Most often, thick linen or cotton fabric is used as a base. Although you can embroider on other materials, such as velvet, synthetic materials, etc. This fabric greatly simplifies the process of transferring patterns to embroidery.
However, if you want to make things easier for yourself, buy a ready-made canvas with the pattern you like on it.
Hoop or frame
Thanks to these devices you will significantly speed up the embroidery process. This is because the area of fabric will be smooth and slightly stretched. You don't have to constantly align the material and make sure that the threads don't break or get tangled.
beading needle
Beading needles differ from regular ones in that they have the same thickness along their entire length. Typically needles from 10 to 16 are used, depending on the size of the bead itself. For small beads – 15-16.
If the needle penetrates the beads freely, then it is suitable.
The choice depends on the embroidery method, so it’s easier to buy a set of such needles.
Scissors
Crafts require good sharp scissors. And in beadwork they will be simply irreplaceable. You may not need to buy them at all - ordinary nail scissors are also suitable for this type of needlework.
Important! Keep materials out of the reach of children.
What materials are required
If you purchase a bead embroidery kit, it already contains the necessary material, diagram, instructions and even a needle. However, this is not enough to create your first painting. Additionally, you will need some tools. If you plan to use a diagram taken from the Internet, then you will need to select and buy everything you need yourself, and this must be done correctly.
Beads
You should purchase only high-quality beads made in Japan, Czech or Taiwan for embroidery. It must be calibrated (of the same shape and size), since otherwise during operation it will be difficult to maintain the evenness of the row. The material, depending on the chosen design, is required in different or one size. This should be determined before work begins. Beads for embroidery are purchased with a small reserve. Buying more of it while working is not the best solution, since the shade of different batches, even from a trusted manufacturer, may differ slightly. The material number indicates its size - the larger it is, the smaller the beads.
Threads
The thread for embroidery is chosen to be strong and suitable in thickness for the holes of the beads. The best option is nylon threads or silk. To further increase strength, you can use a special wax for threads, through which they are pulled before starting work. In this case, you can use floss.
The color of the threads should match the beads and not stand out on the finished product. If you are working with light-colored material, you can use white threads for all beads.
Needles
For bead embroidery, special very thin needles of considerable length are used. They easily pass even through very small beads. Their ends are pointed, so care must be taken when working with them.
What do you prefer for work?
SchemesReady set
Hoop
Classic round hoops can be used if the entire pattern fits in them and the fabric does not need to be moved while working. When the selected embroidery pattern is large, you will need not a hoop, but an embroidery frame. The fabric is secured to it at the upper and lower ends, while its sides remain free. To move the pattern if necessary, the fabric with the area already sewn is wound onto the frame bar. In this case, the bead rows will not be damaged, and the work will remain beautiful and neat upon completion.
Workplace organization
For productive work, as well as in order not to harm your health, it is necessary to provide sufficient lighting, so it is better to place your workplace near a window, or get a good lamp.
It is better to select separate furniture for work. Traditionally, artisans embroider with beads on a lightweight folding table on which an embroidery frame can be conveniently placed.
Practical advice:
- In order to store the smallest parts, it is very convenient to use special zipper bags.
- For needles, pads or separate boxes with soft segments are traditionally used.
- It is recommended to store scissors in special cases.
It is also better to choose a secluded place where you can calmly create.
Tips for comfortable embroidery
To start embroidering with beads, you need a little preparation. It allows you to simplify the process and make it comfortable.
- Preparation of the workplace . It should be well lit, stable and clean. When doing this type of embroidery, be sure to sit at a table, as otherwise it’s easy to accidentally scatter beads.
- Distribution of beads among containers . You need to use plastic jars with screw-on lids, which are sold in all handicraft stores. They allow you to store beads compactly without the risk of them falling apart. If you plan to initially embroider a large piece of one color, it is enough to pour only such material from the bag into a container, and not immediately pour it all into jars.
- Protecting embroidery from dirt . If the product is voluminous, it will not be possible to start and finish it at once. To prevent dust from accumulating in the rows between the beads, you must use a protective cover for the hoop or frame. You can replace it with a clean towel or piece of linen.
If you are not sure that you will like embroidering with beads, it is enough to purchase a small simple set to try.
Basics of bead embroidery
Beginners make mistakes at the very beginning of embroidery: they leave knots while securing the thread. Ideal embroidery has no knots or tails.
How to attach the thread
Fastening methods:
- We make a stitch, pierce and stitch.
- We stretch the thread on the canvas, then press and secure the tip by making several stitches.
- We pierce the fabric in two places with a needle to form a loop, skip it, and then tighten the thread.
- We take the needle out from the wrong side, then from the front, without pulling it out completely, we make several yarn overs on it with thread, and then take out the needle.
These methods allow you to create perfect paintings without deforming the fabric.
Securing a single bead
One bead is sewn into the material like a button. You can use smaller beads to create a small column or put glitter on it.
Materials, tools for embroidery
Bead embroidery for beginners (you can do the stitches step by step without much difficulty) always includes studying the pattern and purchasing basic materials. Stores for creative people sell the necessary embroidery equipment.
Manufacturers offer complete sets with the necessary paraphernalia. But you can buy everything yourself. It is better to take goods of good quality, since the final result depends on them.
To work you will need the following:
| Name of available materials | Short description |
| Canvas | It is advised to purchase fabric that is practically wrinkle-free and stain-resistant, so that the finished painting is not subject to frequent ironing or washing. |
| Special beading needles | They are produced under numbers 15, 13, 12, 10. Usually needlewomen use a needle No. 12. |
| Embroidery frame or hoop | The fabric should not sag during operation. It is better to pull it on a special device. For such purposes, use a hoop attached to the table or a hoop on a leg. For large products, rectangular-shaped devices are suitable, where the entire image is placed. |
| Floss or other strong threads (for example, silk or nylon) | When choosing threads by size and color, you should focus on the size of the hole in the bead and the eye of the needle, the embroidery method, the fabric and the embroidery pattern. The thread will become stronger if it is treated with wax. To work with beads, it is best to use thin threads made from synthetic materials. |
| Rhinestones, sequins, sparkles, stones, glass beads, beads | When starting the sewing process, it is recommended to check the quality of the beads: whether the paint and mother-of-pearl on the beads will remain in their original form when washing or steaming the finished product. |
| Graph paper | Necessary for applying complex designs. |
| Pliers | To remove unnecessary beads in a row of an embroidered image. |
Types of seams
Bead embroidery can be done using several types of stitches. Before you start working on a large scale, you need to study them. This will allow you to avoid common mistakes: strong wire tension, weak wire tension and skew.
Monastic
Refers to the main method of attaching beads to fabric. These steps are similar to those taken when doing half-cross stitch.
The stitches on the front side of the work are inclined, and on the back side they are vertical. In this case, the needle is taken to the front side of the lower left or lower right corner (as it is convenient for you), string a bead onto it and insert it into the wrong side in the opposite upper corner. Then continue to embroider in the same way.
stalked
This seam allows you to firmly attach the bead to the fabric. After securing the thread, it is brought to the main side and a bead is put on. Afterwards, the needle and thread are transferred to the front side behind the sewn bead and, having pulled the thread through it, the next one is put on. The needle is brought out onto the face from the inside out between the beads. Then continue to sew according to the same pattern.
Arched
A needle and thread are threaded up from behind, several beads are put on it, then we pierce the fabric near the last bead and bring it back in front of it. Then we thread the thread through the hole of the beads and put new ones on the thread and fasten them again.
From the picture below you can see that this seam is elastic.
Lowercase
Here the beads are attached in a circular pattern (this is clearly visible in the diagram). The principle is that after securing the thread, it is on the front side at the desired point. Beads are attached to it, and then the fabric is pierced exactly in front of the bead. He returns after a short distance and the beads are strung again.
The seam is fastened
This seam creates a line in any picture, step by step it looks like this:
- Fasten the thread and bring it to the front side and string several beads.
- They place it around the office and begin to sew it on.
- They fasten from the inside out, leading behind the bead and clasping the thread on which it is attached and returning back.
- Continue working until each one is recorded.
Cretan stitch
We bring the needle out in the middle, string one bead and make a loop, passing the working thread under the needle. Then we bring the needle out at the top point and repeat the same steps.
Loop attached and with added beads
To make a double-sided seam, a thread (thread on which beads are strung) is placed on the front side of the fabric along the contour of the pattern. During the fastening process, beads are also strung on each stitch on the other side of the fabric.
For additional strengthening, the thread can be pulled through the beads at the end of the row.
Feather seam
We proceed according to the figure below.
Herringbone
The implementation is clearly visible in the diagram below.
Double-sided stitch forward needle
The stitch is almost identical to the “forward needle” stitch, only the stitch on the wrong side is longer, and it also has a bead threaded on it.
Stitch back with a needle
Let's look at it step by step:
- Secure and remove the threads from the front side. Place the beads on the needle.
- Slide the beads along the thread onto the fabric. Run the needle along the wrong side of one side of the bead.
- Tighten the thread. Bring the needle to the front side of the other side of the bead.
- Run the needle over the beads.
- Tighten the thread. Pass the needle along the wrong side behind the bead.
- Tighten and secure the thread.
Combined seam
It is also called “Double-sided stem-line stitch”. As the name suggests, it is achieved by a combination of a stitch and a stem stitch. The embroidery is tough.
Step-by-step guide to bead embroidery
Now you are ready to get started. Follow our recommendations and excellent results will not keep you waiting. Here's what you need for this:
Preparation
Before you start working, you need to choose a pattern or ornament that you will embroider, and also prepare everything you need for this (the necessary beads and all the materials for the work). Once you have found the beads, the desired pattern and its pattern, cut off as much canvas as you need and sort the beads according to the colors required.
For a beginner, as in the case of cross stitch, ready-made kits with diagrams and all the necessary materials are best suited.
Processing the edges of the canvas
To ensure that the edges of the canvas do not crumble and look neat, it must be processed. There are several ways to process canvas. Some needlewomen prefer to finish the edges of the fabric manually using an overcast stitch. But there is a simpler and faster method - processing the edge of the canvas using PVA glue, an adhesive stick or transparent nail polish.
To avoid pulling the fabric, we use a hoop
They come in plastic and wood. If you want to buy a wooden hoop, make sure that the wood is properly processed. Any minor roughness and surface deformation can lead to damage to the fabric and possibly the embroidery itself. For larger projects, it is better to buy rectangular tapestry hoops.
Video: preparing a workplace and accessories for bead embroidery:
Choosing a bead embroidery technique:
Monastic seam . It is used for embroidering paintings, icons, small images on handkerchiefs and clothes. It will not be difficult to implement even for beginners: you should start from the upper right corner, where you thread a thread and a needle, then string a bead and secure it, “sending” the needle to the lower left corner. Do the next stitch in exactly the same way. If you implement this technique correctly, all your stitches will be placed diagonally. The monastery stitch essentially repeats the half-cross technique, with the only difference - here you also use beads.
All rows are embroidered in the same way, only the direction of movement of the needle changes - the first row is done from top to bottom, the second from bottom to top, and so on. It is important to ensure that all the beads lie in the same direction.
Monastic stitch embroidery
The monastery stitch is the best way to start learning to embroider with beads.
Video: how to embroider with beads (monastery stitch):
Line stitch: secure the bead horizontally. You need to thread the needle and thread in the middle of the “cage” on the right, then fasten the bead and “send” it to the left. This technique is an exact copy of the “back needle” variation, which we know from labor lessons. Using this stitch, you can determine the distance between the beads yourself.
Embroidery with a lower stitch (back stitch)
If the beads are not well secured to the fabric, simply create another line using a backstitch.
Stem seam: it is used to securely fix the beads to the canvas. This type of technique is implemented on the same principle as the line stitch, but with minimal differences. The needle is threaded from the left, a bead is threaded, then the needle is threaded through the opposite corner. After this, return the needle to its original position and thread the thread through the eye of the bead again.
Embroidery with stem stitch
With this stitch you will achieve a denser pattern, since the punctures are made as close as possible to the previous bead.
Recommendations for beginners
Before you begin your own experiments, be sure to read the tips below. They will help you take the first steps correctly:
- To begin with, it is better not to use cotton thread, as it may break.
- To make the embroidery stronger, you can fold the thread in half.
- Use thin needles.
- Remember to line the fabric from the inside out to prevent the fabric from sagging.
- Pull the thread evenly.
- Choose the desired thread color that matches the color of the beads.
These simple rules and good material will make your work easier.
Completion and registration of work
Bead embroidery for beginners (even people without creative inclinations can do it step by step) is not limited to an embroidered image.
The finished work should be washed in warm water (not higher than 40°) and ironed if necessary.
It is better not to use washing powder so that undissolved crystals do not scratch the surface of the beads. A liquid product is suitable for such purposes. You need to dry the embroidery in a room away from sunlight, laying it out on a soft towel.
Properly executed embroidery includes not only a beautiful image, but also its proper placement in a frame. Recently, it has been fashionable to decorate paintings using the “passepartout” method. But with this method, embroidery defects are clearly noticeable.
Passepartout should focus on the beneficial aspects of the work. When choosing colors, it is recommended not to use similar shades. Often they merge with each other. It is advised to take opposite tones. It is better to give the work of tensioning to a specialist in a framing workshop. This way she will look more neat and attractive.
Simple patterns for embroidery with beads
In any business, you need to increase the complexity gradually. This also applies to bead embroidery. The first step is to sew a simple and small picture. With a small number of colors and a smooth transition between them. Most often, such schemes are created for children, but in a sense, you are now akin to a child - you are taking your first steps in a new area.
Don't be shy or ashamed of your first works. No one will see them except you, and over time you will look at your first attempts at embroidering with a smile.
Many schemes can be found in VKontakte groups, look through the albums. For example, https://vk.com/album-88069967_211948789. All you have to do is transfer the photo onto the canvas, and you can embroider.
For children
There are special kits for children's embroidery. They are distinguished by easy, colorful patterns and step-by-step instructions with a selection of the necessary seams.
A pattern such as a ladybug is often chosen. Start embroidering also from the top row, gradually moving down. It is better to choose a drawing with large details, which will simplify learning.
For adults
Start with small items or with paintings that combine print and embroidery. A monastery stitch is suitable for the job. In some patterns, bead embroidery is combined with other embroidery techniques: for example, when an outline or fragment is embroidered with floss threads.
Monastic
The main seam is called the “monastic” seam. It is not replaceable when filling a large area,
- For example, when making paintings embroidered with beads.
- For beginners, it will be more convenient to start learning with this option.
- The work begins from the upper left point, where the thread and needle are threaded.
- The bead is picked up and secured.
- To do this, the needle is moved to the lower left point.
- All subsequent stitches are done in the same way.
- If done correctly, the stitches will be placed diagonally.
Embroidering flowers with beads
Decide on the seam and pattern. And attach the beads in accordance with the picture. It is advisable to start with small and simple flower images, where only a few contrasting colors are used. Such flowers turn out neat, the image does not actually “float”. Due to the different sizes of beads, distortions may appear in a large image.
For example, you can start with cornflower. The cornflower pattern is simple and does not require much time to work. It is also better to immediately embroider this flower on the finished product.
Stem
The stem stitch is used to firmly fix the beads to the fabric. Technically, its execution is similar to the line stitch, but with minor differences.
- The needle and thread are threaded into the fabric on the left, the bead is picked up and the needle goes down through the opposite corner.
- After which, the needle and thread returns to the original one, and the bead is stitched again. In this way, a compaction of the pattern is achieved.
- Each of these seams can be used both for making paintings and for creating costume jewelry.
- Embroidering a brooch, pendant or bracelet with beads is not a difficult task.
- You can decorate a child's dress with beaded flowers, or the collar of a denim jacket with a simple ornament.
- Make an original gift with your own hands. For example, embroider a cute pincushion with beads.
The main thing is to approach the work with imagination and patience. Then the result will exceed everything, even the wildest expectations.
How to embroider a thing
The technique is no different: we choose a seam, a pattern, and the desired material. We transfer the selected pattern onto the fabric with a special marker or chalk and get to work. Tops and T-shirts are usually made from knitted fabric, so heavy, voluminous patterns won't work.
You can embroider patterns from beads.
Embroidery on a dress allows you to show maximum imagination. Bead embroidery is very common on jeans, since the dense material allows you to use a wide variety of beads and beads.
How to frame
The finished bead embroidery must be framed. First, rinse the work in warm soapy water, without squeezing, and dry it horizontally on a towel. Then it is advisable to iron it from the wrong side with a warm iron. The prepared embroidery is stretched onto a stretcher and then inserted into the frame. It is better if it is without glass, as it gives off strong glare. When placing your work in a glass frame, you will need to make a special layer that will not allow the beads to press against the glass. A beaded picture can be professionally decorated by contacting a trusted framing workshop.
Creating jewelry with beaded embroidery
When creating jewelry, it is important to choose the canvas and fabric. Creation occurs in several stages:
- We embroider the drawing.
- Let's cut it out.
- Cut out the required size circle from cardboard.
- We sew the embroidery in a circle.
- We stretch it onto the cardboard.
- We sew the embroidery from the inside out.
- We can attach decorations to the base.
Most often, bracelets are made from beads.
How to embroider a picture with beads step by step
It is easy to embroider with beads when the front of the work is prepared in advance. It is worth spending time on preparation, because it will be gained during the embroidery process.
Step by step process:
- We select beads of the desired colors and scatter them into boxes or organizer cells.
- We mark the outline if there are no markings on it.
- Thread the canvas into the hoop.
- We place the drawing on the stand in front of us, next to it we place a marker and a saucer for individual beads.
- We thread the needle.
- We insert the needle from the inside into the canvas at the level of the first row to be embroidered.
- We string the first bead onto it and sew it on like a button, with 3-4 turns to secure the thread.
- Using a needle, we collect several beads of the colors that are included in the current row, and pour them into piles on a saucer.
- We embroider with beads using the “monastery stitch” technique discussed above.
- If a row is completed and the thread remains, it is advisable to go the next row in the opposite direction so as not to break the thread. For some, it is more convenient to turn the work upside down, while others can do it without turning it over, demonstrating miracles of dexterity in handling a needle.
- When the thread runs out, it should be secured. Firstly, it is convenient to pass it through one bead several times. Secondly, it’s a good idea to arm yourself with a thread threader and pull the tail of the thread through several already sewn beads. Since the tail of the thread will lie in a zigzag, it will not have a tendency to jump back.
If a beaded pattern is embroidered on clothing, then the sequence will be as follows:
- we do the preparatory steps described above, with the exception of stretching the canvas;
- We attach a removable canvas to the clothes;
- We put the garment with canvas into the hoop and begin work;
- At the end of the embroidery, the canvas is evaporated along individual threads.
A removable canvas appeared, soluble in water. Since only waterproof beads are used for clothing, the product must be washed and the canvas will disappear.
Beginner mistakes
Many beginners make a number of mistakes, which as a result reduce the pleasure of work. Let's take a closer look at them.
- Trying to start a project that is too complex.
- The thread is too long.
- Thread splitting (this happens when you pass a beading needle through the thread of a finished stitch).
- Using bad materials.
- Distortion of the scheme.
- Incorrect bead size.
- Using different seams on one pattern.
- Uneven rows.
- The sewing is too tight or loose.
- Wrong thread choice.
Having analyzed these errors, you can easily avoid shortcomings.
Mistakes and how to avoid them
In addition to information about how to embroider with beads, needlewomen are also interested in the question of what mistakes can be made. And how to deal with them. Here are some of them:
- “Herringbone” - the inclination of the beads changes from row to row. Such work “bumps”, forms uneven edges and looks untidy.
- Uneven rows. If the needle catches and splits the canvas, the integrity of the row is broken, some of the beads “move” up or down. In addition, it is necessary to monitor the thread tension - it should be the same for the entire work. Check the rows by folding the embroidery in half and checking the fold.
- Tight sewing. This problem occurs even among experienced embroiderers, but it does not appear immediately. In order to avoid this mistake, when embroidering you need to monitor the thread tension. There is no need to drag out the work too much. You can identify the defect by turning the canvas inside out. If the thread tension is too strong, the holes on the stitched row will be noticeably larger than the untouched ones.
Video lessons for beginners
On the Internet you can find videos that teach beginners the art of bead embroidery. With the help of them you can disassemble and choose a comfortable seam for yourself. Here are some similar options:
There are also special channels run by masters of their craft. Find your mentor and move on to creating the perfect painting.
We've covered the main points that will allow you to tackle your project with ease. It requires effort, a desire to develop and boundless imagination.
Brooch "apple" with stones
Using the template, cut out two silhouettes of fruit from felt. Make another one like this from faux leather (for the reverse side). Glue several large rhinestones, “stones,” to a felt apple. Additionally secure with threads. Fill the remaining space with beads of different sizes. Finish the edges of the fruit with ribbon. Fill the “leaf” with beads of several shades.
On the wrong side, fix the second felt silhouette. Use a glue gun to attach the clasp. Place a leatherette “apple” on top and process the edges by hand.
History of crochet embroidery
This type of embroidery first appeared in France. Then it was used to create imitation lace. Subsequently, it became widespread and popular throughout the world. Today, this is a very fashionable trend and is used for embroidering jewelry and clothing by many fashion houses.
This embroidery technique is very painstaking, takes a lot of time, requires diligence and perseverance, as well as large costs for material resources, therefore it is highly valued.
In France, there is even a special school where they teach beginning craftswomen the intricacies of the technique and help them gain sufficient experience.
Fashion shows feature luxurious evening dresses and wedding dresses hand-embroidered using the Luneville embroidery technique. These works are distinguished by their special chic and high cost. The more complex and unique the pattern, born from the imagination of the master, the higher the cost of the item embroidered by him.
Working in the Luneville embroidery technique is complex and requires a lot of time and patience. But we hope that enough reasons have been given in favor of this technique to make you want to master it. If not to make it your profession, but at least to create exclusive things for yourself and your loved ones, no worse than those of the most famous fashion designers.
What is Luneville embroidery
Luneville embroidery is an embroidery technique originating from Paris. When working, sequins, bright threads or gold beads are mainly used, using a Luneville hook.
An embroidery hook is quite different from a classic crochet hook, and consists of two parts:
- screw handle;
- needle in the form of a hook.
This needle has a non-standard tip size, which is a little sharp compared to a crochet hook. It must be emphasized that translucent or not very dense materials are used for work; the size of the needle depends on the density of the fabric.
Various hook needles
Attention! There is a special pointer on the screw handle that helps the craftswoman find the correct grip, thread management, finding the tongue slot, etc. This type of embroidery is mainly done using a chain stitch.
Visually it looks like it is connected by a row of stitches
This type of embroidery is mainly done using a chain stitch. Visually, it looks like it is connected to each other by a row of stitches.
The Luneville embroidery technique is used on a variety of materials. A lace pattern on transparent silk or cambric fabric using a chain stitch looks very beautiful.
On denser materials (velvet, corduroy) the bead pattern looks great. Embroidery is usually done with two hands; the stitches should be comfortable and easy to perform. For practical work, special frames are used to fix the canvas.
In this way you can perfectly decorate some element of your wardrobe or create a picture that can be hung in the living room. Quite often you can find ready-made paintings with such embroidery in stores, this indicates its wild popularity, not only in Russia, but also abroad.
Scheme for making a butterfly with flowers
Schemes and patterns
There are various pattern options for beginners and experienced craftswomen. Most often, Eastern and Slavic themes are used in the designs. Simple patterns include:
Festoon with pattern
- Leaf and rose - the base is made with large beads, and the middle is filled with small beads.
- Festoon with a pattern - this option is great for evening and wedding dresses. This is a flower arrangement made of glass beads. Non-woven fabric is not required to transfer the pattern.
- The star spiral is a pattern suitable for a formal dress or full skirt.
Most often, bead embroidery patterns on clothes are found in the form of geometric shapes or floral motifs.
star spiral
Secrets of needlework
Each experienced needlewoman has her own secrets in her work, which are also relevant for beginners.
How to work on fabric without a pattern, without a drawing
Embroidering without a pattern implies that the needlewoman has experience.
To facilitate the work process, the image can be applied to the fabric using a copy sheet, or the design can be marked in the form of squares.
The corners of each element are located in squares.
If there is no pattern printed on the fabric, it is convenient to use canvas. On velvet or synthetics, the design is applied from the reverse side.
Features of embroidery on satin, felt, black canvas
Satin is a smooth, dense fabric. It is difficult to embroider on it; only experienced craftswomen are recommended to work with this material. For embroidering on satin, it is better to use nylon or cotton threads.
You should not use wax to treat the thread, as it can stain the fabric. When fastening the thread, avoid rough knots. Having made a small knot, it is better to secure it with a backstitch so that it does not “run away” to the front side than to make a large, rough knot.
Modeled felt is a type of felt. This is a soft but quite dense fabric. When embroidering on felt, it is recommended to use certain stitches: “stalk” and “forward with a needle.”
Embroidering on black canvas requires good lighting, ideally daylight. If electric lighting is used, the lamp should be located under the product. You can use special light tablets.
The black outline must be marked. Special markers are designed for this, but tailor's chalk will also work. You can mark the canvas by stitching it with white thread.
Attention! Some needlewomen rub chalk on a small area of the canvas before embroidering, which makes the black fabric lighter and makes the work easier.
When choosing beads and threads, it is important to pay attention to brighter shades, since any color looks muted against a black background
When choosing beads and threads, it is important to pay attention to brighter shades, since any color looks muted against a black background
Where to begin
When choosing beads, you should take into account that the leader in the quality of beads is Japan, followed by the Czech Republic and Taiwan. You need to remember the numbering of the beads: the larger the number, the smaller the bead. There are 18 numbers in total, the 11th is considered the most optimal for needlework.
Types of beads by shape:
- Beads are round-shaped beads, their width is approximately equal to their diameter. Calibrated beads are beads of the highest quality, the beads in them are identical, one to one;
- Bugles – chopped glass tubes from 3 to 25 mm long;
- Cutting (chopped beads) is the same as glass beads, but the length of the tubes is shorter, about 2 mm.
Bugles and beads sparkle brightly in the light, but have one drawback: they have sharp edges that can cut the thread, so it is better to alternate them with simple beads.
The colors of the thread and clothing must match. Sometimes, to achieve the desired shade of the embroidered design, a backing for beads is used. The needles are chosen to be thin so that they can easily fit into the holes of the beads.
How to use the scheme
There are several types of embroidery, which are used by experienced and not so skilled craftsmen:
- diagram on a sheet of paper or in electronic form;
- design embroidered on linen.
Beads at fashion shows
The first option is used by professionals who can accurately calculate all the nuances and not miss the right cell. This pattern is used for embroidery on canvas. If it is in electronic form, it is transferred to a regular sheet, preferably in a box, like the canvas itself. Next, according to this scheme, they calculate how many cells are needed for which part of the design, and so they embroider. It's convenient and practical.
Embroidery process
But there are also people who use such a scheme for ordinary canvas. It’s more difficult, but those who have already gotten their hands on it don’t complain.
The second type of pattern is popular among beginners and lovers of bead embroidery. They immediately buy fabric for embroidery, which has a design with marked places for beads. They are usually sold in craft kits. They are accompanied by instructions with a detailed description of which technique is best to use for drawing. As well as step-by-step instructions for the technique itself.
Pop art with beaded embroidery