Quilling for beginners, a paper rolling training master class, what equipment is needed - you will learn about all this today from our section. So, quilling is a modern art form using thin strips of paper formed into small patterns or large patterns. The technique is accessible to everyone, and the process captivates both adults and children.
Before you get acquainted with the technique and main elements in the quilling style, thoroughly study what is needed for this.
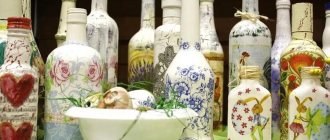
Paper strips
The main part of the work is the selection of high-quality material - paper. There are a large number of manufacturers, with a lot of colors and shades. Their main difference is the width of the stripes (they range from 2 mm to 1 cm) and the density of the sheet.
For convenience, beginners are recommended to purchase a special set for this type of needlework and use a medium size of strips. It includes a basic kit with all the materials and diagrams for making various structures.
You should know that the production of high-quality figures is influenced by the thickness of the paper; it depends on:
- how ductile it will behave when bent and twisted;
- whether deformation of the made elements will occur;
- During the process of twisting products, delamination of the product may occur.
Cardboard density is characterized by weight in grams per square meter of paper material. For example, a suitable option for work is a material whose density is from 120 grams per square meter to 140. All other numbering has some disadvantages in operation.
Also, training can take place with individually cut paper tapes from 20 cm to 50 cm in length, using colored double-sided paper. Of course, you can make the cuts yourself if you spend enough time, or you can use a special machine.
What is quilling?
Translated from English it means “bird feather”. Historians claim that from the beginning of the 14th century, European monks trimmed the gilded edges of books and wound them with a pen, which they used to write strips of paper, hence the name. There are only two directions of this art in the world.
Europeans are laconic in their work and use a minimum of details for their crafts, while Japanese masters create complex and technical paintings, sometimes the number of parts can reach several hundred.
Therefore, it is wrong to say that quilling is fun for children. On the contrary, it is a complex art, like origami, that requires painstaking work and practice. But even a beginner can do something simple and extravagant.
Required Tools
- Slicing machine
Preparation of sheets for needlework is carried out using a special machine - a trimmer; it cuts even strips quickly and evenly. Devices can be of several types, with manual or mechanical activation of the process.
The trimmer allows you to perform curly trimming of edges while simultaneously performing even cutting along the length.
- Rolling fork
This tool is designed to create tight and loose spirals, which are the main element of most designs. It looks like an awl, and modern models have a forked tip and a comfortable handle. The edge of the strip is placed in the fork, fixed with your fingers and wound into a tight roll. When using such a tool, the figures are smooth with a small center.
You can make your own version of a hook using a needle with a cut off eye, fixed in a cork stopper or an old ballpoint pen.
- Adhesive base
Properly selected glue guarantees high-quality and reliable fixation of all components of the craft, so its abilities are especially important. Many stationery liquids with an adhesive base, including PVA, are suitable for paper crafts, but not all are easy to use.
Key indicators of high-quality glue:
quick-drying, thick and dense, dispenser with a small nozzle (1-2 mm)
You can select the most suitable sample through experimentation. Experienced craftsmen recommend using colorless Moment glue; it dries quickly and efficiently fulfills its intended purpose without harming the base.
- Stencil
The quilling ruler has a cork base for convenient fixation of figures with pins, with an attached scale and cells of various widths. Such templates allow you to give the rolls the required shape, taking into account the different diameters of the product.
If purchasing a tool is not possible, then it is permissible to use available materials, for example, for a round shape, a set of mathematical rulers with a figured design, fixed on a surface with a soft structure, is suitable.
- Cork mat
An indispensable thing in the art of quilling. It has a durable structure that can restore its shape and not break for a long time, it is easy to care for and is not harmful to health. This backing is used in conjunction with pins or a ruler.
Let's start with the basics
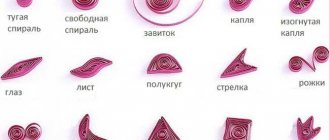
As in the art of folding paper, there are basic types of figures that serve as a kind of base, we cannot do without it. Any instructions for creating quilling crafts will be based specifically on them, so we need to learn how to execute them accurately.
Additional handy items
| 1. It will also be useful to use a regular wooden skewer or toothpick. They are used to apply glue to paper to hold small parts together. |
| 2. Tweezers are needed to accurately glue a curl element or a separate component. The best option is to choose tweezers with sharp ends. It is not always possible to correctly grab the roll with your fingers and carefully place it on the base of the design. |
| 3. A utility knife is used to cut paper or cardboard. |
| 4. Scissors with pointed ends are needed to create fringe on paper. There are a lot of crafts where fringe is simply irreplaceable and extremely necessary. |
| 5. A pencil and a ruler are also assistants in quilling creativity. |
| 6. A comb for twisting strips, from which it is possible to make amazing evenly shaped petals and leaves using a certain technique. It is a pleasure to practice quilling with a comb. |
| 7. Safety pins are used as fastening strips on the surface to create the desired shapes. |
| 8. A mock-up cardboard mat for crafts with marked stripes will also come in handy in the future for needlework. |
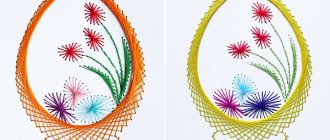
Paintings
Paintings made using the quilling technique are a fun activity that is suitable for people of any age and skill level. The plot of such paintings can be devoted to various topics. With children you can make a painting “Goldfish”
Materials:
- A4 sheet of blue cardboard;
- blue and blue elements in the form of a curved eye;
- yellow semicircles and drops;
- orange, red, green curved petals and tight spirals.
Progress:
Composing pictures using the traditional quilling technique is reminiscent of making a mosaic.
- The entire surface of the cardboard sheet is filled with curved blue and blue petals. The elements are distributed as close to each other as possible. The prepared base is left to dry.
- On a separate sheet draw a sketch of a goldfish with a crown on its head. It is placed on a working cork surface and, using pins, a figure is formed from yellow, red and orange elements. The head is made from a large diameter free roll, slightly sharpening it on one side.
- Having composed the figure, all its elements are carefully glued together.
- Algae threads are formed from green parts.
- Individual elements of the composition are fixed on a blue background.
Essential elements
So, quilling is a modern type of hobby that dates back to the end of the 14th century. It consists of twisting paper into tight rolls, with the ability to unravel it to the desired volume, and so on. For reliability, all ends are glued, and the product itself is fixed with a spot application of glue. The figures are created during the work process based on the master’s ideas.
In order to make your own greeting card, photo frame, create a delicate, unique painting or some image from paper spirals, you need to become thoroughly familiar with the basic elements of quilling. It will take you a lot of time to complete the first job; it will take about an hour to make all the rolls, but an experienced master will take about 20 minutes.
Volumetric flower
Take ten white stripes and form them into either droplets or petals, then start gluing, first two opposite each other, and then the rest. If there is room left, make one more petal or two. Place them with sharp edges towards the center. Leave no space in the core.
Next, take a yellow ribbon one centimeter wide, cut one of its edges, creating a fringe and begin to make a spiral. When it is ready, glue it to the center.
A stem is made from green paper and set aside for now. Both ends should be sharp, and it should be tightly twisted. For strength, you can insert a wire into the center. Next, make a spiral out of the green strip and insert a stem soaked in glue into it, allowing it to dry for some time.
Glue the chamomile to the base of the stem and your craft is ready.
"Free Spiral"
The next workpiece is wound using a similar method, but after removing it from the tool, let it unwind. Only after the required diameter we glue the end of the strip.
All further elements are created on the basis of such loosely twisted ovals.
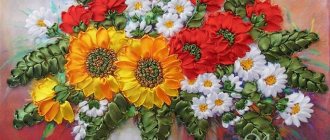
Sunflower
Quilling crafts for beginners were listed above, but this figure belongs to the category of medium complexity, but once you have mastered the basic principles of working with tools and paper, you should be able to do it.
Take the yellow strips and form them into fluffy spirals, with a stripe pitch of one to two millimeters, and squeeze one of the ends to form a drop.
Take a sharp object, such as a needle, and move the center to the sharp end, fixing it in this position with glue.
Next, take the second petal and glue them together on the side at the sharp end and press them together again with your fingers. Make 20 similar petals and increase their number if necessary.
Cut out a circle ten centimeters in diameter from green paper, use a compass to form another one in it, but with a radius of two and a half centimeters.
Start gluing the petals, the blunt ones to the area of the drawn circle, and the sharp ones outward.
Take the green strip and glue two more to it, you should have a long ribbon. Start winding, making a spiral. Insert a wire into its center, bend it so that it does not fall out, turn the flower over and glue it to the green circle.
Follow the step by step instructions and use glue to place the second row of yellow petals. They should be located at the junction of the first row; your core will still be empty.
Form strongly fluffy petals from wide stripes of three millimeters of green color. They should be glued underneath the yellow ones, attaching them to the base of the round stem. Once ready, let the structure dry a little and form a stem from green paper, pasting over the wire.
To make the core, you will need either a long strip of several brown ribbons, or many tightly twisted spirals inserted into the center - your work is ready.
Element "Eye"
We compress the free spiral from both sides at the edges, and we get a blank that looks like a flower petal.
"Crescent"
This look is made by bending the oval to one side, tightly squeezing the ends. You can also use a pencil by grasping it for convenience.
"Heart"
We clamp the oval on one side and lightly press it onto the element on the other. Thus, the shape of the heart is formed.
"Triangle"
To form a triangular shape from the circle, repeat the same process as with the heart, but press all sides with straight fingers.
"Rhombus"
We remember how the eye was prepared. We repeat this technique of clamping a free spiral, but in this case we need to strongly squeeze both edges and form a diamond.
"Square"
To do this, you need to strongly compress the twisted roll on all four sides at the same time.
"Semicircle"
This combination does not require pressing force from all sides. You just need to gently press one part with your fingers, and leave the second semicircular.
"Bell"
It's very easy to turn a semicircle into a bell. Take the sharp ends of the product with your fingers and squeeze so that the edges are sharp and slightly apart.
"Five-pointed star"
This look is easy to achieve. In a circle around the free roll, squeeze the cracks tightly in five places, try to do this at the same distance.
Having learned to freely form the basic elements, you yourself will be able to spontaneously come up with different extraordinary figures. It is very entertaining and so captivating that you will not be left without imagination.
Scrolls can also become auxiliary decorations in creative works.
"S-scroll"
A long paper strip needs to be twisted tightly to its middle, and then a similar twist is made at the other end of the strip, but in the opposite direction. It is not necessary to glue it anywhere; it is preserved in this way. A wonderful device in the form of patterns of flower arrangements.
"V-scroll"
This element looks like the antennae of an insect or the letter “V”. Bend the strip in half and twist the ends on both sides outward to the middle of the fold.
Scroll “HEART”
We make the heart similarly to the previous scroll, but the difference is that the stripes are twisted on both sides into the product.
"CURL"
Its execution is very simple in operation. You need to tightly screw the roll onto the rod, but not to the end of the tape, and then it will unwind on its own. It looks like a number.
Scroll "TENG"
Here the paper strip is folded in a ratio of 1:2. Then use a fork tool to make curls in one direction. The name speaks for itself as to where it should be attached.
Postcards
Quilling cards for beginners consist of simple elements that are assembled into elementary patterns.
Valentine's Day card
Quilling (for beginners, it’s easier to do the details correctly step by step with a photo) made in the form of a Valentine’s card will be an original gift for a loved one.
Materials:
- a sheet of thick white paper, size A 4;
- 20-30 red loose spirals with a diameter of 10 mm;
- 15 light pink and dark pink stripes 1.5*30 cm;
- the same number of strips 0.5*30 cm.
Progress:
- A sheet of paper is folded in half along the long side.
- Draw a silhouette of a heart with a pencil, placing its upper points on the fold line.
- Using curly scissors with wavy blades, cut out the workpiece.
- Stepping back 5 mm from the edge of the figure, lay out a frame of free spirals.
- Wide strips are cut into fine fringes 10 mm high.
- Two-color ribbons are glued together, consisting of a wide fringe and a narrow ribbon.
- Using a tool, roll up a tight roll, starting with a narrow strip.
Without removing it from the device, the end of the fringe is secured. In a similar way, 30 multi-colored small flowers are formed. - The resulting flowers are glued in random order inside the frame, filling the entire space.
New Year card
The traditional quilling technique is ideal for creating New Year's decor and decorating greeting cards.
To create a simple New Year's card you will need the following materials:
- a sheet of cardboard white or any pastel color;
- 15 green elements in the form of a drop;
- 5 brown drops;
- 10 pearl beads;
- stars made of shiny cardboard.
Progress:
- On a sheet of paper, draw a sketch of a triangular Christmas tree with a rectangular trunk.
- The sketch is placed on a cork board and a Christmas tree shape is formed. Its Bottom row consists of five drops, located with the sharp part up. Each subsequent row is reduced by one piece.
- The barrel consists of two rows of elements. I attach one brown drop to the middle part of the lower tier of the crown on both sides. 3 similar parts are placed in the next row. All elements are glued together and the figure is allowed to dry.
- A sheet of cardboard is folded in half. A Christmas tree shape is glued to the center of the front side.
- The crown of the tree is decorated with beads, and a shiny cardboard star is glued to the top.
- Several of the same stars are placed on the surface of the postcard.
Quilling schemes
The diagram is needed so that any type of drawing can be drawn from it. It is especially useful for beginners to navigate using ready-made templates. Then, having learned this amazing craft, you can create your own blanks and implement the idea of composition. There are various schemes for placing rolls. They can be taken from all kinds of magazines, coloring books, and also printed on a computer. Thanks to this, amazing postcards and paintings are created that you will want to give to someone or decorate your home with them.
Chrysanthemum tree
Instead of searching the Internet for information on how to make quilling crafts, think about whether it is possible to implement something else from existing forms. For example, you can get a tree from an ordinary chrysanthemum, but if you use a napkin rather than paper as a basis, the result will be even more interesting.
Find an old napkin, it is better if there are several color options. Cut it into narrow strips three millimeters wide and make a fringe, the more magnificent it is, the better in the end.
Start twisting a loose spiral - the chrysanthemum is ready.
Make nine more flowers and start gluing them to the leaf. Four at the base, the next row three and so on until one. Decorate the craft with a stem of any color, beads, snow made of small white curls - you have a tree.
A type of paper rolling technique
Quilling is divided into such subgroups as:
- Classical
- Looped
- Contour
- Beehive
The classic or simple look is a basic paper rolling technique.
The loop method is based on the production of paper loops. Most often, such forms are used to create leaves and flower petals. But they are also made using improvised means - a comb (comb) or safety pins. Thanks to this, the variety is so wide that leaves are not the limit in quilling creativity. You can make butterflies, all sorts of other insects, little animals, and so on.
You can study the contour style in detail on our website by clicking on the link - Contour quilling. He presents a very interesting and unusual technique. With its help, they make unique compositions on any topic. To understand the process of action, it is best to start with simple images in black and white. Here, a drawing diagram and a blank sheet of paper are used, onto which the outline of the sample is transferred using a non-sharp object. Subsequently, invisible lines are drawn with paper strips with the edge towards the base.
The idea of the Beehive technique, authored by Indonesian needlewoman Susan, consists of openwork curls. They are made from continuous paper strips, glued together and twisted in a wave-like manner. They are placed in contour compositions, filling empty spaces of different scales. These can be wave patterns in crafts, flower buds, trees, cartoon characters, birds and much more.
Now, dear craftswomen, having mastered the basics of quilling - most of it, you will be able to create from simple to complex compositions. We wish you tireless inspiration and great success in this!
Master classes for schoolchildren
The master class is designed for children of primary school age, as well as for those who will soon go to first grade. In quilling patterns for children 6-7 years old, ordinary materials are used, only colored paper needs to be taken in two colors. Orange and green are ideal. The most critical stage is the production of modules. Sequencing:
- Cut strips of paper are rolled into tight coils.
- The ends are fixed well with glue so that the strips do not unravel.
- When the elements are dry, take the coil and press the central part with a toothpick. The result should be a cone.
The child can make such blanks himself, and the adult will have to control that they are all the same height.
Now a three-dimensional figure in the form of a sphere is glued from the cones. You need to leave a hole in it where the stem will be threaded. Take a thick straw and cover it with green paper in a spiral shape so that there are no empty spaces. Now cut out a strip of green paper 5 cm wide and make slits on one side to make a narrow fringe. This strip is also pasted around the stem in a spiral. The edge of the stem is inserted into the hole and fixed with PVA glue.
Four-color butterfly
For this craft you will need paper of 4 colors: 1 for the body and head and 3 for the wings. The lower pair of wings are simple leaves, the upper ones are elongated. These are the basic elements of a butterfly.
In a simpler version, the wings are droplets with rounded ends. The body is an eye. The head is a circle, the antennae are 2 stripes, twisted on one side. The body can also be made from a wide strip of colored paper rolled into a thin tube. The size depends on the expected height of the abdomen. Step-by-step diagram for making a butterfly:
- Cut out 3 strips of paper of different lengths, and they should also differ in color.
- Glue starting from short to long.
- Twist, placing a short strip inside.
- The free end remaining on the outside is fixed with glue.
- The resulting circles are inserted into a quilling board.
- Unwind, then press the center of the circle on one side with needles.
- These places are glued.
- The remaining 3 wings are made in the same way.
- The body is made using already familiar technology.
- Assemble the butterfly by gluing all the elements.
- Glue on the head and antennae.
Tips for Beginners
Quilling for beginners (patterns can be contoured or colored) will be a pleasant and interesting activity if you know a few secrets:
- It is more convenient to place small parts on the substrate using tweezers.
- Finished products can be tinted with dry pastels and paints. This is how experienced craftsmen achieve soft transitions from one color to another, and also give the products visual volume.
- To store paintings and panels you need deep frames with glass. They will help protect the craft from dust and sudden temperature changes (for example, if the painting is planned to be given as a gift and taken out of the house for a while).
- When working in contour technique, it is better to give preference to thick paper or double-sided cardboard. Thin materials can be deformed by the glue, and it is also more difficult to fix such paper on cardboard.
- When printing black and white diagrams for work, you need to lower the brightness of the document so that the lines remain barely visible.
- You can purchase ready-made quilling kits in craft stores. They include all the necessary tools, as well as a template ruler on which you can make parts of different shapes.
- From colored corrugated cardboard you can create large, three-dimensional figures, for example, interior figurines.
- Jewelry, keychains and voluminous crafts must be varnished. Without coating, products will quickly lose their shape and fade.
- To preserve the bright colors of paintings and panels, they must be protected from prolonged exposure to ultraviolet rays.
- Products created for interior decoration must be regularly cleaned of dust using a soft broom brush. If cleaning is not carried out on time, the dust settles in a thick layer and turns into a dirty, sticky substance that will ruin the appearance of the craft.
- You can cut even strips of paper using a document shredder. This device cuts sheets into strips from 6 to 12 mm wide.
Learning how to create beautiful paper crafts is easy. Beginning craftsmen need to practice creating large basic modules, and then begin more complex quilling techniques. Schemes for work must be selected taking into account the experience of the master. For beginners, it is better to give preference to simple drawings, without detailed detailing.
Dandelions
To get started, you should prepare:
- Dense yellow stripes.
- Green stripes (used for leaves).
- Crumpled paper from which the bud and stem are made.
- Sharp scissors.
- Tweezers.
- PVA.
To make a dandelion, the width of any piece is taken at the rate of 3.5 cm. 1 flower will take several strips, the length of which will be equal to a landscape-size sheet.
The manufacturing process itself is carried out in the following sequence:
- 3 strips are prepared for subsequent cutting of petals. Each workpiece is folded in the middle, and petals are cut, the size of which is 0.5 mm.
- Using a special tool, one yellow strip is twisted, and its tip is secured with PVA. Next, orange ones are screwed onto the yellow strip, pre-glued into one long strip.
- The petals gently unbend.
- A green paper rectangle is prepared for the leaves. This part is folded in the middle and a sheet is cut out.
- The resulting fragment is compressed into an accordion to give it realism.
- Bud. For it you need to prepare 1/3 of the strips and cut the petals. Then roll the roll from the strip and secure it with PVA.
All that remains is to cut a strip 2cm wide from the header. The edges of the part are glued, the bud is placed and wrapped in paper. The remaining part of the stem is curled.
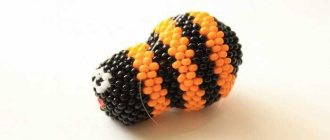
Frog figurine
Quilling figures can be done without a cardboard backing. If you saturate the finished craft with transparent acrylic varnish, it will become durable. The frog figurine made in this tutorial can be used as a keychain or as a pendant on a children's necklace.
What you will need for work:
- scissors;
- PVA glue;
- double-sided paper in yellow, green, white and black;
- clear acrylic varnish;
- large art brush with soft bristles.
Procedure:
- Glue 10 strips of yellow paper into 1 long strip. Roll 1 tight roll. Secure the tip of the last strip with a drop of glue.
- Glue 7 strips of green paper into 1 strip. Wrap the yellow roll. Secure the tip of the strip with glue.
- Glue together 10 strips of green paper. Roll up the loose roll. Give the part a drop shape. Make 1 more such detail.
- Attach the drops to the bottom of a large two-color roll. These will be the frog's paws.
- Glue 12 green strips together. Glue the ring together by wrapping the paper in layers. You can wrap the tape around a round object, such as a deodorant bottle.
- Remove the ring from the auxiliary mold. Flatten it slightly to make an oval.
- Glue this part to the top of the workpiece.
- Glue 5 black strips together. Roll the ribbon into a tight roll. Make 1 more of the same part.
- Glue together 7 strips of white paper. Cover the black roll with white tape. By analogy, glue another part.
- Glue the frog's eyes.
- Wait for the glue to dry completely.
Impregnate the product with varnish, applying it in several layers.