At the dacha, the requirements for water supply are not lower than in city apartments, but higher: it is necessary to ensure supply not only to taps and household appliances, but also for irrigation. Therefore, the pump performance must be high, and the flow rate of the well or well must be good and stable. One more problem has to be solved: in rural areas, electricity is often cut off, so it is advisable to have a supply of water or a backup method of “extracting” it. For well owners, everything is simple: for urgent needs you can get it in a bucket, but you simply can’t get it from a well. We have to come up with backup schemes.
Description and benefits
The drip irrigation method was first used in Israel in the fifties to combat water shortages. Soon scientists were able to find out that if the supply is made in small portions, then not only water, but also labor resources are saved. Moreover, drip irrigation allows for early harvests.
Conventional watering involves the penetration of moisture into the soil to a depth of 10 cm. And with a gradual drip feed, the root systems are more saturated with moisture, as a result of which they grow faster and, accordingly, receive more nutrients from the ground.
Greenhouse made of cellular polycarbonate
Water barrel
beds
Drip irrigation hose
Pump
A separate dropper is provided for each plant
On a note ! Since the soil remains dry, the risk of waterlogging is minimal. What has a positive effect on plant health is that many serious diseases (such as bacterial spot, blackleg, powdery mildew, etc.) develop precisely with excessive humidity.
Also, supplying water at the root reduces the risk of plant burns due to it getting on the leaves (a similar problem is explained by the lens effect, which is played by small droplets). Irrigation into the root zone reduces the rate of spread of weeds, because they do not receive enough moisture.
Important ! Distinguished by its extreme simplicity, the drip irrigation system helps increase productivity by about 30-40%. This method allows you to calculate both the intensity and time of watering for each specific crop.
Initially, drip irrigation was used only in greenhouses, but later it began to be used for growing in open ground.
A distinctive feature of systems for automatic watering from a barrel is the drip supply of water to the root zone
Types of pumps for water from a well
Progress does not stand still and, along with manual ones, there are also electric pumps. They are also very popular among people living outside the city, but a simple device driven by muscular force is not losing its position yet. What is the secret of such popularity and longevity? Most likely, in low price and energy savings. This can also include independence from external water supply networks and the absence of any fees for pipeline maintenance.
Electrical device for extracting water
Types of pumps for a well or well are divided according to the principles that underlie their operation:
- piston;
- rod;
- deep.
What about the disadvantages?
The main disadvantage of do-it-yourself drip irrigation is the need for mandatory control. If you incorrectly calculate the amount of moisture, this can lead not only to excessive consumption, but also to the death of plants. The water level in the barrel will have to be constantly checked, topping up if necessary.
Note ! Another significant drawback is the need to periodically clean the holes (due to their small diameter, they often become clogged). Although there is nothing complicated about this, it is enough to simply blow or flush the system.
Drip irrigation has its disadvantages
We also note that the system should be protected from contamination, for which a filter is installed at the inlet, i.e. at the beginning of the hose, which is located in the barrel. An ordinary piece of foam rubber is quite suitable as a filter.
Connecting pipes from the caisson and tank to the house
Now let's move on to other elements of the autonomous water supply system. In addition to the pump or pumping station, storage or control tank, you will need:
- filters for water purification;
- pipes for internal and external installation;
- devices that ensure automatic operation of the system.
Filters
The selection of necessary filters depends on the quality of the water in your source. In some situations, water treatment stations are installed. However, to protect against mechanical impurities, filtration installations are necessary for all systems.
If the water is not very polluted, then we recommend installing a mesh filter due to the low cost of the product and its sufficient efficiency.
TOP 3 ready-made kits for drip irrigation
The range of such equipment is quite large, but 3 models that have already been tested by summer residents deserve special attention.
Delta 3L-KP18
A set consisting of 60 droppers is designed for an area of no more than 18 square meters. There is overflow protection, expansion is possible by connecting several systems (a special adapter is used for this). The equipment is rich, you don’t need to buy anything in addition.
Circle Beetle
An inexpensive solution that has everything you need - from IVs and tubes to a timer. The maximum area of the greenhouse is also 18 square meters. Assembly is extremely simple, the hoses do not bloom. Available in 60 and 80 plant versions.
Start LCD AquaDusya
This set with an original and memorable name is highly appreciated by summer residents. The system is universal, suitable for berries, shrubs, fruit trees and flowers. It is equipped with a timer, droppers (70 pcs.), pump and everything necessary for installation. The only negative is the underground laying of the highway.
Delta 3L-KP18
Circle Beetle
Start LCD AquaDusya
1470 rub.
2765 rub.
5980 rub.
How to make a hand pump for water from a well with your own hands - step-by-step diagram
Step 1: Making the Case
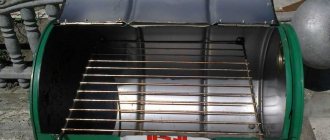
For the base you will need a piece of metal pipe, the diameter of which must be at least 8 cm and the length - 60–80 cm. In this case, the thickness of the cylinder walls can be any. The main condition is the smoothness of the inner surface and the absence of corrosion on it. It is best to process it on a machine. The slightest irregularity will affect the operation of the piston and its wear.
Step 2: Constructing the Covers
The cylinder must be closed on both sides. To do this, you need to cut out two “rounds” from plastic or metal that can tightly cover the diameter of the pipe. Considering that you will be operating a homemade pump in winter, it is preferable to use metal to avoid the cover rupturing when icing occurs. The presence of at least one (top) threaded cap can be considered an absolutely ideal solution. This will greatly facilitate the operation of the pump in case of possible breakdowns. Holes must be made in the middle of the lids. The top one is for the rod, the bottom one is for the disc valve.
Step 3: Additional parts on the body
A drain spout should be made at a distance of approximately 20 cm from the top edge of the cylinder. It is usually made from a small piece of pipe, the diameter and length of which can be selected independently at your discretion. It would also be useful to attach it to the bottom of the flange, thanks to which it is possible to secure the assembled structure to the surface.
Step 4: Piston Assembly
The material for making this part can be any. Wood, plastic, metal - it all depends on how the master himself sees the conditions of its operation. Just don’t forget about winter, as well as the properties of some materials to expand and swell when exposed to moisture. Also, do not overlook the need to make a hole for the piston valve. The next condition is that the diameter of the piston must be such that its edges adjoin the inner walls of the housing as closely as possible. Be that as it may, you need to additionally equip this part with one or two rubber rings to eliminate this gap.
If such a decision is considered reasonable by the device designer, grooves that support the seals can be machined on the piston itself.
Step 5: Installing Valves
The production of these parts is possible both from rubber, silicone, and from metal and plastic. It all depends on the imagination of the designer. The main thing is to adhere to the principle of moving “in one direction.” Thus, the valve attached to the bottom of the pump must freely admit water drawn from a well or well and at the same time reliably close the inlet and withstand the pressure of the piston moving downwards. And vice versa: the piston valve must work flawlessly, admitting liquid into the upper part of the pump when the piston lowers and reliably closing the hole when it tends to the upper position. A little hint: devices that resemble a riveted shape do an excellent job of performing such functions.
How to calculate the volume and duration of watering?
As mentioned above, first a plan is drawn up, which indicates the location of the crops in the greenhouse and the length of the beds. After this, an irrigation diagram is drawn indicating the location of the tank and supply pipelines. All this is necessary to correctly calculate the total length and number of droppers, adapters and other components.
Then the required volume of the barrel is calculated. For example, if the length of the line is 10 m, and the pitch between the nozzles is 30 cm, then 34 of them will be required. With a capacity of each dropper of 5 l/hour, it turns out that all droppers will flow about 170 liters during this time (1 hour).
Important ! With a longer length, the volume of the tank will have to be increased. Or divide the system into two (an alternative is to use a constant source of water instead of a barrel).
Anyone can make a simple version of a drip irrigation system with their own hands.
About other important devices
If water is taken from its own source, then the tank must be equipped with a float mechanism that will turn off the liquid supply when the required volume is reached. In the event of a failure of the float valve, it is important to install an overflow pipe that will insure the system against overflow.
We recommend filling the tank through a diffuser. This precaution is necessary to prevent sediment from rising from the bottom of the container if for some reason the filters do not cope with their work and impurities enter the reservoir. And also don’t forget about installing other components.
Any system is equipped with a pressure gauge and a safety valve.
Master Class. Organization of drip irrigation in a greenhouse
Let's consider the process of arranging the system using the above-mentioned “Beetle” kit, which is produced in the city of Kovrov.
Drip irrigation in a greenhouse from a barrel
Operating instructions for the “Zhuk” drip irrigation kit . Downloadable file (click on the link to open the PDF in a new window).
User manual
Step 1 . First of all, we cut a hose along the length of the beds (in the example - 3 pieces), lay it out over the beds and secure it with clamps. We place a tap/plug at the beginning/end of each segment. We connect the segments, take one to the tank.
The cuttings need to be laid out in beds
Step 2 . Using an awl (it usually comes with the kit), we make holes with the required spacing and install the droppers.
Installation of droppers
Step 3 . As a result of the actions described above, the system in the greenhouse looks like this.
What will the irrigation system look like?
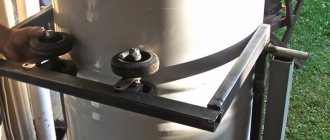
Step 4 . We organize a place for water supply. Since the tank must be raised above ground level (for a pressure of 0.1-0.2 atmospheres the required height is 1-2 m), we build a pedestal from an old refrigerator, and it, in turn, is installed on a special platform, previously made from four paving slabs.
Organization of water supply point
Step 5 . We connect the hose to the barrel. We drill a hole in the latter corresponding to the diameter of the fitting and connect it to the previously laid hose through a fine filter.
Connection of a barrel with a hose
Step 6 . We attach a transparent tube to the tank and hose so that in the future we can determine the water level.
Transparent tube fixed
On a note ! To better see the water level in the barrel, you can place a bright floating ball in a vertical tube.
Tube for determining the water level in a barrel
Step 7 . At the end we paint the refrigerator, and cover the barrel with a lid of a suitable size, otherwise a lot of debris will get inside. That's it, the drip irrigation system is ready, now to start it you just need to open the hose.
Ready-made drip irrigation system from a barrel
Video – Drip irrigation system “Zhuk”
How to serve?
A drip irrigation system from a barrel is a simple design, but in order for it to last for a long time, it requires proper care:
- The pipeline with droppers needs periodic cleaning. It is better to use plastic pipes as the main water supply, which are not subject to corrosion, which often causes clogging of the holes.
- The irrigation system must be equipped with filters. They usually come included. You can use a small piece of foam rubber as a filter, which is inserted at the outlet of the barrel. Filters are cleaned once a week.
- It is better to put a lid on the barrel to prevent debris from entering it, which can reduce the water supply pressure.
- All components for drip irrigation have a small diameter, as a result of which the system periodically becomes clogged. Cleaning will help restore the original throughput. Particular attention should be paid to IVs. They should be disassembled and then cleaned.
- At the end of the irrigation season, water is drained from the barrel and pipes. The system is disassembled and stored for the winter month. Otherwise, the pipes will become clogged with debris, which will require cleaning in the spring.
- For the winter, the hose is wound into a reel, avoiding kinks.
If you decide to apply fertilizers using a drip system, you must first dissolve them in water. After which the structure is washed for at least 15 minutes with clean water.
Master Class. Using a “crying” PVC hose
To simplify the work, if watering is designed for 1-2 beds, you can use the method described below.
Step 1 . First, unpack the purchased hose. In the example, this is a “crying” (oozing) type model made of PVC.
Unpacking the hose
Step 2 . We unwind the hose and lay it along the plants (the photo shows flower beds, but the method is also applicable to beds).
Step 3 . We connect the hose to the fitting, and it, in turn, to the water source.
Connecting the hose to the water supply using a special fitting
Step 4 . We install a plug at the other end of the hose.
Stub
On a note ! All that remains is to open the tap and start the system. Upon completion of the process, the plug is removed, the remaining water is drained from the hose and it is moved to the next bed.
Selecting a water source
The productivity, length of the structure and other operational capabilities of the irrigation system largely depend on the water source to which it will be connected.
Here is a list of possible options for watering:
- well or borehole (relevant for both new, recently developed areas, and old, long-standing properties);
- a natural body of water (for example, a pond originally located on the territory of a garden plot);
- centralized pipeline (necessary for water supply of modern cottage settlements).
An excellent addition to forming a reserve would be a rainwater storage tank, the filling of which depends on the vagaries of the weather, and a VOC storage well, which accumulates purified wastewater separated from insoluble sediment.
Most often, in addition to the main source, there is a backup, for example, a large plastic tank located at a height of 1-1.5 m. If the power is suddenly turned off and the pump operation stops, watering is carried out from the tank.
A detailed diagram of the installation of a biological treatment station with a drainage well, from which, using a submersible pump and a system of pipes (hoses), you can organize watering of lawns, vegetable gardens, and garden crops
A simple, although costly solution in terms of payment, is to connect to the central highway. The pipe leading to the irrigation site is cut into the main pipe using a tee and a ball valve without shutting off, under pressure, since the preliminary installation of the valve allows you to drill a hole through it.
Irrigation from a natural source requires the installation of an additional filter system, because most budget pumps only work with clean water. A filter is also necessary for equipment immersed in a well or sand well.
Cleaner water is in an artesian well, but it requires a special deep submersible pump (popular brands - Gilex, Grundfos, Patriot, Belamos, Caliber).
The old metal barrels have been replaced by convenient plastic containers designed to collect rainwater from the roof. The built-in faucet and connected pump make the watering process more comfortable
Storage containers come in different types: metal and plastic, large and small, purchased and homemade. If the area is small and the reservoir is large, there is enough liquid for several waterings.
A pipeline operating in the summer can be connected to any of the listed sources, but with minor reservations. Let's assume that a collapsible design is suitable for working with a plastic container, but for connecting to a well it is better to build a permanent system.
Image gallery
Photo from
The easiest option is an open pond
Abyssinian well for water supply
Water intake for the system in a well
Well on a summer cottage
Tips for using the system
Here are some useful tips for using a drip irrigation system.
Drip irrigation is a reliable way to save water without compromising the quality of irrigation
- The components used have a small diameter, and therefore the system becomes clogged from time to time. Cleaning will help restore its capacity, which can be done either manually or mechanically. Moreover, special attention is paid to droppers - they need to be disassembled and cleaned of contaminants.
- If rust appears in the water, components and fittings are checked. Instead of metal parts, you can install plastic ones, and the strength of the connections will not be affected. If the filter fails, this is also not a problem - you can replace it with a foam rubber insert (it needs to be cleaned weekly).
- The sealed lid will protect the system from foreign particles and debris.
- After watering, the soil around the plants is loosened or, alternatively, mulched.
Centrifugal and cyclonic filtration systems are used for contaminated waters.
Pipes
The service life of the entire system depends on the quality of the pipeline and its connection. In practice, 4 types of pipes are used to lay the main line. Let's take a closer look at each variety.
- Copper
Such pipes can easily withstand multiple pressure drops in the system and are resistant to corrosion and ultraviolet radiation. The only drawback is the price.
2. Steel
Durable, affordable, but susceptible to rust. And also the connection of such pipes is labor-intensive: the joint is either welded with subsequent protection of the weld, or a thread is cut at the end of each element.
3. Metal-plastic
The basis of such pipes is aluminum, coated on the inside and outside with a layer of polyethylene. They do not rust, do not form condensation, are not destroyed by ultraviolet radiation, and do not accumulate dirt and mineral deposits. However, they are deformed at low temperatures and heating above 95 degrees.
4. Plastic
Plastic pipes for water supply are the most popular due to their properties and easy installation. Let's consider 2 main materials: polypropylene (PP) and low-density polyethylene (HDPE).
Polypropylene pipes are light, durable, resistant to temperature changes, and are not susceptible to rust or other external influences. However, they do not bend, so connecting elements must be used to turn the line and drain the pipe.
HDPE pipes and fittings for water supply have the same advantages as polypropylene pipes, in addition they are also elastic - they can withstand external dynamic influences and water hammer. Service life is at least 50 years.
HDPE water pipes for cold water supply can be used when organizing automatic watering of a suburban area, equipping wells, and arranging fountains. You can select the required pipe yourself using the table.
For drinking water supply, choose products with a blue stripe.
FAQ. Frequently asked questions about drip irrigation
Does drip irrigation affect soil compaction?
Yes, there is a slight decrease in level, a decrease in volume. To provide air access to the root system, you can use a pitchfork to puncture the soil. And in the fall, dig up the area.
Should the tape be buried for watering seedlings? What pitch between holes is required?
It does not matter where exactly the water source will be located. As for the step, it depends on the length of the row and the structure of the soil. If the soil is sandy, then the required step is 10-20 cm, if it is medium-grained, then 30 cm. If the planting row is long, a distance of about 40 cm is maintained.
Why does a tape with emitters water poorly?
In this case, you need to check how high the water tank is above the ground. Its optimal height is about 1.8 m.
How to store drip tape?
During operation, we recommend avoiding excessive pressure and mechanical damage. In winter, you need to wind the hose onto a reel, but so that it does not bend or break. Store in a room with temperatures above zero.
Phytosporin in the greenhouse: we treat beds, walls, plants
Criteria for building the best greenhouse: what to look for?
DIY greenhouse: review of popular designs
Rules for organizing watering of various crops in a greenhouse
Types of hand water pumps
Whatever the design of a hand pump for water from a well, it will work if the hydraulic control and bypass system is adjusted.
The valve systems used contribute to the creation of pressure using human muscle power. All manual pumping devices are divided by device:
- piston;
- rod;
- membrane;
- winged.
Of these, only rod hand pumps are suitable for a well 20 m deep.
Piston pumps are used to lift water from a depth of no more than 10 m. The above-ground part can be made simply or with sophistication. But it is a pipe column and a lever.
The working part is a piston moving in a sleeve. Their mating parts are lapped. The movement of the handle to the piston is transmitted through the rod. There must be a check valve on the suction pipeline, since the system operates under the fill. At the end of the piston there are valves that open to bypass water under pressure.
Determining phases of the piston group operation:
- The system is flooded, the chambers are filled, the check valve prevents the water column from falling.
- The lever is pressed down, the piston moves up and displaces the water above it into the gutter. Under the piston, water enters the discharged zone from below.
- As the piston moves downward, the check valve closes and the holes on the piston open, allowing water to flow upward. The cycle is over.
The system returns to its original position. The amount of water supplied depends on the volume of the chamber, that is, on the cross-section of the pipe and the linear movement of the piston.
A rod hand pump for water from a well differs little from a piston pump in its operating principle. The difference is that the working piston group is located in the casing pipe, under the fill. Place the knot in the water, at least 1 m from the surface, or deeper. The system is in the water, there is a check valve on the bottom of the steamer. With each stroke of the piston, it pushes a column of water above itself. In this way, liquid can be taken from a layer 30 m deep.
All hand pumps, regardless of the design and depth of the well, have an approximate capacity of 40 liters per minute. The magnitude depends on the effort expended, and people have approximately the same muscle strength.
A prerequisite for the operation of a sucker rod pump is a casing pipe cross-section of 100 mm or more. The structure will not fit in a narrow trunk. The long lever provides a long stroke of the piston, but the water flows intermittently, from each stroke. The determining factor for such a system is a long lever of influence, which facilitates muscular work.
A vane hand pump for a well is driven by a wheel connected to blades. The working chamber consists of 3 compartments. Two of them are connected to the suction pipe. There, through a system of valves, water enters the chamber under vacuum and is pumped into the system from a compartment with excess pressure. The water entering the upper compartment flows out evenly. An equilibrium state is achieved by regulating the valves.
A diaphragm hand pump for a well is a chamber divided in half by an elastic membrane. The movable partition is connected to the handle by a rod. The upper chamber is air and does not participate in the transfer of water. In the lower section, one pipe is connected through a valve to the suction, the other is a discharge pipe. When the membrane is pushed down, pressure rises in the water chamber and the valve opens. When the rod is raised, the membrane rises, and the working liquid chamber, under vacuum, releases liquid through the check valve. The action occurs in 2 cycles. A membrane pump can supply water from a depth of 6 m.
Hand pumps are inexpensive and easy to manufacture. You can buy a product in a decent artistic design, or you can make it yourself.
Winter and summer
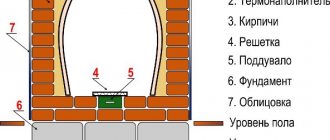
If people live in the house permanently, then the water supply system must be capital, capable of operating regardless of seasonal weather changes. If you are installing winter water supply at your dacha from a well, ditches for pipes must be dug at a depth greater than the depth of soil freezing in winter. The pipes themselves are insulated with geotextiles and mini-wool.
Summer water supply at the dacha from a well requires less effort in equipment. There is no need for thermal insulation; the pump and hose are stored indoors and are installed in the operating position only when necessary. However, such a system needs conservation for the winter. To do this, you just need to drain the water from the system, which is done using a specially equipped drain valve. Otherwise, frozen water in winter will burst the pipes.
To prevent the system from freezing in winter, you need to insulate it Source djdiplomat.ru
Why is water supply from a well beneficial?
A dacha is not just a country estate. We go to the dacha to relax from the bustle of the city, but this vacation should be comfortable and enjoyable. The lack of usual amenities will not confuse tough hunters and fishermen, but it can confuse a fifth-generation city dweller and significantly spoil their mood. For example, the lack of water in the house is unlikely to add positive emotions to the summer resident. However, this issue is quite easy to solve by installing a water supply system at the dacha from a well. This system is relatively simple and does not require large investments.
Water supply to a dacha from a well has a number of advantages over water supply from a centralized main:
- You always have water at hand . It will not be turned off at the most inopportune moment;
- Water extracted from underground formations is much cleaner than tap water . No rust or bleach;
- You will get this water much cheaper ! No payments to utility companies, except for electricity;
- You control the operation of the system, and therefore . It is necessary - the system is turned on, if it is not necessary - it is turned off;
- The pressure force and the layout of the pipes along the dacha area depend solely on your decision .
High-quality operation of a water supply system largely depends on competent design Source fglo.provoloka.ru.net
See also: Catalog of companies that specialize in the development and implementation of turnkey water supply and electrical projects of any complexity
An alternative to supplying water to a dacha from a well is a well. But, according to a number of parameters , such a system is less profitable:
- To drill a well, official permission from the authorities . Hello bureaucracy!
- Site exploration and project preparation can take an impressive period of time .
- Drilling work will have a significant impact on the budget.
- If the electricity goes out, the dacha will be left without water. And, as a last resort, you can always get water from a well with a simple bucket .
Before starting work, it is better to replace the wooden frame of the well with concrete rings, and also seal the seams. This will ensure the isolation of well water from the ingress of domestic wastewater, sewage and water.
A well as an element of water supply for a country house
It would seem that we live in the 21st century. We are already talking about flights to Mars, artificial intelligence and other wonders of technology. And at the same time, some elderly woman in the outback turns the gate of an old, rickety well to get water. In some places, the so-called “cranes” and even ancient “stepping” wells have still been preserved and are working. The most amazing thing is that the water in them cannot be compared with what flows from such convenient city taps.
What is a stepping well ? The principle of its operation is shown in this video. You can't fault the quality - this is a digitized film from 50 years ago. The well on it is real, functioning. Not an exhibit. That's exactly how it's supposed to work.
Maybe this is why grandmothers in remote villages make such delicious pickled cucumbers, tomatoes, not to mention jams and compotes. It is not surprising that people from cities come to such treasured wells to collect water for future use and drink it instead of poison from the tap. Yes, and grandmothers (and some grandfathers who drink little) live longer in villages than in the city - 80-90 years, sometimes even more. It is clear that not only water affects life expectancy, but it also makes a significant contribution.
Therefore, if you have a well with good drinking water right on your property, consider yourself WILDLY lucky. All that remains is to install a water supply from the well to the house and it’s done. We'll see how this is done a little later.
If there is no well, you will have to either drill a well, which is quite expensive, or build some kind of water tower.