I am engaged in selling various decorative wood products on the Internet. I don’t earn millions, but it’s enough to live on. One of the most popular tools in my workshop is the engraver, which requires attachments that constantly need to be changed and increased in number. I realized a long time ago that homemade attachments are better than purchased ones - they are cheaper to produce, safe to use, and last much longer if they are made with high quality. Now I suddenly remembered all of this and decided to share it with you. So today we will look at how to make attachments for an engraver with your own hands.
Source sdelaysam-svoimirukami.ru
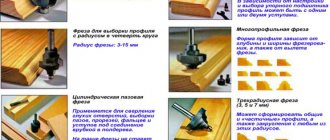
Types of nozzles
petal circle
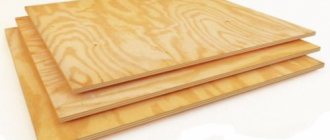
To begin, take scraps of plywood and cut them into 9 small even circles with a hole in the center.
Next, fasten these holes together with glue, after which you need to level them by connecting them to the engraver and running them along the sandpaper.
Clamp the attachment in a vice and make eight cuts with a metal saw. Small square pieces of sandpaper with the grit you need for the job are inserted into these cuts.
Then saturate the pieces with glue or epoxy resin and let them stick out.
Finally, put the homemade flap wheel on the engraver and test the attachment.
Source pinimg.com
Large diameter petal circle
The principle of collecting is the same as the previous one, but with some details.
You still need to take scraps of plywood and cut out circles, but larger ones.
Then fasten them and make eight cuts with a metal saw. Pieces of sandpaper are still inserted into these cuts, but then they are compressed with an elastic band and impregnated with glue or epoxy resin.
Let it sit and dry, then start testing a homemade large-diameter flap wheel for an engraver.
Source mozgochiny.ru
Homemade cutting wheels
Now let's look at how to make the most common homemade attachment for an engraver.
To begin, take a cutting wheel for an angle grinder, a regular compass, but better with two needles at the ends, an awl and unnecessary scissors or metal scissors.
Using a compass, draw small circles (slightly larger than the standard size of the cutting wheel on the engraver attachment), then cut the circle into pieces from which it will be easier to cut out your circles and, in fact, cut.
Right in the center of the cut out circles, you need to make a hole with an awl using rotational movements. The diameter of the hole should be equal to the diameter of the screw from the engraver on which the nozzle is attached.
Finally, sharpen the homemade wheels on an unnecessary sharpening stone, putting them on the engraver itself.
Such cutting wheels are cheaper than purchased ones, and they last longer than non-reinforced ones.
Homemade cutting wheels for the engraver are ready.
Source mozgochiny.ru
Operating principle
The operating principle of a cutter for dressing grinding wheels is quite simple. A set of such tools, assembled into a single unit, is placed on a special axis equipped with a handle for the operator, and is brought into contact with a rotating abrasive wheel. As a result, a set of cutters also begins to rotate on an axis, rolling and sliding along the surface of the circle being processed. Since the working part of the cutters is hardened and has high hardness, when they interact with the wheel, a layer of abrasive is removed from it, which means its surface is leveled.
A dressing tool works on a similar principle, the working body of which is a diamond, or rather, a set of diamonds mounted on a special mandrel in a certain order or randomly. Sets of sprocket cutters can not only be fixed on manual straightening devices, but also used as part of devices installed on a fixed base.
The cutters are assembled into a holder, which is installed on the machine tool rest until it touches the emery stone.
The disadvantages of a roller-cone tool for dressing abrasive wheels include:
The problem with dust, even when using hand tools equipped with cutters, can be solved quite easily. To do this, a hose connected to the vacuum cleaner is attached to its hollow handle.
Of course, one cannot fail to note the advantages of straightening using cutters. This should include:
A device based on rotating cutters demonstrates the greatest efficiency in cases where it is used to straighten abrasive wheels used for grinding work.
Method of dressing grinding wheels by rolling
When performing straightening using cutters, the rolling method is used. Its essence lies in the fact that the tool, rolling around the circle being processed, crushes, chips and removes abrasive grains and the material holding them together from its surface. Thus, the surface of the abrasive wheel is cleaned of foreign inclusions and leveled.
Today, many manufacturers are creating more advanced dressing tools based on cutters. The working body of such devices is a cassette, in which a set of cutters placed on the shaft is already assembled and securely fixed.
Source
The intensity and nature of wear of abrasive wheels depend on the characteristics of the wheel itself and the material of the workpiece. If the wear of the wheel occurs only due to chipping of grains, new grains come into operation, and the so-called self-sharpening of the tool occurs. This is normal. Soft wheels have good self-sharpening properties. In wheels with high hardness, the processes of dulling (smoothing the cutting edges of the grains) and clogging prevail.
Dullness, clogging and abrasion of the abrasive causes a decrease in the cutting ability of the wheel, resulting in an increase in the likelihood of burns, a decrease in the quality of processing and productivity.
To restore the shape of the grinding wheel and its cutting properties, a dressing operation is used, which is the removal of abrasive material and binder from the surface of the wheel, carried out with special dressing tools.
Dressing of the grinding wheel may also be necessary for a new wheel if it runs out. The runout can be checked by touching the rotating circle with the tip of a marker (chalk, pencil) resting on the tool rest. If you move the marker slowly towards the surface of the rotating wheel, it will leave marks on the surface with excess material that needs to be removed when editing.
It would be a good idea to check the wheel for hidden cracks before editing. To do this, it is removed from the machine, installed on a wooden axis (can be hung on a rope) and tapped with some object. The whole circle makes a melodious ringing, while the circle with a crack sounds short and dull.
When editing wheels, a lot of dust is released into the air, so it is advisable to attach a vacuum cleaner hose to a tool and use a respirator.
Basic methods of dressing grinding wheels
At home, they use the simplest editing methods, the purpose of which may be: cleaning the wheel from clogging, leveling (restoring the profile) and reprofiling.
Editing by turning
. Dressing by turning is the destruction (turning) of the abrasive material and the bond of the grinding wheel with a high-hardness dressing tool, which works in much the same way as a conventional cutter works, cutting off a layer of material from a rotating workpiece. CBN inserts or diamonds are used as working bodies of the dressing tools, fixed in mandrels using mechanical clamping, soldering or chasing.
Dressing tools have different designs. Some of them are a rod into the top of which one relatively large diamond is inserted; these tools are called diamond needles, set diamonds.
Other tools have an extended working surface on which a number of diamonds are fixed in a certain order or randomly. Diamond pencils for editing circles, combs, and cutters have this design.
The working surface of these tools is usually located perpendicular to the handle. The depth of the diamond layer can reach significant values. The larger it is, the longer the service life of the tool. When the upper diamonds wear out, the underlying layers come into play.
When dressing a wheel, the tool rests on a tool rest and brings its working surface into contact with the rotating wheel, removing a layer of abrasive from it and leveling its surface.
Diamond or CBN cutters are inserted into mandrels that provide the desired feed and trajectory of the cutting part of the tool. The figure below shows several options for dressing grinding wheels using diamond needles or CBN inserts. All of them have a screw in their design, with the help of which a diamond or CBN cutter is pulled out of the device by the required amount (feed). The straightness of the tool's movement relative to the circle is ensured by a tongue-and-groove system or a protrusion on the device that rests against the edge of the tool rest.
In the absence of special dressing tools (needles, combs, cutters), grinding the wheel can be dressed with a CBN insert, secured in a tool holder or simply clamped with pliers.
The placement of the cutter at an angle to the surface being processed allows you to change the cutting edge of the tool, turning it around its axis so that new, non-dull edges come into use.
You can check the quality of editing by applying a ruler to the treated surface, which should fit tightly to the circle, without gaps.
Dressing by turning with diamond and CBN tools allows you to ensure high accuracy of the wheel geometry. Its relative disadvantage is the smoothing of the surface being processed, which may be undesirable if it is planned to perform roughing work using the straightened wheel. In this case, it is better to apply rolling correction.
However, straightening diamond wheels with abrasive stones is accompanied by a large consumption of stones and takes a lot of time. More effectively, the dressing of a diamond wheel can be carried out using an abrasive ruling wheel, which receives rotation from its drive (see below).
Editing by rolling
. When dressing abrasive wheels using the rolling method, crushing, chipping and removing abrasive grains from the surface of the wheel is done with a round-shaped tool that receives its rotation from the grinding wheel. Silicon carbide wheels, steel disks with a cemented and hardened surface, carbide rollers, and cone stars are used as dressing tools. Balloon stars are the most widely used.
The working part of a rotating cutter for dressing abrasive wheels is a set of disks and toothed sprockets made of wear-resistant metal mounted on one axis. When in contact with a rotating grinding wheel, the discs and sprockets themselves begin to rotate, rolling and sliding along the surface of the wheel. As a result, the abrasive grains are destroyed and chipped and the wheel profile is leveled.
Rotating cutters are made not only in the form of a tool designed to be held in the hands, but also permanently mounted on a stationary base. With their help, wheels mounted on hand-held grinders can be edited.
Dressing by grinding
. Dressing by grinding is also done with a rotating tool. However, unlike rolling dressing, the dressing tool is driven by its own drive rather than by the grinding wheel.
Diamond rollers, silicon carbide, diamond or CBN wheels, and discs made of tungsten carbide hard alloys are used as grinding tools. The axis of their rotation during editing can be either perpendicular or parallel to the axis of rotation of the disk being processed. In the latter case, the direction of rotation of the dressing wheels or rollers may coincide with the direction of rotation of the grinding wheel or be directed against it.
The disadvantage of dressing by grinding is that to carry it out, in addition to the dressing disks or rollers themselves, you also need to have a tool to rotate them. When editing at home, perhaps the best option is to use a grinder with a diamond wheel for editing. With its help, you can edit both electrocorundum and diamond wheels. The grinder used for straightening must have a stop device that can be secured in place of the handle.
The photo below shows the process of dressing a diamond wheel by grinding using a grinder equipped with an old diamond wheel.
When dressing diamond wheels, it is recommended to use cooling, which prevents the combustion of diamond grains, which can occur at temperatures above 700-800°C.
Video:
Source
Ground cylinders for engraver
For this attachment you will need a thin but durable cloth, glue, a tube of the same diameter as an engraver attachment and sandpaper.
To begin, wrap several layers of fabric 12 millimeters wide around the tube and soak it with glue.
Attention, do not use wood tubes or superglue for gluing. Superglue sticks the fabric and the tube together too much, it will be difficult to tear it off, and you shouldn’t glue the fabric even with regular glue on a wooden tube, because the glue will be absorbed into the tube and stick the fabric to the tube itself, which will again make it difficult to tear them off.
Cut strips of sandpaper, shaped like a parallelogram, and the width is the same 12 millimeters, the length should be such that the strip covers the entire tube.
Next, wrap these strips on dried fabric, then soak them in glue again and let it sit.
Carefully remove from the tube, put it on the already prepared engraver attachment and you can test.
By experimenting with tube diameters, you can make different sized cylinders to suit different needs.
Homemade grinding cylinders are ready.
Center cutter
This specific attachment is a type of drill and cutter; it is convenient for cutting and drilling holes in thin materials.
This attachment can be used for cutting small washers from, for example, fiberglass.
To make it you will need a metal block, a drill, a tap, a cutter and a drill.
First, in a metal block (it should be shaped like an oblong brick), drill a hole for a drill and a cutter from the tip of an old small drill.
Then drill a hole in the side for the clamping screws; these holes are driven with a tap.
Next, insert the drill and cutter into place, tighten with clamping screws and you can test.
The do-it-yourself center cutter for the engraver is ready.
Source mozgochiny.ru
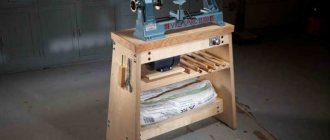
Assembling the fixture
We put return springs on the guides.
We install a movable platform on top. We screw screws into the ends of the guides, having previously put metal washers on them.
We drill holes on the sides of the movable platform and screw wing screws into them, which are needed to fix the platform at a given height.
Finally, all that remains is to install an adjustable depth stop (similar to the depth stops that are used on an electric drill). The homemade product is ready. We install the drill and you can start working.
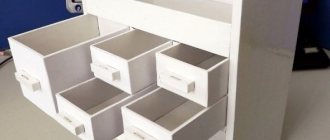
Decorative sanding attachment
Also, someone might find a similar attachment useful for decorative sanding made from ordinary cork.
Take the prepared cork and screw a self-tapping screw without a head into its center.
Place a washer on the self-tapping screw and glue it to the base of the plug.
The chuck's jaws will prevent the screw from screwing deeper into the plug during operation, as they will rest against the washer.
Source drasler.ru
I recommend the following video, where the author makes several interesting homemade attachments for the engraver with his own hands:
Cone manufacturers
Burrs today are produced by many companies and enterprises, both in our country and abroad. It is possible to order burrs according to an individual drawing. Since the scope of such a tool is large, it is not always possible to find the required analogue on sale.
Domestic manufacturers
Among the domestic manufacturers, we can note such enterprises producing cutters as:
Foreign manufacturers
Among the most popular foreign products are products for grinding and other plumbing work from companies such as:
Watch a video on working with burrs:
Whatever manufacturer you choose, do not forget that you may always need more than one cutter, so it makes sense to purchase sets of these devices so that each individual case has its own burr.