Types of designs
Many designs of potbelly stoves for the garage have been invented, so choosing the appropriate option based on the available material is not difficult.
The drawing is drawn up independently, taking into account the characteristics of the room, or taken ready-made from the Internet. The structure, depending on the size of the garage, is made horizontal or vertical. A classic potbelly stove is made from sheet iron. The easiest way to make a stove is from an iron barrel, but the service life of the structure is short, since the thin walls quickly burn out. The option made from a gas cylinder or pipe will last much longer due to the greater thickness of the metal. Simple structures for garages are made from old rims and iron cans.
Choosing a quality barrel
To make a potbelly stove, you can use any steel barrel used in the petrochemical, paint and varnish, chemical, and metallurgical industries for storing and transporting technical products:
- bulk - oils, solvents, paints, diesel fuel, sodium liquid glass;
- pasty - thick lubricants, bitumen;
- bulk - caustic soda, various plasticizers.
They are produced in two types - with an open and closed top; they also differ in the thickness of the bottom, lid and shell.
Any of these containers can be used as a potbelly stove if you first thoroughly clean and rinse its inner surface. However, the thinner the walls of the container, the faster they will burn out and the stove will fail. Therefore, for a potbelly stove you need to choose a product with a metal thickness of more than 2 mm.
Expert opinion
Nikolay Davydov
Stove maker with 15 years of experience
Well, the best option is a stainless steel barrel. High-alloy stainless steel is most resistant to high temperatures in the fuel combustion zone, which means a stove made from it will serve for a longer period.
Types of stoves depending on location: vertical model
Depending on the plane in which the metal tank will be located, there are two types of homemade potbelly stoves: vertical and horizontal. Each of these types of heating devices has its own advantages and disadvantages.
A vertical barrel stove is installed not on the floor, but on legs. To make the door, you will need to cut out the side of the tank and provide it with hinges
It is important to remember that the hinges must be fixed to the barrel and the door not from the inside, but from the outside.
A mandatory element of this design is a perforated metal plate, which is called a grate. To fix such a grille, you can use ordinary corners. In order to make a blower, you will need to prepare a metal pipe with a gate valve. The thickness of the metal walls must be sufficient, otherwise the structure will quickly burn out.
A vertical barrel stove is always installed not on the floor, but on legs
The damper for a long-burning wood stove, located in a vertical plane, is fixed with special bolts. When igniting fuel inside the tank, open the blower as far as possible.
A hole in the shape of a circle must be made in the upper part of the canister. It will be needed to connect a chimney structure to a homemade stove. The pipe is joined to a metal surface using welding equipment.
The function of the grate is to protect the bottom of the canister from burning out, as well as to retain thermal energy. Thus, this element is necessary when installing a homemade long-burning stove.
Before starting assembly, it is recommended to draw up an individual drawing of the device. It should be as detailed as possible, contain a drawing of the future unit and its individual components, and also indicate their dimensions.
To make the door, you will need to cut out the side of the tank and provide it with hinges
Design features are determined depending on the purpose of the device and the place where it will be located. If you wish, you can download a ready-made drawing of a potbelly stove on the Internet. However, in this case it is necessary not to make a mistake with its volume.
The vertical version of a homemade heating device is easy to assemble. You can find application for such a unit both in a private home and in the country. The firewood used to light a heating device of this type is selected depending on the dimensions of the firebox.
Barrel stove: features of the horizontal model
From a barrel with a volume of 200 liters, you can also make a heating device located in a horizontal plane. In this case, it is also necessary to prepare a supporting structure. Its height is calculated taking into account individual operational characteristics. When choosing this indicator, first of all you need to focus on the dimensions of the room in which the homemade heating device will be installed.
In the drawing of the furnace, you need to take into account the features of its location. The assembly of such a structure occurs in almost the same way as in the case of a vertical heating device. Let's take a closer look at the process of making a potbelly stove from a metal canister yourself.
From a 200 liter barrel, you can make a heating device located in a horizontal plane
A hole must be made in the bottom of the tank, which will be used to remove ash. At the same time, you need to understand that its parameters should not be too large. Next you will need to make an ash pan. The material used for this element is a regular metal sheet of appropriate thickness. Then it should be docked with the bottom of the heating device. For this purpose it is customary to use welding equipment.
When arranging the ash pan, it is necessary to provide an inspection window through which this compartment will be cleaned. Next, the chimney structure is installed. In this case, there are two common options for locating the pipe - on the back wall or in the upper part.
A long-burning potbelly stove, located in a horizontal plane, can be used not only for heating garages, basements and outbuildings, but also for cooking. For this purpose it is equipped with a special hob. This device is mobile, so it can be taken out into nature.
A 200 liter barrel is installed horizontally on the surface, in a lying position
What and how to make doors from
Doors for potbelly stoves can be purchased cast. You will need a small height for the ash pan and a larger one for storing fuel. There are ready-made blocks - a flow door with a blower in one design. In this case, a frame made from corners welded to size is welded into a hole cut to size, and the casting is already bolted to it. To prevent air from blowing in from the cracks, a small edge is welded around the perimeter of the cutout under the door - a 1-2 cm strip of metal.
How to attach a cast iron stove door to a gas cylinderYou can not buy doors, but use a cut piece of a balloon wall. Then you will need some kind of hinges or replacement parts. It’s clear with the hinges: mark the places, weld them. There is an interesting version of homemade loops: several links of a thick chain.
The hinges on the door can be made from several links of steel chain
A latch will need to be welded to such a door.
Chimney construction process
The complexity of the process of constructing a chimney for a potbelly stove in a country house directly depends on the location of the stove in the room. For example, bringing a pipe out through a window is much easier than making a hole for a chimney in the roof. In this regard, before installing a potbelly stove, you should take into account the design features of the building.
Safety rules and structural measurements
If you plan to install the stove outdoors, then installing a chimney will not cause much difficulty, the main thing is to choose a suitable location
It is important to remember that the stove structure should be located away from flammable objects and active recreation areas
Constructing a chimney indoors will require knowledge of safety rules that will help avoid fire. The material from which the pipe is made must have increased heat resistance and can easily withstand temperatures above 1 thousand degrees. If you plan to install a potbelly stove near walls lined with clapboard or plastic, then the part of the wall located in close proximity to the stove is sheathed with fireproof material.
Don't forget to decide on the pipe size
The hole through which the chimney will enter the ceiling must also be decorated with non-combustible materials, since the entire structure becomes very hot when the stove is operating. For these purposes, a special glass is used to prevent contact of the hot pipe with the edges of the hole. If there is more than one potbelly stove installed in a building, then a separate smoke exhaust system is made for each of them.
After calculating the diameter of the pipe for the potbelly stove, you will need to calculate the total length of the pipeline, but first you need to accurately determine the location of the stove in the room. Then determine the specific location where the chimney will be vented outside. When measuring the length of the pipeline outdoors, you need to take into account that the height of the pipe above the ridge should be 1.3-1.7 meters.
It is more difficult to carry out installation work indoors
Installation of all system elements
Installing a stove installed outdoors is not difficult. To assemble the system, you will need a pipe of the required diameter, which is placed on the pipe extending from the potbelly stove. The pipe must be put on the pipe, and not inserted into it. Otherwise, smoke will leak out at the junction of the nodes. The procedure for installing a smoke exhaust system in a room is much more complicated and consists of several stages:
- the pipe section is securely attached to the furnace pipe;
- the pipeline is extended using connecting elbows;
- the smoke exhaust is passed through a passage glass and discharged onto the roof or behind the wall;
- all connecting nodes are securely fixed.
A section of pipeline located outdoors must be insulated with heat-resistant material. During operation of the potbelly stove, condensation inevitably accumulates on it. To get rid of the condensate accumulated in the system, a tee is installed on the outer section of the pipeline, equipped with a faucet for discharging liquid. In the place where the horizontal and vertical pipelines connect, an inspection window is made to make cleaning the chimney easier.
The final stage is checking the functionality of the smoke exhaust system. If you managed to properly make a chimney for a potbelly stove, then after igniting the stove the necessary draft will be created and the smoke will quickly be discharged outside. During the combustion process, you need to ensure that smoke does not leak into the joints of the nodes. If a smoke leak is detected, the connections must be sealed using heat-resistant sealant.
Design features and operating principle
Those who want to build a potbelly stove with their own hands should first understand the features of its design. This is a very simple stove in appearance, but despite its simplicity it is quite effective in heating rooms.
The main highlight of the device is the pipe, or rather its diameter. Therefore, during manufacturing, it should be remembered that the throughput of the chimney pipe should be lower than the productivity of the firebox for the formation of flue gases. It is necessary that gas distribution be ensured by accurately calculating the pipe diameter. For example, if the volume of the firebox is 40 liters, the diameter of the chimney should be made equal to 106 mm.
Device design
Hot gases cool down too quickly, so it was invented to burn the fuel in partial pyrolysis mode. The secret lies in the presence of a metal screen on three sides - at the back and on the sides of the structure. These plates should be located at a distance of 50 mm from the furnace body in order to reflect back 50% of the IR radiation. This makes it possible to achieve the desired temperature inside the firebox and reduce the risk of fire in the enclosing structures, as well as avoid burns when operating the stove.
A potbelly stove burning dry wood or coal emits a lot of heat at the beginning of combustion
Therefore, even if you heat the stove little by little, it will fly out into the chimney, which means that when creating a structure with your own hands, you should pay great attention to convection. It is necessary not only to prevent the warm air from going in different directions, but also to hold it near the stove. The bottom of the stove heats up moderately compared to the walls, but also radiates heat downwards
This does not reduce the performance of the potbelly stove, but you should think about safety - avoiding a fire, especially if the stove is installed on a wooden floor. In this regard, it should be placed on a metal sheet with a 350 mm offset along the contour of the structure. The sheet is laid on a layer of asbestos or other non-combustible material. This will further increase the efficiency of the stove.
The bottom of the stove heats up moderately compared to the walls, but also radiates heat downwards. This does not reduce the performance of the potbelly stove, but you should think about safety - avoiding a fire, especially if the stove is installed on a wooden floor. In this regard, it should be placed on a metal sheet with a 350 mm offset along the contour of the structure. The sheet is laid on a layer of asbestos or other non-combustible material. This will further increase the efficiency of the stove.
Chimney
Chimney installation
Another important element in the design of such a stove is the chimney. It must be constructed as follows: a vertical part with a height of at least 1.2 meters is installed. In this case, it is advisable to wrap it with heat-insulating material, for example, basalt cardboard.
The next part of the chimney is the hog, which is a horizontal or slightly inclined pipe of the same diameter. It is in this compartment that the remaining flue gases burn out, and from here up to a quarter of all heat is released into the room. The length of the hog is at least 2.5 meters, and ideally 4.5 meters.
According to injury safety requirements, there must be at least 2.2 meters from the bottom of the hog to the floor covering so that a tall person does not touch his head on a hot pipe. It is advisable to surround the device with a special protective fence in the form of a metal mesh or cylinder.
How a stove can be used in a garden plot made from a barrel with your own hands
The furnace is fired up as follows:
- Dry solid fuel is tightly packed into an empty cylinder to such a height that the upper plane of the piston is below the lower boundary of the chimney opening. Do not add wet wood, which can slow down the movement of the piston during the combustion process.
- Place wood chips, a rag or paper sprinkled with diesel fuel or kerosene on top, close the lid with the piston.
- Open the valve completely, set fire to the rolled paper and throw it into the pipe. When the wood burns well, close the damper, setting the minimum gap for air flow.
Cooking shish kebab on a homemade stove
On a homestead, a stove made from a 200-liter barrel can be used to heat greenhouses, light a bathhouse, or burn garbage.
Types of Incinerators
In summer cottages, various homemade stoves for garbage are often observed.
There are such varieties:
- Stationary structures that are characterized by good capacity and convenience. They usually have significant dimensions, weight, and are located in one place. Allows you to dispose of large volumes of waste.
- Mobile design, it is also called portable or mobile. Suitable for occasional use and for handling small amounts of waste. These varieties are distinguished by their compactness and save space. It can even be transported in the trunk of a car; they are light in weight.
Can stove
A can or barrel is often used as a furnace container. The idea is quite popular because it requires almost no work to make the case. You can cut and weld the remaining structural elements (door, legs, chimney) in a few hours.
Assembly steps
- For the blower, make a hole under the neck.
- You need to make a hole in the bottom of the can for the chimney pipe.
- The design of the grate should be either serpentine or in the form of a grid of reinforcement so that it easily fits into the container of the can without using unnecessary fasteners.
- All dimensions of the structure can be seen in the drawing. The finished stove is installed on bricks, or metal legs are welded.
Due to its compactness, such a stove can be installed in a small room. Consuming a lot of fuel, heating a room with it for a long time is not rational. You also need to ensure that burning coals do not fall out of the stove during the combustion process.
Features of operation
When operating the stove, it is necessary to alternate its lighting cycles, which include:
- fuel storage;
- ignition of the stove;
- direct combustion process with room heating;
- cleaning of ash products from the combustion and blower sections.
The most important stage is the placement of fuel, which must be placed in a certain order to facilitate the ignition process. First you need to put paper and thin dry firewood on the grate, light a fire and close the door.
Once the kindling material has ignited, larger logs can be added. Wood must be loaded carefully to prevent the fire from dying out. Once the wood has been fully loaded, the fire door must be closed tightly.
The draft in a potbelly stove can be adjusted by using a valve on the chimney or by slightly opening the ash door.
While the stove is burning, you must not touch its body to avoid getting burned.
To restore draft after a long period of burning, it is necessary to periodically disassemble the chimney and clean its elements from accumulated soot.
Arranging a brick oven for a garage
Brick stoves provide gentler heat, but until they heat up themselves, they will not heat the garage. If you plan to heat every day, this option is good. If the garage will be heated periodically, it is better to make a metal stove - heating up a frozen brick stove is long and tedious, and it will start heating in about two hours.
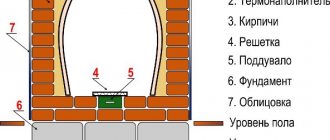
For those who decide to install a brick stove in the garage, we will lay out the order of a small (relatively) stove with a heating shield and a hob (just in case).
Image of the furnace and necessary materials
The stove is made of solid ceramic bricks (not burnt). Excluding combat, 290 pieces are required. The masonry should be laid using clay mortar, the thickness of the seams is about 0.5-1.8 cm.
This furnace requires a separate foundation - the weight will be about 500 kg. Its dimensions are 15-20 cm larger than the dimensions of the oven.
Arranging a brick oven for a garage
It is desirable to lining the firebox (laying fireclay bricks on fireclay mortar). Bricks are ground down for furnace casting. The dimensions of the bed for the grate, stove and doors must be larger than the dimensions of the casting. The gap is necessary to compensate for thermal expansion and also for laying a thermal insulation layer around the doors. This will reduce the formation of cracks near them (due to different thermal expansion).
Asbestos cord was traditionally used as a thermal insulation material. If you don't want to deal with asbestos, you can cut mineral wool cardboard into strips. Only it must withstand very high temperatures - up to 1200°C (minimum 850°C).
Installed in the 6th row, the valve allows you to switch the stove into winter and summer modes. This is convenient in the off-season, when full power is not required, but it is already damp.
Continuation of masonry
The height of the oven can be increased by repeating rows 14 and 15.
Continuing the formation of the heating shield
Watch the video for the process of pre-laying a stove without mortar (recommended in order to select bricks and understand what’s what).
Required materials and tools
Before you begin assembling the device, you need to prepare the following construction equipment:
- grinder;
- grinder;
- welding machine;
- file;
- hacksaw
To make a potbelly stove from a metal barrel, you must also purchase the following additional materials:
- metal for legs and chimney;
- door hinges;
- pieces of sheet iron;
- bolt;
- fittings (for grating);
- brick;
- cement and sand (for mortar).
Making a heating device with your own hands is not a difficult task. The main thing is to comply with the technical conditions and strictly follow the instructions.
Interesting potbelly stove with stonework
A 200-liter barrel can serve as the basis for another interesting stove - with masonry inside. To assemble it you will need:
- the barrel itself;
- thick metal wire or fittings;
- large round river stones;
- chimney pipes.
There is no ash pan in such a stove, so cleaning will be some difficulties. We immediately recommend making the firebox door level with the bottom of the barrel - this makes it more convenient to remove the ash. We make a kind of grate from reinforcement or thick metal wire. Only here it will fulfill a different role - it will support the masonry.
To assemble the stove, it is necessary to cut off the top cover from a 200-liter barrel and equip it with a pipe for connecting the chimney. In the lower part we cut out a door for storing firewood with a height of 150-200 mm. We fix a grate at a height of 250 mm, on which we pile stones to the top
Please note that large stones are needed so that combustion products can easily pass through the space between them.
The stove will need a strong, non-combustible base with a metal sheet in front of the firebox - it will be quite heavy, so the legs must be strong or absent altogether. The barrel is placed on the base before the stones are placed in it. Otherwise, you won’t budge it later. After installing the stove in its normal place, weld the lid and connect the chimney - you can start kindling. To improve traction, it is recommended to drill several holes with a drill with a diameter of 4-5 mm - air will be sucked through them.
Rules for starting a furnace during development
The furnace is started as follows:
- The waste is poured into the filler hole in the amount of 2/3 of the tank volume.
- To make the stove start faster, you can splash a little gasoline.
- A wick twisted from oiled paper is ignited and inserted through the filler hole into the firebox - the tank.
- The damper is installed so that the filler hole gap is no more than 10-15 mm.
- A few minutes later, after the burnout flares up, the stove will return to operating mode.
- The damper regulates the draft.
Ready-to-use oven
As can be seen from the figure, heating occurs in the upper part of the stove, where the thermal chamber is located. The secondary air entering through the openings of the afterburning chamber, connecting with waste vapors, burns at a very high temperature. Pyrolysis system in action.
You can improve this stove by connecting a water or air circuit to the heat tank. Of course, using such a stove at home is not entirely convenient, but it is ideal for heating utility rooms.
Burning area and savings
What else is worth noting is that fuel consumption in such garage furnaces directly depends on the combustion area of the waste. The larger the area, the greater the consumption.
A fuel tank that is too high also does not contribute to the good operation of a long-burning stove. At a certain point, when a large amount of fuel burns out, draft may be disrupted in a stove with a high firebox.
Therefore, proportions must be respected. The most optimal would be if the height of the fuel tank is 100-150 mm. Of course, you will have to add fuel to the tank more often, but stable operation of the stove will be ensured.
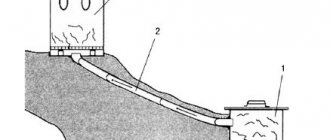
Construction of a pyrolysis bath
Such a pyrolysis stove for a bath can be an ideal option in places where there is a problem with wood fuel.
The upper part is heated to a temperature of 800-900°C, which is a good option for installing a heater and heating water for a bath.
A homemade pyrolysis stove for a bath can be even simpler. Its installation will require a minimum of materials and labor.
The picture shows a diagram of the Bubafonya pyrolysis stove, which is also suitable for a bathhouse. To operate, this stove can use wood waste - sawdust, wood chips.
The structure of this furnace couldn’t be simpler, but nevertheless it is a real pyrolysis furnace.
Scheme of a waste pyrolysis furnace
It is made from a regular 200-liter barrel and consists of four main parts:
- housings (200 liter barrels, you can make a stove from a gas cylinder);
- covers;
- piston;
- chimney.
Furnace before loading fuel
Furnace before loading fuel
If you decide to make the stove from a gas cylinder, then you need to choose the option from a single piece of metal. The use of a gas cylinder made of composite materials is prohibited. The option of a small gas cylinder will not work either, since its dimensions will not be enough. However, the use of a gas cylinder with a capacity of 27 liters will allow you to create a stove of low power (up to 7 kW), which is suitable only for a very small bathhouse.
- The lid of the barrel (or gas cylinder) is cut off, and the chimney is welded as shown in the figure. Unlike the previous stove, the use of horizontal sections in the chimney is allowed here.
- It is necessary to install a damper inside the chimney, with which you can regulate the draft.
- Next, the furnace lid is made. It should fit loosely on the barrel. There is a hole in the middle of the cover for the piston.
- The piston is made from a piece of pipe with a length exceeding the height of the barrel by 100-150 mm. A circle made of 3-5 mm metal is welded to the base of the pipe. The thicker it is, the longer it will last.
- But if you don't have thick metal, any will do. Just be prepared for the fact that when one burns out, you can install another.
- On the reverse side, ribs are welded onto the piston; they can be made from pieces of reinforcement with a diameter of 10-12 mm. That's it, the oven is ready.
Installation Rules
Like all heating appliances, during their operation, potbelly stoves must be treated with full responsibility and strictly follow the safety rules:
- do not leave the stove unattended, on children or people who have no experience in using such devices;
- place the stoves at a safe distance from furniture and interior items, at least 1 meter;
- do not overload the stove while firing the stove;
- for the firebox, use only oil that has been free of water impurities;
- do not block the chimney during combustion;
- Do not leave any objects on the surface of the stove to dry, even after it has gone out.
Method three. We use an old heater to dispose of waste
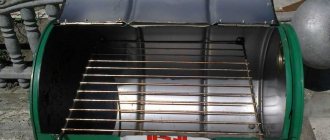
If you have an old sauna stove lying around, do not rush to send it to the landfill. Even if it is very rotten or rusty. We can turn a heater that has long been unusable into a fairly good garbage disposal by installing it at our summer cottage. We do it as follows. First, using available tools, we remove all internal elements from the heater - leaving only the grate and, of course, the body itself.
After this, we take sheet steel and weld it to the base from the inside, thus strengthening the entire structure.
In this case, we will be able to load garbage directly from above, although before loading large items, it is recommended to light a flame in advance using dry branches and paper. Directly during the combustion process, it is advisable to cover the stove with an iron sheet, placing pieces of brick under it - this will ensure the unhindered escape of smoky gases.
The classic is a stove made from one barrel. Drawing
Manufacturing progress.
First, remove the top of the barrel, then cut the side for the door.
We take welding and attach the door of the future stove. We measure 200 mm from the bottom and install grate bars.
It is advisable to install another door under the ash pan to control the draft.
You will need fire bricks to protect the walls. We lay them out from the inside.
For the chimney bricks, we install the structure as in the figure below.
The bricks are laid out on the kiln mortar. The composition of the oven mortar is 1 part clay to 2 parts sand, the mixture is mixed with a minimum amount of water until it reaches a very thick consistency.
The thickness of masonry joints should not exceed 5 mm.
To increase the heat transfer of the stove, you can install another barrel on top. You need to make a hole in the barrel for the chimney and weld a piece of pipe under the chimney.
Method to use a damaged barrel
Installation of a holey barrel can be done on bricks. It is advisable to choose for these purposes an area where it would be best to rake the ash. The result is a kind of blower. The holes at the bottom of the container act as a grate. As a result, you get a design ready for use.
If your summer cottage is a small area or there is a fire hazard near it, then it is advisable to cover the barrel with a flame with a sheet of iron. Then the calves will not fly to the sides. When the bottom has burned out, instead of grates you can use twigs that are inserted through the container.
What types of brackets are there for street lighting fixtures?
Approximate prices for metal lighting poles: .
Prices for outdoor LED pole lights can be found here.
It is necessary to cross a couple of rods. They will act as grates on which compressible waste is laid out. From below there will be air draft, which is required for waste disposal.
Adjusting this flame is very easy. If necessary, it can be quickly extinguished. And the barrel can be located in any convenient place. In addition, large branches can be used when burning garbage.
The presented work on waste disposal at the dacha is considered the simplest. When disposing of waste in large quantities, you need to watch for sparks. To carry out such work, it is better to choose wet and cloudy weather. Then it will be more difficult for the flame to spread, and all conditions for burning waste will be created in the container.
You will find all the information about heated barrels for country showers here.
It is very important to take care of your personal safety. Therefore, be sure to wear glasses to prevent sparks from damaging your eyes. Wear gloves on your hands to avoid thermal injury. You will also make yourself a poker stick, which you will use to move the branches. Such activities will contribute to their final combustion. It is advisable to always have a fire extinguisher on hand. If such a situation occurs that the flame spreads to dry grass and bushes, then you will be able to localize the fire in time.
The principle of operation of a potbelly stove from a barrel
A potbelly stove made from barrels is very similar to the type of potbelly stove that we perfectly imagine. However, it is not mass produced. This structure is purely the creation of self-taught craftsmen. Among other things, the modernized stove has a round shape and is similar to the metal Slobozhanka stove.
The appearance of the simplest potbelly stove made from a barrel, however, has a large number of disadvantages
The main difference between them is the fuel combustion option. Wood sawdust is used for the following reasons:
- if you heat a potbelly stove with this fuel, it will be quite economical due to the low cost of this type of fuel;
- Sawdust that has been previously compressed burns out for quite a long time. One load is probably enough for 6-10 hours for this design.
It is quite obvious that a potbelly stove made from a 200 liter barrel looks good. Such a stove usually has a diameter of 600 mm. A hexagon with sides of 314 mm can easily fit into this circle. This makes it virtually no different in technology from conventional oven appliances. The efficiency in such stoves, as a rule, does not exceed 15% (We previously wrote how to increase the efficiency of a fireplace or stove and recommended bookmarking the article.). If a screen is used to increase it, then such a stove does not last long and goes out of service after about one season.
Read the article on how to make an economical potbelly stove with your own hands and get answers to your questions.
The main reason for this efficiency comes not only from the fairly thin metal, but mainly from the height of the barrel of 850 mm. Approximately 1.3–1.5 times less than the depth, the height of the firebox should be located in potbelly stoves made from a barrel. In the case when the ash pan is made high and the grate bars are raised, then the lower part, as practice shows, will take heat and give it back to the air, thereby violating the entire correctness of gas dynamics. In this case, there are only two ways out:
You can wall the barrel up to the middle of the height in brick. This can be seen in photo 3.
Potbelly stove their barrels walled up in brick
It is also possible to equip a refractory-lined oven at the top of the oven. And run a chimney through it.
In both cases the work will become more difficult. The service life of this furnace does not exceed five years, but the efficiency cannot be raised above 20%.
With grates or without?
In the simplest version, no grates are provided. If the cylinder is small or stands horizontally, then selecting a part inside is problematic. In this case, the design of a potbelly stove made from a cylinder is quite simple: the body is placed on legs, one door, and a pipe for connecting the chimney is welded in the upper part. All. The whole stove.
The internal structure of a potbelly stove made from a horizontally located cylinder is quite simple: only a door for loading fuel/unloading burnt coals and an exit for the chimney
The photo above shows examples of such simple ovens. In order to improve heat transfer, metal strips are welded to the outside of the body. In the upper part, in addition to the smoke pipe, there is another outlet - a lid is installed on it, and this outlet is used as a stove for cooking food and heating tea.
If you still want to make grates in a potbelly stove from a horizontally installed cylinder, you will have to weld a tray for collecting ash from below. Below there is a drawing and photo of the practical implementation.
Drawing of a potbelly stove made from a horizontally located gas cylinder with an ash box welded to the bottom. A finished stove made from a cylinder with an ash box. A drawer, welded to size, is placed on this shelf. By extending/retracting it, the oxygen supply and the burning power of the wood are regulated
In vertical versions of potbelly stoves made from a cylinder, grates are most often installed. In this case, it is easier to allocate space. Usually, thick reinforcement bars are welded inside: a cast iron grate of a suitable size is difficult to find. But this option is bad because the reinforcement quickly burns out, and repairs are complicated: remove the old reinforcement and weld in a new one. You can weld pieces of thick corners or reinforcement inside (as in the photo), separately weld grate bars from the reinforcement and lay them on the corners.
Option for installing grate bars in a potbelly stove from a gas cylinder
This video talks about how to make a stove from a gas cylinder with your own hands - the grates are made of fittings.
https://youtube.com/watch?v=97RjGkMHbG0
Potbelly stove with smoke circulation
This is a rectangular stove with minimal fuel consumption and the ability to regulate combustion intensity. The structure (furnace body) is assembled from metal sheets by welding.
Required materials and tools:
- welding machine complete with electrodes;
- grinder and circles for cutting metal;
- roulette;
- metal corners;
- metal rods for the grate;
- pipeline;
- sheet metal.
The furnace consists of the following sections: firebox, smoke circulation, ash pan, exhaust pipe. Additional elements: doors with canopies and latches, grate, metal legs, valve on the pipeline to reduce heat loss.
Assembling a potbelly stove with smoke circuits
- We make a drawing of the future furnace.
- According to the dimensions indicated in the drawing, we make markings on the sheet metal and use a grinder to cut out blanks for the future firebox.
- We join the sheets of metal to form a rectangle. We weld metal corners inside (on the side walls of the oven) on which the grate will be placed.
- The grate is made from a set of longitudinal and transverse metal rods of the same length, connected by welding. The cells must be of sufficient size to retain fuel on them and free passage of combustion products through the grate. There is no need to weld the grate itself to the body of the firebox, then it can be pulled out while cleaning the stove from ash and ash.
- At the next stage of work, it is necessary to weld a sheet of metal inside the firebox, which forms a smoke circulation. The size of this sheet of metal should match the bottom of the furnace in width and be slightly shorter in length.
- After the interior of the stove is ready, it is necessary to make a ash door and a door for putting fuel into the stove. We make the doors in such a way that it is convenient to clean the oven and remove the grate. To make canopies, we use a metal rod and a tube of suitable size. We cut them with a grinder and weld them to the walls of the firebox and to the doors, respectively, then insert the free section of the rod into the tube. For ease of use of the doors, we make handles from thin strips of metal and attach them by welding. We make the valves in the form of a long curved strip of metal and, accordingly, a hook to which it will cling.
- The legs of the stove can be made entirely from metal corners or adjustable. To be able to adjust the length of the legs, you will need nuts and threaded metal rods of appropriate thickness. Thanks to this technique, the potbelly stove will stand steadily even on an uneven surface. And also, with the help of such legs, it is convenient to disconnect the stove from the pipe and carry out maintenance or replacement of any parts.
- Outlet pipeline with damper. For the damper itself you will need a metal rod of small diameter and a sheet of round metal with a diameter slightly smaller than the diameter of the pipe. We drill two holes in the pipe, insert a rod into them, bend its outer part for convenience, and install and weld a metal circle inside the pipe. Thus, when the rod turns, the circle will turn accordingly, changing the gap and reducing heat loss from the furnace to the atmosphere.
- In the upper part of the furnace we cut a hole corresponding to the diameter of the outlet pipe and weld it hermetically.
There can be two or three smoke circuits in a potbelly stove. And in order to reduce heat loss from the metal walls into the atmosphere, the outside of the furnace is lined with refractory bricks or a reflective metal screen is installed with a layer of heat-insulating material, for example, an asbestos sheet.
To light a fire in the stove, newspapers, sawdust are placed on the grate, small dry logs are placed on top and the newspapers are set on fire with matches. Once the logs are hot, larger pieces of wood are added to the stove. Do not open the firebox and ash door at the same time. Regulation of draft and combustion intensity occurs by changing the gap in the pipe (valve) and through the blower.
Assembly sequence
The barrel stove is easy to assemble and requires equally complex tools. We will need:
- angle grinder (grinder);
- welding machine;
- a hacksaw for working with small parts (this is more convenient);
- Grinder.
You will also need auxiliary materials:
- pieces of sheet metal - for scalding doors;
- hinges for doors;
- chimney metal;
- metal for legs;
- brick and cement for organizing the base for the stove;
- fittings for creating a grate.
Prepare cutting wheels for the grinder and electrodes for the welding machine (if electric welding is used).
Making a potbelly stove from a barrel is not the most difficult task; the main thing is to follow our instructions exactly and observe safety precautions.
Initial preparation of the barrel
Making a stove out of a barrel with your own hands is as easy as shelling pears. The first step is preparing our “source code”. A 200 liter barrel must be cleared of paint (if it has been painted). Those who neglect this step will have to inhale the aromas from burning paint. Our task is to make the barrel shiny, and at the same time get rid of rusty stains. Use a grinder to sand the metal.
In the next step, arm yourself with a grinder and carefully cut out two rectangular windows in the barrel. Work with the tool carefully, as the sawn rectangles will be useful to us as doors. We process the edges with the same grinder or file so that they are not so sharp. The door under the firebox should be larger than the door under the ash pan. In addition, the ash pan door will serve as an ash pit.
For now, we cut off the top part of the barrel completely. We will need to assemble and place a grate inside a 200-liter barrel. Therefore, the absence of a top cover will ensure ease of installation.
Assembling the grate
To make a grate, use reinforcement. The diameter of a standard 200 liter barrel is 571.5 mm. Therefore, the grate must be smaller in diameter in order to pass through the internal volume. At the level between the firebox door and the ash pan door we make arbitrary projections - the grate itself will rest on them. For example, you can make them from sheet iron and weld them to the inner walls.
A potbelly stove from a barrel will generate quite a lot of ash, falling into the ash pan. Therefore, it must be large - the recommended height is 100-130 mm. Do not make the door too narrow, otherwise there will be problems with ease of cleaning.
Preparing the doors
The doors of our stove will be clearly smaller than the loading and ash windows. Therefore, they need to be scalded around the perimeter with pieces of sheet iron about 20 mm wide. We also cut out handles from sheet iron and rivet or screw them to the doors. At the next stage, we carefully weld the hinges, after which we weld the doors to the stove itself - now our 200-liter barrel is almost ready to serve a second life.
Making the base
For our 200 liter barrel, it is advisable to make legs. Use pieces of thick reinforcement for this or make them from metal corners 2-3 mm thick. The optimal distance from the bottom of the barrel to the base is 100 mm.
If you intend to make a potbelly stove from a barrel, think about where it will be installed. You will need a reliable non-flammable base. It is best to make it from brick or pour a concrete screed. The space in front of the stove is made of non-combustible material - for example, from sheet iron laid here. If the floor in the heated room is concrete, simply lay a sheet of iron on it and place a barrel on it.
Preparing the chimney
The design of a 200-liter barrel stove requires the presence of a chimney. It would be nice if it was removable - a “pipe-in-pipe” system would be suitable for this. That is, we weld a smaller diameter pipe with a height of 100-150 mm to the stove, and then put a larger diameter main chimney pipe on it. You can also use ready-made factory dismountable chimneys. The point is that the stove can be quickly cleaned by removing it from the base - a volume of 200 liters does not mean that it will never become clogged with fumes and soot.
Final assembly of the furnace
We take our 200 liter barrel with legs welded to it and install it on a pre-prepared base. We lower the grate inside. At the next stage, we weld the top cover with a short chimney pipe. Next, we put the main chimney on it and go for firewood.
Place some paper and small wood chips on the grate, light the fire, until a steady flame appears. Now start laying the main firewood - it is best if it is dry. Wet logs burn worse, and they also smoke, clogging the chimney. Close the firebox door and use the blower to adjust the combustion intensity. Do not forget to periodically add new portions of fuel until the set temperature is reached.
High thermal conductivity of a potbelly stove - minus or plus
The most significant advantage of a potbelly stove is its high thermal conductivity, which ensures rapid heating. This characteristic also acts as the main disadvantage, since it not only warms up quickly, but also cools down quickly.
This is a common “disease” of all metal heating devices.
You can solve the problem of rapid cooling. To do this, it is enough to cover the resulting structure with bricks. This material, unlike metal, is a wonderful accumulator of thermal energy. True, such a design will require a longer firebox to heat the room. Burning time and fuel consumption are successfully reduced by installing a brick screen equipped with ventilation holes. Such systems are widely installed in bathhouses.
It is most rational to install a brick screen at a certain distance from the stove walls. In this case, the heat emitted by the stove is used as efficiently as possible.
Ready-made solutions for waste incinerators
You can burn garbage not only in barrels. Various objects are suitable for these purposes, for example, the body of an old refrigerator, large buckets, stoves. You can build a special oven or purchase ready-made solutions.
A store-bought solution is more practical. If you don't want to poke around in the ground and rotten iron, you should think about buying one. An outdoor oven can be used for wood-fired cooking. The presence of an ash pan will make working with ash easier. Most models are equipped with a spark arrester, which makes operation safer.
The decision depends on the budget, the volume of waste, and the frequency of work. It is important not to neglect safety requirements and remember the appropriateness of such decisions.
Conclusion
It is quite possible to make a brick potbelly stove from bricks yourself. Such a furnace increases efficiency from 50-60% to 70-75%. However, it is still not cost-effective enough to fully replace stove heating. Although it retains heat more efficiently than iron, it requires the connection of a heating panel for constant use.
As a temporary source of heat, a brick potbelly stove, made with your own hands in a garage or greenhouse, is fully justified.
The design can be further improved by clad in metal. This will increase the service life and protect the stove from damage.
Advantages and disadvantages of a potbelly stove
Potbelly stoves have gained widespread use for a number of main advantages. Among them there are positive and negative sides; everyone chooses their own type and is able to make a stove on their own. Main positive aspects:
- The universal design allows you to use any options for igniting the stove. The type of fuel does not actually matter; it can be any combustible solid raw material. With some modifications, used engine oil is used for heating.
- Simple design, lightweight installation structure. Do-it-yourself manufacturing does not require financial costs; knowledge in the fields of welding and plumbing is sufficient.
- A large number of varieties allows you to manufacture and install in accordance with the heating area, room and other needs of the device.
- There is no need to build a foundation or large structures.
Almost any equipment, especially that which can be made by hand, has several disadvantages
A potbelly stove is no exception; before choosing this heater, you should pay attention to irreversible facts:
Much attention is paid to fire safety. A sealed chimney must discharge spent fuel to the street; the doors are securely fastened to prevent embers or other combustible elements from falling out. It is possible to get burns if you come into contact with a potbelly stove during the combustion process. The long operating time of a self-made potbelly stove will not give you peace of mind when preparing firewood.
Increased fuel consumption allows you to use the stove only for the necessary time.
Some varieties cannot be used indoors, there are types for heating or warming only
It is important to make a universal device that will help at any moment
The principle of operation of "Bubafoni"
The well-known law of convection states that when heated, warm masses move upward, and cold ones take their place. The work of “Bubafoni” is based on this principle: when the fuel burns, the air heats up and rises, entering the outlet pipe; the cold flow enters the stove through the pipeline. This is how constant circulation of air masses occurs. This in turn supports the fuel combustion process.
The furnace design includes a damper on the inlet pipe (gate). By setting the gap at a certain level, you can regulate the intensity of fuel combustion.
The work process ends with the complete burning of the wood and the lowering of the piston with the load to the bottom of the fuel tank. It is possible to stop the operation of the furnace ahead of schedule if you completely close the damper on the inlet pipe. This will stop the flow of oxygen into the stove. Another way to complete the heating process is to use fire safety equipment.
Types of barrel baths
The barrel sauna is suitable for organizing the following types of steam rooms:
- Russian bath , as you know, consists of two sections, a steam room and a washing area. The steam room is filled with moist hot steam. This type of bath is very easy to organize in a barrel. A stove is installed in the steam room; there must be space to organize a washing room so that contrasting water procedures can be carried out. It is better to position the stove so that the chamber with the heater is in the steam room, and the firebox and expansion tank are in the washing area. Since there is little space, heating equipment is selected in a small size. The peculiarity of this type of bathhouse is the formation of a large number of drains, so water drainage must be carefully considered;
- The Finnish sauna is characterized by the presence of very hot dry steam. In this case, it is important to properly organize ventilation with valve systems. The steam room is equipped with benches and a small stove. The peculiarity of this type of bath is the need for sharp cooling to carry out contrast procedures. If you can organize a font near the barrel, it will be great, but you can get by with a supply of buckets of cold water;
- ofuro – Japanese type of bathhouse without a roof, i.e. In this case, the barrel is placed on its end. Heating equipment and benches are installed inside. The design is easy to install, but requires more time to prepare for bath procedures.
Manufacturing Instructions
During operation of the stove, its body heats up strongly, so such a heating apparatus must be placed on a monolithic fire-resistant surface. This could be a layer of concrete, asphalt concrete, metal sheet, or just earth. The stove must have its own chimney; connecting the device to the chimney of other heating devices is prohibited.
There are two options for assembling such a furnace: with a horizontal and vertical arrangement of the barrel.
Vertical model
Vertical potbelly stove from a barrel
Scheme of a vertical potbelly stove made from a barrel
The manufacturing process of a vertical furnace model looks like this:
- Prepare an opening on the side surface of the barrel to allow loading of firewood;
- The door can be purchased in advance or a cut-out part of the wall can be adapted: hinges and a handle can be welded to it, making it convenient to close and open the combustion chamber;
- A little lower than the combustion door, cut another hole for mounting the blower door. To make the blower itself, a thick-walled pipe, cut lengthwise, is used. It should be able to move along the metal slats, but not be completely removed;
- At a height of 20 cm from the bottom of the container, install grate bars - a metal plate with holes or a welded cellular structure made of reinforcement. To fix them, use a regular steel corner.
Option 1 - mesh gridOption 2 – fittings
- You need to weld metal legs at the bottom of the barrel or simply install the structure on bricks;
- The role of the hob will be played by steel wire, which can be welded to the top lid of the oven;
- Brick lining (optional)
To protect the walls of the container from burning, the inner surface of the firebox can be additionally lined with refractory bricks, giving it a semicircular shape using a grinder. Masonry should be carried out using a kiln mortar containing 1 part fatty clay and 2 parts sand. The mixture is made with a minimum amount of water and should have a thick consistency;
- Next we make a chimney (more details below).
A hole for a chimney with a diameter of at least 15 cm is cut out from the side of the container in its upper part (or side). The height of the pipe must be at least 4 m. When installing it, the following recommendations should be taken into account:
- It is advisable not to install the pipe strictly vertically; the presence of horizontal and inclined sections increases the amount of heat received, but the number of turns should not exceed 3 times;
- the bending angle should be 30 degrees, and only in exceptional cases reach 45 degrees;
- horizontally located chimney elements cannot be longer than 1 m;
- to prevent condensation, the part of the chimney facing the street should be insulated with basalt wool;
- To reduce the load on the device body, the chimney must be attached to the wall.
On the chimney of a potbelly stove, you can install a rotary valve or a valve that moves along guides. Using this element, you can adjust the intensity of heated smoke removal and completely block the chimney during the period when the stove is not heated.
Horizontal model
The efficiency of a potbelly stove made from a 200 liter barrel will be higher if it is made and placed horizontally.
Potbelly stove from a barrel - horizontal version
Scheme of a horizontal potbelly stove made from a barrel
The algorithm of actions for horizontal placement of the container will be as follows:
- Place the barrel on its side;
- To ensure stability of the structure at the bottom of the container, you need to weld legs from a steel angle or small diameter pipes;
- In the upper part, cut an opening for storing fuel the full width of the barrel to make it easier to remove the grille and reflector;
- Install a metal reflector inside the container, which will separate the combustion chamber from the chimney and the grate (you can make it yourself from reinforcement rods;
- Cut another opening lower to allow air flow into the firebox and clean the stove from ash, or make it a separate structure by welding the ash pan. As a result, the design will look like this:
Inside view
- Weld hinges on one side of each hole and install doors of the appropriate size. For tightness, it is recommended to cover them with asbestos-cement cord;
- In the back of the container, make a hole for the chimney and weld the pipe. Further installation of the chimney pipe is carried out in the same way as for the vertical model.
- You can also weld a sheet of metal on top of the barrel and use it as a hob.
Final design
How to use the stove correctly
Only dry wood is suitable for use in pyrolysis heating stoves. This is due to the fact that when wet fuel is burned, a lot of water vapor is released, which reduces the temperature in the working area. Of course, in this case, there can be no question of effective combustion of pyrolysis gases. In addition, there are other unpleasant aspects associated with incomplete combustion of volatile components. Firstly, when cooling in the chimney, they fall out on its walls in the form of tar, creosote and other difficult-to-remove substances. Secondly, the content of hazardous chemical compounds at the outlet of the chimney exceeds all permissible standards, which negatively affects the environment and human health. And, on the contrary, when burning well-dried wood, the exhaust gases consist mainly of carbon dioxide and water vapor, and the operation of a potbelly stove from the outside can only be judged by the slight movement of heated air at the upper end of the chimney.
Before adding fuel, the piston is removed and put aside, and the space inside the stove is filled with firewood. It should be remembered that the thermal power and duration of operation of the heating device depend on the density of the stacking, therefore all gaps between the logs must be filled with shavings, chips, wood husks, etc. Place a rag soaked in kerosene or diesel fuel on top, install the air distribution piston and close the unit lid.
For ignition, you can use a rag dampened with a flammable liquid.
The stove is ignited with the damper of the air supply pipe fully open by throwing burning rags into it, which have been previously soaked in barbecue liquid or the like. After the wood burns, reduce the air supply.
In order to make the operation of a potbelly stove safe, follow a few simple rules:
- If flammable substances are used to ignite wood (gasoline, kerosene, solvent, special products for wood-burning stoves), then it is necessary to install the piston and close the stove with a lid before throwing a lit match.
- It is not recommended to use plastic, rubber, foam and other household waste as fuel for two reasons. Firstly, this is due to the release of extremely toxic substances that cannot burn even during the process of pyrolytic decomposition. Secondly, during high-temperature oxidation of such materials, a huge amount of soot is released, which means that the chimney will have to be cleaned several times a month.
Despite the fact that pyrolysis decomposition promotes the most complete combustion of fuel, a small amount of soot and ash is still formed during operation of the furnace. To remove carbon deposits, you can use a metal scraper and brush. As for ash, the most convenient way to clean a potbelly stove from a barrel is with an iron scoop with a short handle. There is no need to remove all the ashes. A layer of ash 2–3 cm thick will act as thermal insulation, preventing the bottom of the heating device from burning out.
Where is the best place to install?
When installing a potbelly stove from a 200 liter barrel in a garage, it is important to follow established fire safety rules. In a small room, the heating device should be placed in a place opposite the door. In this case, the distance from it to the walls or other interior items should be at least 50 cm.
Expert opinion
Nikolay Davydov
Stove maker with 15 years of experience
No flammable items should be placed near the stove, and when moving, you should be careful not to accidentally contact exposed skin with its body to avoid burns. The room where the potbelly stove is installed should be well ventilated, at least naturally.
Materials and tools
- Metal barrels of various sizes.
- Sheets of tin.
- Pipes.
- Cans.
- Clay, pebbles.
- Bricks.
- Tool for cutting metal.
- Welding machine.
- Work clothes, gloves, safety glasses.
https://youtube.com/watch?v=eYdPEOGK2CQ
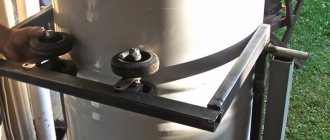
If possible, we weld all the parts that need to be connected using electric welding. When the potbelly stove is ready, you need to take care of its stability. Therefore, weld or drill the legs. Rollers are an ideal option. Before cooking food on a potbelly stove for the first time, it needs to be fired. It is necessary so that the remaining paint and other chemical products burn out. Everyone can figure out how to make a potbelly stove; you just have to set yourself a task and start methodically completing it.