A problem arose: to repair the equipment, I needed to accurately drill several holes with a diameter of 2 mm in a steel plate, and the drills turned out to be so blunt that they burned and did not work.
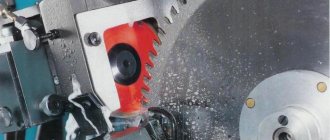
I tried to sharpen them on a homemade sandpaper made from a three-phase asynchronous motor with a simple capacitor start. The machine in the photo: a tool rest with markings for sharpening drills.
However, my skills and coarse-grained corundum stone allow me to edit drills from 4 mm relatively well, but problems arise with smaller diameters. You need professional equipment.
This need shaped the task: to make by hand a device for sharpening small drills, as simple and reliable as a metal bolt. I took as a basis an idea from the Internet (used for a long time) called Wishbone (in our opinion - Wishbone), which I talk about below in this article.
I had to work in the evenings in the kitchen of a city apartment, not a private house, after all stages of dinner had been completed. Naturally, I sawed, drilled and leveled almost on my knees with the most accessible hand tools.
Therefore, Vishbon was completed only on the second day, although in a workshop, using a grinder and a drilling machine, it can be done in a couple of hours.
In general, advanced users quickly print this device on a 3D printer and get high-quality samples of hand tools.
Wishbone - what a drill sharpening device can do and what functions it cannot do
This product allows you to fix dull and broken twist drills quite quickly and shape their cutting edges, just like in a factory for home use.
The main feature of the device: it does not require high sharpening skills; anyone can use it. The design is not complicated.
It’s worth immediately taking into account that such a homemade product only performs two-plane sharpening. Its capabilities are limited to two functions:
- by forming an angle at the apex, and you can deviate from the standard value for steel of 120 degrees and grind other values. A table of the dependence of angles and parameters of different types of processed material are published in reference books;
- creating a rear cutting angle.
Apex angle
Relief cutting angle
You can talk about them for a long time, but it’s unlikely that it will be better than Viktor Leontyev (a real master) on his YouTube channel. For those who don't know this, look there. I think I should warn you - this is important!
In principle, the correct creation of these two angles is sufficient for working with small drills at home, and often in production. Sharpening the jumper with this device will not work. You need to use a special machine.
The correct sharpening form is the key to effective work.
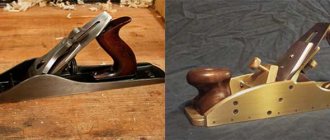
As a result of processing, the cutting edge of the drill is given a certain geometry, a priority for a particular diameter of the drill and the structure of the surface being processed. To obtain the required shape, accordingly, different methods of sharpening the cutting edge are used. There are single-plane, conical, two-plane, screw and cylindrical types of sharpening. At home, the first two methods are most often used as the simplest, and drills with a diameter of up to three millimeters are sharpened in one plane, ensuring a thirty-degree slope of the rear corner. The disadvantage in this case is the high probability of destruction of the working part of the edge due to its thinning, therefore, for drills of larger diameter, sharpening in the form of a cone is usually used, forming an angle at their tip in the range of 118-120º.
Personal experience of making a Wishbon instrument at home with your own hands
You can choose any body material, of different compositions:
- aluminum sheet or soft alloys;
- plastic;
- laminate or fiberboard;
- polyethylene or fiberglass;
- even a wooden plank.
I settled on a plate made of getinax: it is easy to process and has high strength.
To make the case, I drew a sketch on a squared notebook sheet. No drawings needed. Scale 1:1. I placed a small drill on it as a size guide.
For clarity, I outlined the dimensions with a red pencil and showed the corners.
After that, I drew the dimensions on the getinax. I drilled holes in the body of the future device.
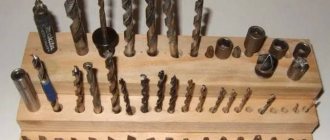
Since I didn’t have a normal drill, I had to make a homemade one based on the cannon drill principle. I used a piece of a spoke from a Soviet bicycle. Diameter 2 mm.
I filed off part of the side edge and sharpened the end into a central corner. On the one hand, it is a parody of a cannon weapon, but it is a completely working design for soft materials.
It is permissible to make them even from nails and wire of different diameters. This way you can make different types and diameters of such tools. No special precision is required. My finished drills are shown in the photo.
From the getinax I used a hacksaw to cut out a body blank and an additional part for attaching the wheel - a regular washer for an M3 nut. I used a 4 square piece of copper wire as an axis. In order for the wheel to rotate well, a spacer had to be installed.
The method of connecting parts is conventional riveting. Vishbon showed the rest of the details in the photo.
The clamping block (a pentagonal figure in the photo) was made with holes with a diameter of 4 mm.
In the central part of the body, I had to use homemade drills to increase the diameter of the hole and cut the thread. I made the tap with my own hands from an M4 hairpin: I sharpened one end slightly into a cone and cut part of the thread along the length from opposite sides with a hacksaw.
From the opposite end of the thread, I clamped two nuts against each other, which allowed me to work with it with a wrench.
Homemade tap
I must warn you: it’s easier to work with a factory tap. But, in a critical situation and for soft materials, this design is justified.
In the middle of the 120 degree angle I scratched a bisector, which serves as the basis for laying the thinnest drill bits.
I reduced the height of the body so that even the smallest drills protrude from it: this makes it easier to install them.
In the upper part of this, Vishbon made a mark at the exit of the angle bisector to facilitate the assembly process: centering the axes of large drills when fixing them in the fixture.
The mark indicates the center of the drill.
Sharpening using reverse mode
You can make a very simple homemade device for sharpening drills with your own hands from sandpaper. This is a convenient option if you don’t have a grinding wheel at hand.
In this case, you should wrap an even round piece of wood or a pipe (even a plumbing plastic pipe will do) with several layers of sandpaper.
It is advisable to make quite a lot of layers (about 2 cm) so that the drill can be sharpened faster and with high quality. You can fix the paper with glue.
To sharpen the drill, place it in a drill or screwdriver. It is extremely important to enable reverse rotation mode. In standard mode, tool sharpening cannot be done in this way.
Next, simply drill through the sandpaper several times along the entire length of the drill. In general, you can even do without a pipe by simply rolling up a long enough piece of sandpaper.
During the drilling process, the edges of the equipment are sharpened with sandpaper. The method allows you to restore even heavily worn drills. But the quality of sharpening will not be as good as when using emery.
9 main rules for working with Wishbone, without which it is impossible to achieve a good result
I show them in the form of step-by-step instructions with a strict sequence of actions. However, keep in mind: there are two ways to work with Wishbon:
- straightening dull factory edges;
- bringing broken drills back into working condition.
How to straighten dull edges
1. Loosen the clamping screws and insert a drill under the fixing plate, tighten the fastening without fanaticism: you will need to make adjustments.
2. Using a magnifying glass, set the drill so that the cutting edges are parallel to the plane of the body or wheels. It is very convenient to turn it with pliers.
3. Adjust the sharpening angle at the tip. To do this, we install some kind of even guide, for example, a ruler, on the top of the drill and the wheel. The planes of the fixture and the reference line must be parallel.
But if you need to make the sharpening angle not 120 degrees, but less, then we simply move the drill a little higher, as in the photo.
To accurately set a certain degree value, the required angle is drawn on a sheet of paper using a protractor and its bisector is drawn. The device is oriented according to this template.
4. The fastening screws are tightened until they stop. The drill is fixed. After this, you need to repeat the measurements in steps 2 and 3. Be careful and careful as a necessary condition for accurate sharpening.
5. Place the Wishbone vertically on the grinding surface of an abrasive stone or sandpaper, laid on the most even surface, for example, glass or plastic.
Then we tilt it at a slight angle from the vertical to cut off the occipital region. At first, a simple template will help.
After sharpening several drills, it will lose relevance due to the skills developed.
6. All that remains is the sharpening itself: the Wishbone is lightly pressed against the abrasive surface of the sharpening device in the set position (large loads are harmful), and smoothly moved away from you, always placing the wheel in front.
Without reaching the end of the abrasive surface and without further touching it, the device is lifted and carried through the air to the beginning of the abrasive. The process is repeated several times.
During each sharpening, it is very important to always point the Wishbone in only one direction: away from you.
7. The Vishbon is rotated 180 degrees around the axis of the drill and completely repeats steps No. 5 and 6 for the second edge.
8. Using a magnifying glass (the eye gauge may fail), a visual assessment of the condition of the cutting edges, apex angles and rear cutting is made. If necessary, repeat steps No. 5 ÷ 8.
9. Sharpening ends with one pass for each side, which ensures the removal of the remaining burrs on each of the cutting edges. The edges will be perfect. I advise you to check it.
I should note: when I first made Wishbone and immediately began sharpening the drill for metal, acting on a whim, I neglected most of these rules. As a result of the test, it was possible to drill only an aluminum plate, but failed to drill a steel one. There was no hole.
I showed this entire process of sharpening and drilling in the video below. You should do everything right at once, without unnecessary haste.
How to sharpen a broken drill bit on Wishbone
The process described above for broken drills will take a very long time. Therefore, the damaged end must be ground off using an emery wheel.
You can also use a drill:
- insert the broken drill into it;
- turn on reverse;
- set an angle of 60 degrees to the sharpening stone. This tilt is important;
- start the engine;
- Carefully grind the broken end onto the cone. Follow safety requirements.
Now all that remains is to repeat all the steps to correct the edges and additionally restore their shape.
Good abrasives quickly grind down thin drill bits. Therefore, after 20 passes on the surface being treated, conduct a visual assessment of the cutting edges and angles and re-adjust them.
Errors
The most common mistakes in self-sharpening drills include the following:
- The corners are made symmetrically and correctly, but the lengths of the edges for cutting differ from each other. In this case, the center of drilling is uneven relative to the axis of the tool. While using this tool, beats will occur. At the beginning of work, it will be extremely difficult to get into the applied markings. In this case, the working element will most likely simply break.
- The alignment is accurate, but the cutting edge has asymmetrical angles. It follows from this that when drilling a hole, only one working surface will work. That is, the processing procedure will proceed very slowly, and the working part may overheat and break. In addition, the hole will be broken, that is, its size will be larger than the size of the drill used.
Wishbone alternative design: what are the differences between the tool
An alternative is to mount the guide wheels across rather than along the main plane of the housing. I hope that making such a device is not difficult. But 3D printing will require drawings.
In this case, drills are sharpened perpendicular to the plane of the cutting edges. For some, this feature of the tool is fundamentally important...
I do not think so. It is necessary to take into account that a spiral drill for metal, using a stationary machine, can be sharpened in different ways:
- the already mentioned Victor Leontyev performs this action, placing the cutting edge across the rotation of the emery;
- sharpener Nikolai Kulikov places it parallel. Watch his channel “Kulikov Experience” on YouTube.
Both techniques of these experts work correctly and have a number of advantages and disadvantages. Welders sharpen drills with a grinder. They always have this tool at hand: it allows them to cut off any bolt, angle, channel, or fragments of metal elements.
Homemade people make a sharpening machine, which is adapted for straightening drill elements on the side of an emery wheel... Such devices, I must note, are not suitable for everyone.
There is no universal advice. Which design should be chosen and used for sharpening metal drills with your own hands - decide for yourself.
Sharpening machines
The optimal device for sharpening drills with your own hands is a regular sharpening machine. But it is best to experiment with old equipment, since without experience the instrument can simply be ruined. If you have no experience working with emery, it is better to purchase a specialized machine.
Easy-to-use multifunctional sharpening devices are available on the market. You can purchase a simple manual machine or electrical appliance.
Modern models work almost automatically. The design provides not only a fixation mechanism, but also a supply mechanism for the sharpening tool.
This type of equipment is especially suitable for working with twist drills. However, the cost of such devices is quite high, so it is not practical to buy them for your home.
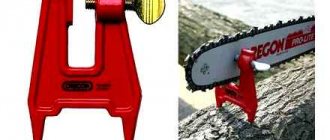
Selection rules and scope of application
When choosing a device such as a drill attachment designed for sharpening drills, you should consider a number of factors. This will allow you to purchase a truly convenient and effective device that will successfully cope with all tasks.
The first thing you need to pay attention to when choosing such an attachment is the compatibility of the diameter of the mounting hole in its coupling and the size of the drill chuck on which it will be installed. An important parameter is also the tool sharpening angle provided by this device. Many manufacturers of such attachments include an additional sharpening stone with the device, which allows you to sharpen drills at a different angle. To ensure that the sharpening attachment you purchase has wider functionality, it is better to opt for models with an additional sharpening stone included.
A sharpening stone is usually enough for several dozen sharpening processes. In some models, the grinding wheel can be adjusted, which increases the service life
When using attachments on a drill, remember that this is not a full-fledged sharpening machine, but a device designed to quickly correct a “lost” drill in cases where there is no access to stationary equipment. That is why you should not overload such devices, then they will serve you much longer. It is not advisable to use such attachments in production conditions, where the need for full sharpening of drills arises quite often, since under conditions of intensive use they will quickly fail. This device is indispensable in small home workshops, which are not always equipped with a traditional sanding machine.
Tools
For sharpening, two types of devices are used: universal-purpose attachments or stops and highly specialized devices.
The simplest devices include a hand holder. This tool only serves to hold an object in a specific position. Sharpening control is carried out visually. For this, an arbitrary reference point is used. Therefore, experience is required to operate this device. Its advantages include simplicity, compactness, and low cost. The main disadvantages are low processing accuracy and increased requirements for the skills of the performer.
The stop for an electric sharpener is a universal device used for fixing tools and is not specifically designed for a drill. Many models have tilt angle adjustment and are equipped with a marking scale. This determines better accuracy of work than with a manual holder, however, in this case, the skills of the performer are of great importance. In addition, there are more advanced and universal options with additional height adjustment and designed for mounting the part on a workbench instead of the emery body. Such stops are compatible with any electric sharpeners and allow you to process cutters, chisels, knives, screwdrivers, etc.
Semi-professional guides for different drills are more advanced tools compared to those discussed above. They provide reliable fixation of all linear parameters with setting values according to markings and high-precision control of sharpening (up to microns). Installing the device in the gutter prevents it from moving or turning. Linear movement is assumed, controlled by a limit stop or a performer, and the movement of the edge along an arc. These devices provide good sharpening quality. However, professional skills are required, since correct processing requires taking into account the type of drill. Due to the lack of automation, guides are classified as professional devices. However, there are also semi-automatic versions of guides equipped with a sharpening unit. They eliminate the need to install a stop on the workbench and change discs.
It should be noted that all the devices discussed above are designed for standard electric sharpeners. In view of this, you must first install the emery disc.
Electric sharpening machines are designed for restoring twist drills. That is, these are highly specialized devices. Their main advantage is considered to be ease of use, eliminating the need for special skills and experience of the user. This is due to the automation of the device. The performer only needs to place the drill in the hole, taking into account its diameter. This also eliminates the possibility of errors, ensuring accuracy. However, for most variants of these devices there are no settings. Because of this, they are more relevant for domestic use. Some models are equipped with an attachment for scissors and knives. There are professional options that allow operator control of sharpening. In the models under consideration, the drill is mounted in an individual cartridge instead of a common holder. They are equipped with settings for the sharpening angle, material removal depth, and edge processing method.
Another simple option for everyday use is represented by attachments for sharpening drills. The drill attachment for sharpening drills includes a casing with sandpaper inside.
In industrial conditions, with intensive use of drilling machines, it is necessary to constantly restore their working elements. For this purpose, there are racks presented by professional stands with sharpening devices for various options. They are versatile and highly productive, but very expensive.
Regardless of the type of device used to sharpen the drill, accuracy control is carried out using a template. It allows you to determine the accuracy of the angles of the cutting part.
What you will need for assembly
Electric/motor
Various drills, including large diameter ones, are sharpened on the machine in everyday life. In addition, the primary processing of the cutting edges of the tool and their finishing are separate stages of work. Therefore, you will have to change the circle and install the one that is at hand from those purchased in advance. Since the machine is long-term equipment, it is necessary to install it for the future. Based on this:
- engine power: about 1.2 - 1.5 kW is sufficient;
- power: single-phase. Any garage or small workshop (shed) on the site, with rare exceptions, is connected to the 1ph 220/50 line. This is what we need to proceed from.
Grinding wheel
Moreover, there should be several of them, with different grain sizes. To securely fix the abrasive on the engine shaft, bushings are prepared that clamp it on both sides.
Sharpening device
You can limit yourself to the simplest “shelf”, but then you will not be able to maintain the required angle. This type of work requires a lot of practical experience.
The device can be purchased, although it is quite rare on sale.
The best option is to make it yourself. For example, like this:
Schematic elements
- Magnetic starter (with 3 pairs of contacts) for a 3-phase circuit.
- Start/stop button or 2 different ones - to turn the machine on and off. And the third one is definitely an emergency stop. It is often combined with a pedal, which is much more convenient and safer, since your hands will be busy when sharpening drills.
- Wires. With the indicated engine power, 1 “square” is enough.
The simplest connection diagrams for three-phase motors are shown in the figures:
It is easy to find an acceptable one on the Internet, depending on what kind of motor is used, how its windings are connected (“star” or “delta”), and what voltage source it will be connected to (1 or 3 phases).