If you are a keen hiker, then you know how important it is to be able to provide yourself with an effective and reliable source of fire on the road. Without it, you will not be able to cook food, boil water for drinking, or keep warm in bad weather.
Since ancient times, people have solved this problem by making a fire. However, this method requires quite a large amount of firewood, some skills, and is not very good from an environmental and safety point of view. Therefore, they have been replaced by modern gas and gasoline burners, which make it possible to solve all problems with cooking as comfortably as possible. However, this solution also has its drawbacks. For example, if you are going on a multi-day hike, then the weight of gas cylinders or gasoline containers can be quite significant, and no one wants to carry the extra weight. Or, for example, you are about to fly on an airplane, where, as you know, it is impossible to transport such things, so there is a need to purchase gas and gasoline on the spot, which is not always possible.
Therefore, more and more tourists are turning to wood stoves.
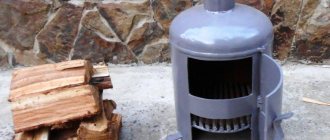
They combine all the advantages of a fire with the utmost simplicity and comfort of a burner. To use such a stove, you will need a minimum amount of fuel of almost any type: firewood, branches, pine cones, leaves and even dry grass. Therefore, you can use a wood stove in any area, with the possible exception of the desert and ice ridges. And most importantly, it has excellent efficiency, which allows you to boil a liter of water using just a few dry wood chips. This is explained by the special design of such a stove, which uses the phenomenon of wood pyrolysis.
If you are interested in such a device, then you can buy one of the ready-made products, for example this one. Or you can spend one hour and make a wood-burning camp stove yourself, because you only need three tin cans of different sizes and our instructions.
So, first of all, you will have to get three tin cans of different sizes. The first, largest, will serve as a shell. The second jar is smaller because it must fit freely in the first. And the last, smallest one, is useful as a burner. In addition, we will need a marker, a drill, metal scissors and a small wooden block.
Making an auxiliary device
This wooden block is not part of the stove, but serves to make it. With its help, it will be more convenient for you to drill holes and perform other operations. Insert the block into the jar and draw two lines with a marker approximately at the level of the lid.
The distance between the lines should be approximately 7–8 millimeters.
Carefully cut out a rectangular notch. The top edge of the can should fit freely into this recess.
Let's position the wooden block in such a way that it provides reliable support for the can. The upper edge should fit comfortably into the notch we made.
Gas infrared
In this method we will tell you how to assemble such an installation yourself, because... building an infrared burner is very difficult.
Materials and tools
For production you will need:
- Infrared ceramic burner.
- Gas cylinder.
- Oxygen hose 2 m with a diameter of 0.4-0.6 cm.
- Clamp 2pcs
- Screwdriver
- Nozzle for liquefied gas or natural gas (depending on the fuel used).
- Retaining ring
When choosing a ceramic heating pad, it is better to give preference to small models - gas is consumed more economically. The peculiarity of infrared heating is that it heats objects, not air, so if possible, it is good to have a stand under the heating pad, which will allow you to direct the energy.
Manufacturing instructions
The diagram clearly describes the principle of operation of the stove. The gas-air mixture allows you to achieve high temperatures with the least risk of fire.
Principle of operation
Essential elements
- Place the nozzle into the connection hole of the infrared burner.
- Attach the retaining ring on the reverse side.
- Place a clamp on the oxygen hose to prevent gas leakage.
- Connect to the nozzle, tighten the clamp with a screwdriver.
- Connect the gas cylinder to the hose, also using a clamp.
- To light the heater, you need to hold a match to the ceramic heating pad. It is forbidden to ignite gas near the nozzle. Fuel can be propane, argon and natural gas. When replacing fuel, you need to change the type of injector. The gas camp stove is ready.
Type of infrared gas stove for a tent
Operating rules
A camp stove for a tent should not only heat the space, but also serve as an assistant in cooking.
Infrared heaters are not intended for this, but craftsmen have learned to cook on the following tiles:
- You need to place the heating pad with the radiating side up, and place two stones or bricks on the sides.
- Place metal rods or skewers on the bricks.
- Place dishes on top for cooking and heating canned goods.
A 200g can will last for 2 hours, after which you need to replace it with a new one. The gas cylinder must stand upright. It is prohibited to leave the stove unattended. Ventilate the tent from time to time. The surface temperature of the ceramic heater is 800-900 degrees.
Making holes in the bottom of a large jar
First, draw a line along the bottom edge of the can. This line is needed to mark the points for the ventilation holes. In this case, a special dye is used for marking, but nothing will happen if you do it with a simple marker.
We drill holes along the line we marked. Their number and size are of great importance for the operation of the stove. If there are too few of them, there will be no traction, if there are too many, then the wood will burn out very quickly. Therefore, it is better not to overdo it here in order to be able to drill more holes after testing.
Design and principle of operation
A camping potbelly stove is a miniature stove that works on the principle of its “big sister” - the potbelly stove. The stove is easy to use when relaxing outside the city. For heating small tents and cooking food, the stove has plenty of power.
The stove starts with a body mounted on legs. Different designs require different shapes and sizes, however, to make the concept easier to understand, it will be easier to imagine the body as a regular square.
The body is divided into three parts:
- blower;
- firebox;
- smoke circulation.
Further details:
The vent is the lower part of the stove. The bottom for it is the bottom of the furnace body, and the upper wall, separating the ash pan and the firebox, is made in the form of a lattice made of iron grates.
Made this for:
- Providing oxygen access to the combustion zone;
- Gradual emptying of the firebox.
Firewood that has burned into charcoal falls into the ash pit through the grate, making room for a new batch of firewood. In most drawings, the blower is allocated 1/5 of the total volume of the body.
This value may vary depending on the design. A sash is required. It serves as a channel for oxygen access and a door through which burnt coal is removed.
The firebox is the main part, the fuel receiver and the chamber in which combustion is maintained. Most of the internal volume is separated for it - from a third to a half. Just as in the previous case, a sash is required. Through it, firewood will be supplied to the combustion zone.
Smoke circulation is a system for increasing the heat transfer of the stove. A smoke circulation system is implemented by installing a number of partitions parallel to the base of the stove in the upper part of the stove body.
When assembled, they will form a zigzag-shaped box in which smoke is retained, giving off more heat. This reduces the traction force, but the amount of heat emitted by the stove increases disproportionately
On some models, the smoke circulation system is located not above the firebox, but perpendicular to the body. A rectangular area is separated under it, equal to the length of the case at the rear wall. In this case, the partitions are not located parallel to the base, but perpendicular.
Operating principle of the stove:
The combustible material, firewood, is loaded into the firebox and then set on fire. The firebox flap is always tightly closed during combustion and opens only to load a new batch of firewood. During the combustion process, the lower flap opens a couple of centimeters
This will allow oxygen to enter the wood combustion zone and maintain combustion. Attention! There is no need to open the ashpit completely - in this case, the wood will burn out 3-5 times faster and the stove will not be able to properly release heat. The ashpit should be opened completely in cases where it is necessary to clear it of coals. The rest of the time it should be slightly open. Air will flow through the gap, feeding the fire and creating draft. Under the influence of this draft, air will enter the stove from below, heating up, and then, together with the smoke, will leave through the only opening - the chimney.
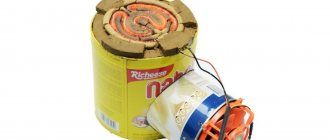
Drilling the bottom of the middle jar
We make many holes in the bottom of the jar. Their size and quantity should be such that firewood cannot fall out through them.
The result should be something like this.
Assembling the structure
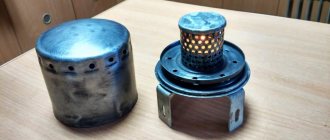
We insert the middle jar into the large one.
As a result, our stove consists of two cans, rigidly inserted into one another. At the same time, a small gap remains between their walls, necessary for air movement.
Making a burner
The type of burner in different designs may vary slightly. In this case, the option with round holes in the side wall is used. You have already learned how to do them well from previous operations.
We cut out the bottom of a small jar with metal scissors.
The edges can be smoothed with a hammer and filed.
We carry out tests
The main part of the wood stove consists of two tin cans inserted into one another. We load the middle jar with flammable material, which can be wood chips, branches, or cones. It is best to use dry branches on trees, because branches lying on the ground may be damp to one degree or another.
Set it on fire and wait for it to burn. At first, this may cause some difficulties, but after several training sessions it will be possible with one match.
When a confident, intense burning has begun, we place a burner on top, which we made from a small jar.
And then we place a kettle or pan on top.
If you watched the manufacturing process to the end and did not understand anything or it seemed too complicated to you, then check out another option. The video below demonstrates how to make such a stove without any tools other than a regular knife. It turns out, maybe not so neatly, but no less practical.
And we invite all our readers who have already used similar stoves in the field to share their impressions and advice with us.
Brick pyrolysis oven
Even if you have a diagram, you won’t be able to make such a stove yourself.
Brick kilns today are no longer as relevant as they were quite recently. However, a DIY brick pyrolysis oven can cope with heating a large house. We hasten to warn you that the work is complex and requires knowledge in this narrow industry. After all, from time immemorial, a good stove maker was worth his weight in gold and for good reason. The masters passed on the secrets to their followers like some kind of treasure. There are a lot of nuances and schemes, which are not so easy to understand.
If you still decide to make a pyrolysis oven out of brick with your own hands, despite the fact that it is practically impossible, the first thing you need to do is the foundation. The structure is quite heavy, so it requires a separate, powerful strip foundation. The entire structure made of refractory bricks is already placed on it. Fireclay bricks are laid inside.
Regarding the installation scheme, we repeat - it will not be possible to build such a complex structure on your own, even if you have a drawing. Stop futile attempts, waste your time, money and nerves in vain.
You need to hire a knowledgeable person, preferably on the recommendation of reliable people. All you have to do is watch the process and accept the work. Pay attention to what the chimney will look like. It is better to avoid a completely brick chimney. A metal insert must be installed in it or a ceramic chimney must be built into it.
Also note that a heat exchanger for a water heating system can be installed in the oven. By and large, this can be done according to the principle of installing a water circuit in a fireplace. We have already written about this earlier. DIY pyrolysis oven video: