Plastic is widely used in various spheres of human activity, from industry to everyday life. Thanks to the widespread use of polymer materials, we are surrounded by a huge number of bags and sachets, packages and bags with different textures, colors and structures.
For the purpose of reuse, you can make a variety of crafts from plastic bags, using them for practical and decorative purposes. To process a durable and reliable material that is pliable in work, you can use all kinds of techniques and non-standard solutions.
Thanks to different processing methods, it is possible to produce beautiful jewelry, decorative jewelry and attractive children's toys. Also, from bags with a dense structure you can weave rugs for decorating the entrance area, reusable string bags for stores or storing vegetables and non-bulk products.
Recycling plastic bags with your own hands will not help to avoid an environmental disaster, the foundations of which are laid by the active production of plastic. But this method of using strong and durable material will ensure compliance with the principle of environmental friendliness.
Joint creative activities with children will help, when using bags for crafts, to explain to the younger generation the need for moderate consumption. You can make many crafts from packaging and garbage, large and small, colored and plain or even transparent bags.
To process flexible and pliable material, you can use the most accessible tools that can be found in every home. These are scissors and a sharp knife, and the bags themselves can be sewn and glued, secured with tape or tied with thread, forming the required volume in crafts.
Flowers from bags
The flowers will be easy to make and bright. They will add newness to the atmosphere and act as an original present.
To make an unusual item, you should know how to make crafts from bags.
For example, to create roses you need to stock up on:
- multi-colored packages;
- wire;
- scissors;
- braid or green threads for winding.
Performance
- Using wire cutters, cut the wire into equal lengths.
- Cut out 11 squares from polyethylene.
- We make rings with a leg from the wire.
- We wrap the rings in polyethylene, securing them to the stem.
- We collect a flower. We twist the small petals, then the large ones. The main thing is strong fastening of the petals.
- For the stems, twist the wire and wrap it with green threads or braid.
Garland of pompoms
Another option for a festive and unusual decoration of a yard or local area would be a garland. Several pom-poms are formed from the bags; when assembling the garland, you can alternate colors and shades, the sizes of the elements, creating truly beautiful decorations, and each element can be illuminated with an LED.
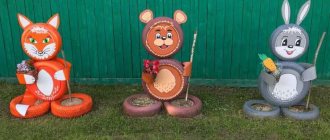
Cockerel
For a bright cockerel you need:
- packages in the amount of several dozen;
- a piece of thick wire;
- a simple pencil:
- adhesive tape or tape;
- several sheets of A4 paper;
- glue gun.
Manufacturing
Making the frame of the future cockerel. We draw a life-size template on paper and bend the wire along it. If something turns out unevenly, don’t despair; everything will be corrected when done.
We bend the wire so that the ends become the end of the contours in the places where the paws will be located. A description of the implementation will help achieve realism.
We make a couple of types of stripes from bags. For the torso you will need a strip, the thickness of which is 3 cm, for the upper part up to 2 cm. It is advisable to take it longer, you can get rid of the excess. We string the prepared material onto a wire of small thickness. It turned out to be a crumpled little thing.
To add volume to the cockerel, we put high-density polyethylene on the frame; it is necessary to stuff more material there so that the workpiece does not have too much hardness. We secure the bag with adhesive tape so that the frame takes on the appearance of a chicken. The absence of tape is compensated by wrapping with fabric.
After the workpiece has acquired similar chicken outlines, we form the appearance. We wind strips of wire from the tail, which are wrinkled. High winding density masks errors.
The rooster's head requires a comb and beak. If the figurine will be used at home, then these parts can be made of paper; if outside, then plastic will be needed. You can use a disposable plate for this.
We attach them to the head with a heat gun and continue winding the crumpled strips. We decorate the ruffles on the head with eyes.
- How to sew a decorative mini bag with your own hands
- Crafts from cotton pads - beautiful ideas and tips on how to make decorations and toys with your own hands (70 photos)
- DIY New Year's crafts: 70 photo ideas and a master class on making crafts for the holiday
To make the paws, we create blanks from non-solid wire and attach them to the torso. We fasten them with excess, since later they will be stuck into the ground so that the craft holds itself. The craft is done.
Therefore, first we learn how to create pom-pom balls
Step-by-step making of crafts with your own hands, starting with pom-poms. Making them from threads is as easy as shelling pears. And we will have to use polyethylene “threads”. There is no need to buy them because they are handmade.
This process is labor-intensive and consists of two phases:
Cutting threads from bags. Using scissors, cut narrow strips of as long as possible from purchased bags - no more than 5-7 millimeters wide. There will be 5-7 strips, connect them into one length with quick super glue. And as much footage as possible. If it's not enough, do more.
Cut out a pair of identical rings from cardboard, approximately 15 cm in diameter, with a hole 3-5 cm in diameter inside.
The outer diameter will become the volume of your pompom, so determine the proportions of the circles yourself. Place the circles together and wind the “threads” tightly together and without gaps.
Otherwise the pompom will seem lopsided. Wind until the inner hole allows no more threads to pass through. Finally, tie the fixing threads and cut those along the edge of the circles.
You take off the rings, and from the large pom-pom you get almost the entire “body” of Fat Piglet from the cartoon, who loves to visit.
In the same way, make a pom-pom head on a smaller diameter circle, and then on four smaller circles, pom-pom arms and legs.
“Revive” your sweet tooth with your accessories: eyes, ears, hands, tail. One craft is ready. The options for what crafts you can make from bags are endless.
Door wreath
This decor is one of the New Year's crafts made from bags that will wonderfully transform the front door.
A step-by-step description will help you create such a product with ease.
- Crafts for Mother's Day - how to make simple and beautiful original decorations and toys with your own hands (130 photos + video)
- Craft flag - how to make it with your own hands correctly? Master class on making for holidays and parades (105 photos)
- Eyes for crafts: how to make templates and a master class on making eyes from various materials (100 photos)
You will need materials in the form of:
- white bags;
- scissors;
- clothes hangers or thick wire;
- glue gun.
Performance
We roll the hangers or wire into a circle for the base. If hangers were used as it, then it is better to use a hook to attach the wreath.
We cut strips of polyethylene.
We begin to wrap the circle in strips so that the free ends stick out. There should be no gaps between the strips. So we close all the gaps on the circle to the end.
When the wreath is ready, decorate the product with small Christmas tree decorations using a glue gun. After the glue has dried, the decoration is ready.
- Craft angel - 105 photo ideas on how to make your own angel quickly and easily from scrap materials
- Crafts from matches - 125 photos of original ideas for professionals and simple crafts for beginners
- Crafts with children: a review of interesting and exciting ideas for creating toys and decorations (115 photos)
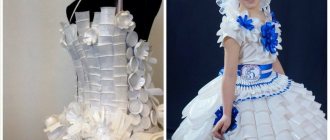
How to make an African skirt
You can make a Papuan costume for a girl with your own hands by making a fluffy skirt. Using your imagination, it’s very easy to make a skirt from different materials. The most basic way is to cut pieces of fabric. For this:
- We choose green fabric and cut it into strips to get an imitation of leaves.
- After the flaps have been cut, they just need to be sewn onto an elastic band. To do this, choose a wider elastic band, measure the waist and cut off the required size.
- We sew the elastic band together to make a ring. Instead of fabric, it is permissible to use other materials. A tulle skirt will look impressive, or you can use regular New Year's rain, but too much rain will be needed to get the effect of a full skirt.
Fantasy is not limited. If there is no rain, patches, etc., then a bath sponge will do. This option is also suitable for boys portraying Africans. The washcloth should be loosened. Don't have a washcloth? No problem! We use film from old videos or audio cassettes.
If time is running out and a holiday is just around the corner, but as luck would have it, everything listed is not in the house, we still don’t lose heart. We take a new garbage bag, cut it up and get an original bright-colored skirt.
Herringbone
Beautiful Christmas trees are expensive, and sometimes it is not possible to buy them. In this case, a DIY Christmas tree made from bags will help out. This craft is also given as a gift to create a special mood among friends or relatives.
To create such crafts for the New Year, you need the following materials:
- chopsticks for Chinese food;
- polyethylene bags (green or white);
- glue gun;
- wire;
- scissors;
- box cardboard (quite thick).
Performance
We connect the Chinese food sticks to each other using glue. We attach wire to them, we get tree branches. To better secure the wire to the sticks, we wrap the structure with adhesive tape.
We cut strips from polyethylene material so that the width is 3-4 cm, create a fringe by cutting the strip. 1 cm of width should remain uncut. There should be several such blanks.
Then we cover the Christmas tree branches with fringe using circular movements. We glue the entire structure in a similar manner. At the location of the trunk, the fringe should point down.
To add additional volume, you can create a few more branches. We make a thick tube out of paper and glue the resulting fringe.
On one side we wrap it up to half, on the opposite side we do it in the same way to position the needles in different directions.
We bend the resulting branch in half and attach it with glue to the part of the wire branch from below. So we add some more branches.
We create a cross-shaped stand from cardboard material. The figure must have sufficient length. Glue the resulting Christmas tree into the center. We decorate the product. The Christmas tree is ready.
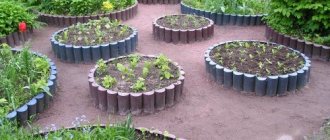
Garden option
A bright flower from a plastic bag is a godsend for an original decoration of a street flower bed without extra financial investment.
To create a masterpiece, you will need multi-colored bags, buttons (for the middle), metal or plastic rods (for the stem), thin, flexible wire and fishing line.
Flowers are created simply:
- Polyethylene is cut into strips - the wider, the larger the petals will be.
- Folded in loops.
- They are tied with fishing line (elastic thread) - for fastening.
- The loops are cut or remain unchanged.
- A button is placed in the center of the head and secured with fishing line, thread, glue.
- The stem is attached to the bud. To make the fastener look neat, hide it under the petals. Straighten them out.
The work is done quickly, in 30 minutes. You can put flowers on a whole flowerbed. For variety, bags of different shades are used. The last stage is planting in the ground. Weather conditions do not greatly affect the product - it will last 1 season.
Easter
If you need to decorate Easter eggs or need a craft for a child care center, a small attractive basket made of bags will help out.
It is impossible to create such a product without the following accessories:
- yellow polyethylene;
- mayonnaise container;
- glue gun;
- ropes;
- scissors;
- double-sided adhesive tape;
- threads with a needle.
Description
We make a large strip of polyethylene so that it covers the bucket. We wrap the container with tape vertically, gluing it with polyethylene. This is necessary so that there is no visible light between the flounces.
To create flounces, you need to cut off the sides of polyethylene from top to bottom. Along the longitudinal side it should be divided into a couple of parts using scissors. You will need 6 pieces of these blanks.
The long part of the workpiece should be marked with a needle and thread. We gather the part from above, pulling the thread. We tie the workpiece. To tighten the thread, do not forget to see how the workpiece will look on the bucket. It should be wrapped with a flounce once.
Three such shuttlecocks are needed. You need to make sure that the skirts are not too long. If the parameter does not match, you can cut off the unnecessary part.
Use a glue gun to attach the shuttlecocks to the container. Let's start from the bottom. The location of the upper shuttlecock should be exactly along the edge of the container.
We make a flat braid from polyethylene, attach it with glue, covering the sloppy edge of the topmost shuttlecock.
We make a handle by wrapping it around a bucket, or we make it from a thick rope. We decorate the basket with flowers or beads.
The finished product can be filled with cotton wool or other similar material and Easter eggs can be placed in it.
Element execution stages
The upper part of the suit can be made in the form of a top or T-shirt. A brightly colored fabric with a tiger or leopard pattern will look most impressive. It would be appropriate to decorate the option for a Papuan girl with bright beads or feathers. There are many options, the main thing is not to limit the course of your imagination .
You can use whatever is at hand. Here buttons, shreds of different colors or feathers can be used, which lend themselves very well to painting with bright colors. To do this, it is important to use not watercolors, but, for example, something chemical in spray bottles. Otherwise, the child will get dirty.
The design of the headdress should also not be ignored. It's not very difficult to do. It is necessary to make a cardboard headband and attach feathers to it, like the Indians. If you don’t have feathers, you can make them from cardboard or any other material you want or have on hand.
The headdress must sit firmly on the head so that it does not fall off when playing games or dancing. It is necessary to cut the size of the headband exactly to the size of the head; if the headband is wider, it will easily fall off, and if it is made narrow, the child will be uncomfortable, and the performance will not bring him proper pleasure.
An important point in designing a Papuan costume for a boy or girl will be its design with details and accessories. Surely many people have souvenirs in the form of beads brought from trips to hot countries.
Polyethylene handbag
To knit the product you will need:
- packages of suitable colors (from three to six packs);
- The knitting tool depends on the thickness of the yarn from the bags.
- fishing line with a diameter of 1.6;
- half rings as handles;
- any decor.
Description
Preparing the yarn. We cut the bags of the required color and thickness, tie the strips together.
We knit a sample. The required chain size is obtained by subtracting the width from the length of the bottom. It is about 20 cm.
We make air loops, the length of the chain should be a little longer by one centimeter, so the harness takes it away from the chain. We knit the bottom part according to the given pattern. We tie the chain with single crochets on one side.
We attach fishing line to the connected rows and knit them into the fabric. Where the turn is knitting proceeds according to the schematic drawing. Knitting with fishing line continues.
Upon completion of knitting the bottom, we remove the fishing line and tie it using a crayfish step. Having completed the binding, we throw the thread to the wrong side of the bottom. We knit the first wall of the bag with single crochets.
We knit in the round in the same way. The second row requires 10th increments in all columns (2 single crochets). This is necessary to expand the product upward.
Then we knit without any increases to the required height. When making the walls, we pass the fishing line (it should be a little longer).
We knit one row with fishing line. When you finish tying, we connect both ends of the fishing line and tie it into the fabric.
We perform the binding over the row we just knitted. The top will become a little tight, which is why more line is needed.
Gently stretch the edge from above. To give an attractive look, the handbag can be tied using a crayfish step. We put a sofa pillow in the purse and leave it there for a while.
We are engaged in the manufacture of handles and valves. We knit it, guided by the bottom pattern. We mark the places so that everything is attached evenly. We attach the pocket, flap at the back, handles, buttons on the magnet using sewing accessories. The bag is ready.
Bags can serve as an excellent material for making various products; even children can work with them. And various ideas and master classes from the article will help you create original and colorful crafts from bags.
Chrysanthemums
One of the interesting ideas for crafts from cellophane bags is making a variety of flowers. The photo below shows a sample of lush chrysanthemums made from burgundy-colored bags attached to wire.
To start working on the craft, prepare a long thread from interconnected strips of polyethylene. You will also need a cardboard template according to the size of the future flower. The synthetic thread is wound with many turns onto the base and tied with a thread in the center. Then the template is carefully removed, and the cellophane loops are straightened in all directions.
A wire is screwed from below to create a stem. You can then wrap it with a strip of green polyethylene or use corrugated paper. The center of the flower, where all the petals come together, is sheathed with yellow or orange floss thread. Such a bouquet can be placed in a vase or “planted” on a personal plot, decorating a flower bed.
This craft from cellophane bags is simple, you can make it together with children of primary school age. Some craftsmen, after tying the winding in the center with scissors, cut the loops of polyethylene, then the flowers are made up of thin threads, the number of petals comes out twice as large, and the flower turns out more magnificent.
Advice from professionals
In order to successfully modernize a cardboard milk carton, you need to adhere to an action plan and take into account the recommendations of experienced needlewomen.
Thanks to this, it will be possible to eliminate errors and improve the quality of work.
Helpful Tips:
- For work, you can use only thoroughly washed and dried milk bags.
- The container is not always durable, so before making crafts it needs to be covered with a second layer of cardboard. This will make the structure more resistant to damage and durable.
- Decorative cubes can easily be turned into children's cubes. To do this, it is enough to paste them not with photographs of family members, but with beautiful images of animals.
- When making children's toys, you should avoid using harmful materials (toxic paints, glue with an unpleasant odor).
Milk cartons can be a good base for beautiful crafts. If you prepare the material correctly and use your imagination, you can make wonderful products that will decorate any apartment.
Mat for the bathroom or bathhouse
For those who know how to knit, milk bags can be a good substitute for yarn. Cut the bags into narrow strips and knit a wonderful rug.
This product has many positive aspects:
- it is very light
- it does not collect debris, just lift the mat and sweep the floor underneath it,
- it dries quickly, you can simply wipe it off,
- no need to buy expensive yarn; the material for such a rug is available in every home.
Idea 2. Tetrapack wallet
Photo from lobestir.com
There are many options for making a wallet from milk cartons. Let us present the most simple and understandable one, in our opinion.
To make a wallet you will need:
- 1 empty package,
- double sided tape,
- Velcro fastener.
Photo from lobestir.com
Operating procedure:
- Cut off three sides at the top of a clean and dried bag. One should remain - this is the future flap with which the wallet will be fastened. On the remaining part, cut off only the top (ugly) part.
- Carefully cut off the bottom of the bag.
- Place the ruler vertically in the center of one of the sides and run along the fold with blunt scissors. Repeat the same steps on the opposite side of the bag.
- Bend the box as shown in the photo.
- Fold the folded part of the bag in half to create two compartments for money. Glue both together using double-sided tape.
- Fold the flap over the wallet, mark where the Velcro will be on the flap and wallet, and glue it on. If you have a special tool, you can install a button instead of Velcro.
- Fill your wallet with money and zip it up.
If you want no one to know what the wallet is made of, the product can be painted or covered with paper or fabric of interesting colors. If you add a small strap to it, you get a small handbag for a girl.