Anyone can create a solar collector for a summer shower with their own hands at the dacha, in country houses, in such conditions - there are many ways and all of them are not too complicated, they use available, available materials. The main thing for a homemade product is to build a system that effectively accumulates solar energy, an adsorber, and a pipeline with minimal heat loss. We will describe the most common methods for self-assembling a summer shower, on the basis of which the user can also build his own modifications.
General concept of solar collectors
For a makeshift solar collector, you can use any pipes, hoses, used or unnecessary radiators with internal cavities, and even sections of heating batteries.
The advantage of a homemade product is that it is extremely weakly susceptible to breakdowns, nothing burns out in it, all the parts can be collected even from landfills.
What is a solar collector
Solar collectors are sections with a system of tubes, sections heated by the sun, accumulating its thermal energy and transferring it to water. Factory devices of this type can be complex - special vacuum tubes or flat vacuum blocks filled with a special liquid - a coolant.
At the top (tips) are copper flasks, heat exchangers, the specified heated substance rises from the cavity of the tubes/sections in them, concentrating heat there. These elements are united by a part (strictly speaking, a collector) into which the water being treated flows, it washes them, and heat is transferred to it. The section can be covered on top with a material (typical of flat models) that helps attract and concentrate sunlight, or the tubes can remain uncovered (the properties of their material are sufficient).
Not only will a solar collector provide a summer shower, it will also be suitable for an everyday, well-warm shower.
Factory products, of course, are more complex, but all such systems are based on a similar principle: circulation of water through a solar absorber or its heat exchanger.
There are simpler designs: water moves in a system of tubes (coil) in a section covered with material that attracts the sun's rays. Black material is usually installed inside; a mirror coating (foil) is often used - the rays will be reflected and once again heat the interior space. Such a block has a certain degree of tightness - in addition to the fact that the tubes heat up, heat is concentrated in the environment itself (like in an oven).
In its most basic form, a solar collector is a horizontal flat spiral of black rubber hose, covered with a dark transparent matte cloth that attracts the sun. Often a small pump and filter are added. There can be many modifications: a system of PVC tubes, small plastic/rubber sections - but the principle is the same.
It is necessary to distinguish between 2 systems: a shower with a solar collector and a solar-powered one. These are different heating equipment. The solar panel is designed to collect heat, which is transferred to special units (inverters, generators) that convert it into electricity, accumulated by the battery and then used for various needs, including heating water with heating elements. Solar collectors are originally intended for heating; they are self-sufficient modules that directly prepare the liquid that flows through their coils, through sections with heat exchangers; they cannot be used for any other purpose.
The principle of operation of a homemade solar collector with a shower
Circulation is based on natural convection: the warmer substance inside the collector coil, expanding, acquiring a lower density, rises and enters the upper part of the storage tank through the outlet pipe. The colder layer at the bottom is displaced, moves through another pipe to the lower segment of the coil, heats up, and rises again.
While the sun is shining, the liquid constantly moves along the described contour, and with each cycle it enters the coil, which is no longer completely cold, thus becoming more and more heated. The tank is raised above the solar absorber, so the circulation of the coolant does not tip over during night cooling - the cold layer simply accumulates at the lowest point of the circuit (the bottom of the collector), and the warm layer remains in the barrel.
On average, collectors produce +50...+60 ° C, especially successful designs - +70, high-quality metal products in the southern regions (a copper absorber is discussed below) can provide a boiling point.
How the pipes are located, the need for a pump
Pipe location:
- the hot pipe from the collector is connected to the top of the tank, the cold discharge into it is at the bottom;
- the supply pipe in case the barrel is filled with a pump, yard or home tap - on the opposite side at the top;
- Inside the tank for supply to the shower head, a vertical section of pipe is installed; the upper end ends at the beginning of the upper third of the tank to collect the incoming hot water, which is on the upper layers. You can replace it with a more efficient flexible hose with a float. Adjust it so that the end is always submerged, but the hose itself is near the surface - this way, when the liquid level drops, it will always take it away.
A small, low-power pump can be added to the system; it is required if the elements are located in such a way that they do not provide natural circulation. If there is a pump, then the barrel and the collector can be placed at any height in relation to each other.
Classification according to temperature criteria
There are quite a large number of criteria by which certain solar system designs are classified. However, for devices that can be made with your own hands and used for hot water supply and heating, the most rational option would be to separate them by type of coolant.
So, systems can be liquid and air. The first type is more often applicable.
In addition, a classification is often used based on the temperature to which the working components of the collector can be heated:
- Low temperature. Options capable of heating the coolant up to 50ºС. They are used to heat water in irrigation tanks, in bathtubs and showers in the summer and to improve comfortable conditions on cool spring-autumn evenings.
- Medium temperature. Provide a coolant temperature of 80ºС. They can be used to heat rooms. These options are most suitable for furnishing private homes.
- High temperature. The coolant temperature in such installations can reach up to 200-300ºС. They are used on an industrial scale, installed for heating production workshops, commercial buildings, etc.
High-temperature solar systems use a rather complex process of transferring thermal energy. In addition, they occupy an impressive amount of space, which most of our lovers of country life cannot afford.
The manufacturing process is labor-intensive, and implementation requires specialized equipment. It is almost impossible to make such a version of a solar system on your own.
It is quite difficult to make high-temperature solar panels using photovoltaic converters at home
Classic shower design with a barrel and a solar collector with a plastic coil
All the methods of the considered homemade products are simple: in general, this is an insulated housing with tubes (metal, plastic), a barrel on the top of the cabin in direct sunlight and a circulation line. All other methods are modifications of the described design. Under ultraviolet light, plastic loses its strength and cracks, so a metal tank is also good. However, you can use any material, even a wooden barrel, as long as it does not dry out.
It is also not necessary to make a complex design for the water outlet, or to provide for the possibility of mixing it with cold liquid. You can get by with a simple flexible overlapping hose with a shower head. If the barrel is filled with a household pump, manually with buckets from a well, then there is also no need to build a pipeline to the supply tap (our example with it).
Assembly Features:
- Frame for the cabin: metal profiles, strips (even suitable from a landfill), PVC pipes, wood, any material from which you can build a stable structure. You can do without a frame, if there is somewhere to secure the barrel, but the place should be open on all sides, they will do , for example, unshaded roofs of extensions and other structures. As walls, you can use fabric drapery, opaque polyethylene.
- Barrel. The volume and material are chosen by the user at his own discretion, our case is 120 l, plastic.
- Water supply, piping: garden hose, plastic pipes (25 mm) with fittings, quick-release connections.
- Drainage: trench and pit.
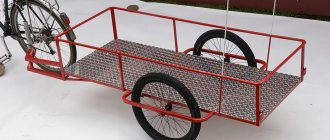
Iron frames from old spring beds were used for the cabin. Welding was used. There are jumpers on the frame and a seat for a barrel on top.
Drainage is a hole at a distance from the shower with grooves that gradually deepen away from it. The depressions are filled with coarse crushed stone, gravel and construction waste.
Next, holes were made with a hand drill for the legs of the frame, which were installed in them and concreted (a bucket for each support).
The procedure for constructing a summer shower with illustrations
Preparation of elements: barrel, pipes, shower head, hose, float valve for water supply.
The supply will be carried out through a dedicated channel using a flexible hose (10 m ¾ inch). We also purchased 5 m of a tube thinner than ½ inch to separate the flows - to the shower tap and for filling.
First you need to make a flooring so as not to step on dirt while taking a shower. This element is treated with antiseptic impregnation and painted with yacht varnish.
We mark the barrel to correctly install the supply/fill line. On the east side, to the left of the entrance to the shower, there is a water inlet (for filling from the yard tap). There we will mark the place to drill a hole for a regular float valve from the toilet tank. We drill with a screwdriver and a step drill.
The valve (float) is inserted and secured with a nut. We install the faucet with the hole down, so the hose will not break. We use tow and Unipack sealing lubricant.
Next, we use quick-release connections to connect to the hose. You can also insert a thermometer into the barrel.
We install 2 fittings. First, we designate the filling level, cold water outlet (bottom), hot water inlet (top).
We cut 2 more fittings into the bottom - for the shower and for the drain, just in case. We attach a faucet to the first one. In our case, it has a tee with a valve for adding cold water. You can get by with a simpler design - one tap. We put a plug on the drain pipe. We attach a sinker to the supply hose.
The top of the barrel is covered with a lid, and several small holes are drilled there for “breathing.” The tank is filled with a yard tap through a flexible line. But you can also fill water in buckets, using a pump through the top without a separate line.
The barrel itself acts as a kind of solar collector, a thermos, heating up in the sun.
solar collector
A grid (coil) is assembled from ordinary plastic pipes (external diameter 20 mm) and fittings. Plugs are welded diagonally at the upper and lower ends. A manifold of 25–20–25 mm tees is welded on top and bottom.
The next stage is the body: a frame made of 50x50 mm timber with sides:
We make thermal insulation so that the captured solar heat is accumulated inside the box. We use extruded foil polystyrene foam 30 mm:
Marking for pipe holders and their installation:
We install the solar collector just below the barrel; a metal frame was built for the structure, but it can also be made simpler: from wood or simply fixed with support on a suitable surface.
Next are the important “little things”: glass, plexiglass or thick film for the box, transparent/translucent plastic, sealing with polyurethane foam. The latter measure is extremely desirable, since even a small hole can lead to critical heat loss. The lid is transparent so that the effect of the rays is enhanced: they get inside and once again heat the pipes by reflecting from the foil coating. The entire line is insulated with penofol.
This system provides heating up to +51° C. Natural circulation: water, heating up inside the collector, periodically splashes out of it into the barrel, is taken from the upper segment to the shower, and the cold layer is simultaneously forced out from below onto the coil.
Flaws
The reason for the relatively weak heating: the thermal conductivity of polypropylene (the coil is made from) is very low, comparable to expanded clay and wood, that is, it is better suited for insulation rather than heat transfer. If you use metal (especially blackened copper), including as the inner lining of the box, then the temperature can be raised to the boiling point in hot climates.
You can also replace polypropylene with corrugated stainless steel tubes, like those from a shower hose. Place duralumin plates inside as reflectors.
Advice: do not use a plastic valve with a float - it will crack, as it is not designed for warm water; use a brass design.
Possible knot variations
The barrel can be insulated with polyethylene and similar materials; if they are black, the efficiency will improve.
Faucet principle: If there is a cold water supply line, it can be used to both fill the tank and dilute the hot shower. That is, there must be power from a yard tap or another tank for cold water connected to a “hot” barrel.
Materials and tools, assembly technology
We consider the need for materials and products in parallel with a description of the solar collector manufacturing technology. This work can be done in the following order.
Case manufacturing
For this you will need:
- waterproof material for the back wall. This can be multilayer waterproof plywood, plastic or other similar materials;
- planed softwood board 150x32 mm. All wooden parts must be treated with antiseptics and fire-retardant impregnations;
- roll insulation;
- construction stapler for attaching insulation from inside the housing;
- aluminum foil to create a reflective surface over the insulation;
- polycarbonate, cellular or monolithic, body size 4 mm thick. The holes for attaching it should be located no closer than 4 cm from the edge of the sheet, so you need to take this factor into account when determining the size. Can be installed with an overlap. It is advisable to purchase material without a protective layer against ultraviolet radiation, as heating will occur even in cloudy weather;
- seal made of porous rubber (tape - self-adhesive) under polycarbonate.
Assembly sequence:
- The board walls are attached to the back wall with self-tapping screws 50 mm long using a screwdriver in increments of 25–30 cm.
- Insulation is installed, fastening is done with a construction stapler with staples no shorter than 10 mm.
- A reflective foil surface is installed on top of the insulation layer.
- A sealant is glued to the end of the body boards.
Collector installation
When making this important unit with your own hands, you can use stamped steel radiators from a refrigerator or heating system. To do this you need:
- Before installation, the radiator must be painted with matte black paint using a paint brush or roller.
- Install it into the case through gaskets with a gap of about 20 mm from the rear wall, secure it with self-tapping screws to the rear wall.
- Connect the collector outlet pipe using a metal-plastic product with an internal diameter of about 20 mm.
- Connect a return line made of the same material.
Upon completion of the collector assembly, install the polycarbonate front wall. In this case, the holes for the screws should be 1–1.5 mm larger than the diameter of the screws to compensate for thermal expansion.
Circuit installation
The operation is performed in accordance with the previously developed project in the following order:
- Make the wiring to the indirect heating boiler, connect it to the pipe of its internal circuit, which is a heat exchanger.
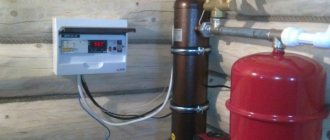
- Conduct wiring from the boiler to the collector, providing for the installation of a circular pump and an induction heater.
- The purpose of heating is twofold: the main thing is to prevent the collector from freezing at critically low outside temperatures, the additional purpose is to increase the temperature in the system to the required level under the same conditions. The use of an induction heater requires the installation of a circular pump. In this case, it is necessary to provide protection against turning on the heater without it.
- Loop the circuit by connecting the distribution pipe to the collector return.
During installation, you need to determine the highest point of the system and install a valve for bleeding air plugs on it. At the lowest point you need to install a drain valve to remove the coolant in emergency conditions.
When assembling the system, you need to use materials to seal the threaded connections in the form of flax tow or fluoroplastic sealing material.
System assembly
The operation consists of installing the collector in the housing to its permanent location. This should be the southern slope of the building's roof. Work order:
- Lift the collector onto the roof and secure it at the desired angle.
- Make holes in the roofing pie for wiring the outlet and return pipes.
- Connect the pipes into a common circuit.
- Fill the system with coolant, turn on the circulation pump (without an inductor) and check the circuit for leaks, and if necessary, repair them.
- Seal holes in the roof hermetically.
- Insulate the piping of the assembled circuit with insulating materials.
Option with two barrels
What is required for the solar collector (in this example, the area is 1 sq. m):
- corrugated “fifteenth” pipe;
- water will flow into a 160 liter tank with 1 cm foam insulation.
The difference between the point of intake and the entrance to the collector is 2 m.
The water discharge point has been moved from the top to the bottom third of the tank. This way the warm and cold layers mix better. Reaches +45... +50° on sunny days, on cloudy days - +35° C.
Two 160 liter barrels are tied with polypropylene pipes - they are easier to work with than metal-plastic ones. The system operates on the thermosiphon principle, convection: hot liquid goes up, cold liquid goes down. No pump, fuel or electricity is required; circulation occurs automatically.
They build a frame from a pipe for the solar collector, tilt 45°, orientation - strictly south. They make stands for barrels.
The hot water barrel can be equipped with a heating element so as not to be left without water on cloudy days. At the bottom of this tank there are 3 outlets: 2 for the line from the solar collector (warm water is pumped into the tank, cold water is returned to it). The third conclusion is for the shower mixer. The pipes, additionally insulated, are connected by American connections, that is, they can be disconnected if necessary, without damaging the elements, by simply unscrewing. It’s also more convenient to assemble the system right on site.
Ordinary garden hoses, insulated with foamed polyethylene, are laid from the tanks to the mixer; they are fixed to the fittings with ordinary clamps. These hoses are combined in front of the mixer: a shunt with a ball valve is installed. This element is for comfort: if you run out of warm water, you can open the valve on the shunt and the liquid level in the tanks is equalized, and when it is supplied, both barrels are filled equally, eliminating the need for separate filling.
The tap is closed after filling the tanks. Then the system functions like this: cold liquid enters the manifold through its lower pipe, expands when heated in it, rises and through the upper pipe goes to the storage tank, and from there to the shower. It is important that the barrels are located 0.5–1.5 m above the collector. It is necessary to organize the intake of water from the warm upper layers, for which a corrugated intake hose (can be taken from a washing machine) is equipped with a foam float.
To monitor the amount of liquid, a transparent tube with a black float is inserted into the warm water tank (heat accumulator). The tanks are insulated with penofol - 2 layers of 5 mm each. The warm container was covered with a 5 cm thick circle of EPS.
The above insulation is not particularly effective, it can be used for the period of preparation of a more thorough finishing, consisting of 100 mm mineral wool, 5 cm polystyrene foam. This element is extremely important: the barrel will work on the principle of a thermos, it will cool down by only a few degrees per day, which will make it possible use warm liquid at night.
How the system works: an example from real experience
The solar collector system with shower described above showed itself to be excellent even in the not particularly warm, compared to the South, climate of the Moscow region. In the evening, the tanks are filled with 120–130 liters. The sun starts heating them and the solar collector at 8:30 or earlier. In our case, until this time the shadow of the house was falling. By 18:00 the rays begin to lie tangentially - the efficiency decreases.
Result: 120 liters, poured from a well with t° +8 at an air t° of +22...+24, by 15:00 they warm up to +45° C. By 17:00 - up to +52° C. On cloudy days at The temperature of the environment is 18–20° C and reaches +35° C. The heating is quite enough for a well-warm shower. It should be taken into account that insulation can be improved. In 5 months savings on your electricity bill reaches RUB 3,500.
Calculation of solar collector power
Based on actual costs, it is believed that to satisfy one person’s need for hot water, from two to four kilowatts of thermal energy is required.
As an example, let’s calculate the power for real conditions in the Moscow region.
Initial data:
- Based on the data given in the table of solar energy receipts in various regions of Russia, the absorption area will be 2.35 m2.
- The insolation indicator for the Moscow region is 1173.7 kilowatts per hour per square meter.
- The efficiency of the collectors is 0.67–0.8. It is advisable to use the first indicator, which is typical for home-made designs and outdated models.
- The optimal inclination angle for the region will be used. To a first approximation, it should be equal to the geographic latitude of the location of the converter.
Insolation indicator depends on the region
Calculation of the solar energy absorption area for one tube, taking into account that the given value corresponds to a collector of 15 elements: 2.35 m2 / 15 pcs. = 0.15 m2. Accordingly, the given value for 1 m2 will be: 1 / 0.15 = 6.67 (pieces), that is, the collector register of the indicated area will consist of 7 tubes.
We calculate the thermal power of one tube, which will allow us to determine the number required to satisfy the average energy demand. The power received from one heater based on consumption per day is calculated from the ratio: N = S * I * K, where:
- N is the power of one tube;
- S is the absorption area of one tube;
- I is an indicator of the magnitude of insolation for the Moscow region;
- K is the minimum efficiency coefficient.
N = 0.15 * 1173.7 * 0.67 = 117.95 kilowatts per hour per square meter.
The average energy production per day will be (taking into account the length of daylight hours) for the Moscow region 0.325 kilowatts per hour. And the annual savings per square meter will be: 117.95 * 7 = 825.6 kilowatts per hour.
Thus, the generation of thermal energy by a solar collector of 2.35 square meters reaches 8 kilowatts per day. By going back to the beginning, you can make sure that the collector of the given size fully meets the hot water needs for a family of three.
The given methodology is very conventional, however, as practice shows, it is quite reliable for determining the main parameters of the reservoir.
The power of one collector is enough for a family of three people
From a refrigerator radiator
There is a description on the Internet of a homemade solar collector with a refrigerator radiator. The manufacturing process as a whole is described above; let us briefly recall the main points:
- You can place reflective material (foil) in the inner surface of a tightly closed insulated box, but here it is fixed on a black rubber mat. This is also an effective option, since a dark color attracts rays better and accumulates heat.
- We place the coil inside the body, cover it with glass (you can use screws as stops), and place it so that the rays fall at right angles.
- We connect the PP pipes to the inlet for cold water and the outlet to the shower tank for warm water. And also the liner can be the most basic - from flexible, rubber hoses.
- Shower tank - any suitable container.
How it works
The collector collects energy using a light accumulator or, in other words, a solar receiving panel, which transmits light to an accumulating metal plate, where solar energy is converted into thermal energy.
The plate transfers heat to the coolant, which can be either liquid or air. Water is sent through pipes to the consumer. With the help of such a collector you can heat your home, heat water for various household purposes or a swimming pool. Air collectors are used mainly for heating a room or preheating the air inside it. The savings when using such devices are obvious. Firstly, there is no need to use any fuel, and secondly, electricity consumption is reduced.
In order to get the maximum effect from using the collector and heat water for free for seven months of the year, it must have a large surface area and additional heat exchange devices.
From copper tubes
A collector with a copper coil, lined on the inside with sheets of the same material, is extremely effective. Perhaps the most effective one we found on the Internet. Tubes and strips are soldered with a special autogenous soldering iron at seams and joints, so the copper absorber was the most labor-intensive stage, taking 2 days.
Copper was blackened by placing it in a bath of potassium persulfate:
The case was insulated, and foil was attached to the back wall to reflect heat. All gaps were carefully sealed:
The structure was moved to its place, for this it was wrapped in ordinary cling film, and only after transportation and connection was the glass installed:
Result: in the hot southern climate, under direct rays, the copper became hot, the water heated to a boil, and there were even noticeable traces of melting of the polymer structural elements. It is advisable to add cold liquid to a shower with a solar absorber of this type, for which purpose provide a separate barrel with it or a supply from the tap.
The simplest options for solar collectors for a summer shower
The elementary nature of the most unassuming options for solar collectors does not mean they are ineffective. Despite the sometimes flimsy, unattractive design, often assembled from rubbish, they perform their functions.
Recommendations:
- It is advisable to place the absorber in a sealed case, at least wrap it in polyethylene;
- the front cover should be transparent, and if it is part of the absorber, then you can use a dark or matte material recommended for other parts;
- the back wall must be treated specially - black material or foil is placed on it to reflect light and retain heat inside;
- the best material for the coil, body, and parts is metal. In the sun, it will not just heat up, but glow.
However, even if you do not adhere to some of the above tips, the collector will perform its functions. Let's look at some striking examples.
Simple rubber hose, polypropylene pipes in a sealed housing:
The last photo above is an excellent solution - the black limited space creates the effect of an oven, the coil is thick, its walls are thin, it heats up quickly.
From PET bottles, carboys
An elementary method is solar collectors made from plastic bottles. Of course, it is highly recommended to paint them black; even a regular can of spray paint will do. In one embodiment, the bottles are used as a casing for the coil pipes.
System diagram with PET bottles:
Here plastic bottles with a black seal act as a casing for the coil:
Selective coating
Selective coating performs perhaps the most basic function in the operation of a collector. A coated plate or radiator attracts many times more solar energy, converting it into heat. You can purchase a special chemical as a selective coating, or you can simply paint the heat storage tank black.
To make a selective coating for solar collectors with your own hands, you can use:
- special finished chemical;
- oxides of various metals;
- thin thermal insulation material;
- black chrome;
- selective paint for the collector;
- black paint or film.