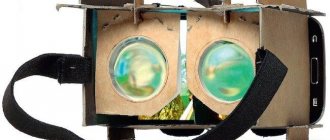
Due to the growing popularity of VR technologies, many people want to join them. Today there are many different variations and models of devices on sale in different price categories. Nevertheless, some users, out of curiosity or in order to save money, are wondering how to make virtual reality glasses with their own hands from cardboard or plastic (which is more difficult)?
This option is suitable, first of all, for those who have a modern smartphone with a large screen and a built-in set of sensors (more about the required sensors below). According to statistics, a considerable part of the world’s population uses such devices. Thus, with insignificant monetary and certain time costs, the user can make excellent three-dimensional glasses with his own hands. We will look at what is needed for this and how all the parts are assembled below.
Google Cardboard
An interesting point is that even Google produces and distributes a simplified design made of cardboard and simple lenses, called Cardboard. Their VR glasses, even in a similar design, are available in several versions that are not difficult to replicate at home.
Moreover, the company itself has made all the necessary information publicly available.
Thus, there is no need to talk about the relevance of the issue under consideration.
What you need to assemble VR glasses at home
Before worrying about the materials and components of future glasses, you should make sure that your smartphone meets the requirements of VR technology. The phone settings should ensure comfortable work with 3D films, games and other virtual reality projects.
Suitable for such purposes, for example:
- Android 4.1 JellyBean or better
- iOS 7 or higher
- Windows Phone 7.0 and so on
The screen diagonal must be at least 4.5 inches for comfortable and full operation of all applications.
What sensors are needed:
- Magnetometer, that is, a digital compass
- Accelerometer
- Gyroscope
The last two conditions are required for most virtual applications ; otherwise, the user will only be able to view movies. Without these two components, it is not possible to fully evaluate VR technology.
It should be noted that for self-production you will not need expensive or rare components. So, now let’s move on to the list of necessary materials for making VR glasses with your own hands at home:
- Cardboard. It is recommended to use the most dense and at the same time thin variations, for example corrugated cardboard. The cardboard must be in the form of a single sheet with dimensions of at least 22x56 cm and a thickness of no more than 3 mm.
- Lenses. The best option would be to use biconvex aspherical lenses with a focal length of 40-45 mm and 25 mm in diameter. It is recommended to use a glass option instead of plastic.
- Magnets. You will need two magnets: a neodymium in the form of a ring and a ceramic in the form of a disk. The dimensions should be 19 mm in diameter and 3 mm in thickness. As a replacement, you can use ordinary food foil. Alternatively, you can use a full mechanical button.
- Velcro i.e. textile fastener. This material requires two strips of approximately 20-30 mm each.
- Rubber. The length of the elastic band should be at least 8cm, since it will be used to secure the smartphone.
In addition to materials, you will also need some tools: ruler, scissors, glue . Based on your capabilities and ingenuity, some materials and tools can be replaced with alternative options if functionality does not suffer.
Purpose
3D glasses are required to view stereoscopic images. For each eye, a different image is created, which is taken from different points, so a volume effect is formed. Seeing three-dimensional objects is possible only with binocular vision, which requires two eyes.
Separately, each eye sees only two-dimensional pictures, and since the eyes are located at a distance from each other, the brain receives a picture of one element from two sides. After processing the received information, a three-dimensional picture is created.
It is the principle of binocular vision that is used by 3D film directors . To shoot one frame, two movie cameras are used, which are installed at a short distance from each other. Therefore, two images are obtained from which a stereo pair is formed. But for optimal viewing of such films, the appropriate tools are required, represented by 3D glasses.
When watching 3D films, every viewer has positive emotions and vivid sensations. But scientists are warning citizens about the dangers of 3D glasses, both for children and adults. After watching such a film, doctors recommend checking your health. If nausea, weakness and dizziness appear, this indicates overwork. In the event of such signals, it is recommended to refuse further viewing of films in this format.
Drawing of virtual reality glasses made of cardboard
As you already understand, materials and tools alone will not be enough to manufacture, much less assemble, an entire structure. Of course, this requires a drawing or simply a template diagram for creating virtual reality glasses.
You can find a template for cutting out glasses below. It can be easily printed and then pasted onto a piece of cardboard. Since the expanded version of the glasses goes beyond the usual landscape format (and consists of 3 A4 sheets ), you will have to carefully and accurately combine all the fragments at the joints.
To download the template to your computer, you need to right-click on the image, and then click on “Save Image As” .
3 parts template
Below you will see 3 large pictures that will need to be printed and then glued onto cardboard so that all the joints are respected.
The finished result on cardboard
This is the final result that you should get by connecting 3 parts of A4 sheet on cardboard.
Cut out cardboard design
This is what we got after we completely cut out the cardboard according to the drawing. Carefully follow the numbers and connect all the parts correctly.
Where to get glasses lenses
In this matter, it is the lenses that are the most difficult to access component. If you can’t find them in nearby stores and retail outlets, you can search on the Internet.
Among the available and most likely places that may offer such a product for sale, the following can be noted:
- Shops in the “Optics” category. Here the product is measured in dimensions - diopters, and for glasses you will need lenses of at least +22 diopters .
- Stationery stores. They sell loupes (i.e. magnifying glasses) here, 10x lenses should work as an alternative.
- Search on domestic websites and trading platforms, or on foreign online auctions.
- Make it from a plastic bottle (more details in the video instructions)
In the event that the lenses received by the user differ to a certain extent from the specified standard, it will be necessary to either grind the lenses themselves or make appropriate adjustments to the design of the glasses. Often the problem can be solved by including in your design a device for adjusting the distance from the smartphone to the lens.
How to make glasses without lenses
Those who imagine the option of creating VR glasses without lenses can immediately forget about it. Without special lenses, the resulting design will be no different from ordinary glasses or glass . Such a design will not bring any practical benefit, except that it can be used to create a cinema effect.
Another manufacturing option
1). For thicker cardboard, it is better to take a stationery knife; it is more convenient for them to work directly on top of the sheet. If you want to assemble the glasses manually by inserting the keys, then you need to cut out the cardboard along with them, as in the picture. If your homemade virtual reality glasses are subsequently glued together, then you don’t have to leave such a reserve.
2). Next, you will need 2 lenses, preferably biconvex. Google recommends taking lenses with a diameter of 25 mm. The focal length of the lenses should be 45 mm. Craftsmen even take lenses from hardware stores, and some video bloggers on Youtube, when making 3D glasses for a smartphone with their own hands, use improvised means instead of lenses.
So, for example, you can cut 4 identical circles from an ordinary plastic bottle, glue them together 2 pieces with a blowtorch, leaving a small distance at the top. Then water from the tap is drawn into the syringe, the space between the biconvex “lenses” made of plastic is filled with it, then the remaining gap is also sealed, and in your hands you find yourself with almost completed home-assembled virtual reality glasses.
3). Some smartphone models support magnetic switching, which allows you to control the device without removing it from the box. To implement such an idea, you will need a simple system of magnets: a neodymium ring magnet and a ceramic disk magnet with a diameter of about 19 mm and a thickness of about 3 mm. But even without them, all control will be simple and convenient; it is enough to make a hole for your finger in the design of homemade virtual reality glasses on the bottom or side.
4). When almost everything is ready, all that remains is to solve the problem of attaching the smartphone to the glasses. To do this, you can use a rubber ring and 2 Velcro strips (approximately 20x30 mm) to secure the cover.
Step-by-step instructions on how to make virtual reality glasses with your own hands from cardboard
So, when the user has all the materials, tools and a printed template, then assembly can begin.
First step
- Paste the template onto the cardboard
- Cut along the contour
- Bend and fasten individual places
The first step is to glue the drawing onto a sheet of cardboard. The main thing is to be careful and maintain accuracy at the joints so that the dimensions are not distorted. Then all elements must be carefully cut along the contour. By special marks on the drawing it will be clear in which places the structure needs to be bent and in which to fasten.
Second step
- Insert lenses into the finished structure
- Magnet fastener
- Lining cardboard with foam
Next, you need to insert lenses into the already assembled frame, and, if necessary, fix them to increase the reliability of the fastener. Then a strip of foil or magnets is glued to create something like a control button.
To increase the comfort of using the resulting device, in places of contact with the head, the surface can be covered with foam rubber or other softening material.
Types of models on the market
Stores offer several types of 3D glasses, differing in appearance and creation principle. These include:
- Anaglyphic . Anaglyph image coding is considered traditional. To create a picture, 2 frames of a stereo pair are used, which can be black and white or color. These frames are superimposed on each other, with one having a lot of red tones and the other having a lot of blue and green. The glasses are equipped with special color filters that block some of the image. Therefore, the necessary signal is transmitted to each eye. The first such glasses were created from ordinary cardboard into which light filters were inserted. The advantages of glasses include an affordable price, as well as efficiency of use. A disadvantage is considered to be poor color rendering, and if the products are worn for too long, then due to the power of visual inertia, shades of red and blue will predominate for a long time. Many viewers report headaches and eye discomfort after watching the film.
- Polarizing . They belong to the passive class of glasses, and a lot of money is not spent on their production. The products do not require specific maintenance or use of batteries. The filters in such glasses can be linear or circular polarized. In the first case, the filters are installed perpendicular to each other. The second type uses filters with multidirectional polarization. These filters divide the image into two stereo pairs, so a different image is broadcast for each eye.
- Interference filters , otherwise called Infitec. They are presented using the method of displaying stereo images, which is used in Dolby 3D cinemas. When showing a film, interference filter technology is used. For each eye, a picture is created in which the wavelengths of the shades differ. Viewing requires glasses that filter the wavelengths, allowing a stereo image to be seen. These glasses are considered very expensive compared to other varieties.
- Bolt action . Glasses of this type are equipped with liquid crystal shutters that close in a specific sequence. In this case, a frequency of 60 Hz is used. Products must be synchronized with the project or screen, which displays frames for different eyes at a similar frequency.
- XpanD active stereo glasses . In them, one eye sees only half of the 3D image, but thanks to the rapid change of frames and the inertia of vision, a person sees the full image. Manufacturers build in a special infrared receiver to which a signal from the screen is transmitted, which allows synchronizing the operation of the shutters. The main disadvantage of such products is their high cost. They operate on batteries and are considered reliable and durable.
When choosing a specific model, its cost, operating features and user preferences are taken into account. The products are offered by many large companies, and additionally differ in size, so it is advisable to try them on in the store to buy the right option.
Questions and answers
Is it possible to make VR glasses out of paper?
No you can not. Think for yourself, under the pressure of the lenses your structure will simply fall apart, not to mention the weight of the phone itself.
Can they be used for PC gaming?
Yes, they will essentially be no different from purchased alternatives.
I couldn’t assemble the case the first time, what would you recommend?
To begin with, take your time, carefully follow the template, and watch the video example to reinforce it.
Photo example of finished glasses
Using the recommendations from this guide, everyone who wants to make VR glasses with their own hands now knows how to do it.
This is a fairly simple and cheap option that will satisfy the needs of a wide range of users. Once I'm done, don't forget to read the article on how to adjust your glasses for comfortable use.
Paper glasses
Glasses made of paper are already a trend from origami. To complete this task, you need colored paper, stationery scissors and a little patience.
Take the paper and fold it in half, then make a diagonal fold.
Next, fold the paper so that it looks like a triangle. Then fold the paper again, only so that half of the triangle is visible.
At the end, draw another strip and carefully cut everything out. If you do everything correctly, you will receive paper points.