Surely every home has an unnecessary thing that is a pity to throw away. Maybe it’s old or just doesn’t fit the interior of the room. To do this, there are many techniques that give life to old things. For example, using the decoupage technique you can decorate a cardboard shoe box.
This article will help you learn how to decorate a box in decoupage style.
Tools and materials: what is needed for the job?
In order to begin the process of decorating the selected product, you need to prepare all the materials and tools. This can be done in a specialized store or in regular offices.
To decorate cardboard boxes in decoupage style you need:
- box (it can be made of any material - cardboard, plastic, wood);
- acrylic paints (preferably light colors);
- glue (selected depending on the material of the box);
- napkins with drawings or printed pictures;
- varnish for fixing the finished product;
- brushes with good soft bristles;
- a bowl of water (preferably warm);
- scissors and sandpaper;
- additional decorations (rhinestones, beads, lace, etc.).
This is the basic set for work, supplemented depending on the complexity of the product design.
Final stage
- Proceed to creating an image: either take decoupage napkins, or any other image on paper.
- You can paint it yourself using soft brushes.
- Apply glue to the box, wait for it to dry, attach an image, if the option with drawing is not suitable, put a sheet of white paper on top, iron it.
- Trim off the excess if a napkin was used.
- Secure the final version with 3 layers of varnish. Both decoupage varnish and parquet varnish are suitable.
- This completes the decoupage of the cardboard box! Enjoy!
Nuances of working with images:
- Individual elements should not be cut out, but rather torn out of the napkin, so the edges will be less noticeable; they can be retouched using fine-grained sandpaper.
- Movements to smooth out the pattern should be done from the center to the periphery.
- After successfully fixing the drawing, acrylic paints are used for greater effect.
- Additional elements are welcome (colored paper, beads).
Decor for decoupage boxes
Usually, original and unusual spice sets and sweet stands have a high price. But you can save money by decoupaging a shoe box with your own hands. You can choose any style, decoration and box size to suit your kitchen interior.
If you are decorating a box for a children's room, then you should choose the appropriate designs. It is better that the design is made in one stylistic direction.
Organizer out of the box
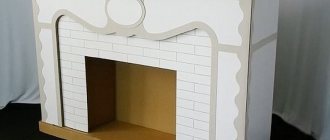
An original organizer for papers, writing instruments, and kitchen spices can be made from a shoe box. Remove the lid, find the center of the long sides. Make angled cutouts on the sides, then carefully bend the bottom of the box in half to become the center wall of the double organizer.
To make an even fold, draw a knitting needle or the blunt end of scissors along the previously drawn line. Now you can carefully draw a fold along the ruler.
We bend the workpiece and glue the sides. We cover the inside of the organizer with paper or fabric. We cover the outer part with a primer.
Now you need eggshells. It needs to be washed with soap and cleared of the inner film. Apply PVA glue to the surface of the box and carefully glue small pieces of eggshell. We get the original surface. To be sure, we pass the brush with glue over the surface again.
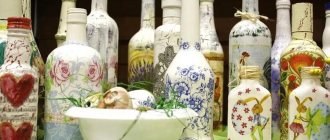
Rice paper for decoupage - step-by-step instructions for use, features and subtleties of use (110 photos)- Decoupage of bottles - step-by-step instructions and description of the progress of decorating with various materials (110 photos)
- Napkins for decoupage - manufacturing features and tips for use (85 photos)
We glue fragments of napkins on top - according to the same principle as in the previous master class on decoupage boxes. All that remains is to coat the surface with varnish, and the more layers you apply, the more attractive the box will look.
Decoupage of boxes with your own hands is an interesting activity that takes a little time, but as a result you get original interior items. After trying it once, you won’t want to throw in the trash something that, after a little modification, will adequately decorate your home.
Tips for beginners in needlework
There are a number of tips that it is recommended to listen to when decoupaging boxes with napkins.
For children's rooms, it is recommended to use napkins of cute animals, beautiful flowers or favorite superheroes.
Men prefer designs with pictures of weapons or cars. You can make a beautiful box for a birthday gift.
To please your grandmother, you can make a box with images of family photos.
Drawings with fruit and vegetable still lifes, aromatic herbs, etc. are perfect for the kitchen. To store sewing accessories, use tin boxes with appropriate patterns (for example, fabrics, threads).
Regardless of the chosen design, a box made using decoupage technique will look original and stylish. It can become either a decoration for your home or a gift for loved ones.
Step-by-step instructions for beginners
Before you begin master classes on decoupage boxes, you need to understand the essence of its implementation. This will help beginners to master the technology of such decoration at the initial stage. First of all, you need to prepare tools and materials, namely:
- Decoupage box. For beginning craftsmen, it is best to take a ready-made wooden blank (such a product can be purchased at handicraft stores).
- You also need to get decoupage cards or napkins, which are sold at retail outlets specializing in hobby goods. In general, any type of paper with a pattern is suitable for the technique (regular table napkins, wallpaper, postcards, clippings from literature, etc.), but for a beginner it is still better to use special blanks.
- Sharp scissors for cutting out pictures.
- Brushes of different sizes for glue and varnish.
- Glue (regular PVA or for decoupage).
- Glossy or matte high-quality acrylic varnish (the durability of the product depends on the quality of the varnish).
- Acrylic primer.
- Sandpaper.
Popular articles Snow Maiden made of colored paper
Surface preparation
In order for the decoupage to turn out neat, the surface of the object being decorated must be perfectly smooth, so it must be properly prepared. This is done in several stages:
- Using sandpaper, you need to carefully sand the workpiece. This will help remove paint or varnish from the old product, as well as remove minor scratches and other defects.
- If the surface has very deep cracks or chips, they are first puttied, then the putty is allowed to dry for 3 to 5 hours, and then sanded again to a smooth state.
- Dust and debris remaining on the object after such treatment must be carefully removed, and then degrease the surface with acetone or an alcohol solution.
- After the workpiece is completely dry, an acrylic primer is applied.
- 30-40 minutes after the primer has dried, you can begin decoupage.
Paper thinning
The thinner the paper with the image, the more effective the decoupage will be.
Thinning the material is one of the important stages of the technique, so it must be treated with special attention, otherwise the design will look sloppy or completely deteriorate. For this reason, beginners are recommended to use special decoupage cards on rice paper, which do not require prior preparation.
In other cases, the paper is thinned using one of the following methods:
Using tape. Varnish is applied to the front side of the picture in several layers, and after it dries, tape is glued to the back side of the picture.
The adhesive tape is carefully peeled off along with the excess layers of paper. The procedure can be repeated several times until the picture becomes almost transparent. Softening in water
As in the previous method, the outer side of the image is treated with varnish, then the picture is lowered into a container with warm water for several minutes. The time it takes for the paper to soak depends on its density. The soaked drawing is carefully removed from the water and placed face down on a stationery file. Next, remove excess layers of paper, rolling them from the wrong side using careful finger movements. As a result, only a thin layer with a pattern should remain.
Decorating the product
The final stage of decoupage is the decoration process itself. This is the most enjoyable stage, because here you can give your imagination unlimited freedom. The decorating procedure can be divided into several parts:
- The object being processed is tinted with a certain color of acrylic paint (it all depends on the master’s idea).
- After the paint has completely dried, they begin to glue the prepared pictures. This is done in this way: using special glue or regular PVA, slightly diluted with water, the finished layer with the image is glued to the surface of the workpiece, where the pattern is very carefully smoothed out.
- After the picture lies perfectly flat, it is smeared with another layer of glue.
- Other images are glued in the same way.
- At the end of the work, the product is coated with two layers of transparent varnish.
- At the last stage, the product is decorated with additional decorative elements.
Gift box: decoupage on wood
Wood is often used as a material for decoupage.
The best gift is one made by yourself. If you want to please your loved ones and give them an unusual gift, then decoupage a wooden wine box.
Such a gift is relevant for any holiday, and its design will not be difficult.
The technique for performing it is the same as described above, only with a few additions:
- a sanded wooden box should be treated with alcohol to degrease the surface;
- It is better to put sawdust and cut gift paper inside the box so that the bottle does not hit the walls.
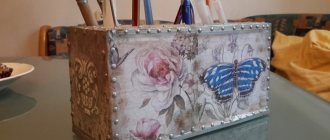
Box with roses (stencil)
In this master class, we combined several techniques for decorating a box with our own hands. Let's try to mix styles, textures and techniques. The main theme of this master class is fabric imitation using painting. Since not everyone knows how to draw well, we decided to use a stencil here.
A stencil design is attached, you can choose any one you like.
The master class is simple, even a beginner can handle it.
To work you will need:
- Casket or box.
- Acrylic primer.
- Acrylic paints.
- Tassels.
- Stencil.
- Masking tape.
- Sandpaper.
- Everything that can be useful for decoration: cord, ribbons, lace, braid, and so on.
If the box or blank is made of wood, you may need to sand it with sandpaper and varnish it. This way we will protect the workpiece from swelling.
We wait for it to dry and cover it with acrylic primer.
Dry and sand. Cover the bottom and top corners with masking tape.
We paint all sides of the box with any light acrylic paint. Thus, we make the bottom layer for imitation fabric.
We paint with a brush in a horizontal direction, applying the paint evenly and evenly. Next, let the workpiece dry, sand it with sandpaper and varnish it. We mix our light paint with the same beige paint a shade darker.
Popular articles Polymer clay earrings
The paint should not be too thick, so be sure to wet the brush in water and squeeze it out. Apply it to the side with horizontal strokes.
Then take a sponge or brush and sweep it across the surface in a horizontal direction.
That is, we need to make an imitation of fabric. This will be one direction of our “fabric”. This is what should happen after processing with a sponge or brush:
We needed a layer of varnish to prevent the paint from being absorbed into the surface of the product. If it weren't for the varnish, we wouldn't have gotten such a textured surface. We do the same with all the side surfaces of the box: paint and wipe off the paint with a sponge or brush. It will be great if you apply varnish on top. We wait for the product to dry, put the same paint on a wet brush and paint the side parts, but this time vertically. We erase the paint with a sponge vertically. As a result, we should get “fabric”.
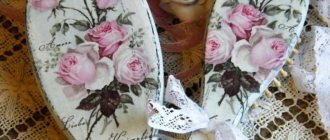
Dry and lightly sand the sides of the product. We choose a stencil for our pattern. Let's say this is a drawing with a rose.
We cover with tape the places that are not needed for decoration. We place the stencil on the side of the product.
Choosing colors for printing the pattern. In this master class these are yellow, burgundy, light green and dark green. We take paint onto a brush or sponge and apply it to the stencil. There should not be a lot of paint so that it does not flow under the template. Your brush should be semi-dry. Don’t rush, if the first time it didn’t turn out bright, you can go over it with a brush again. We remove the stencil and wait for the paint to dry. Turn the stencil over to the other side. Flowers should be arranged randomly. We paint the stencil.
This is what the side looks like. There should be no empty spaces; instead, draw leaves on the main background. Fill the empty space with small leaves.
Next, we make the rose drawing three-dimensional. When it dries, we apply our stencil to the familiar pattern. Secure with tape. Apply burgundy-colored paint to the middle of the rose, and use dark green paint to add volume to the leaf.
Next, sand the sides after the surface has dried. To complete the job, you can coat the sides of the product with several layers of varnish. It's time to work on the lid. Place strips of masking tape on the sides of the lid. We paint the lid in the same order as the sides. First, we varnish a light color, similar to the “fabric”. Then the “fabric” itself: paint horizontally with a brush, then vertically.
Dry the lid and place the stencil on it in different directions. Apply yellow and light green paints. We fill all empty spaces with small sheets. Apply the stencil again, paint the roses burgundy and the leaves dark green. Sand horizontally and vertically with a brush after drying. We admire our work and apply varnish in 2-3 layers.
We decorate the bottom of the box and the sides at our discretion. In this master class, the sides of the lid are painted yellow, and a cord is glued with a glue gun. At the bottom there is a velvet ribbon glued with Moment glue. Wooden legs are glued. It will be beautiful if you attach a strip of lace or gold braid, cord, and so on.
Available blank: decoupage box
The blank for needlework can be made with your own hands, which is quite simple and affordable. You just need to put together the optimal box and paint it according to your own taste. The basis can be a rack frame or a metal type replacement.
However, not everyone can make such an element on their own, so you can also purchase a box in a themed store, for example, Ikea. There you can choose a product for every taste! And only then decorate it in the style you like and a riot of colors.
A standard wooden box made of slats is suitable as a blank.
While working you need to stock up on:
- Free time;
- Patience;
- There is a sufficient amount of materials for handicrafts.
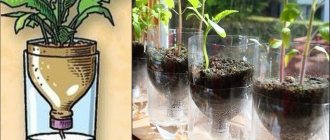
Decoupage of vegetable boxes: simple and beautiful
The place where vegetables are stored is often not given due attention. And, nevertheless, when the house is in perfect order, you want all its components to be in harmony with the environment.
The following requirements apply to boxes for fruits and vegetables:
- The product must be reliable and strong;
- It is advisable to divide the space sectorally;
- The box must be closed, but ventilation must be organized in its plane.
To decoupage a vegetable box, you can choose any thematic picture
If you plan to use it permanently, the box can be made of any size. However, if you have to move it periodically, you should not take on too large volumes. It’s better to make several compact products that will house vegetables and fruits separately.
Decoupage of mailboxes: simple and tasteful
This practice is more suitable for those who live in the private sector. A mischievous and whimsically decorated box will certainly fit well into the interior and characterize its owners as people with good taste. Today there are not so many factory variations on the theme of mailboxes. Therefore, this field is still free for creativity.
A mailbox decorated using the decoupage technique will add originality to the yard of a country house
To make the box truly stylish, you need to consider the following features:
- It is better to choose neutral shades that will not irritate over time;
- You should not save on materials, because mailboxes are installed for a single year;
- Paint and decor tend to wash out under the influence of external factors, so the box should definitely be coated with a protective varnish.
It is important to remember that decoupage is just a decoration method! There is no need to reinvent the wheel and try to change the most ordinary mailbox beyond recognition. It should be convenient for both the owners and the postman to handle.