What does it consist of?
All indigenous people living in America are commonly called Indians. But in terms of clothing, the most interesting tribes were those living in the north and east of the country. Men in these regions wore pants (leggings), made of two pieces of leather, and a shirt. In the cold season, a poncho was thrown on top.
The Indian men's suit was distinguished by its simplicity of cut, since it should not restrict the movements of the hunter and warrior. The nation's love of freedom is reflected in the straight, spacious lines of the style.
The Indian's shirt was comfortable, long enough and warm. Thanks to the round neck, it was easy to put on over the head. Oval armholes did not interfere with raising your arms, throwing a spear or drawing a bow. The trousers were no less comfortable. For Indian men, they started from the waist, and thanks to a special cut, they made it possible to quickly jump on a horse and ride without a saddle.
Women's clothing was richer, although it was based on a simple cube dress. In different tribes it was transformed into a tunic or long shirt. In some areas, the national costume consisted of a skirt and a straight blouse. Women were more likely than men to wear items of clothing made from suede, while the stronger sex preferred leather. Moccasins were put on their feet. Sometimes they smoothly turned into leggings, decorated with fringes, and resembled high boots.
Characteristic design and color scheme
The Indian costume is characterized by multi-layered and colorful, natural colors reminiscent of the colors of the steppes. These are mainly beige, ocher, terracotta, and other shades of brown. Thanks to the rich decoration with beads, deer incisors or porcupine quills, the national costume of the Indians looked very original. Women made extensive use of embroidery, decorating clothes with geometric patterns and lines.
Until the 19th century, warriors' costumes were generously trimmed with beads on the chest and back, which served not only as a circular ornament, but also performed protective functions.
All elements of the Indian national costume were richly trimmed with leather fringe. Sometimes the shirt was painted: the top was covered with blue and green (sky), and the bottom with red or brown (earth). Some especially prominent warriors and hunters applied special drawings to their costumes, showing the number of killed or captured enemies, the number of horses killed in battle, and the number of scalps taken.
Making Pants
When the question arises of how to make an Indian costume, the image of pants richly decorated with fringe immediately appears before your eyes. When choosing a bottom, you need to take into account that they should be standard, not narrowed, but not wide either. A style that is too tight can ruin the overall positive impression of the outfit.
Sewing fringe onto an Indian costume is quite easy. An adult must measure the length of the pants from the top point to the very bottom, then cut two identical strips of felt of the required length. Using specialized clothing glue or, optionally, a needle and thread, the fringe is attached along the entire length of the side seam of the trousers. When the glue dries a little, you will need to make cuts on the fabric not exceeding two centimeters.
Traditional accessories
Almost all members of the tribe wore long hair. To prevent them from interfering with work, the forehead was tied with a thin red strap. For men, it was simple leather; women's headbands were richly decorated with beads and totemic designs.
The national headdress of the Indians is a crown of feathers, which is a cap or headband. Only leaders could wear it. To make an attribute of power, eagle feathers taken from the tail of a bird were used. Ordinary Indians preferred a headdress called a roach. It was made from horse mane, feathers of simple birds, and porcupine quills.
In addition to the costume, additional accessories that served as a symbol of honor and dignity were of great importance for the tribe. The warriors did not part with a tomahawk, the name of which came from the English transliteration of a war club. The standard weapons of the Indians were a bow and arrow, a knife and a flexible spear with a stone or bone tip.
The Indians were very fond of all kinds of decorations, giving them a sacred meaning, considering them a talisman against evil spirits. Bracelets and chest necklaces were characterized by an unusual combination of colors and structures. They were made from animal bones, beads, shells, and metal tubes. Deer fangs, bird claws, coins, or remains of military weapons were strung onto leather strap bracelets.
DIY Indian headdress
So, making your own Indian headdress is quite simple - follow these instructions and you will succeed. It is better to choose colored cardboard as a material; you can give preference to corrugated cardboard, as in the instructions. Or you can opt for regular cardboard, but keep in mind that it must be colored on both sides, at least where the Indian feathers are.
As a result, you should end up with a headdress like this:
And here is the template for Indian feathers:
How to do it yourself
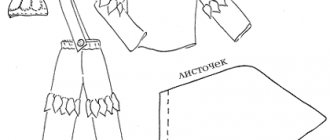
An Indian costume is easy to make with your own hands. The first one is a tunic for girls, and if it is shortened, it becomes an ethnic shirt for a boy. Step-by-step algorithm:
- We take a rectangular piece of fabric according to the child’s size and mark the middle. Stepping back 8 cm in each direction, draw a neck 6–8 cm deep with chalk.
- For the armhole, mark straight lines measuring 20 x 80 mm on the sides of the fabric. They should be located 3 cm below shoulder level.
- To decorate the armhole we make fringe. We cut the fabric along the entire circumference of the neckline to a depth of 4–5 cm. You can sew ready-made fringe to the Indian tunic.
- Before sewing the side seams, we try the suit on the child and adjust the length and height of the armhole.
- To decorate the hem, cut the fabric to a depth of 8–10 cm every 2 cm. Sew the side seams.
We make the fringe for the neck separately. To do this, take a piece of fabric of the desired color, cut out a rounded ribbon 6–10 cm wide. Then we make cuts on it and stitch it to the collar. To decorate an Indian costume, we sew colored patches onto a tunic or shirt or apply special paint for clothing.
Indian trousers are best made from ready-made items. They may be a slightly different shade, but in the same color scheme as the shirt.
To the trousers you need to sew fringe stripes made of material 5-10 cm wide. We choose the length ourselves - to the knee or to the bottom of the trouser leg. Before attaching the fringe and adjusting the length, you need to try on a boy's Indian costume.
It is much easier to make a set of clothes from color-matched T-shirts without inscriptions and trousers. They need to be sewn with fringe, decorated with an ethnic pattern or colored embroidery. On top of the costume you can put a vest with fringe or a cape, jazz it up with a bright bib made of beads, pieces of fur, small feathers, and shells.
Why is this option considered good?
An Indian costume is considered a budget option for holidays and games. Parents will not have to search for suitable materials and parts for a long time in order to breathe life into it. An Indian costume for a girl and a boy will be considered universal. An important aspect is the small amount of time spent on creating a beautiful outfit.
Mothers who do not know how to use a sewing machine win twice, since attaching accessories requires a few stitches or regular glue.
The only possible difficulty may be finding a brown pillowcase or bag. Also, a DIY Indian costume involves purchasing fringe, which can be replaced with a piece of brown felt, and feathers.
Roach from scrap materials
Making an Indian feather headdress is not difficult. To create a roach, you can use real feathers, fabric or paper.
From feathers
An Indian feather roach would look most plausible. You can assemble the headdress on a strip sewn from thick fabric, a rigid ribbon with a geometric pattern, or a rim made of corrugated cardboard. You need to take real feathers, at least 10 cm long. It’s a good idea to paint them in different colors. Manufacturing algorithm:
- We measure the circumference of the child's head.
- We choose a material to match the suit or paint cardboard.
- We lay the feathers on the strip, glue or sew them.
- We hide the place of attachment with beads, ribbon with an ornament, or colored paper.
- We make ties on the woven strip or insert an elastic band so that the roach stays on the head.
Before you make an Indian headdress with your own hands, you should look at photographs of ready-made options.
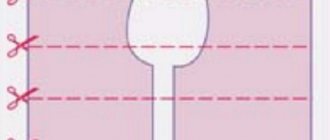
On an A4 sheet folded in half, draw the following figure. Place the cut out figure on a sheet of polypropylene fabric and cut out the blank.
We make holes in each corner and insert eyelets
It is necessary to insert a canapé stick into each feather, having previously lubricated it with glue. It is necessary to prepare felt rectangles measuring 8x12, the number of which should be the same as the number of feathers
Each feather must be wrapped in felt. All feathers must be wrapped with thread.
Feathers are attached to the prepared frame
The sticks sticking out from the bottom are carefully cut off. The resulting structure is covered on top with a cloth coated with glue. A row of feathers is sewn on top of the fabric.
Preparing decorative elements
From fabric
For another, more complex version of the Indian headdress in the War Bonnet style, you will need a tight-fitting Indian hat made of felt or other dense material. You can sew it yourself. To do this, take a strip of fabric 18–20 cm wide, slightly longer than the circumference of the head, matching the color of the suit. The edges are worn down. The top of the warp is gathered onto a thick thread and pulled together. You will get a hat. Step-by-step algorithm for making fabric roaches:
- We take the long, hard feathers of the bird (preferably the tail feathers), straighten them over the steam from the kettle, and smooth them out.
- We trim the tips and shafts, aligning the feathers to length.
- We tie a thin cord 10 cm long on the shaft of each feather and secure it with glue.
- We cut scraps of bright fabric that matches the color of the suit, wrap the rods, leaving a loop. For strength, you can use glue.
- We take a hat sewn in advance and make holes along its edge for attaching feathers.
- We pass the cords through the slits and tie them on the wrong side.
At the end of the work, we arrange the feathers in a fan and complement the Indian roach with a bright forehead. If desired, you can decorate the product with side pendants made of thin strips of fur, placing them in front of the ears. You will get a real Indian headdress.
From paper
One of the available materials for making roach can be plain paper. It should be dense and better tinted in the mass. In addition to this, the work will require scissors and glue. Creation algorithm:
- Fold the paper sheet like an accordion.
- From the blank we cut out a shape similar to half a feather. Leave 3–5 cm at the bottom for fastening.
- We cut the feather a little from the top and to the middle.
- We unfold the accordion, lubricate the attachment points with glue, and press it tightly to the cardboard headband.
- To hide the edge of the feathers, we decorate the rim with a strip of colored paper or fabric.
To make the roach look more fun, feathers are decorated with colored pencils or felt-tip pens. To complete the image of a real Indian, a boy can be given a battle hatchet or a spear, and a girl can wear ethnic bracelets on her hands. Paint the child's face with body paints, using black, white, red and brown shades as a basis.
Original outfit for a boy
The basis of such a suit is a jacket and pants. You can use unnecessary items in your wardrobe or sew them using patterns from thematic magazines. Ordinary straight children's pants and a long-sleeved blouse will do. Color - shades of brown, gray, yellow, olive. You can use a white turtleneck, light or brown jeans or any other clothes. A patterned braid is sewn along the entire sleeve. You can easily buy fringed braid or make it yourself. To do this, you will need to cut a strip of fabric and cut it into small strips.
Exactly the same fringe and braid are sewn onto the panties. You can leave only the fringe without using braid, which simplifies the work. There are many details in an Indian costume for a boy, so try to decorate the outfit you make in an original way. The edges of the sleeves and the bottom of the pants can be cut into fringe. The braid can also be sewn to the knees and elbows.
https://youtube.com/watch?v=XIDPnfpnT_w
Next, they begin to create a loincloth and poncho. For the bandage, cut out two large rectangles from light fabric. Sew smaller rectangles of brightly colored fabric onto them. Sew braid and fringe to the smaller rectangles. You can embroider some kind of pattern, we will need to complete as many details as possible. Large rectangles are sewn to a wide belt. This belt will allow us to tie a loincloth over our pants.
For the poncho, cut out a large square of fabric and fold it into a triangle. An incision is made on the fold in the middle to put the cape and poncho over the child’s head. We cover the cut with braid. A fringe is sewn along the edge of the poncho, pulling out the threads. Appliques are sewn on the surface of the poncho or embroidery is done.
All you have to do is make a roach, which is a feather headdress. Indian hats with feathers can be purchased at the store, but if you have a dozen turkey feathers lying around the house, you can easily make one yourself. The feathers should be painted in different colors and glued to the braid, which the child will put on his head. If you don’t have feathers on hand, you can make a roach out of cardboard and paper. You will need to cut a strip of cardboard that is approximately 2cm wide and slightly longer than the circumference of your child's head.
A circle is cut out of the fabric, which is a symbol of the sun, and glued to the central part of the roach. Various geometric shapes are made from colored paper and glued to the base of our hat. It will be necessary to cut out various shapes from paper that resemble oblong leaves, fold them lengthwise and cut the edges with fringe. The completed feathers are glued to our Indian headdress. Next, long strips of colored paper are cut out and glued to the roach, making a paper fringe out of them. Instead of paper strips, you can also use fabric strips.
To complete the look, you can make a bow and arrows or a tomahawk out of plywood or wood, which you simply cut out of paper.
