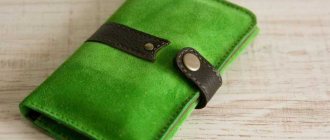
Crafts from a plastic bottle (master class). Catch the ball toy.
You will need:
- flexics
- glue
- threads
- ping pong ball
- scissors
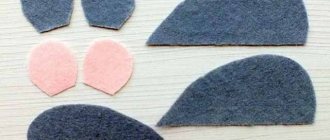
1.
Prepare orange flexi and cut out flower petals from it.
2.
Using glue or double-sided tape, attach the petals and string to the bottle.
3.
Attach a table tennis ball to the other end of the thread.
That's it - play by trying to catch the ball in the flower.
Delicious turtle made from vegetables
Warsaw artist Marta Turowski came up with kitchen utensils depicting different animals with one goal - to make children eat better. Is this a familiar problem? In this master class we will make a turtle from vegetables, which will definitely whet the children’s appetite. And it starts with this simple set:
Half a head of cabbage, a few fresh cucumbers, toothpicks, 15 cm of floral wire and a sense of humor.
Half a cabbage serves as a secure base. Cucumber circles are attached to the cabbage with toothpicks, indicating the shell, legs and head. The tails of the toothpicks need to be broken off, we are making a turtle, not a hedgehog. And we twist glasses out of wire, let our beauty be not only very tasty, but also very smart, like this:
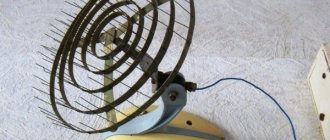
How to make a craft from plastic bottles. Vane.
For those who want to know which way the wind blows.
You will need:
- plastic bottle (preferably a pot-bellied one)
- scissors
1.
Prepare a clean bottle and use scissors to cut windows in it. It is desirable that they be approximately similar to the blades of a weather vane.
You need to make 4-6 similar holes and then bend the corners.
2.
Attach the weather vane in a suitable place - on the balcony. This can be done using an iron pole. Make a hole in the bottom of the bottle and put a pole on it.
Now you will always know which direction the wind is blowing.
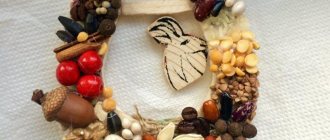
Nutshell turtle
In the chapter on using plasticine mass, we already mentioned nut shells. Here's what else you can do in this direction:
This miniature model can be made from just half a walnut shell, one whole pistachio, four pistachio half-shells and a branch for attaching the head. All parts are attached to each other using plasticine or using a glue gun. Such models are especially good because when working with small parts, the child is forced to concentrate more on the process and be more careful than when working with large objects. This is almost a jewelry job for a child and it best develops fine motor skills.
Have you already decided what kind of turtle you will make? In the song she was called Natasha, in the book - Tortilla. What will your name be?..
Crafts from plastic bottles for children. 3D glasses.
You will need:
- transparent plastic bottle
- unnecessary sunglasses
- colored markers
- scissors
1.
Cut two parts from a plastic bottle as shown in the image.
2.
Take the glasses out of the glasses and outline them on the cut part of the plastic bottle.
3.
Use a red marker to color both sides of the left glass.
4.
Use a marker to color the right glass blue on one side and green on the other.
5.
Insert the glass back and enjoy 3D pictures.
How to carve a skull from wood
To see the volume it is necessary to sculpt more often. And see the volume. This is the most basic thing for a carver; sometimes a person is excellent at drawing, but in wood it is zero. He doesn’t see the volume! True, there is such a moment when I sculpted it. For you, the step has already been completed and you no longer want to cut as much. I went through this, for me a life-size drawing is enough, where I try to draw the details and draw shadows as long as I need it.
- Login or register to post comments
Joseph Epstein
I don’t pretend to be the ultimate truth, but I’ll try to lay out my approach. In the face, it is not so much the correct anatomical proportions that are important, but its expression plus the positioning of the head and the entire figure in accordance with this expression and vice versa in connection with the clients. This is brilliantly proven by the art of caricature, where deviation from real proportions only increases similarity and expressiveness. I do this. I pay attention to the faces in his life in photos and videos, I made a folder of faces. When the task is set, I try to find a similar face in a different way and model it as my own. I’m trying to understand what directly creates the desired memory. If the task is tedious, I sculpt it without detailing. And only having caught what solves the problem, I start carving. At the finish line there is an option to ruin everything that was done correctly earlier. Treatment of eyes, lips. Small differences can ruin the deal. But this is only with experience. It may be natural that books, no matter how annoying it may sound, are not enough. Judging by your figure, you build your face simply, that is, there will be no problems with the anatomy. I wish you success.
- Login or register to post comments
Oleg Svechkarev
When, I also can’t handle sculpting if I’ve mastered carving. I even make sketchy sketches for volumetric carvings, without working out the details, the main thing is to break down the proportions and quickly start working on the wood. And for a portrait, a head in volume, it’s convenient to start with a blank in the shape of a cube, beat off the axial line, then the contours from the front and go through the inventory, later you draw the profile of the head with a pencil and repeat the operation (there is an option to change the sequence, first the profile, then the front) and thus base base received,
- Login differently register to post comments
Viktor Trifonov
I also have a problem. I sculpted everything, it burned out. I cut with force. in my head, “What’s the point, what remains for our client to do has already been created, the rest is just technology.”
- Login or register to post comments
Glory
Thank you very much for your answers. I figured it out for myself. What remains for our client begins with drawing and modeling. And so that something comes out. you need to work hard. Thanks again for the answers.
How to carve a small skull // how to carve skull
- Login or register to post comments
Sergey Karpikov
my method is different: I cut the face T. figuratively, the top line is the forehead, the nose is vertical. Next, I cut half of the face, going into profile, and later I move to the other half and combine it.
- Login what else is it called register to post comments
Boris Ivanov
That's why I don't sculpt or even draw, but I'll draw the economy and forget to cut it out.
- Login or register to post comments
Crafts from a plastic bottle (photo). Bracelets.
Foam plastic to help
To make a turtle, you need to make a frame from polystyrene foam and tie it tightly with wire.
To make a turtle from foam plastic, you will need the foam itself, wire, cement and paint. The frame is designed from foam plastic, then it should be tied with wire. A cement solution is prepared, which will be applied to the foam. In order for the head to be firmly fixed to the body, it must be driven into the base of the future product with nails before cementing.
To save on cement, you can use expanded clay. Apply it to the surface of the foam and wait for it to dry completely. The craft can be varnished and the colors you like applied to the surface. To decorate the turtle's eyes, you can use different numbers of stones, beads or buttons.
Before the cement has time to dry, all parts of the product must be shaped. To do this, take a wet brush, which removes all the unevenness and blemishes. The head and other parts of the turtle can be formed separately from cement, but this will be more difficult.
You can place some kind of support under your neck so that it is fixed more securely. Roll 2 balls, which will later be used as eyes. Before drying, the shell can be given any design. The final painting and drying will not take long.
Return to contents
Crafts from plastic bottles (instructions). Casket.
Plastic plate
A cool solution would be a simple plastic plate, which is easy to find at every dacha. A turtle can be made from a plate of any diameter.
A cute turtle can be made from two painted tires, an old basin and a small piece of plywood for the head and tail.
Required:
- Plate.
- Markers/paint.
- Stickers or plastic overlays.
- Cardboard.
You need to take a plastic plate and slightly trim the edge. The product can include various available tools. Take cardboard, which has been pre-cut into pieces, and glue it to the inner surface of the turtle using glue or tape.
Form the future limbs of the turtle: tail and head. The latter can be made from a separate piece of cardboard and also using simple paint or beads.
The top of the turtle is covered with paint. Color solutions are limited only by imagination.
Return to contents
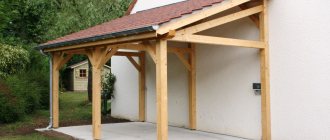
Palm tree made from plastic bottles. Option 1.
You will need:
- brown plastic bottles (1.5-2 liters)
- green plastic bottles (the larger the bottle, the more magnificent the leaves)
- thick rod (for the base of the trunk)
- awl or drill
- scissors
1.
To make tree bark, you need to prepare brown plastic bottles and cut them into pieces 10-15 cm high.
2.
Next, along the edge of the cut, you need to cut out cloves 5-7 cm high and bend them back.
3.
To make palm leaves, you need to cut off the bottoms of green bottles. On one workpiece you need to leave a rigid neck with a lid, since it will play the role of fastening.
4.
Start cutting out the leaves - you need to do this so that there is about 5-7 cm left to the edge.
5.
Start collecting green blanks, putting them on the same blank with a neck. Screwing the lid will hold everything together and you will have a palm tree crown.
6.
Now you need to make connecting holes. Their diameter must match the diameter of the base rod. Such holes can be made using a drill or a hot awl. Make a hole so that the crown of the palm tree does not fall through.
7.
We begin to collect the palm tree. When you have strengthened the rod, begin to place blanks of brown plastic bottles on it. The design ends with a green crown.
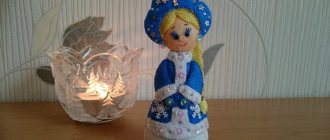
Plasticine reptile
Now let's see how to make a turtle from plasticine, in whole or in part. If we are talking about a completely plasticine model, then we need to make the following blank balls: one large dark brown one, four smaller green ones for the front and rear legs, a small one for the tail, and a large green one for the head. By connecting the blanks and giving them a shape, you will get the toys you want:
cute turtles...
and even baby turtles...
The exact sizes of the balls and their ratio to each other are not important, do not be afraid to do something wrong - errors are completely excluded here. Do not forget that sculpting a reptile from plasticine with your own hands is a creative process. Some disproportion will only add to this lifestyle and unique charm.
How to make a palm tree from bottles. Option 2.
You will need:
- brown plastic bottles
- green plastic bottles
- knife, scissors
1.
Use a knife to cut off the bottom of the bottle.
2.
Next, use scissors to divide the bottle into 4 equal parts and cut out each part in the form of leaves.
3.
Start stringing the blanks one on top of the other to form a palm branch.
4.
Turn the structure upside down and you will have a palm branch. To make a branch you need to use about 10 - 20 plastic bottles. If you want to use fewer bottles, you can also use the bottoms that were cut off from bottles earlier. Simply insert them between each bottle of cut leaves.
*You can have branches of different sizes - their length can vary from 60 cm to 150 cm.
5.
Preparing the frame. To do this, prepare brown bottles. Cut off the bottom and make cuts along the edge in the form of a fringe.
6.
Place the finished branches onto the crown frame. You can decorate it if you wish.
We additionally secure the details
After the turtle shell is firmly glued to the mold, it is advisable to further secure the parts with a strong thread and needle. You can use knitting yarn or twine.
Sew the bottom to the foam so that the thread crosses along the bottom of the bottle. Now all parts of your turtle are well fixed, and the threads will serve as an additional decoration.
In the center of the shell, where the threads intersect, glue a small button. This will make your homemade toy even cuter.