Almost no one will refuse to receive fresh flowers as a gift. Beautiful floral compositions from overseas plants, collected by professionals, amaze with their size and variety. Bright, unusual exotic bouquets filled the flower shops. The names of flowers are beyond the power of an ordinary person to remember and learn.
What then should those who have grown with their own hands excellent flowers in the country or collected a modest bouquet of wildflowers do? Is it possible to beautifully package flowers yourself using different materials? Certainly! We’ll tell you how to do this better in the article.
The easiest option for beginners
Transparent packaging film for flowers is considered a universal material and is suitable for any bouquet for any occasion. Many housewives have learned to dry the film and re-wrap flowers in it.
You can pack both a whole complex bouquet and a single flower in film. The film is placed at an angle, the flowers are placed on the corner, after which the bouquet is wrapped around the film, tightened with a cord or tourniquet.
Other flowers
And more ideas from the Internet on how to make flowers from cardboard egg trays (photo).
By cutting out the edges of the tray of different shapes, you get different flowers; all that remains is to color them.
Interesting crafts are obtained in the form of multi-layered figures that look like lush flowers and even pine cones:
A lovely flower that looks like a cosmos:
There is chamomile and violet here:
Fun kids craft with buttons:
In this video there are beautiful poppies:
And also hyacinth:
In order not to forget the address of the page and share with friends, add it to your social networks: Do you want to know news about competitions or master classes?
Tags: Crafts from waste material, DIY flowers
Attention! It is better to write urgent questions in the comments on the website (form at the bottom of the page) or, better yet, directly by email. There are no notifications about comments from the VKontakte form! This form is more for feedback. 
Discussion: 6 comments
- Elena (Family leisure):
March 13, 2016 at 6:05 pmIt was a very comprehensive master class. I didn’t know it was possible to make flowers like this from trays. We were surprised.
Answer
- Olga Smirnova:
March 14, 2016 at 2:05 pm
What a fantasy! These beautiful roses are practically made from garbage! I just don't know how to use them yet.
Answer
- Olga:
March 14, 2016 at 6:01 pm
Roses are wonderful!!!!!! All that remains is to find cardboard trays for eggs - there are only plastic ones everywhere.
Answer
- Alina:
June 12, 2022 at 4:52 am
Very good! Do you think it’s possible to coat them with varnish?
Answer
- Faith:
February 12, 2022 at 08:11 pm
Cool! We will definitely use it in our after-school classes.
Answer
- Sveta:
February 13, 2022 at 9:10 am
Great idea, original! Children need to be taught to think creatively, to see the potential for creativity in the most ordinary things. This is the future of many professions in the age of robots and computer technology.
Answer
The easiest option using kraft paper
Craft paper itself is the simplest means of packaging and goes with almost everything. There are no particular requirements for packaging bouquets in craft paper.
The easiest way to pack a bouquet is like this. Sort out the leaves and flowers and wrap the base of the bouquet with film. Cut a square of craft paper and roll it into a ball. Place flowers inside. Tie with a bright ribbon at the base of the bouquet.
Additionally, you can draw any ornament on paper, attach lace with staples, etc. Packed in kraft paper, the flowers will contrast with the gray-brown background and look in all their beauty and sophistication.
How to beautifully wrap a gift for a man: alcoholic souvenirs
For people who are looking for a quick way to wrap alcoholic gifts in an impressive way, you can use cotton or knitted fabric, decorating with colored ribbons and adding tags in the form of wishes. This will in no way protect our gift from possible damage, but it will add a nice decorative accent. Alcohol can also be decorated with wrapping paper.
Packing a bouquet in rectangles and corners
For this type of packaging, the selected paper is cut into equal squares. It is good to take paper or matte film that matches the overall tint of the colors. The film is laid out on the table, corners up with equal sides. The formed and tied bouquet is placed in the center of the squares and wrapped in paper so that the wrapper looks the same on all sides. The interception site is tied with a tourniquet and then with tape.
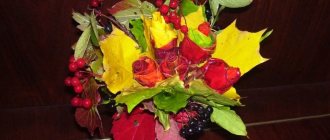
Unusual bouquet design options:
DIY gift paper decor
What to do with beautiful wrapping paper that ends up in a pile in the house after the holidays?
Don't rush to throw it away before you see these photos. We have prepared many ideas for you to use it!
"Outfit" for shoe boxes
Ordinary shoe boxes wrapped in gift paper turn into an original and practical item for storing photographs, stationery and other small items, and are worthy of taking up space on open shelving.
Add style to your shelving and freshen up your dresser drawers.
By lining your dresser drawers with bright paper, you will not only freshen up your furniture, but also create an incentive to keep things tidy.
Decoration of gift bags.
To create a festive mood, you don’t have to wait for special dates. When going to visit friends or family, take a gift with you, putting it in an elegant bag or wrapper. You can take care of the decoration in advance and make blanks for appliqués. If you receive crumpled paper, you can smooth it slightly with a warm iron.
Original book wrappers
It is not necessary to wrap all the books, one or two are enough to create bright accents in the interior
Wrapping paper can be used to decorate shelving made from boxes
Organizing space in dresser drawers and desks
Cornflakes boxes, tin cans and toilet paper rolls all transform with a little dressing up. They can be used to store pencils, scissors and organize space in drawers.
Instead of paintings
A plainly painted wall can be decorated with gift paper, placing it in a frame.
Since the pieces of paper are quite colorful and bright, it is recommended to choose frames of the same color.
Colorful wallpaper
You can make colorful “patchwork” wallpaper from elegantly selected pieces of wrapping paper.
Holiday lettering and decorations
Paper garland
Original “napkins” for treats.
Wall boards
Boards with metal clips decorated with wrapping paper can be placed on the wall. They are very convenient for keeping reminders and notes in sight.
Beautiful paper vases
They are useful for storing small items and sweets. To make paper vases, you need to select a suitable container, wrap it in thin plastic film and cover it with pieces of paper. Then the product should be allowed to dry for 24 hours. The inside of the vase can be coated with paint.
Decorative birdhouse
Clothes for paper dolls
Paper train
Decoration for Easter
Instructions for packing a bouquet in a floral net or organza
An excellent way to present flowers is to wrap them in mesh or organza. This bouquet looks stylish and unusual. Similar packaging methods are used by florists in flower shops and specialized salons. You can pack a complex bouquet of different types of flowers in a net.
Before creating a bouquet, the stems of the flowers are trimmed, and the flowers themselves are laid on top of each other in a spiral. Flower stems are alternated with ruscus branches and tied with ribbon.
From a roll of mesh or organza, cut three equal squares and a rectangular piece. The squares are folded in half, the corners are moved and folded in half again. You should get a rhombus with four vertex corners. The ends are fastened with staples, so 3 blanks are made.
Each blank is applied to the bouquet and wrapped with ribbon, the diverging edges are connected with staples. Using a cut out rectangle, the lower stems are closed, pinned with staples and tied with a wide ribbon. The stems that remain open are trimmed with pruning shears.
Roses from egg trays
Egg trays are perhaps the most affordable material for creating various crafts, for example, for children's creativity in kindergarten. From container cells (cassettes) you can create unusual and very beautiful roses . In the future, they can decorate any decorative items, for example, a photo frame, mirror or lampshade. Also, such flowers can be used as an independent decoration, placing them on a shelf or coffee table. Master class by Olya Vedutova.
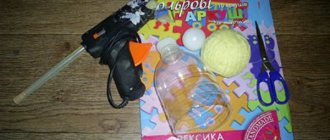
Prepare the necessary materials and tools:
- cardboard egg box;
- scissors;
- green corrugated paper;
- watercolor paints;
- brush;
- hot-melt gun with glue stick.
How to make roses, step by step:
Step 1
To begin with, we cut off the top part of the box, and leave the bottom, with the cells.
Step 2
Next, use scissors or a stationery knife to separate all the cells.
Now you need to create petal blanks from them.
Step 3
We make four cuts on each cardboard piece.
We leave the high areas of the cells for creating petals. To assemble one medium-sized rose bud you will need four blanks.
Step 4
Then we open the details of the cell so that you can get to each petal with scissors.
We begin to give the petals a rounded shape, cutting off sharp corners.
The first tier of petals is ready! Next, cut out three more blanks.
Step 5
Then we make cuts towards the center on the bottoms of all the parts.
We do this so that during the process of assembling the flower, its petals can be easily twisted and created the necessary shape of the bud.
Step 6
Now all the cut out parts need to be painted in the desired shade.
We shade the centers of the petals with a light tone, creating the effect of a natural color.
Then dry naturally.
Step 7
Gently bend the tips of the two petals in half.
Apply a drop of hot glue to one of them and glue them together.
Then we give the same shape to the remaining pair of petals. Glue them to the resulting flower base.
Step 8
Next, we attach the next piece to the bottom of the bud.
The bud must be positioned so that its corners are in the center of the next petals. Using hot glue, we attach all four parts.
The third workpiece is attached in the same way.
Step 9
We cut the fourth blank into separate petals. Then we apply glue to them and attach them to the bud.
Step 10
When the flower is completely dry, paint the finished craft again with a more saturated tone.
We shade the tips of the pink petals with a light tone.
Step 11
Cut out flower sepals from green corrugated paper. Apply glue to the middle of the part and attach it to the bottom of the bud.
Step 12
That's it, all that remains is to twist the tips of the sepals.
Vintage egg cell roses are ready!
The result was such cute buds:
For another version of more magnificent roses, see this video from YouTube:
The second and third master classes are simpler, useful for teachers and parents, for crafts in kindergarten.
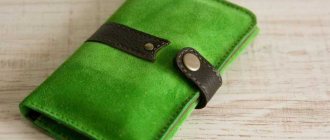
Options for packaging flowers in fabric (burlap, felt, etc.)
Burlap, linen, felt, as well as craft paper, are considered new and environmentally friendly types of bouquet packaging. Flowers in them look natural, advantageous and unusual. You can clearly see the process of using burlap as packaging in the following videos:
In principle, you need to proceed in the same way as when packing in film or sisal. A square of burlap is cut, the corners are folded diagonally, a bouquet is placed in the center, which is wrapped in corners. The junction is intercepted with ribbons or thread and decorated as desired.
Protecting the floor while painting the walls
To prevent damage to the floor during repairs, it is usually covered. The edges of the paper are attached to the floor with masking tape, which is then easily removed and leaves no marks.
After painting is completed, the dirty paper can be used as kindling for the stove, or for laying in high beds as a bottom layer. This is true, of course, only for real paper, and not for shiny plastic wrappers.
Kitchen cabinet drawers are lined with paper sheets, so they get less dirty. The top of tall cabinets can also be covered with old paper, this will make cleaning easier. It is enough to replace dusty sheets with clean ones every six months.
Use old wrapping paper to stuff shoes that need to be put away. This will keep the shoes in shape. If you drop aromatic lavender oil on paper, moths will not appear in the storage area.
Don't throw away holiday gift wrappers like any other paper. It will find reuse.
Instructions for a cascading bouquet
Cascading bouquets are becoming popular for gifting in sets. To compile them, you need to purchase a box and lay any paper on the bottom. Flowers should be the same length. They are placed on the bottom of the box, laid out like a fan and tied with an elastic band. The box is closed with a lid and sent as a gift to the recipient.
White gift filler
You can use regular copier or printer paper.
I got the highest quality and thinnest cuts from white wrapping paper, similar to tissue paper. These sheets are easy to cut and look wonderful in the end. A small sheet makes a heap of filler for several boxes!
And my example using white slices to wrap gifts with soap for the New Year.
Instructions for a vegetative bouquet
A bouquet that presents flowers in the most natural way is called a vegetative bouquet. Most often, such bouquets are asymmetrical, a small group of plants takes the main attention, and tall ones are placed in the distance. Plants should look as natural as possible, as they grow in nature.
Packaging a bouquet of chrysanthemums
Original packaging
How to pack a gift in an original way? There can be many options.
For example, you can pack a gift like candy. The wrapper for this candy is made of colored paper. For a detailed step-by-step master class with photographs, see here.
And this is a video version from the author:
Many small gifts can be placed in boxes in the form of cake portions; a detailed master class with diagrams is here.
Another non-standard option is to hide gifts in a balloon and wrap it like candy - a surprise is guaranteed! See details.
And since we're talking about sweets, we can't help but remember the main childhood temptation - chocolate eggs. It is in the form of a kinder surprise, only in a large size, that you can arrange gift wrapping. Master Class
For a small gift, you can glue together a paper cupcake like this, which is already a gift in itself:
Well, if you don’t want to hide your gift, then you can make such transparent packaging:
Several options for packaging flowers in a box and basket
Popular arrangements in boxes and baskets are in trend now more than ever. To prepare such a bouquet yourself, you will need different tools: a mold, pruning shears, foam substance for floristry, decor and a container for water.
From floral foam you need to cut a base smaller than the lid of the box. Soak it with moisture. Make a bedding out of film and cover the container for the composition with it. Place a sponge soaked in water on it.
Prepare the flowers by shortening their stems to the desired level. Arrange them in the sponge as desired. Decorate with additional decor.
You can also use an acrylic box. Water is poured into the bottom of the box, flowers and stems are cut to the required size. Place the flowers in a container and straighten them as desired.
Daffodils and tulips
Author of the photo and description of the craft: Oksana Eduardovna Alexandrova, teacher at MBDOU No. 267 in Izhevsk.
I really like experimenting with “waste material” - giving it a “second life”. This time my gaze fell on the egg tray. Why not, I thought... and this is what I got.
For work I needed:
- egg tray;
- gouache;
- beads (orange, yellow);
- fishing line;
- brush, scissors, glue gun;
- cardboard.
Step by step:
Stage 1: Daffodils (3 pcs.)
We begin work by making daffodils:
1) Cut out a deep “cell” from the tray; mine is 4 cm high;
2) Next, cut out 6 petals of 3 cm each and a circle with a diameter of 2-2.5 cm, which will serve as the basis for gluing the flower parts.
3) Glue the parts onto the base.
4) Decorate the flower.
5) We make the stamens from beads (yellow and orange) strung on a fishing line (5 pcs.).
Glue them into a flower bud - the daffodil is ready. This way we make 3 flowers.
6) Cut out and decorate the leaves (number and size as desired).
Stage 2: Tulips (2 pcs.)
Let's move on to tulips.
1) Cut out a deep cell from the tray to the required length.
2) Cut out a bud consisting of 4 petals.
3) We make cuts on 1:3 parts of the cell, thereby obtaining stamens.
4) Decorate the parts, glue them together - the tulip is ready!
Stage 3: Collecting prepared elements into a composition.
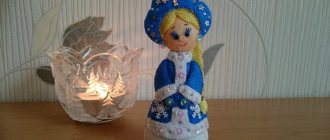
How interesting is it to pack a flower in a pot?
Houseplants are often given as gifts for holidays instead of fresh ones. If the flowerpot in which the flower grows is unattractive, you can improve the situation by decorating it with tulle, sisal, floral film, or burlap to match the flower. You can complement the composition with plaster figurines of gnomes and insects.
Original compositions and examples of decor creation
Traditional decoration - bouquets in a vase. You can collect a bouquet of daisies, roses, tulips, and for experienced florists it will not be difficult to create a gladiolus branch:
If you love indoor flowers, but don’t have time to grow them, then a corrugated paper orchid flower is just what you need. This is difficult work that requires certain skills, but the result is worth it.
You can decorate a room not only with bouquets of paper flowers. For example, for indoor wedding ceremonies, you can create a photo zone using paper flowers. They are attached to a perforated wall using a wire bent into a hook.
Using the techniques described, you can create a topiary. The base is a foam ball, which is covered with corrugated paper petals.
This “cool magazine” harmoniously combines the warmth of the created bouquet and the sweet filling of the box. This gift will definitely be remembered for a long time!
MASTER CLASS ON THE TOPIC
We decorate a box of chocolates in the “Cool Magazine”
Your guests will immediately notice the beautiful flowers decorating the interior, but will not immediately understand how this cup does not fall...
With a little patience and effort, you can create elegant decorations for your room, make an unforgettable celebration, or simply delight your colleagues and loved ones with a uniquely decorated simple gift.
Storage boxes
There is always a lot of small things in the house that require certain places and storage systems - torn buttons, threads and needles, spare keys, memorial cards and paper ones, real letters, receipts and checks. In general, storage boxes are a super thing that will help you deal with the nonsense that is lying around every step of the way in your home and clearly requires organization.
How to design storage boxes - master class from Clubcrafted
How to make gift filler from napkins
If you have regular table napkins, then your gift boxes will not be left without filler! If the napkins are white, then the filling is white.
First divide colored napkins (regular table napkins) into layers.
The fact is that napkins consist of 2-3 (usually three) layers. The top (front) is usually with a pattern, and the bottom is white.
Next, the principle of operation is the same as with other paper: roll, cut, fluff, crumple and fluff again.
The difference between this filler and the others described above is that it is soft and does not hold its shape very well.