Main characteristics
It doesn’t matter at all whether your wallet is classic or designer and unusual, it must meet a number of requirements to make it convenient to carry with you and constantly use:
- The size of the wallet should be such that it can accommodate banknotes of any denomination. Money should be removed from the wallet freely, without getting stuck or crumpled;
- The wallet must be securely closed so that nothing falls out of it. Zippers, buttons and Velcro are used as fasteners;
- The finished wallet must be decorated. It is better to decorate even the most laconic men's wallet with decorative stitching or embossing.
A high-quality handmade wallet can easily replace a store-bought version, and as a gift it will show your love and respect for the birthday person.
Material selection
You should choose the material for your future wallet based on its wear resistance. Since a wallet is constantly being taken out of a bag or pocket and rubbed against surfaces, the material must be smooth and resistant to wear.
On the Internet you can find many photos of handmade wallets made of genuine leather, but this is not the only material from which you can make a wallet with your own hands. Suitable for sewing:
- High quality synthetic leather;
- Soft PVC;
- Thick denim;
- Natural or artificial suede;
- Felt;
- Jacquard;
- Thick raincoat fabric.
Marking and cutting leather for a homemade wallet
When the leather plate has dried, you can begin marking it according to the pattern and cutting out the parts for making the wallet.
To mark, you need to lay out the patterns on the surface of the skin and trace them around the perimeter using a ruler using an alcohol felt-tip pen.
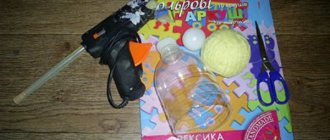
You can cut natural leather with a scalpel or a stationery knife. To do this, you need to firmly press the metal ruler, oriented along the marking lines, and with sufficient force draw the knife blade along it. To prevent the knife from dulling, you need to place a soft material under the skin, for example, corrugated cardboard or several newspapers. If you have never cut skin before, it is better to first practice on an unnecessary area of the plate.
The photo shows the workspace and tools that were needed when cutting leather for a homemade wallet.
Preparing for work
Before you start creating a wallet, you need to prepare a sketch and all the necessary tools. You should have on your table:
- Sketch and paper pattern;
- Thick threads and scissors;
- Zippers;
- Main material and lining material;
- Dublerin if you are using soft fabric;
- Cardboard. It is needed to give shape to compartments for storing plastic cards;
- Thimble;
- Decorative elements, if they are intended for decoration.
Wallet accessories can be purchased at leather goods stores or craft stores.
Before starting work, it is necessary to think through in detail all the stages of work and their sequence, and perhaps write a plan. If you have any difficulties with the sewing technology, carefully watch a master class on how to make a wallet on the Internet, preferably in video format.
Leather wallet
The most difficult process of making a wallet is creating a leather product. But despite this, a wallet made of this material will be practical and will last for many years!
What kind of skin is there? What materials and tools are needed? What will you need?
Leather types:
- Calfskin;
- Kid;
- Deer skins;
- Pig skin.
The structure is:
- Smooth;
- Fleecy;
- Lacquered.
You can purchase leather in specialized stores or order it online, based on your preferences.
Of course, leather is very different from other materials and requires special tools to work with it. Here's what you need to get:
- Rulers;
- Knives of different sizes;
- Roller knife;
- Tailor's scissors;
- For marking you will need an awl and a pen;
- Mat with markings for cutting;
- Glue for rubber;
- Double-sided tape will come in handy;
- Clips and brushes of different sizes;
- Rubber roller;
- Nylon hammer;
- Punchers of different sizes;
- Wire cutters and pliers;
- Fine abrasive sandpaper;
- Special leather oil, varnish or paint;
- Sewing machine or special equipment for leather;
- Threads: synthetic or waxed;
- Gypsy needle;
- Fasteners (zippers or buttons).
The list looks huge. In fact, you need to look at the wallet model, because some may not be needed.
Manufacturing process:
- To make a leather wallet with your own hands, you need to make patterns. You can find them on the Internet or create them yourself using your own wallet design.
- Transfer the patterns to the skin and cut out the blanks.
- Based on the model of the wallet, connect all the parts, sew them, attach fasteners, and decorate.
- Treat the wallet with varnish or the like.
Thus, a men's or women's wallet made of genuine leather is made by hand and is ready to delight its owner.
Women's fabric wallet
Before sewing a simple women's wallet with your own hands, prepare the main and lining fabric, double fabric, scissors, threads to match the fabric, a needle, a clasp and a small zipper.
Cut out a template for the future product from paper or cardboard. Duplicate the fabric. To do this, apply the adhesive fabric from the back to the main one, place a piece of cotton on top, iron it with a hot iron.
Cut out the fabric, be sure to leave 1 cm on each side for seams. Sew in the zippers. Pockets without a zipper can be folded and ironed or trimmed with bias tape.
Note!
- Macrame: diagrams, interesting projects and detailed descriptions of making crafts
- Crochet amigurumi - examples of how to make a beautiful toy with your own hands (75 photos)
- Coffee topiary: step-by-step master class on how to make a small decorative tree from coffee beans
Make a photo window out of a plastic bottle. Connect the pockets together;
Sew the pockets to the main piece. Sew a strap fastener with a button. Sew decorative trim along the edges of the wallet.
Crocheted wallet: pattern
A cute wallet for storing paper money and coins can be knitted or crocheted. There are several useful diagrams for this:
Option No. 1 with knitting needles
Option No. 2 knitted, openwork wallet
Option No. 3, knitting needles
Option number 4, crochet
Option number 5, crochet
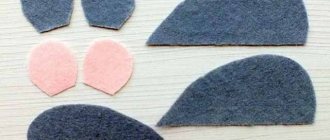
Children's wallet made of felt
Since the children's wallet is not used for its intended purpose, it can be made from soft multi-colored felt. This fabric does not require edge finishing and can be easily hand-stitched.
Children love wallets in the shape of funny animals. To sew a felt owl wallet you will need multi-colored pieces of felt, thick embroidery thread, scissors, adhesive doll eyes and a zipper.
The front side of the product is created according to the principle of appliqué. The parts are sewn with an over-the-edge seam or a classic stitch. You can also glue the parts using a glue gun. The reverse side will be plain.
You need to insert flap strips between the front and back parts to make the wallet easier to open.
A zipper is sewn into the upper part of the wallet. A small carabiner with a cord can be attached to the owl's ear so that the owl wallet can be attached to a child's belt or backpack.
The finished product can be decorated with beads or buttons.
Decoration methods
The product is decorated with decorative elements or by creating the texture of the fabric. Additional density and volume will be added by padding polyester, onto which the cut details are applied.
If the parts are customized on synthetic padding, there is no need to duplicate them. Cutting is done after stitching due to shrinkage of the material.
Decoration with rhinestones, beads, and sequins is done manually. When sewing, only the upper fabric is pierced with a needle. The decor is sewn around the perimeter of the product or in the form of a pattern. The drawing diagram must be prepared in advance. Decoration with lace, braid, adhesive rhinestones, and embroidery is done before sewing a fabric wallet. Stones, beads, artificial flowers are sewn on after sewing. Large decorative elements should not fall into the functional areas of the fingers, so as not to interfere with ease of use.
The finished product is painted with acrylic paints. You will get an original effect if you carefully coat the edges of the product with a thin layer of textile glue and then dip it in glitter. Using the same technology, but different decor, they create dissimilar fabric wallets with their own hands.
Coin box made from old jeans
An original small coin purse can be made from unwanted jeans. In addition to old trousers, you will need:
- Lining fabric;
- Press for accessories;
- Thick cotton threads;
- Lightning;
- Magnetic snap closure.
To sew a coin holder, it is better to take the lower part of the jeans legs, where the fabric wears out less:
- Cut out the details of the wallet from jeans;
- Cut out pockets from the lining fabric; the edges can be stitched or finished with bias tape;
- Sew in a zipper;
- Sew two small denim flaps and sew a magnetic fastener on them;
- Sew side seams and pockets;
- Sew bias tape around the edge of the wallet;
- Decorate the product.
You can also sew a wallet from an old leather bag. If you combine pieces of the same material of different colors in one product (for example, from several old belts), you will get a patchwork style wallet.
To sew an original wallet for yourself or as a gift to a friend, you don’t have to spend a lot of money. To do this, you just need to be inspired by an interesting idea and set aside a few hours to create a masterpiece.
How to make a leather wallet.
In order to make a leather wallet with your own hands, you will need the following tools and materials:
- Hammer,
- punch 2 mm,
- rulers,
- stationery knife,
- threads,
- cardboard 0.5 mm,
- genuine leather 0.6-0.7 mm thick,
- ruler with circles of different diameters,
- pen,
- metal bone,
- Double-sided tape,
- neurite glue,
- tassel,
- accessories - buttons.
You will also need equipment:
- sewing machine,
- machine for installing accessories.
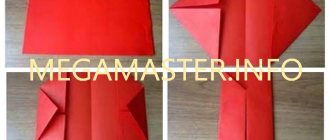
In order to cut the material, you need to build a pattern. I don't post the pattern so you can download it, everything is visible in the photo.
To do this, take 0.5 mm cardboard and, using rulers, construct the figures as in the photograph, according to the specified dimensions. You should get 11 patterns with dimensions: 189x111 mm - base, 170x110 mm - inner part, 111x47 mm - front pockets 3 pcs., 104x47 mm - inside pockets 6 pcs., 90x20 mm - strap. Make all the cutouts on the patterns as shown in the photo. Draw out the bend using a pen, this will make it easier for you to navigate when assembling the parts.
This is interesting: Which pans are the best and most harmless
Let's move on to cutting the leather. Take the leather and place the patterns on it. Using a ruler and knife, cut the cut.
And now you have the finished wallet details.
Next, using a sewing machine, we make a decorative stitch along the top of all pockets.
Take double-sided tape 3 mm and 5 mm wide, and stick it on the pockets as in the photo.
First, we take the base (189x111 mm) and glue 1 pocket (111x47 mm) onto it.
Glue on the 2nd pocket (111x47 mm).
Before gluing the 3rd pocket onto the base, take a template and make a hole using a 2 mm punch and a hammer. Dimensions are shown in the photo.
And punch a hole in your pocket.
We install a button (male) on the pocket using a hardware machine.
Glue the third pocket onto the base and sew it on.
Now we glue the pockets (104x47 mm) to the inside (170x110 mm). We glue one at a time, starting from the 1st pocket (the numbering is signed on the pattern) and sew them on only at the bottom for now.
The same must be done with all pockets.
Let's move on to making the strap. Apply glue to both pieces of leather and glue them together.
Use a knife to make a curve on one side and sew it on three sides.
Apply 5mm double-sided tape to the back of two strips.
Take the base and measure 30 mm from the edge and 45 mm from the side. Glue the strap to the base.
And sew it on both sides as in the photo.
And so you have two assembled parts of the wallet.
Apply 5mm double-sided tape to the entire bend.
We start with the base, make a bend at the top 6 mm and the spine at the bottom (if it’s convenient for you, make a bend using a metal bone). Then we stitch it.
We do the same with the inside.
On three sides we glue the lower part (inner) with 3 mm double-sided tape.
Glue the inside to the base. Be sure to tap the gluing areas with a hammer.
We make a bend one by one, first from the side of the strap, and stitch it.
Then the other side and sew it on as well.
The final touch, take a ruler and measure 10 mm from the edge on the strap. And punch a hole in the center with a punch.
We put a button (mother) on the machine.
Thank you very much for your attention! So we made a leather wallet together with our own hands.