Many have probably heard the expression “weapon of victory.” It is important in the history of the Soviet people. This expression united all types of weapons that helped our country in the victory over the Nazis, and also became real symbols of the Russian soldier. This also includes the T-34 tank, an anti-tank rifle, the legendary Katyusha multiple rocket launcher and, of course, the Shpagin submachine gun, aka “PPSh 41” - an assault rifle, a device, drawing and description of which are given in this text.
Story
From the experience of the war in 1939-1940 between the USSR and Finland and the Degtyarev submachine gun then in service, a certain fact became clear. It consisted in the fact that the Red Army needed to be equipped with automatic models and, accordingly, organize their mass production. “PPD-40” and “PPD-38” (Degtyarev submachine guns) were not suitable for such purposes, since they were labor-intensive and required a considerable amount of machine equipment for their production. They also had a shortage of materials and high costs. To replace the PPD, it was necessary to develop a new, cheapest and simplest submachine gun. This question was important.
In 1940, a competition was announced for the invention of a new submachine gun. The tests identified two main rivals. They turned out to be B. G. Shpitalny and G. S. Shpagin. Their models were quite promising. Shpagin won. Its version was adopted for service on December 21, 1940. Its full name was: “Submachine gun of the Shpagin system 7.62 mm mod. 1941 (automatic machine “PPSh 41”).” This is a reliable fact.
The “PPSh 41” - an assault rifle, a device whose drawing and description are given in the text below, went into mass production in the autumn of 1941. Namely, during the climax of the war, when the Red Army was in great need of such weapons. Due to the fact that such a device as the PPSh assault rifle had a simple design, did not use alloy steel and complex special tools, its production was launched at many enterprises in the country that had not previously specialized in weapons production.
The bulk of the parts of such weapons as the PPSh assault rifle were manufactured using the cold stamping method using electric and spot welding. The most complex and expensive part was the drum magazine. It was borrowed from “PPD”, which had a lot of complaints during operation. This slightly delayed the release of such weapons as the “PPSh” - an assault rifle, the drawings of which are presented below for review. After modernization, the drum magazine was replaced with a sector capacity of 35 rounds, and the corresponding sight was replaced with a reversible one, having a firing range of 100 and 200 m. During the war years, about 5.4 million Shpagin submachine guns were produced. The automatic operation of this weapon is due to the recoil of the free shutter. When firing, the barrel bore was locked by the mass of the free bolt, which was pressed by a spring (reciprocating action).
The design of the trigger-type mechanism was such that thanks to it it was possible to fire both single shots and a machine gun burst. The removable drum-type magazine was designed for 71 rounds, as in the Degtyarev submachine gun (“PPD”). The open-type aiming devices consisted of a sector sight and a front sight. The slide-type safety is located on the bolt handle. This was an important detail. Also in this case there was a slider-type fire mode switch.
How to make a machine gun that shoots rubber bands
Any machine gun model presented above can be modified by adding the ability to fire.
The easiest way is to attach a small handle to one of the sides of the machine. A thin lath may also work. The “trigger mechanism” can be installed either from above or from the side. The main thing is that it is comfortable for small children's hands.
You can attach the cuttings using nails or superglue. The main thing is that the fastening is reliable.
Another thing necessary for shooting is a rubber band. It is better to use so-called “bank” rubber bands. They cost very little and are the perfect size. There may be a couple of these rubber bands in your organizer. To charge the weapon, weave two rubber bands, attach a paper clip to one of them. If possible, it is better to make several charges. To fire the shot, carefully grasp the paperclip. In this case, the elastic band must be stretched to the very edge of the handle. And then release the paperclip.
Try not to point the weapon at people or animals, as the shot can have significant force and cause harm to others.
Design
It is a “PPSh” automatic firearm. It is designed for firing in bursts and single shots. Automation works due to the free recoil of the shutter. This is an important property in this case. In other words, reloading and extraction of the cartridge case occurs after the shot due to the return of the loose bolt. Fire is fired from the rear sear, that is, before the shot, the bolt is in the rear extreme position. Then, after descending, he goes forward, after which he fires the cartridge. The primer is pierced at the moment the last process is completed. The shutter does not lock during firing.
This scheme is often used in the development of devices such as submachine guns. For example, the Israeli-made Uzi works on a similar principle. Although absolutely simple, such a solution requires the use of a massive bolt, which increases the entire mass of the weapon. In addition, a weapon that uses a similar reloading scheme can fire due to a strong blow, for example, when falling. If, due to an impact, the bolt rolls from the front extreme (unfixed) position along the guides further than the cartridge feed window from the magazine or from the rear extreme position, it will break off the stopper.
As in Degtyarev’s weapons, such a device as the PPSh assault rifle has: a receiver, which is fused with the barrel casing, a free massive bolt with a safety lock on the loading handle, and a disk magazine. He also has a wooden stock. But with all this, the PPSh-automatic is more technologically advanced. In this model, only the barrel needs precision mechanical processing, and the bolt was made on a lathe with further rough milling. In weapons such as the PPSh (automatic machine), the production of almost all other metal parts can be done by stamping. Here, the barrel casing has a recoil compensator at its front end. That is, in this case there is a beveled plate with a hole for the bullet to pass through. There are through windows on the sides of the casing. Thanks to the reactive action of powder gases when fired, they significantly reduce the effect of recoil and “lifting” of the barrel upward. The scope of this model has only 2 positions. Namely - 200 and 100 m. Since 1942, the PPSh began to be equipped not with a disk magazine, but with a sector (box-shaped) magazine for 35 rounds.
This was dictated by certain conditions. Namely, the fact that disk-type stores were complex to produce and less reliable. They also demanded adjustments for a specific instance of the machine gun. That is, this part from another similar “PPSh” might not fit. Judging by military photographs, box-type magazines have been seen in troops only since 1944. Next, we will consider the device of the PPSh machine gun in more detail.
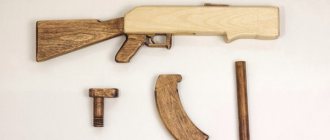
How to make a realistic Kalashnikov assault rifle
A realistic model of the machine can be made at home using available tools. So, here is a list of things you will need:
- Thick and wide board (thickness should be at least 4 cm);
- Wood handle (quite thin);
- Plywood sheet;
- PVA glue;
- Dye;
- Jigsaw;
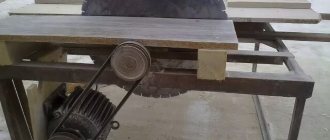
- Milling machine;
- Sandpaper;
- Magnets;
- Marker;
First, choose the necessary material for work. It is better to choose a pine board.
When choosing wood for a product, please note that there should be no knots or splinters on it.
We make a sketch on the wood. Using a marker we outline the outline of the future Kalashnikov. It is worth considering that the magazine will be separately attached to the machine, so you need to draw it separately. When the image is ready, begin to carefully cut out the blank using a jigsaw.
In order for the magazine to be securely attached to the base of the weapon, you need to try it on and sharpen it several times. Nothing should get caught, only in this case the child will be comfortable while playing.
Use a milling machine to add volume to the product. To do this, it is necessary to chamfer the handle, as well as the butt. Subsequently, sand the workpieces as best as possible.
Take the prepared side parts, cut from plywood, and glue them to the main part of the machine, generously smearing them with glue. Particular attention should be paid to the contour of the workpiece. Then press all the parts for more reliable gluing, and leave for several hours until completely dry. As a result, it is worth sanding the product again so that the plywood parts do not stand out.
Start modeling the barrel of the future wooden machine gun. At this stage you will need a thin cutting (you can make it yourself or purchase it in the construction department of the store). You also need to cut out the front sight and drill holes in the machine gun in order to later fasten the barrel. Lubricate all parts with glue at the fastening points. After the machine is completely assembled, give it time to dry.
At the final stage, start painting the resulting machine model. You can use dark paint or varnish.
If you prefer paint, use water-based paint. It's safer.
To make the magazine more securely attached to the machine, it is necessary to use magnets. If the purchased magnets are in the shape of a tablet, then before gluing them, it is worth drilling small holes in the magazine and the inside of the machine. The diameter of the holes must match the diameter of the magnets. If you purchased a roll-type magnet, then glue a piece of the magnet of the desired shape and size to the inside of the machine. In this case, a metal plate must be glued to the magazine. It is better to choose quick-drying glue or superglue.
Now the wooden machine gun is ready. This weapon model is very interesting and realistic, which means it will undoubtedly be in demand among children.
Trunk
Inside this part there is a channel with four grooves. They curl up from left to right. There is also a chamber with a bullet entrance. It has a certain bevel at the bottom. This is to set the direction of movement of the cartridge into the chamber.
This trunk contains on the outside:
- The front part is rounded. This is to protect against nicks.
- Thickened part. For placement in a receiver box.
- A semicircular notch on the thickened part. This is to secure the barrel in the appropriate box.
- The protrusion is circular. In order to limit the process of barrel advancement when returning to place. This also reduces the perception of bolt shock.
How to make a simple machine from wood
To diversify your child's games, you can make a simple wooden machine. It won't take much time, but first you need to prepare everything you need.
Tools:
- Circular saw;
- Drill;
- Jigsaw;
- Sharpener 10 cm.
- Sandpaper;
To simplify your work, print out a drawing of the machine model. The drawing can be easily found on the Internet. Then follow the instructions below:
- Take a block of wood or a piece of thick board;
- Based on a drawing or photograph of a machine gun, carefully mark the boundaries of the future weapon on the tree with a marker;
If you print an image of a machine gun on paper, and then cut it out and use it as a stencil, the product will turn out to be very realistic. After all, all proportions will be maintained.
- Start cutting straight lines using a circular saw;
- Pay special attention to cutting out the curved parts of the machine. To do this you need to use a jigsaw;
- Use a sharpener to contour the weapon;
- To make the machine more interesting, do not forget to drill holes such as the barrel;
- Polish the resulting weapon using sandpaper by hand;
- Take a small piece of wire, preferably aluminum, to construct the trigger;
- At the end, paint the machine or varnish it;
This wooden toy machine is quite easy to make and will bring a lot of joy to the child.
Receiver
This element is the base. It contains the following details:
- Namushnik with a front sight.
— Sight.
— Receiver box latch.
- Swivel swivel.
The front part of the receiver serves as a casing, and the rear part serves as the bolt box cover.
In general, the receiver consists of:
— The base of the front sight for attaching a flywheel to it.
— Swivels for attaching a shoulder belt.
- Sight pads.
— Inserts for guiding the barrel.
— Front inclined plane of the casing. It is a muzzle brake.
— Longitudinal cutouts on the casing. This is to improve and facilitate air circulation.
— Windows in the muzzle brake area to provide exit for powder gases.
— Transverse hole for the connecting axis.
— Windows for ejecting cartridges.
— Latch spring stop.
- Bottom ledge. This is to limit the drop in the rear receiver area.
— Cutouts for fuse.
— Two side ledges (to limit the movement of the latch).
— Cutout for the bolt handle.
Description of PPSh
The PPSh infantry weapon was distinguished by its extreme simplicity of design. It only had about 70 parts, including the stock and magazine cylinder. Most of the machine gun was made from weapons-grade steel of varying quality (varied from factory to factory). The semi-pistol-shaped butt was machined from solid birch or ash.
A mechanical sight in the form of a rear sight and front sight, designed for shooting up to 500 meters, is installed on top of the receiver. In reality, PPSh fired at a distance of 100 - 200 meters. At a greater distance, the bullets began to disperse too strongly.
The machine gun's standard ammunition was a 7.62 x 25 mm cartridge of the 1931 model. A fired PPSh bullet is capable of penetrating brickwork or several millimeters of steel. Coupled with a high rate of fire, the weapon became dangerous in conditions of “dagger” combat or confined spaces. The cartridges were fed from a drum that could hold 71 rounds. The disk magazine was very heavy; when loading ammunition, it periodically jammed.
Already in 1942, they launched full-fledged production of sector magazines with 32 rounds. The “horn” turned out to be much more convenient. It weighed less and did not interfere with the soldier’s movement, and the 32-round clip was easily compensated for by faster reloading.
The barrel of the product had rifling and was 269 mm long. This significantly affected the speed and accuracy of the bullet. The combat rate of fire reached 1000 rounds per minute. At the same time, the barrel became very hot and, to protect the shooter’s hands, an external casing was attached to it, acting as a radiator. Cooling of the casing was accelerated by perforated windows. The part of the casing protruding beyond the muzzle ends into the muzzle brake.
PPSh can be fired in two modes: burst and single. Switched by a button located in the trigger guard in front of the trigger. There is a fuse located at the base of the shutter cocking lever. When turned on, it locks the shutter in the extreme rear or forward position.
Design and operating principle
The automation operation scheme is simple and reliable. The design of the mechanisms is based on the free movement of the bolt under the influence of powder energy. When cocking, the bolt is retracted to its rearmost position, the return spring is compressed, and the part itself is blocked by a stopper. When you press the trigger, the bolt moves forward, a cartridge is snatched from the magazine and inserted into the chamber. When the bolt touches the chamber, the firing pin extends from its mirror and pierces the cartridge primer. A shot is fired, and under gas pressure the bolt returns to its original position. At the same time, the cartridge case is removed from the chamber and thrown out through the window.
Such automation made the PPSh submachine gun heavy and unsafe. The shutter, due to its features, was heavy. Taking into account the quality of processing, the standard version could be even heavier. Another disadvantage was the high probability of self-inflicted gunfire. And in any shutter position.
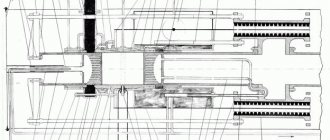
This is exactly what the Shpagin machine looks like in the form of a diagram.
Performance characteristics
| Weight, kg | 5.3 with full drum magazine |
| Length, mm | 843 |
| Barrel length, mm | 269 |
| Rate of fire | 1000 rounds per minute |
| Sighting range, m | 200 – 300 |
| Caliber, mm | 7,62 |
| Number of cartridges in the magazine | Sector – 35, drum – 71 |
| Automation principle | blowback |
Receiver latch
This element consists of the following parts:
- Cap.
- Springs.
- Hairpins.
The cap has: a hook with an inclined plane; the upper protrusion is semicircular; 2 side holes for the pin to pass through; bends, thanks to which its movement is directed and its forward movement is limited; notch on the back for ease of opening.
The latch spring is a unique part. It performs a specific function. In this case it is a short cylindrical coil spring.
How to make a toy machine and wood
Before you start working on a future toy, carefully draw a sketch of the future machine and transfer it to the material from which the product will be made. In this case, each detail must be drawn separately.
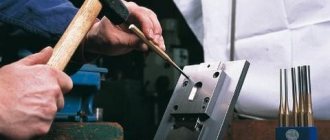
Make sure that the entire set of tools necessary for the job is at your fingertips. For the initial finishing you will need: hammer, chisel, hatchet, plane, wood hacksaw, metal hacksaw, drill, level.
For harvesting, you should choose coniferous wood. And on the blank, leave at least 15% of the material as a reserve. This is required for subsequent adjustments to the shape of the product. All elements of the future machine are cut out separately.
After all the parts are cut out of the wood, you need to move on to the sanding stage. To achieve the desired result, use the following sequence. First, file each piece using files. Then use coarse sandpaper first and then fine sandpaper to bring the surface of the product to the required level of smoothness.
At the last stage, start decorating the future toy. To do this, coat the surface of the wood with varnish, preferably in two layers. Pre-prime the areas where the paint will be applied.
Let the toy machine dry. And you can start playing.
Shutter box
This item has:
— Peculiar lugs for connection with the receiver.
— A cutout for a store with a window.
— A vertical groove for the magazine latch.
— A clip for connection with the trigger box and the front part of the stock.
- A window for the disconnector.
— A hole for the magazine latch axis.
— A window for the trigger-type lever sear.
— An oval hole for the protrusion located in the back of the trigger box.
- Window (to engage the receiver latch).
— A tail with a hole for the corresponding screw.
— Window for the guide rod.
You should also know that inside the bolt box there is a reflector attached to its front part. It has a certain rigidity.
Description of the cartridge feed mechanism
Everything is quite simple here. The supply of cartridges to the chamber is ensured by a rammer located in the bolt and a magazine borrowed from the PPD.
Next is the mechanism that locks the stem canal. In this case there is also nothing complicated. Locking the barrel channel of a weapon such as a PPSh assault rifle is carried out due to the bolt mass and the pressing force of a reciprocating spring.