DIY games “Noise boxes”, “Colored magnifying glasses”
Marina Nurtinova
Do-it-yourself games “Noise boxes”, “Colored magnifying glasses”
Do-it-yourself games: “Noise boxes”, “Colored magnifying glasses”
Didactic game “Noise boxes”
Purpose of the game:
development of auditory memory, ability to distinguish and differentiate noises, logic, training of concentration.
Materials:
noise boxes with various fillings that make different sounds (paired, colored cards with images of what is in the boxes).
For this game, noise boxes were made from Kinder Surprise containers. They are all paired. The following fillers were used:
• Two boxes are empty.
Also for the game you need cards - pictures depicting what is in each of the boxes.
Option 1. Find a pair by sound
To begin with, we introduce the children to all the noise boxes. Together we explore the sound of each of them. We draw children's attention to the fact that all boxes sound differently. After the children become familiar with the sound of each of the noise boxes, you can begin the educational game itself - ring one of the boxes and invite the children to find a box with exactly the same sound. Among all the noise boxes, the child should try to find boxes with the same sound, that is, find pairs by sound. During the game, the child learns to concentrate his attention on sounds (which is very important for the development of hearing and speech). In addition, to find a box that sounds similar, you also need to use logical thinking.
Option 2. Drawing up rows
You need to arrange the noise boxes in rows. First of all, find the loudest, then the quietest noise and determine the average one, comparing it with the first two noises. You should start with three boxes. If the child has learned to classify three boxes, then you can introduce all the others one after the other. Each new box is compared with all the already familiar boxes and ordered in relation to them. The number of boxes for classification is determined depending on the child’s abilities and interest.
Option 3. Sound lotto
Listen with your children to how different containers sound. Then draw the children’s attention to the picture and say what is shown on it. Then invite the children to guess what is in the containers and place them on the corresponding picture.
Didactic manual “Colored magnifying glasses”
"The World Changes Color"
Task:
show children that surrounding objects change color if you look at them through colored glasses.
Description.
The teacher invites the children to look around them and name what color objects they see. Everyone together counts how many colors the children named. Do you believe that the turtle sees everything only in green? This is true. Would you like to look at everything around you through the eyes of a turtle? How can I do that? The teacher hands out green glasses to the children. What do you see? How else would you like to see the world? Children look at objects. How to get colors if we don't have the right pieces of glass? Children get new shades by placing glasses - one on top of the other.
"Mysterious Pictures"
- examining colored pictures through glasses of different colors and observing which images in the picture become invisible.
DIY magnifying glass with LED lighting
I use a magnifier for working on small electronic components, inspecting circuit boards, and other tasks like these. The other day I saw an LED magnifying glass in an online store and decided that I should make one for myself. This article will tell you how to improve a regular magnifying glass by equipping it with LED lighting. After I made it, I was surprised at how much the lighting improved the view of magnified objects. Materials and tools: - SMD PLCC LEDs (white) - 8 pcs. — SMD resistors 100 Ohm (1206 or 0805 standard size) – 8 pcs. — A ring-shaped printed circuit board cut from a foil blank (about dimensions below). - An ordinary magnifying glass. — Battery compartment for 4 AA batteries. — Multi-core connecting wires insulated in two colors – 1 meter of each color. - Glue moment. - Soldering iron and solder. - Wire cutters. After you have purchased all the necessary materials, you can get to work - prepare the printed circuit board for soldering the LEDs.
Measure the diameter from the lens side and from the frame side of the magnifying glass. Let's call the lens diameter A and the frame diameter B.
The inner diameter (D1) of the ring board will be A and its outer diameter (D2) will be B. We used a router to cut the board, but with a little effort and patience you can do this job by hand with a drill press and Dremel , making two concentric strips separated from each other from copper foil.
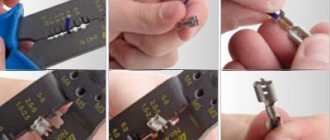
Once you're done with the board, it's time to prepare the LEDs. I had white SMD LEDs in a PLCC package. At the same time, the size is not critical, any will do - be it 1206 or 0805. Please note that larger LEDs are easier to solder. The same goes for resistors - it is recommended to use them in large cases. Although I used the 0805 myself (because I already had them), it was not very easy to solder these small parts.
Solder the LED and resistor at right angles, as shown in the photo. You will need eight of these LED-resistor pairs. Make sure the resistor is soldered to the positive terminal of the LED.
Mark eight equally spaced positions on the ring board and solder the LED-resistor pairs as you can see in the image. Before you try to solder the parts, it would be a good idea to tin the soldering area. This will allow you to solder the components into place without fuss and without causing them to heat up too much. Solder all eight pairs. Check with a multimeter (in diode test mode) whether the LED lights up after soldering each pair. This will ensure that the LEDs were not damaged during the soldering process.
After all the LEDs are soldered, glue the board on the lens side (placing the board with LEDs on the outside of the lens) using instant adhesive. Carefully align the board.
Now you need to connect the battery to the copper strips of the board - solder the “minus” going from the battery compartment to the inner concentric strip, and the “plus” to the outer one. You can include a switch in the circuit, or simply remove the battery to turn off the backlight.
The photographs show how it all works. I had a lot of fun putting the lighted magnifier together and have even more fun using it. I hope that you too will enjoy the convenience of this improvement if you decide to make it yourself.
Based on materials from www.instructables.com
Master class “Colored magnifying glasses for experimentation”
Oksana Nikolaevna Molchanova
Master class “Colored magnifying glasses for experimentation”
Master class “Colored magnifying glasses for experimentation“
Dear colleagues!
Childhood is a joyful time of discovery. Knowledge of the environment should take place in the child’s direct interaction with the natural world and unfold like an exciting journey, so that he receives joy from it.
Children's experimentation is a wonderful means of intellectual and cognitive development of preschool children. In the process of experimentation , the preschooler gets the opportunity to satisfy his inherent curiosity, to feel like a scientist, researcher, discoverer. Therefore, in my work I use elements of children's experimentation .
For the master class we will need:
- plastic bottles of different colors (brown, transparent, green, blue,
— colored cardboard.
What to do:
Draw a magnifying glass in duplicate on colored
Do It Yourself (Knowledge) 2008-01, page 99
lenses ((X2 > a^). Such a simple lens, used for viewing small objects, mounted in a frame and equipped with a handle, is called a magnifying glass (Fig. 1 shows the designs of several such magnifying glasses). Magnifiers with higher magnification usually consist of a system of lenses ( Fig. 17).
In Fig. 9, a shows the path of light rays in the lens and inside the eye when viewing an object AB. First, the rays are refracted in the lens, then pass into the eye through the lens and are reflected on its retina in the form of APVP images. If the object under study were in place AjBj and had its magnitude, then it would be reflected on the retina of the eye with the magnitude ApBc at an angle. As a result of the appearance of light excitation on the retina of the eye, an image of the object AB is created in our consciousness and we clearly see it.
The magnification of a magnifying glass is determined by the formula K = -, in which L is the distance of best vision, it is equal to 250 mm, and is the distance between the object and the lens, in magnifying glasses a = f, then the approximate magnification of the magnifying glass is:
/
Let's solve some practical examples.
Example 4. The focal length of the magnifying glass is f = 50 mm. Determine the magnification factor.
Example 5. What magnification does a magnifying glass provide, the optical power of which is D = 16 dp.
K=- = L-— = LD = 0.25-16 = 4. / /
It would seem that with the help of a magnifying glass you can obtain very large magnifications - you just need to reduce its focal length, for example, with / = 0.5 mm, the magnification should be K = 500. However, the use of magnifying glasses with a very short focal length and, accordingly, with a small diameter , almost impossible. Usually one-
framed lens; 2 - handle
Lens magnifiers are made with a magnification factor of no more than 6.
Making magnifying glasses. Based on lenses released from old, deteriorating optical devices (photo enlargers, filmoscopes, etc.), and magnifiers that have failed for various reasons, it is possible, with diligence and desire, to make excellent magnifiers (Fig. 10). It is advisable to choose stainless steel as the material for their parts. The manufactured base of the magnifying glass (frame and handle) must be cleaned with sandpaper, sanded and polished, and then the lens must be mounted into the frame and the magnifying glass is ready.
As an example, we will show the manufacture of a magnifying glass based on a double-convex lens with dimensions: diameter 90, thickness in the center 15 and at the ends 5 mm. In Fig. Figure 11 shows the structural design of such a magnifying glass, which consists of a frame (a lens with epoxy glue is inserted into it), a base for the handle and a handle embedded in the base, also with epoxy glue. The magnifier's handle is long (-180 mm) so that it can be used for mounting on a tripod.
The sequence of making a magnifying glass is as follows:
— for the frame of the magnifying glass we take a strip of stainless steel with a thickness of 0.9 - 1, a width of 22 and a length of 3.14-90 = 283 mm. Along the entire length of the strip, with a width of 5 mm along the center line, we make holes with a depth of 0.4-0.5 mm using a drill 0 1 mm on a drilling machine (Fig. 12, a).
97
Watch magnifying glass: companies and prices
Today there is no shortage of goods. Many manufacturers make high-quality devices designed to enlarge watch movements. They implement innovative developments and guarantee quality.
The Swiss watch magnifier from the Horotec brand deserves close attention from craftsmen. The products are manufactured by a company that has won the trust of consumers. The company began its activities in 1946. During this time, the company was able to gain first positions in the market.
The enormous success is due to the fact that Horotec products meet the highest standards. Watch magnifiers from a well-known brand are reliable and durable. With their help, craftsmen perform painstaking work that requires precision and care. The collection includes devices of different types: with a threaded lens mount, with a plastic and aluminum ring, as well as illuminated glasses. The cost of the products is reasonable. For example, you can purchase a classic-shaped device for 2,040 rubles or a magnifying glass for glasses for 3,260 rubles.
The Swiss watch magnifier from the Bergeon brand is very popular. This is a manufacturer known all over the world. It occupies a leading position in the production of equipment for craftsmen involved in the repair of wrist and pocket watches. The company focuses on quality and reliability. Therefore, magnifying devices provide clear image transmission, are lightweight and can be used for many years. Their cost cannot be called high. Devices from the Bergeon brand can be purchased for 2,180 rubles. There are also more expensive models. For example, for an aplanatic magnifying glass with a threaded mount you need to pay 4,920 rubles.
Products from the German company Eschenbach are also used in watch workshops. The manufacturer produces magnifying glasses taking into account the needs of specialists. Therefore, the range includes magnifying devices with air holes that prevent the condensation process. In the manufacture of the housing, fire-resistant plastic is used, which is characterized by increased strength. To magnify small objects, a lens made of PXM material with a cera-tec hard coating is used. The price of a watch magnifier from the Eschenbach brand is 1050 rubles. The cost of the product is affordable. The quality leaves no doubt, because the German manufacturer cares about its reputation.
A watch magnifying glass from a leading brand is a product that facilitates the work of the master and increases labor efficiency. There is a large selection of optical devices. Therefore, every specialist involved in the repair of time measuring instruments can purchase a suitable model.