Tools and materials
The main component of the vehicle is a durable waterproof body. You can make an all-terrain vehicle using profile steel pipes with the following sections:
- 4x4x1.5 cm;
- 5x5x0.3 cm;
- 4x2x0.15 cm;
- 2x2x0.15 cm.
Of course, the greater the load on an individual element, the larger the cross-section of the pipe used should be. The recommended thickness of sheet metal is at least 0.125 cm. It is not recommended to use very thick sheets, because they will significantly make the structure heavier and increase fuel consumption.
For a homemade all-terrain vehicle, you can use air-cooled motors. Their power can be 15-20 liters. s., and this is a very decent indicator, allowing you to move at high speed.
However, the largest tracked all-terrain vehicles are sometimes equipped with engines from the base vehicle, which will help move significant loads without losing momentum.
In a simpler version, gearboxes and axles are taken from the original car. As for the tools, you will predictably need:
- welding machines (electric with suitable electrodes included, but gas can also be used);
- angle grinders;
- wrenches and adjustable wrenches;
- files;
- screwdrivers;
- hammers;
- fasteners.
Basic data of the Bobik all-terrain vehicle
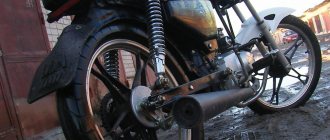
Engine - Lifan 182FD, 11 hp, four-stroke, forced air cooling, made in China. The gearbox is from a VAZ-2106, four-speed. Bridges are from VAZ-2106, gear ratio 3.9. Tires - VI-3 (from KRAZ-255B), lightweight (“torn”), actual size 1250×520-533 mm. The wheels are non-separable (for beading), with the tires secured with bolts. Overall dimensions (length x width * height) - 3300x1950x2300 mm. Loading capacity on land/water -300/200 kg. Curb weight - 780 kg. Maximum speed - 25 km/h
Conqueror of the taiga
Life in the Siberian forests is so harsh that having your own SUV is not a luxury, but a real necessity; another thing is that not everyone can buy such a car.
The exception is local craftsmen who were able to put half of the VAZ-2106 body on tractor wheels, along with its engine and a cargo compartment attached to the rear, hastily welded from old metal sheets.
Other features of the pickup include reinforced suspension, the use of axles from an old UAZ, as well as benches for transporting passengers.
Which model to choose for homemade products
When creating a homemade design, any Lada or Lada car is used. The machine is equipped with an additional frame, the body is attached to the base through rubber pads. The design provides for a transfer gearbox or an additional gearbox, expanding the traction range. The car retains its standard heating and ventilation system, and the original seats and seat belts remain in the cabin.
VAZ-2108
The wheeled all-terrain vehicle from the VAZ-2108 retains the original body and interior, but the wheel arches increase in accordance with the diameter of the wheels. The installation of extenders is provided to prevent contamination of the side windows when driving in off-road conditions. The body is placed on a frame made of steel profile, to which axles, engine and transmission units are attached on leaf springs. Ground clearance depends on the diameter of the wheels, the deflection of the springs and the relative position of the points for sealing the ends of the elastic elements.
VAZ-2106
The design based on the VAZ-2106 consists of a modified car body and a frame assembled from channel sections. The gasoline engine and gearbox of the car are left in their standard places, axles and a transfer gearbox from UAZ SUVs are mounted on the frame. Modified tires from a GAZ-66 truck are installed on homemade wheels (made from standard UAZ parts). The resulting all-terrain vehicle based on the Lada can move through swamps and overcome water obstacles up to 1 m deep.
VAZ-2107
A wheeled snow and swamp-going vehicle based on the VAZ-2107 body does not differ from designs based on other cars. There are original designs on rubber tracks; road wheels are made from standard Zhiguli wheels. Torque is transmitted through the gearbox to the transfer gearbox, which rotates the drive wheels. The increased dimensions of the equipment should be taken into account; driving such all-terrain vehicles on public roads is prohibited.
Made in the USSR: DIY all-terrain vehicles
Soviet amateur inventors created in garages and sheds single copies of gran turismo class cars, single-wheel drive crossovers, SUVs and even amphibians. Some projects received interest at the highest level.
Utility vehicle Tbilisi and Iveria V8
Three-axle all-wheel drive all-terrain vehicles from the Georgian city of Bolnisi began with the initiative of enthusiast Guram Kvernadze. In 1986, based on decommissioned UAZ units and with parts from the Colchis cabin, in just four months he built a car for driving along mountain trails, where even Soviet SUVs sometimes passed.
The cargo-passenger Tbilisi was equipped with a GAZ-24 engine and gearbox, and UAZ axles. The middle and rear ones, of course, required serious modifications.
Following the first, several more cars with different bodies were assembled in Georgia, including Iveria with a V8 engine and a modernized transmission.
The Ministry of Automotive Industry of the USSR became interested in the Georgian initiative. The vehicles were requested by NAMI and tested at the Dmitrovsky training ground. Testers recognized that trucks with a ground clearance of 220 mm are superior to UAZ in both driving performance and load capacity, but require serious improvement in many respects, including ergonomics. Hope flashed!
Meanwhile, in the USSR there were more and more problems that were not compatible with the fine-tuning and production of new cars. The “Vezdekhod” cooperative, organized in Bolnisi (by the way, perhaps the first automobile cooperative in the USSR) ended its activities in the early 1990s with the construction, by order of the local Ministry of Health, of several three-axle nurses based on decommissioned serial UAZ bodies.
Neva from Strelna
Nikolai Yakovlev and Vladimir Kapusto from Strelna, when building two identical cars named Neva, of course, did not count on mass production. But their 1988 SUVs are interesting precisely because, structurally and technologically, they were more suitable for small-scale production than other home-made products.
The frame was made of two longitudinal spars, close to the front end, and three transverse beams. The spars consisted of two welded water pipes with a diameter of 32 mm, to which boxes of two L-shaped profiles were welded on top. The square cross-section beams were welded from a steel sheet 2 mm thick. Interestingly, the front beam also served as a reserve tank for oil. The frame of the tent was also made from water pipes.
The engines and gearboxes on Neva SUVs were from Zhiguli, on one car - from VAZ-2101, on the second - from VAZ-2103. Transmission - based on components and parts of GAZ-69 and UAZ-469. The driveshaft between the gearbox and the transfer case is homemade, with crosspieces from a GAZ-69. Springs and shock absorbers are from Volga GAZ-24. The body is made of sheet steel, with panels connected by welding. The glass is from Niva, the steering is from GAZ-69, albeit with a changed angle of the steering column, the brakes are from Volgov. The front seats and some interior parts are also from GAZ-24, the rear ones are homemade. The cars were easily transformed into a pickup truck with a carrying capacity of 800 kg.
The Soviet man’s dream of a practical, inexpensive, but all-wheel drive car, already at the dawn of perestroika, prompted not only individual home-made workers, but also rapidly multiplying companies to build similar cars with the expectation of small-scale production. But investors were in no hurry to invest money in such ventures. And home-made machines could not compete with serial, proven and inexpensive mass-produced domestic machines.
However, soon second-hand and then new foreign cars competed with Soviet passenger SUVs. Of course, for many, the desire to make their own, unique car has not gone away. But life today is completely different, and therefore the “samauto” movement in the form in which it existed will never return. But there is something to remember!
A garage craftsman assembled a dynamic tracked all-terrain vehicle from spare parts from a Zhiguli
An all-terrain vehicle, and even one on tracks, in the understanding of most, is something slow and clumsy. In fact, this may not be the case at all. Today we will tell you about the history of the construction of a rather interesting homemade product. The project is based on a design with a waterproof body, on components and assemblies from the nearest disassembly.
According to the author of the all-terrain vehicle, the most tedious and time-consuming task is making tracks. Conveyor belt, pieces of metal profile, a mountain of bolts, nuts and of course this.
A more interesting activity is creating the frame of the so-called boat, which will have to keep the car afloat.
The power unit was a regular 1.5-liter Zhiguli engine, two axles from a VAZ. One of them had to be turned over. A transfer case from the GAZ-69 also appeared in the design.
The power unit is located at the rear, but all the controls are at the front.
By the way, the issue with the windshield was resolved elegantly. They took the windshield frame from the body of the VAZ-2106 and placed it on the all-terrain vehicle and inserted the glass there.
The Zhiguli bridges helped ensure complete tightness of the hull. They simply became part of the boat, tightly welded to the side walls of the all-terrain vehicle’s bottom.
The controls are like in serious special equipment. Under the right hand is the gear shift lever, on the other side is the transfer case. The brake system and free differentials help steer the all-terrain vehicle. If you slow down one side, then thanks to the differential the wheels on the other side rotate and thereby turn in the desired direction. Simple and reliable.
The side glazing was made using monolithic polycarbonate. The top folds back to allow the driver to take his seat.
As a garage craftsman said in his logbook - drive2.ru/r/selfmade/selfmade/297139/
, the unit can be easily accelerated on virgin snow up to 80 km/h.
A more detailed process of building a homemade machine can be found here.
The garage craftsman's all-terrain vehicle was sold after the first test tests. As they say, the engine had not yet cooled down, and those wishing to purchase the equipment lined up, pushing each other with their elbows.
Source
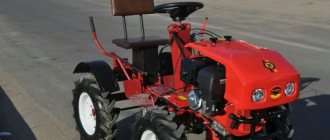
Homemade tractors with a VAZ engine
Farmers are interested in how to make their own tractor using old Zhiguli cars. But they are not the only ones who are interested in the topic of independently constructing a small unit. Homemade tractors with a VAZ engine are created by farmers and owners of large plots of land. Indeed, why buy a tractor if you can create one from a Zhiguli?
Features of homemade equipment
So, what primarily pushes farmers and farmers to create a small tractor? The answer is low costs. A Belarusian or another unit with similar characteristics may be superfluous, but a small one - why not? It's easy to find old Lada cars. Especially for people who live in villages and towns. It's even more fun to breathe life into a car. Of course, it is difficult to imagine how a tractor with a VAZ engine can compete with a full-fledged model, but it is true. But its characteristics may be quite sufficient for the landowner.
What do you need to assemble a breakaway tractor with a VAZ engine on your site? First of all, you need to decide on materials and tools. In addition, drawings and diagrams of all elements and parts should be made. These diagrams need to show dimensions.
Basic rules for leaving a diagram:
- Each component must be described separately.
- It is necessary to make a general drawing that shows all the elements of the engine.
- The final result depends on the quality of the diagram and drawing.
Shortening the frame will reduce fuel consumption.
What can a tractor assembled with your own hands do?
As practice shows, the use of VAZ 2109 and VAZ 2106 in the design of a tractor allows you to create quite powerful units that can cope with average work. A tractor is enough to maintain a large enough garden on your own.
Important points when preparing a drawing:
- It is important to position the gearbox correctly.
- It is necessary to use a protective casing for the motor in the drawing and take into account its presence in the overall diagram.
- It is equally important to consider the location of the fuel tank.
- It is possible to shorten the frame, but this will require strengthening the front suspension.
Development and assembly of equipment using a VAZ engine
To create a homemade tractor with a VAZ 06 engine, we need a VAZ engine. The remaining parts can be taken from other cars, tractors, or made yourself. So what cars or tractors can you get the rest of the parts from? Firstly, using a VAZ engine, it is very convenient to use a gearbox from a GAZ-53. Secondly, it’s not a sin to use rear wheels from MTZ-82. Then a homemade tractor with a VAZ 2106 engine acquires fairly normal proportions. Thirdly, you can use the front wheels of a walk-behind tractor that has failed.
What about the steering? It can be used by anyone, including the one installed on the Zhiguli . There you can get a driver’s seat or make it yourself. But steering, wheels and engine are not the only elements of a tractor. Therefore, it is still necessary to decide where to get the bridges. The answer is Zhiguli. We take all this and the engine from the old car.
Construction sequence
In order for the frame to be reliable, it is necessary first of all to think through the kinetic scheme. When making a frame, you can use channels and corners. They must be properly welded together.
After this, the metals are inspected for rust. If they are present, they should be treated with a primer material used specifically for metals. After this, the chassis is modified. At the very end, the brake system is checked. It can be borrowed from a VAZ car.
Wheel mounting
When installing large wheels, it is necessary to consider the braking system and axles. When you change wheels, everything changes significantly. The engine is mounted only after the frame has been prepared. To be more precise, as soon as the primer is painted and dried, you can install the protective cover of a homemade tractor from a VAZ.
After this, the seats, steering and other elements are installed on other sites. If the tractor will be used with heavy loads at the rear, then it is necessary to use a counterweight.
Tanks are not afraid of dirt... Or snow?
One day, a resident of Omsk had to show all his skills as an auto mechanic when faced with a snow drift that completely paralyzed traffic.
As a result, his old “nine” received a powerful visor for clearing snow, and a little later a tracked platform assembled according to the owner’s own design, easily overcoming any off-road conditions and meter-long snowdrifts.
And the neighbors of the talented Omsk resident are especially happy about such changes, who know for sure that 2109 will certainly not leave them in trouble, bringing bread or pulling their car out of the dense snow crust.
Another tanker from Yuzhnouralsk
A similar engineering feat was accomplished by a resident of Yuzhnouralsk, who placed his outdated Zhiguli on a large welded platform and tracks.
And in order to demonstrate the capabilities of the modernized VAZ, the self-taught mechanic asked his friends to shoot and publish an amateur video online, which clearly shows how easily the all-terrain vehicle overcomes the tests of snowdrifts and roadside slush.
Manufacturing
To get a tracked all-terrain vehicle from a VAZ with your own hands, you should first of all carefully select the drawings. The illustration below shows the most general conceptual diagram of the Tazik-1 vehicle. The distance between the centers of the outer track wheels ranges from 208 to 213 cm.
This is what a homemade all-terrain vehicle based on the Oka car will look like with a total length of 3.3 m and a track height of 0.542 m.
And here is a detailed drawing of an all-terrain vehicle with a box from a VAZ 2108.
The classic and already thoroughly tested in practice scheme is “Basin-1”. It is assumed that the engine and gearbox will be installed in the boat.
The crankshaft is machined under the bearing of the original shaft (a steady rest will be required). Additionally, an adapter for a release bearing is installed. A crown taken from the “eight” is threaded onto the motor flywheel; the classic starter is connected via a spacer, and the speed reduction is provided by a transfer unit from Toyota.
Whether to use all-wheel drive in an all-terrain vehicle or use other solutions depends on the creators of the equipment themselves. The front-wheel drive design has the advantage that the nose will not rise up when driving. In addition, there is less danger of “goating” on the road. In a rear-wheel drive version, the vehicle will not “dive” into the mud, but the load on the sprocket increases very significantly. As for the all-wheel drive system in VAZ-based all-terrain vehicles, it is:
- provides greater cross-country ability than other tracked vehicles;
- allows you to make a more durable body;
- more difficult to operate;
- increases fuel consumption (at least the last three properties are indicated by car experts).
All-wheel drive all-terrain vehicle with a breakable frame - “Bobik”
In my spare time I enjoy building all-terrain vehicles. I built the first such car in the summer of 2011. And now I present, in my opinion, one of my most successful developments - an all-wheel drive all-terrain vehicle with a “breakable” frame - “Bobik”.
The frame is articulated (“breakable”), consists of two box-type semi-frames, welded from profile pipes with sections 40x40x2 mm, 40x20x1.5 mm and 40x25x2 mm. The places where bridges are attached to them are reinforced with linings made of a rectangular pipe 40x25*2 mm.
The frames of the cabin, hood, wings and body are made of square pipes 20x20x1.5 mm and 15x15*1.5 mm.
Dimensions of the front half-frame (length x width x height) - 1650x800x260 mm. The engine compartment occupies 750 mm (in length), the rest of the space is reserved for the driver's seat. This half-frame was conceived as universal - for several types of engines. Therefore, the dimensions of the engine compartment were made for the VAZ-1111 Oka engine. Most of the other suitable engines are smaller in size. For example, for an engine like the Lifan 182FD, the length of the engine compartment can be reduced by 100-150 mm.
The rear semi-frame is trapezoidal in plan (narrower in front than in the rear), so that the turning radius is smaller. The width of the “top” is 200 mm, the base is 810 mm, the sides are 900 mm long. The height of the “box” of the semi-frames is 260 mm. To increase the volume of the body, I made a rectangular rear semi-frame.
Steel plates of 10 mm thickness are welded to the internal crossbars of the semi-frames, to the sides facing each other, for attaching the articulating joint (fracture unit). The distance from the internal “ends” of the semi-frames to the middle of the bridges is 790 mm. Thus, the base of the all-terrain vehicle is 1830 mm.
The design of the turning point is based on the steering knuckle from the front axle of the UAZ-469. Inside, in two bearings 180106, one bearing 180208 and two bushings, the CV joint from the UAZ rotates.
How to make a tracked all-terrain vehicle from a VAZ with your own hands?
Fans of homemade vehicles are constantly looking for more and more new options for remaking seemingly familiar cars. However, it is important for them not just to focus on their imagination, but also to take into account the experience of those who have already walked along the same path. It's time to figure out, for example, how to make a tracked all-terrain vehicle from a VAZ with your own hands with minimal complexity in the shortest possible time.
Tuning headlights VAZ 2101
When starting to improve your car at home, make sure that the traffic police officers do not have any complaints. The main thing is to follow the rules of the golden mean. Tuning headlights is not difficult to do. Replace glass or install optics of an unusual color.
The most popular type of appearance change is “angel eyes”. This is an ideal option for any car with large optics typical of the period of the 70-80s of the last century.
The tuning photo shows the resemblance of glowing pupils. The effect is achieved thanks to the luminous rings inserted inside. An added benefit is that white or blue neon tubes are a good size.
What you need to buy to make “angel eyes”:
- transparent plastic rod;
- a pair of 220 Ohm resistors;
- two pairs of 3.5 volt LEDs;
- a metal can with a diameter smaller than the headlight.
To change the appearance of the VAZ 2101-2107, you will need the following tools:
- wire cutters, pliers or pliers for cutting wire;
- medium-sized file or set of needle files;
- a hair dryer used at a construction site to heat surfaces;
- soldering iron, rosin and solder;
- electrical tape or duct tape.
When making, follow the sequence. Make sure the quality of work matches your intentions.
Optics require careful handling and a certain sequence of work:
- Cut the prepared rods to length.
We measure the length of the diode strip and tube - Using a hair dryer, heat until soft and bend into the shape of a jar.
- Resistors are soldered to each leg. The contact points are carefully wrapped with electrical tape.
- A pair of LEDs are attached together.
- In order for the VAZ lights to become radiant, make several cuts around the perimeter of the tube.
- Insert the LEDs into the tubes and secure with adhesive tape.
- Remove the glass from the headlights and insert the prepared accessory inside. Tuning headlights for a penny, completed.
Ready-made angel eyes
What do I care about snow, what do I like heat, what do I like torrential rain?
Russian craftsmen designed the real beast, equipping the body of a VAZ-2107 with low-pressure wheels borrowed from the all-terrain KamAZ, and posted a video of its practical tests online. And judging by this video, the SUV will not only be immune to winter surprises, but also to floods, because it easily forded a shallow river.
At the same time, commentators doubted the efficiency of the Zhiguli engine, as well as the economy of such a solution, but they turned out to be right, because the developer himself indicated a consumption of 30-40 liters.
Recommendations
In some cases, the car body is not changed. However, you will have to install stripped wheels of large diameter, for example from agricultural machinery.
On old tires, fresh tread is cut to improve cross-country ability and make the vehicle lighter.
Installing 2 Zhiguli gearboxes instead of one will help reduce speed and increase traction force. For rubber, you can use a regular conveyor belt of suitable dimensions.
Here are some more tips:
- a caterpillar mover can be obtained by adding a bushing-roller type chain to the belt;
- the tape along the edges is stitched with fishing line with an indentation of 1 cm (so that it lasts longer);
- an alternative option is a caterpillar made from truck tires (it is not recommended to use passenger tires);
- special attention should be paid to the design of controls;
- A diesel engine is more economical than a carburetor engine, but starts worse on cold days.
How to make an all-terrain vehicle with your own hands from a VAZ 2107 car, see below.
All-terrain vehicle fracture Bobik, Toptyga and some others
An all-terrain vehicle is a convenient, and sometimes the only possible, means of transportation for a fisherman, hunter or ordinary villager. To be successful, an all-terrain vehicle must have most of the following qualities:
- high cross-country ability. The technology must overcome any obstacles, cope with any directions, even those that seem to be possible only for a person on foot;
- reliability. There is an opinion that the better the jeep, the further you have to go behind the tractor. It is several times more unpleasant if an all-terrain vehicle breaks down after driving into a thicket of forest or into an impassable swampy area. Even a tractor won’t help here;
- low cost of components. This quality does not require any special explanation. Naturally, it’s nice to use technology that is inexpensive to operate;
- low fuel consumption. The same thing: the less fuel an all-terrain vehicle consumes, the further you can go on it.
Probably, since Soviet times, craftsmen have become accustomed to assembling various equipment that can be classified as vehicles with their own hands. And now many people have a similar hobby. For example, there are people and semi-official companies - based in neighboring garages in GSK - who are engaged in assembling all-terrain vehicles from what is at hand. Break all-terrain vehicles are very popular.
Snow blower from Zhiguli? Why not!
The next VAZ was put on a caterpillar track by an enthusiast from Barnaul, who decided to re-equip his old “seven” in this way.
However, unlike previous modifications, the author of this project decided to go even further by equipping the front part of the Zhiguli with a wide shovel, which made it possible to use the car for snow removal.
It is worth noting that this is not the first creation of the master, who has already created a tracked all-terrain vehicle with an electric motor, and not the last, because the creative Barnaul resident has plans for a swamp vehicle.
Brother
Little is known about this masterpiece, although its authors have opened a separate YouTube channel for their brainchild. So, given: a VAZ-2108 body, a welded rectangular frame, UAZ locking axles, as well as a gearbox and an 8-valve engine from a VAZ-2115, which replaced a less powerful manual transmission and an engine from OKI.
Solution: a fairly powerful swamp vehicle, the power units of which may not withstand truly serious and dangerous off-road conditions. But it looks impressive, yes.
Homemade all-terrain vehicle from VAZ
A village craftsman built an original all-terrain vehicle for off-road forest travel, hunting, fishing, picking berries and mushrooms.
The all-terrain vehicle frame is made of channels, axles and a transfer case from an UAZ are installed. A VAZ body was installed on the frame along with the engine, gearbox and attachments.
The wheels are made from old GAZ-66 tires, with new treads cut out on the tires.
As a result of the alteration, ground clearance has increased significantly
The all-terrain vehicle moves well in deep snow.
Also, the all-terrain vehicle can move and stay on the water due to its large wheels. The photo shows how the all-terrain vehicle crosses the river.
As a result, the guy made such a real SUV from old Lada cars! The result was a very good all-terrain vehicle, although fuel consumption doubled.
Source
Tuning the interior of the VAZ 2101
The “classic” VAZ, made in the USSR, which has traveled thousands of kilometers on the Great Danes, probably looks unsightly. The interior is unattractive and very different from modern cars. Do-it-yourself interior tuning is carried out in several stages.
Tuning the instrument panel of the VAZ 2101. Photo
Experts involved in tuning the appearance of the “penny” instrument panel recommend installing a torpedo from a foreign car or taking it from a modern relative. Tuning classics is an art that requires a combination of taste and the parts at hand.
The ideal option is torpedoes from the BMW E30 or sister cars from a later release: “fives”, “sixes” or “sevens” will look beautiful. Any auto parts store has the necessary accessories.
First, the old dashboard is dismantled:
- The instrument panel is removed.
The panel is attached in the places shown by the arrows - The glove compartment shelf is removed.
- Get rid of the fasteners that secure the torpedo to the engine compartment.
- We disassemble and remove the steering column.
- Drain the coolant and remove the pedal assembly.
- Home tuning and installation of a new panel is carried out in the reverse order.
The master must take into account the configuration of the new torpedo and the placement of modern instruments on it. Remember that using spare parts from the “seven”, you will need to upgrade the heating system for high-quality operation of the equipment. Working at home requires patience and skill with tools.
Tuning seats VAZ 2101
The car will radically change its appearance after the seats are reupholstered. This is a painstaking and difficult operation that requires special training. By following the required sequence, you can do the work yourself. The price in this case is affordable for people of any income. In addition, it’s nice to show off the results of your efforts.
Sequence of work:
- Remove all seats.
- We remove the factory covers by releasing the clamps on the back.
We remove all the trim and check the springs - Carefully separate the cover into its component parts. They will serve as a template for cutting the new fabric. Number each element to avoid confusion when stitching.
- We lay out parts of the old cover on the new smoothed material. We fasten them with needles or pins. We trace the outline with a felt-tip pen with a small allowance.
- The cut out elements are glued to thin foam rubber. Special glue in tubes is ideal.
- The inside of the seams is smoothed out and turned away.
- The finished cover is placed on the seat.
We put new covers with foam rubber on the seats - The chairs are put in place. Cheap tuning is over.
Tuning the ceiling of VAZ 2101
The car will radically change its appearance after the ceiling is reupholstered. It is best to replace the old upholstery with new one, but you can glue new fabric over the old material. At the same time, to make traveling in your car comfortable, do not forget to install a new layer of sound insulation.
When starting work, remember that you will need a lot of patience and the ability to work with modern materials. The attached pictures and descriptions will help in tuning the ceiling of your “iron” friend. Following the instructions exactly and following the sequence is much easier to achieve a good result.
Ceiling tuning process:
- The work begins with removing the glass, handles, injury protection and visors.
- Remove the factory fasteners from the arches that run along the perimeter of the trim.
- We remove all the arches along with the upholstery. Work begins with the passenger seats to avoid damaging them.
- Lay out the new upholstery on the floor and make stamps on it to secure the arches.
- New fasteners are attached to the arches.
- Let's start re-upholstering. Work is carried out from the rear window. One part of the arc is inserted into the black cap. The second is in the factory hole of the body.
- The material is secured with clamps after all the arcs are in place. Otherwise, there is a high probability of tearing the fabric.
- At the front, the fabric is fixed to the front windshield frame. At the finish line, an arc is placed next to the rear window. A special tongue is used.
- The final part of the perimeter alignment using special latches.
Together with tuning the instruments and panels of the VAZ, the internal appearance of the car will radically change, turning an unsightly car into an original vehicle.
Replacing the old VAZ 2101 ceiling. Video
Universal all-terrain vehicle for village life
It all started with the fact that a family that moved to the village had to think about the future fate of their “six” after 20 years of its operation.
As a result, it was decided to put the VAZ body on the frame of a UAZ purchased for 9 thousand rubles, the owners of which were going to hand it over for disassembly. It is noteworthy that the latter’s units were also used, and they turned out to be in fairly good condition.