Everyone knows that lately various techniques for manually creating elements and decorative items have become very popular. For this purpose, ordinary available means are used, which do not require additional financial costs. Glass bottles and plastic products have gained the most popularity.
Glass has firmly strengthened its position compared to other materials among those who like to create their own jewelry due to its strength, stability, affordability and ease of use.
But along with the advantages, glass objects have a significant drawback - their shape is difficult to change. Therefore, not everyone will take up cutting glass.
But coping with this task with the right approach will not be difficult. So how to properly cut a glass bottle?
Methods for cutting glass objects
In practice, there are 4 main methods of cutting glass that are most widely used, but there are many more.
- cut using a glass cutter;
- apply thread;
- use vegetable oil;
- split with nichrome wire.
Safety precautions
Proper handling of glass containers is safe. When heated, no chemical elements are released, and when cracked correctly, small pieces do not fly off. But following safety precautions is necessary to prevent possible injuries.
Work only with gloves so as not to cut your hands on the sharp edges of the finished product. In case of an unsuccessful attempt, it is easier to collect the fragments without cutting. Safety glasses will protect your eyes from broken pieces of glass. Clothes should not dangle, especially if work is carried out using power tools. After the procedure, all items are thoroughly cleaned and washed, glass dust is removed with a stiff brush.
A beautifully cut bottle looks interesting and modern. It can become a vase, a decorative element, a workpiece for needlework, a stand for brushes and pencils. You can create a product at home using available materials. The main thing is to study the process, follow the instructions and not neglect safety precautions.
Cutting glass with a glass cutter
Main stages:
Make a cut on the glass. Heat the candle material or a lighter. You need to heat the cut made with a glass cutter.
For more uniform heating, you need to smoothly rotate the bottle over the fire along the cut line. It is enough to hold it over the flame for 5 minutes.
Place the part of the object that needs to be cut into a container of cold water.
Repeat the procedure if necessary. Part of the bottle may not break off the first time. Therefore, the procedure must be continued until the glass bottle is divided into 2 parts.
Trim the edges. Using coarse sandpaper, you need to sand the edges without wasting time, otherwise you may cut yourself.
Now you can decorate the bottle using the necessary materials. The decorative element is ready.
Popular methods
Glass containers do not decompose in soil; recycling at home is not always possible. Collection points in Russia are rare, so it is worth using raw materials for household needs. Glass bottles make bases for handicrafts, beautiful vases, and original stands for brushes and pencils.
You can cut the bottle using improvised means. They use both a professional tool, a candle flame, and a woolen thread. You can break off a neck with a smooth edge using boiling water and nichrome wire. Items to separate can be found in any home.
To obtain a beautiful, even cut, you will need experience and skill. Separation along the intended line does not always occur.
After the bottle is cut evenly, the edges are sanded until smooth. This will eliminate possible cuts and minor injuries. The blank can be left in its original form or decorated with stained glass paints, decoupage, stucco molding from plaster and polymer clay.
You can make many interesting things for interior decor from a cut bottle.
Glass cutter
The most popular answer to the question of how to quickly cut a glass bottle is to use a glass cutter. The tools can be found in the construction and repair departments. Cost depends on power, size and brand. A homemade glass cutter is also suitable, the main thing is that the structure is fixed and the container can rotate.
It is necessary to cut off the neck the first time. Then the cut will be smooth, without chips or cracks.
Pass the cutting element along the intended strip, then pour boiling water over it and immediately lower it into cold water. The temperature difference will allow the top part to break off. If this does not happen, the procedure is repeated again, but without using a glass cutter. They create a temperature difference and try to break it off. It is not recommended to use the tool again; the chip will be of poor quality. Problems may arise due to the bottle material being too thick, insufficient power of the glass cutter, or poor fixation. If the temperature difference is minimal, the reduction effect will not work and you will have to repeat the manipulations.
Homemade glass cutter for bottles
Candle flame
You can evenly split a bottle at home using a regular paraffin candle. Use a simple pencil or marker to mark the location of the future cut. Take the container in your hands and hold it over the flame so that it heats the marked strip. Then they finish the job in two ways:
- dipped in cold water;
- pass an ice cube along the heated strip.
They tap and break off the necks of bottles. If it doesn’t work the first time, repeat several times. It takes at least five minutes to warm up. To speed up the process, first draw along the marking line with a glass cutter or drill. After this it is heated with a candle. The effect of temperature difference operates in the same way as in the first case.
It is extremely difficult to achieve a perfectly smooth edge using this method. It is better to prepare sandpaper in advance.
The candle heats the surface unevenly, and the rate of temperature rise is small. For this reason, professionals often use a butane lighter. The heating rate is reduced, the high temperature is maintained longer. Sharp exposure to cold water will help chip the edge.
Heat the bottle over the fire. Cool the heating place with ice. By lightly tapping, split the bottle into two parts.
Using boiling water
Anyone can cut containers using boiling water. Go along the cut line with a glass cutter or drill. Fill the kettle with cold water and place it on the stove. Bring the liquid to a boil, remove the dishes from the stove and pour boiling water along the line in a thin stream. After heating, place under running water. The cut part is cleaned with coarse sandpaper and sanded with fine sandpaper.
The second method will tell you how to cut off part of the container using boiling water faster:
- Mark the place of the cut with a marker;
- carry out a glass cutter strictly along the line;
- attach strips of electrical tape at a distance of a centimeter from the cut;
- remove the kettle from the stove and pour boiling water over it;
- as soon as the container warms up as much as possible, lower it into a basin of ice water;
- take it out and pour boiling water over it again, immerse it in ice water.
A light tap is enough to make the bottom pop off. This method produces a smoother cut. It is suitable for separating glass bottles both lengthwise and crosswise.
The location of the incision is marked. The area of the incision must be drawn several times with a glass cutter.
Hot water is slowly poured onto the site of the future split until the bottle breaks into two parts
Thread for yarn
You will need cologne, matches or a lighter, a couple of tens of centimeters of thread and a bowl of cold water. Almost every method involves heating and sharply cooling the container. It is important to observe one condition - the cologne must be flammable. It can be replaced with any flammable liquid in small quantities. Step-by-step instructions will tell you how to cut a bottle with thread:
- Labels are removed from glass containers;
- wash in soapy water, rinse with running water;
- wipe dry;
- wrap the thread around the product at the site of the future chip;
- tie a thread, remove it and dip it in a flammable liquid;
- pull it onto the bottle and set it on fire;
- After fading, the threads are immersed immediately in cold water.
The bottle should crack the first time without much effort. If the temperature was high enough, the container will split into two parts immediately after being immersed in ice water.
The method is potentially dangerous due to the presence of flammable materials. It is better to carry out manipulations not indoors, but outdoors.
The thread is wound around the bottle, then tied and carefully removed. The thread is soaked in alcohol and put back on the bottle, after which it is set on fire. When the fire goes out, the bottle is immediately immersed in cold water.
Heating from friction
The friction force increases the temperature of the bottle, which means that the compression effect due to a change in temperature can be used again. Glass containers are cleared of labels. If the sticker does not come off, you can keep the bottle in warm water for about half an hour. Then they begin to manipulate the heating. Numerous master classes explain in detail how to cut a bottle using friction:
- mark the cleavage line;
- Screeds are placed above and below for restriction;
- twine is wound along the line;
- take both sides of the thread and begin to move it;
- after a few minutes they are lowered into water;
- keep in water for no more than three minutes;
- when tapped, part of the container will come off.
If you first run a glass cutter along the line, there is no need to prepare a bowl of water. When rubbed, the bottle will crack at the cut point. The main thing is that the broken part does not fall and break. This method will require some physical training. For strong heating, you will have to apply the twine to the surface of the glass quite intensively.
Two rubber ties are put on the bottle, and twine is wound between them. The free edges move back and forth. When the friction point heats up, place the bottle in cold water and tap the friction point.
With nichrome wire
An interesting workpiece can be easily obtained by cutting lengthwise. This method can be used for any chips. You will need a spray bottle with plain water, nichrome wire, asbestos, rubber bands and a power source.
The type of cut depends on the evenness of the wire. Before use, it is carefully straightened.
Wrap glass containers with wire. They are fixed with rubber bands in two or three places. The asbestos is broken down and placed under the rubber bands. If there is no heat-resistant material at hand, rectangular blocks of wood will do. The material is also applied to the lower part, because the bottom is thicker than the walls.
A power source is connected to the ends of the nichrome wire. They apply current for a minute, maybe a little more. As soon as the wire turns red, the power is disconnected and sprayed onto the cut area from the sprayer. A characteristic sound will indicate that the glass container is cracked. With this method, the edge turns out smooth and beautiful.
Take a glass bottle and nichrome wire. The wire is fixed to the bottle with rubber bands. A piece of asbestos is required. Asbestos is placed under the rubber bands.
A piece of asbestos is also placed in the neck. Electric current source
The current is connected, and at the same time water is splashed onto the bottle, where the wire touches the glass. After a while, the bottle splits into two parts
Dremel
Glass products can be separated in different ways. Dremel is used as a last resort. The result is worse, a successful cut is less common. Follow the algorithm:
- Marking. A marker marks out the line of the future chip. It should be smooth and not overlap.
- Fixation. Masking tape or duct tape is used to wrap the bottle on both sides of the line.
- Preparation. Put a nozzle on the tool and check its functionality.
- Incision. Slowly move the tool along the strip. Turn the product three to five times.
- Sanding. The edge is treated with coarse sandpaper and sanded with a fine-grained cloth.
After processing the edges, the product is left to cool completely. In an hour you can start decorating. The method is inconvenient because you won’t be able to do everything yourself. One person will hold the tool, the other will slowly rotate the bottle. If done alone, there is a risk of getting an uneven edge.
Using Cotton Thread
The first method uses a glass cutter, but if you wish, you can do without a glass cutter. Helpers in this will be ordinary thread, alcohol, cold water and a lighter.
Basic cutting steps:
- mark the desired line on the bottle with a marker or felt-tip pen;
- moisten the thread in acetone or alcohol;
- wrap the thread around the line several times;
- tie a rope and cut off the ends;
- bring the bottle horizontally to a container of cold water and set fire to the thread;
- after the thread completely burns out, dip the bottle in water, after which the unnecessary part will break off due to a sudden change in temperature;
- sand the edges with sandpaper.
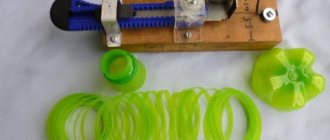
DIY glass cutter for bottles
There is no need to spend money on buying a glass cutter for bottles. This device is very simple, and if you have certain parts and desire, you can make it yourself. Below, we will provide step-by-step photo instructions for assembling a convenient and practical cutter. You may have to buy some parts, but they cost a penny and are sold at any market or hardware store.
Required materials:
- Wooden base: 25 x 14 x 2
- Side bar: 25 x 4 x 2
- End block (stop): 11 x 4 x 2
- Wooden slats: 25 x 1 x 2
- Roll-out rollers: 4 pcs with a maximum diameter of 4 cm (preferably fixed rollers with rubber coating)
- Cable channel: 25×2 (with minimum thickness)
- Roller glass cutter
- A little PVA glue and a handful of screws
Assembling the device
We will start with the most complex and exquisite stage of the work - assembling the cutting mechanism. We take a wooden strip 25 x 1 x 2 and saw off two pieces of 3 cm long from it. Carefully make through longitudinal holes in the resulting pieces of wood. They will serve as grooves for installing a hinge on which the guide with the glass cutter will run. From the same rail, cut off another piece, 9-10 cm long, and arrange all the parts as in the photo below. We cut the cover of the cable channel to a length equal to the size of three wooden parts (2 pieces of 3 cm each and the width of the rail - 2 cm), approximately 8 centimeters. At the next stage, we will fix the cutter on the guide. To do this, it is better to make a small recess at the end of the rail, which will serve as a kind of limiter for the glass cutter. To prevent the wood from cracking when tightening the self-tapping screw, at the attachment point, you should make a hole in advance with a drill of a smaller diameter. If your self-tapping screw, like the cutter in the photo, has recesses for breaking off glass, then you can use them for fastening. If there are no grooves, or they are located further than the cutting roller, then it is better to drill a mounting hole in the metal head. In general, the main thing is that the glass cutter is installed as in the photo. After securing the cutter, it's time to put the structure together. To do this, screw two 3 cm bars along the edges of the cable channel cover. We screw hinge screws, no more than 4 centimeters long, into the pre-prepared grooves in the bars (long ones can be cut off). We drill a through hole in the lower part of the guide rail, install it between the bars and fix it with self-tapping screws. In order for the rail to rise, its lower corner must be smoothed using sandpaper or a file. We look at the photo and repeat.
Having finished designing the cutting mechanism, you can proceed to assembling the working platform of the future bottle cutter. First of all, we attach a side block 25 x 4 x 2 to the base. These parts can be connected using self-tapping screws, screwing them into the back of the base. You can also use PVA glue or epoxy resin. When the side part is fixed, you can proceed to installing the roll-out rollers. The first pair of wheels is installed at a distance of 3-4 cm from the upper edge of the base. The next pair is located 12 cm down. For more elongated bottles, you can prepare another set of holes, 5 cm below the second pair of rollers. Pay attention to the photo. The final stage of assembly will be attaching the lower part of the cable channel to the edge of the side bar, and fitting the end stop with screws or glue. With a slight movement of the hand, attach the cover with the cutter to the base of the cable channel and the device is ready for use! Another way to attach a glass cutter.
Oil is another helper in cutting a bottle
A great way to chip off unwanted parts of an item is to use vegetable oil.
Basic actions:
- fill the bottle with cold water to the desired level;
- place in a container with cold water filled to the same level;
- add vegetable oil until a thin layer forms (do not pour the oil directly from the bottle, otherwise you won’t get an even layer, the water will be covered with oil in patches);
- select a piece of metal (the wider the glass of the object being cut, the thicker the metal you need to choose, and vice versa);
- heat a metal object to the limit using a gas stove or burner;
- lower the blade to the oil level, while protecting your eyes and skin from splashes of heated oil;
- the oil will heat up and the glass will quickly crack as a result of the sudden temperature change.
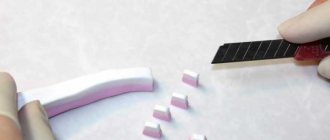
Plastic bottle across
There are no special problems here, you can even cut with ordinary scissors. But there is one trick - you need to start cutting, and to do this you need to pierce the bottle. But the side walls are thin and sag.
You just need to squeeze the bottle where you want to pierce it. So that a bulge appears, which will act as a stiffener. And it is more convenient to make a puncture with the sharp end of a knife, rather than with scissors.
Application of nichrome wire
For this method, you need to acquire nichrome wire, a 12 V battery and cold water.
- Apartment renovation in Odessa at a reasonable price from an experienced company stroyhouse.od.ua with experience
Bedroom furniture from the manufacturer - its advantages
- Sony PlayStation 5 repair
Determine where to cut (wrap the bottle with a sheet of paper, connect the edges so that the edges are even, and circle with a marker or felt-tip pen, remove the sheet). Take a piece of nichrome wire 0.5 mm thick, attach the first tip to a heavy object, then attach the battery wire here.
Wrap the wire around the bottle along the drawn line. Take the wire with pliers to avoid burns, pull it slightly, apply tension to the other end of the wire, holding for about 30 seconds. Dip into cold water.
After a sudden change in temperature, part of the bottle will break off. All that remains is to sand the uneven edges.
In addition to glass objects, another material that is accessible in all respects is used for decoration and decoration - plastic.
There are probably plastic bottles in every home, so why get rid of them when you can decorate your home with them.
Nichrome wire
Finally, I left a not very simple, but interesting and spectacular way to easily cut a bottle at home. You don't need much for this.
You will need a power source, for which a simple 12-watt battery is well suited, the wire itself, a bottle that needs to be cut, and a container of water in which you can dip the bottle.
To more conveniently determine the cutting line, you can take a glass cutter and carefully draw the direction. Next, we take a heavy object that will not catch fire - stone or steel will work well, it will hold the wire on one side. There you will also need to connect the power cable.
We wrap the wire along the cut line, and then grab the second edge with pliers. You need to pull a little so that it stretches a little and becomes smoother. Then we apply voltage and observe a beautiful, but quite dangerous picture - a heated nichrome wire. Half a minute will be enough for such a device to cut almost any bottle.
Working with plastic
Many fans of plastic items and decorations often wonder how to easily cut a plastic bottle to get an item of the desired size.
- How to prepare for the casting?
- Transportation and storage of fittings
- The Brazilian Carnival is the hallmark of Rio!
To work with plastic, you will need scissors, a knife, a marker and a stand for a marker or felt-tip pen, which can be used as a book or any box.
Basic steps:
Place the bottles on the table and make a stand next to it for the felt-tip pen. You need to add books or boxes until the marker is at the required height. Hold the marker with one hand and rotate the bottle with the other to draw a circle.
Make a cut a few centimeters above the outlined mark, insert scissors and cut off the desired part. Carefully straighten the cut with scissors.
In fact, each method is convenient in its own way, which is why it is already widely used among craftsmen and lovers of “Hand Made” equipment.
Glass bottle products
From a glass bottle you can make the most creative things to complement the interior of your home if, after cutting, you decorate them with all sorts of elements. Glass products are taken from both transparent materials and multi-colored ones, which can be combined with each other.
Transparent glass containers can be painted in a variety of colors, covered with paper, fabric, and ribbons. The work process, of course, is painstaking, but the result is pleasing, since the products turn out to be original and unusual. Among the most common DIY crafts:
- Chandeliers. In this case, knowledge in the field of electrical engineering is required, but if necessary, you can contact a specialist who will lay out the wires, install sockets, and you can make the lampshades yourself to your taste. The upper part of the bottles is painted with acrylic heat-resistant paints in different colors; there can be 2, 3, 4, 5 horns - at your discretion.
- Vases. It is considered the simplest option for crafts made from glass bottles. Typically painting requires acrylic paints in a spray can for even application. Painting is done in one color, two or several, identical shades or contrasting colors. Flowers, colorful autumn leaves, and dry herbs are placed in vases.
- Hallway hanger. Bottles should be cut diagonally. Using super-strong glue, the resulting elements are glued to a plastic surface, creating hooks for hanging various things. We also make hooks for the bathroom to hang various accessories.
- Candlesticks. The products are made from a convex bottle that once contained wine. Before making candlesticks, a droplet-shaped hole is cut out of the container. Candles are inserted inside and lit.
- Pot for decorative flowers. This item is usually used in the countryside. For crafts, bottles are used, cut lengthwise and filled with natural plants. If used indoors, you can fill it with artificial flowers.
You can make glasses and wine glasses from empty glass containers. Glasses are made from the bottom of the bottle, cut crosswise. For wine glasses, you need the top part, turned upside down and firmly glued to a stable plastic surface.
If you have an accumulation of empty glass bottles from various drinks, do not throw them away. Crafts made from glass containers can perfectly decorate your home. In addition, making decorative elements yourself does not require experience, but the end result brings joy and pride in a creative thing.
Photo of ideas from a glass bottle
Photos and videos of ideas on how to cut and use glass bottles
Photo instructions on how to cut a bottle
Photo tips on how to cut a bottle
Sources
- https://posuda-gid.ru/butylki/138-kak-razrezat-steklyannuyu
- https://SdelaySam-SvoimiRukami.ru/4759-6-sposobov-rovno-razrezat-stekljannuju-butylku.html
- https://tytmaster.ru/kak-razrezat-steklyannuyu-butylku/
- https://mirrukodelija.ru/kak-razrezat-butylku/
- https://vsesamodelki.ru/kak-razrezat-butylku/
- https://sdelatrykami.ru/kak-razrezat-butylku/
How to cut lengthwise
A designer item can also be obtained from a bottle cut longitudinally. The following materials are required for work:
- a bottle of ordinary water with a spray nozzle;
- a piece of nichrome wire;
- a piece of heat-resistant material (asbestos, paronite);
- rubber bands;
- a power source that can provide 30-40 V and an electric current of 3-4 A.
Popular articles How to crochet a toy hippopotamus
The nichrome wire is carefully straightened, since this determines whether the edges of the cut will be smooth. The bottle is wrapped lengthwise with wire and secured with rubber bands in several places - this will be the cut line. Asbestos or other material should be broken into small pieces and placed under the rubber bands on all sides. Thus, when the wire heats up, it will not damage the rubber bundles. If there is no asbestos at hand, you can use small wooden slats. A lump of heat-resistant material is also placed in the neck of the glass container, due to which the wire is pressed against the edges of the hole. It is also necessary to press the asbestos to the bottom, since it, like the neck, is thick. It is best to place the container on a piece of asbestos or a wooden plank.
An electric current is connected to the ends of the wire - it does not matter whether it is constant or alternating. Electricity is applied for 30-60 seconds until the wire turns red
The current source is turned off, and the places where the glass comes into contact with the wire are intensively sprayed with water from the prepared bottle
After a loud click is heard - the crack of a bottle - the rubber bands are carefully removed. The result is two absolutely equal parts of the container, ready for use.
BottleWire fasteningThe wire is fixed with rubber bands
Pieces of asbestos Place pieces of asbestos under the rubber bands We insert a piece of asbestos into the neck
We connect the electric current. Turn off the source and use a spray bottle to intensively spray the places where the wire comes into contact with the glass. Two parts of the bottle.
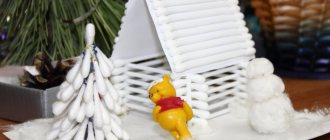
Cutting a bottle in half using oil
You can cut the bottle with regular vegetable oil. Moreover, on the eve of the New Year, it is easy to create beautiful holiday candlesticks-caps or candlesticks-glasses from cut parts of bottles.
- What to give your beloved husband something unusual for his birthday. List of ideas + video
- Can a non-owner of a car apply for compulsory motor liability insurance?
- Radon baths: indications and contraindications, reviews from doctors, benefits and harms, rules of administration
To do this, take advantage of the proposed master class on making original gifts and souvenirs.
Step-by-step procedure
The workflow for cutting a bottle with a diamond glass cutter can be divided into several stages:
Step 1: Take a clean, dry bottle and glue a strip of copper tape along the center of it, this will be the cut line. Instead of copper tape, you can use a marker or do without basting at all.
In addition, bottles with factory seams on the sides are often found. But for convenience, copper adhesive tape is usually used.
Stage 2: Dip the bottle in water and cool slightly.
Stage 3: install a diamond blade for cutting glass in the drill and proceed to the main process, cut the surface of the bottle carefully, periodically rinsing the cut area under running tap water.
To prevent splashes from flying around, it is necessary to cover the work area with plastic film. The bottle is cut first on one side, then along the bottom, and then on the other side.
Step 4: Once the bottle is cut, you need to sand its edges to make them even and smooth.
For grinding, use powdered silicon carbide mixed with water and a piece of cut glass, moistened sandpaper or a drill with a glass grinding attachment.
Step 5: You now have two original bottle halves that can be used for different purposes.
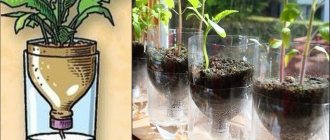
For example, in one you can germinate wheat sprouts or ornamental grass, and the other can be used as a dish for ice cream, candy or fruit.
But if you don’t have a glass cutter, it won’t hurt you to find out how to do without it and cut the bottle into halves.
Method 4 - installation with filament
This method will require a transformer, for example, from a microwave oven with the secondary winding removed, instead of which three turns of a powerful power cable are installed. The free ends of the wire are closed through a thick wire. The stand (base) must be heat-resistant and dielectric.
The next step is to connect the transformer to the electrical network. When you turn on the transformer, the filament will heat up: a bottle is applied to it and gradually rotates. When the glass is heated, the neck along the heating line will disconnect, so you need to make sure that the heating is uniform and along the same line.
Method 1 - use a glass cutter
Here you will need a glass cutter. You can use a factory model or make it yourself. The design of a homemade device can be different: the main thing is that the bottle and the cutting element are securely fixed, but the bottle rotates freely.
Important! When cutting, you need to make one pass: this will ensure the most even edge. Next, you need to prepare hot (boiling water) and cold (with ice) water. First pour hot water along the cutting line so that the glass warms up well.
After this, immediately pour cold water over the bottle.
Due to temperature contraction, the glass should break off along the preliminary cut line. If this does not happen, the procedure must be repeated (douse it first with hot and then with cold water).
Plastic bottle along
The plastic in the bottle is much thicker near the bottom and neck. Here it can split along an unpredictable trajectory if you try to cut it with a knife, and even more so with scissors.
It is better to pre-saw these areas with a fine-toothed metal blade. Such files are found in manual and electric jigsaws.
Or you can heat the knife over a fire so that it passes through the plastic as if through butter. But this method is more dangerous and requires speed and precision of movements.
And the edges of the plastic will be melted and require large amounts of machining.