How to make a metal scriber from a bolt and a drill bit
A scriber (scriber or Scriber) is a tool for marking metal surfaces. Such products of various designs are produced by industry and in terms of quality they differ greatly. In order not to waste money, you can make it yourself, even with low qualifications and without expensive materials.
The process of making a metal scriber
Holding the bolt in a vice, cut off the head and most of the threads.
We insert the bolt shaft into the chuck of the drilling machine, turn it on and use a grinder to round the end formed after removing the head.
We turn the bolt over and form a cone in place of the remaining thread and dull its tip.
We correct the cone with a file and make two belts on the rod to make it easier to hold the tool with your fingers in the future. We finally form the other end.
We clamp a drill (broken) made of HSS steel with a diameter of 3 mm in the drill chuck and form the working part in the form of a sharp cone. The tip can also be made of silicon carbide or tungsten.
We tap the blunt cone of the bolt and drill an axial hole with a diameter of 3+ mm and a depth of about 25 mm.
Squeeze a drop of superglue into it and insert a pointed drill with the fastening part.
The scriber is completely ready to work on both soft metal and steel.
Do-it-yourself marking compass and metal scriber
Hello, dear readers and DIYers! When making various metal parts, a compass is often required. And if the surface of the workpiece is dirty, then it is better to mark it with a metal scriber.
In this article, Viktor Nikitin, author of the YouTube channel “ROTORKOR” will tell you how he made a marking compass.
Given the relative simplicity of these tools, a small amount of welding work will be required.
Materials. — Old taps — M8 wing screws — Steel square, sheet — Machine oil, sandpaper.
Tools used by the author. — Grinder, cutting and cleaning discs — Screwdriver, metal drills, tap, file — Belt grinder — Semi-automatic welding machine, welding mask — Vise, clamps, core, hammer, adjustable wrench — Ruler, square, marker.
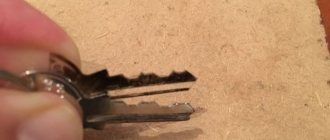
Manufacturing process. So, old M6 taps will serve as tips.
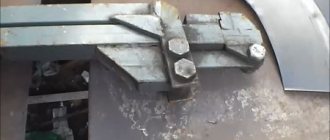
The master cuts the rods for the compass to the same length from a 15X15 mm steel square. To do this, both workpieces are simultaneously fixed in a vice and cut off with a grinder.
The ends of the parts are leveled using a belt sander.
At one end of both workpieces, the center is marked and cored.
Metal scriber
Part marking is the most important operation in the production process chain. Depending on the requirements for accuracy and legibility of lines on the surface, the method of applying them is selected. Pencil, chalk, and marker are easy to use. No effort required when marking. However, these methods are not effective enough in many cases. The lines are too wide, easily removed during operation and are difficult to see during processing. The optimal tool for high-quality marking is considered to be a metal scriber. The lines are clearly visible and cannot be erased. The thin contour allows for the production of high precision parts.
Double-sided scriber (marking pencil)
- Price: $1.07
- Go to the store
There was a review of the scriber (“marking pen”) recently.
I ordered a double-sided analogue. The tool is unsightly in appearance, but performs its functions perfectly. Actually, there is nothing special to write about the scriber - it is a tool designed for marking (but not punching!). It is not always convenient to draw on parts with a pencil, and it is not always reliable - it can be erased, and the marker is also thick, and the awl is too soft. The scriber has sharply sharpened carbide tips.
Appearance:
The cap is twisted
And in general everything is sorted out
Thus, you can, for example, to carry it in your pocket, twist the tip (on which the cap is not screwed) with the sharp part inside the handle.
The length of the tips is 10.5 and 9 mm, diameter 3.15 mm. It’s worth adding that there is about a millimeter of hard alloy there, maybe up to two, at the very tip, and I have nothing to check the composition of this hard alloy at home - except maybe scratch the glass.
Tips:
The sharpening angle, as we see, is different.
Well, let’s scratch the glass:
Again, as we see, depending on the angle, the result is different. the thin side says mysku and the left stripes, the thick side says uncle_sem and the thick stripes on the right.
I can say that despite the not entirely pleasant first impression, I was quite pleased with how the scriber “works”, and for a little over a buck it’s a must-have for a DIYer or mechanic.
Description of the tool
For many years, domestic manufacturers relied in production on strict rules regulated in legislative acts. Thus, the metal marking scriber GOST 24473-80 must comply with the dimensions and characteristics specified in the document. The following types of tools were allowed before production:
- one-sided;
- two-sided;
- single-sided with handle;
- double-sided with handle.
The material of manufacture was also discussed. The scriber could be solid carbon steel or carbide-tipped. Replaceable needles were sometimes used as a cutting element. The tool is made from steel grades U10, U12. Such models have their pros and cons. The disadvantages include rapid wear of the tip. The advantage is the ability to sharpen the device on any abrasive equipment. In addition, the steel sample is cheap. A metal scriber with a Pobedit tip will cost more.
Its service life is many times longer, it is not afraid of scale, dust, and dirt on the surface. A special diamond wheel is required for sharpening.
DIY making
The home master is not limited by strict production regulations and requirements. He has the right to make a metalworking scriber for himself from the desired material, the desired size, and shape. Experienced craftsmen, even at large enterprises where it is possible to use a factory-made product, believe that a self-made model is better. A homemade scribe takes into account the individual characteristics of the worker and the peculiarities of performing operations. A comfortable handle is more comfortable to use, since you often have to exert significant effort when applying markings.
Having decided that a tool is necessary, the question arises - what should a metalworker’s scriber be made of so that it is convenient and lasts a long time?
There are many options, for example:
- Bench tools: file, tap, tool steel drills, core.
- Part made of high-strength alloy: valves, shafts, needles, spokes.
- Drills, drills with pobeditovy tipped.
Home production technologies require the availability of the necessary tools and work skills. Deciding how to make a scriber with your own hands in this case is the choice of the master. Among the most popular methods are the following:
- sharpening of convenient parts according to drawings;
- production of a holder for a scriber with replaceable needles;
- welded structure of handle and cutting edge.
When working with an abrasive tool, remember that it is unacceptable to overheat the workpiece. The appearance of scale on the surface is a defect. A minimum of 0.5 mm of metal should be removed in this case. Cooling liquids and a gentle processing regime are used.
A good solution for making your own scriber would be to use sewing needles. For their production, high-strength carbon steel is used. Having made the handle, which can be made of wood or other materials, a clamping mechanism for the needle is inserted. It is first shortened to the required size. It is even easier to use sewing needles by removing the rod from the faulty machine.
A completely different, modern approach to solving the problem is offered by savvy craftsmen. You can purchase a set of electronic scribers online. It works on the principle of arc engraving. To implement the idea, you need to know the principles of electrical engineering and skills in working with devices. Although the power supply voltage is small, even a cord from a computer USB port will do, you should follow safety precautions.
DIY metal scriber
This is a high-voltage engraver-perforator! Using a scriber you can cut out and apply various images or inscriptions on metal. Structurally, the tool is simple, and to make it yourself you will not need either machines or rare or expensive materials. This device can work perfectly from a computer's USB port.
All the necessary parts for the scriber are sold in this Chinese store.
And if portability is needed, then it can be connected using a regular 3.7 V battery. This device is very economical, it only requires electricity to operate and no other expenses such as drills, etc.
To make it you will need a dropper; you can buy it at any pharmacy for a couple of kopecks. The shorter needle will serve as an electrode. To connect it to the body, we put a PVC pipe on it. A cut needle cap will provide excellent protection against accidental arc injury. The very tip of the needle should protrude a maximum of a couple of millimeters from the cap. The coolest cable option for this device is the cables from regular headphones. They have good insulation and are quite thin.
Soldering wires to a needle is quite difficult and for this we advise you to use Super Glue. PVC - the tube from the dropper will serve as an excellent dielectric.
DIY electronics in a Chinese store.
So, the USB connector is glued. You can also glue the switch with superglue. The wire can be secured with electrical tape and everything will work perfectly. The wire going to the electrode needle needs to be soldered and a PVC tube placed on top of it. That's all! The assembly is finished and the device is completely ready!
As you can see for yourself, the scriber is assembled very quickly and easily! There is one very important nuance about this device - it is PROHIBITED to repeat the process yourself for those who are not familiar with electrical safety rules, do not have experience working with high voltage and are not familiar with radio electronics!
It is best to charge such a device from a power supply with a USB output. If a high-voltage discharge hits the USB cable, it will instantly damage the computer and will have to be thrown away. The device produces such an arc from a very weak power supply of 5V (volts) and only 500 mA, and this power supply is much more powerful - the same 5V, but already as much as 2 amperes and the difference in power is quite noticeable. Be careful - you may get an electric shock, of course, not fatally, but painfully.
Place two thick fiberglass plates on the table surface as a dielectric, and on top of them - a steel plate on which you can attach a sheet of paper with magnets. A high-voltage arc can easily make perforations, i.e. cut a large number of small holes, any porous materials such as paper or cardboard. In this way, you can make various stencils very quickly. If you need to transfer any image to metal, this can also be easily done using a drawing or printout. From the impact of a high-voltage arc, small potholes are formed on the metal, which form the image itself. The depth of such notches directly depends on the distance between the electrode and the plate; the greater the distance, the larger the arc and the stronger the impact of the marker!
What is core
A center punch or core is a metalworking impact-cutting tool in the form of a metal rod made of hardened steel with a point at one end, designed for marking on metal necessary for positioning the drill. It is used in conjunction with a hammer. The last blow is struck on the core, as a result of which the tip of the tool leaves a dent in the metal, which is used to install the drill. Due to the hole, the possibility of slipping during drilling is eliminated.
Typically, cores are a round rod. Its edge is sharpened at 100°-120°. This angle was chosen for a reason. It is with this slope of the top that the cone sinks quite well into the metal, while its tip is deformed to a minimum. It should be noted that tools designed to work with soft metals can be sharpened at a smaller angle. Due to this, the geometry of the hole changes, and it is easier to get into it with a drill for non-ferrous metal, which has a different cutting edge angle.
The part of the core that is struck with a hammer is called the buttplate or striker. The central area of the instrument is usually made in relief, for more comfortable holding in the hand.
The center punch is made of tool steel. Its tip is hardened to a length of 20-30 mm. Its firing pin can also be heat treated. In this case, the central part is not processed, which allows the tool to absorb impacts very effectively and prevents it from breaking. The reserve length of hardened steel near the tip allows, if necessary, to sharpen a worn tool without the risk of losing its chopping qualities.
Types of center punches
Although the core is a very simple tool, its design may differ depending on the tasks for which it is made.
Popular varieties:
- Ordinary.
- Bell.
- Auto.
- With extension spring.
The usual one is just a steel rod with a round or multifaceted cross-section. It is only used in conjunction with a hammer. Although the core has its own specific sharpening angle, it can be used as a scriber. In this case, the accuracy of such a line will be worse due to the specific cone-shaped structure of the tip. This tool is produced in various length variations. Usually it is 140 mm, but it can be increased. The tool should be chosen at hand. If it is too narrow, your hand may be damaged by the hammer.
The bell is very similar to a regular center punch, but has an additional element in the form of a funnel. Due to it, it is able to center on convex and spherical surfaces. With this tool it is easy to core a metal ball, which is difficult when using a conventional straight core. The circle around the tool prevents the tip from sliding to the side. This is a very specific and highly specialized core, unsuitable for any other work other than marking spheres. Its skirt is made of fairly hard rubber. It effectively absorbs shock and does not slip, which facilitates the correct direction of the tip.
The automatic core can be used with one hand. This is a completely self-sufficient tool that does not need to be used in conjunction with a hammer. It is a hardened tip embedded in a tube with a spring system. To operate the device, you need to place the tip at the drilling point and press. As a result, the main internal spring is compressed, then the release mechanism is triggered, and it rebounds. As a result, the hard tip strikes the surface. This device makes holes of the same depth, which distinguishes it from a conventional metalwork core.
Automatic punches are very well suited for use in hard-to-reach places where it is impossible to reach with a hammer. When choosing this tool, it is best to pay attention to devices with a round handle in place of the butt plate. This makes pressing easier and does not create pain in the palm after the mechanism is activated. If you do dozens of holes in a row, then the absence of discomfort will be very important.
The core is a very simple tool that is often made by hand. Often, homemade devices are no worse than purchased ones. A fairly common punch design is the spring punch. It consists of a separate tip and striker. They are connected to each other by a conventional extension spring. To trigger such a device, you just need to pull the firing pin and release it. Due to the elasticity of the spring, it will accelerate forward and hit the tip, which will go deeper into the metal. This type of punch is used without a hammer, but it requires two hands to operate it, so it is not as good for hard-to-reach places as the automatic store-bought counterpart.
Possibility to make a tool with your own hands
A simple version of the dash is made from thick diameter wire. A similar solution is to drive two long nails into a suitable wooden handle. A mechanic's compass is also used to mark wood. The accuracy of drawing increases as the distance between the teeth of the tool decreases; skill and experience play an important role.
The scriber is a mechanical compass with a built-in level. The latter is intended for precise marking of lines horizontally and vertically. If everything is done correctly, then marking with your own hands will allow you to assemble the log house in such a way that it will not be possible to push a match between the logs.
Scriber is an advanced carpentry trait that has been given two levels. This saved time for the carpenter. After all, now they don’t draw a rough line for marking, but immediately draw a finishing mark.
How to make a metal scriber from a bolt and a drill bit
A scriber (scriber or Scriber) is a tool for marking metal surfaces. Such products of various designs are produced by industry and in terms of quality they differ greatly. In order not to waste money, you can make it yourself, even with low qualifications and without expensive materials.
The process of making a metal scriber
Holding the bolt in a vice, cut off the head and most of the threads.
We insert the bolt shaft into the chuck of the drilling machine, turn it on and use a grinder to round the end formed after removing the head.
We turn the bolt over and form a cone in place of the remaining thread and dull its tip.
We correct the cone with a file and make two belts on the rod to make it easier to hold the tool with your fingers in the future. We finally form the other end.
We clamp a drill (broken) made of HSS steel with a diameter of 3 mm in the drill chuck and form the working part in the form of a sharp cone. The tip can also be made of silicon carbide or tungsten.
We tap the blunt cone of the bolt and drill an axial hole with a diameter of 3+ mm and a depth of about 25 mm.
Squeeze a drop of superglue into it and insert a pointed drill with the fastening part.
The scriber is completely ready to work on both soft metal and steel.