Crafts made from plastic bottles are distinguished by their versatility: they can decorate both your home interior and your garden plot or playground. In terms of manufacturing technology, they are practically the same: garden products simply need to be coated with waterproof types of paints, and also not to use paper or cardboard in their design, which can get wet in the rain. Plastic products are durable and practically not susceptible to external factors, so they are ideal for decorating summer cottages and flower beds. Below is a master class on making an owl from a plastic bottle. This instruction leaves room for imagination; the bird can be made in several versions, differing in their complexity, so this craft is suitable even for children.
Owl from a plastic bottle for the garden: master class with video
Crafts made from plastic bottles are distinguished by their versatility: they can decorate both your home interior and your garden plot or playground. In terms of manufacturing technology, they are practically the same: garden products simply need to be coated with waterproof types of paints, and also not to use paper or cardboard in their design, which can get wet in the rain. Plastic products are durable and practically not susceptible to external factors, so they are ideal for decorating summer cottages and flower beds. Below is a master class on making an owl from a plastic bottle. This instruction leaves room for imagination; the bird can be made in several versions, differing in their complexity, so this craft is suitable even for children.
Master class on making an owl
Making a garden figure of an owl from plastic bottles is not that difficult, the main thing is to have the desire to create. And detailed video instructions will help you understand the simple secrets of making crafts.
Video: how to easily make an owl from bottles
Using available tools, you can transform ordinary plastic containers, turning them into a garden sculpture of an owl. The decorative figure of a bird will become an original decoration for a flowerbed or miniature pond and will delight you in any weather.
Step by step creation
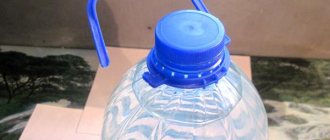
To make an owl you will need:
Two parts should be cut from the bottle. The first is the bottom and bottom of the bottle to the point where it begins to narrow. If you turn it upside down, it will look like an owl's head with ears. The second is the part of the bottle between the neck and the label, that is, another expanding part. The neck of the bottle should be cut off. The resulting part will have holes on both sides, into the wider one you need to insert the first blank - the owl's head.
The product will look neater if the parts of the bottle are cut in such a way that when connected, a smooth transition from one component to another is obtained. If this effect could not be achieved, you can straighten the joint using a stapler or tape. It is important to use them on the inside of the craft so that they are invisible after painting it.
If it is intended that the owl will be used to decorate the house, it is necessary to trim the only hole remaining in the product for stability.
The next stage is painting the owl. To maintain proportions, it is recommended to draw eyes with a diameter of about a third of the entire height of the product. It is better to use acrylic paints - they are better suited for coating plastic products. The paint must be applied in several layers so that the insides of the owl, for example, the tape used to fasten it, do not show through.
If the owl was created for the home, the product is ready. But if you plan to install the craft in the garden, a few more modifications are needed.
Little owlet
To make a funny owl that will appeal not only to children, but also to adults, you need to prepare a liter cola bottle, acrylic paints, scissors and a spitting gun.
Progress
- Prepare the bottle: remove the top label and rinse the inside.
- Cut the container into 4 pieces. The first part is the neck (not needed in further work). The second part is the expanding part from the neck to the beginning of the label. The third part is the straight part of the bottle (not useful in work). The fourth detail is the bottom.
- Take the second and fourth parts and glue them together using a glue gun.
- Turn the resulting figure over and paint it with acrylic paints (draw big eyes, an orange beak, and the owl’s chest).
You can decorate the area with such crafts in different ways. You can simply place the owl on a vertical thin stick (there is a round hole at the bottom), or you can make several holes with a hot awl or nail, thread a wire, and use it to secure the craft to a tree or fence.
Owl decorations
A common way to decorate owls from a plastic bottle is with hats. One of the most consistent with the image of a wise bird is a professor’s cap, which is made from another bottle and plywood.
To do this, you need to cut off a flat part of the bottle, glue a square piece of plywood onto the resulting cylinder and paint the resulting headdress black. Then the cap is glued onto the owl's head; if it seems that it is not held securely, several slits can be made in the owl's head into which the edges of the cap should be inserted.
Another way to decorate an owl is with professor's glasses. They are made from waste CDs, which are glued to the bird's eyes with the mirror side facing out.
It is worth noting that such decoration is only suitable for products made from large bottles, for example, five-liter bottles.
However, if desired, you can cut out circles from the disks, suitable for decorating smaller items. The eyes of owls can be decorated using all sorts of methods: pupils from unnecessary buttons or beads look good, glued eyelashes that are cut out from the remaining unnecessary parts of the bottle. In addition, to decorate the owl, you can glue a voluminous beak to it, also cut out from leftover plastic. If desired, you can give the owl additional volume by gluing feathers to it. They are easy to cut from the same bottles; you can also use disposable plastic spoons.
When attaching them, it is important to follow the order and move from the bottom rows to the top so that they overlap the joints. Feathers can be used to decorate the entire owl or just its wings. With this design, it is important to remember that a product with many details is more difficult to paint without leaving transparent parts of the plastic, so if children are making an owl, you can paint all the feathers and the body of the owl separately, and then assemble the already tinted parts.
Using crafts made from plastic bottles in flowerbed design
- If you have a lot of clear plastic bottles, you can paint them by pouring a little paint inside and shaking it.
- Initially, a border is made of stones: it will hold the future flower bed.
- Soil is poured inside. Lines for installing bottles are marked on it.
- The bottles are screwed into the ground upside down along the marked lines.
- Flowerbeds look more elegant if you use smooth, clear lines. You can lay out flower beds in the shape of stars, unusual symbols, or animals. It is very interesting to combine planted fresh flowers with compositions made from plastic bottles.
Single flower beds made from large bottles (baklag) in the shape of different animals look fun. To do this, cut off one side of the eggplant, make several holes at the bottom of the resulting container for drainage, fill it with soil and plant flowers in them. Such container flower beds are mobile and can be installed in different parts of the yard. They are also portable.
Owl from one bottle
The method of making crafts is very easy, even a child can handle it. So, in order to make an owl, you need the following materials:
Depending on where the craft will be placed, the size of the bottle varies. So, a massive toy made from a large bottle will look best in the garden. To make an owl that will be placed in the house, the size of the bottle is not important.
It is also worth considering that a wide container will produce a well-fed owl, while a narrow container will produce a slender one. The best option would be a regular 2 liter bottle.
Design, choice of style and design of a country plot of 10 acres.
Find out how to make a tire pond with your own hands here.
Step-by-step instruction
First you need to remove all labels from the bottle. The easiest way to remove them is to soak the container for 30 minutes in warm water.
Using a marker, you need to mark the locations of future cuts. So, it is necessary to cut off the narrow part of the neck and the middle from the container. The bottom of the bottle will become the owl's head, and the wide section of the neck will become the body.
It is worth considering that an owl made from plastic bottles will be very light in weight and, when installed in the garden, can fly away at the first gust of wind. This can be avoided by filling the lower torso with cement or plaster.
If you plan to sit the owl on a tree, you can heat an awl and make several holes in the lower part of the toy’s body. A string is threaded through the holes and the owl is tied tightly to the branch.
The resulting blanks must be combined into a heap. To do this, you need to use hot glue to go over the cut areas and press the parts for a few seconds. There is no need to be afraid that hot glue will deform the plastic - it cools down very quickly.
An owl from one bottle is the simplest craft, the main thing is your imagination in its design
If you don’t have hot glue, you can fasten the craft using a stapler, but then the edges won’t look quite neat.
The last step is to paint the owl with acrylic paints. Here everything depends only on the imagination of the master. When coloring, it is advisable to focus on the eyes - they should be large and expressive.
If the toy will be placed outside, it is better to use aerosol paints - they are resistant to various weather conditions.
Ideas for garden crafts made from plastic bottles
PET material is lightweight and, moreover, durable, so you can easily and quickly make any thing from it. I'll start by showing the huge vehicles. Oh, and now there will be impressions.
All sorts of bottles, even canisters, will be suitable for this purpose. Look how much work there is here. If you have children, they will be interested in such products. Choose any job and create a whole composition in your garden plot.
You can also take equipment, airplanes or helicopters as a basis.
You can also make a masterpiece from a shampoo jar and you will get an airplane. Paint with acrylic paints so that weather conditions do not spoil the craft.
The furniture still looks wonderful, it would seem, that’s it. Of course, you need quite a lot of the required material here.
And the author of this work thought of making a boat. It looks awesome, don't you think?
Entire houses are already being cultivated and greenhouses are being built. Gazebos made from such waste materials also began to be in demand.
And of course furniture items such as chairs, stools and trash cans. Well, everyone will definitely like this.
You can also make an ottoman and place it, for example, in a bathhouse or gazebo. So don't throw away your juice cans.
Let's move on and see that you can design and decorate the trees in the garden.
And place mushrooms under them, and these could be fly agaric mushrooms. Imagine and success will come on its own.
Decorative decorations are also made for the fence, the bottoms of bottles are cut off and scenes are laid out.
Stumps and benches are also decorated. It comes out bright and beautiful.
Flowers and sunshine are cultivated in playgrounds and schools. These are the most famous works.
And of course you can’t do without flower beds and flower beds. You can even make it from one ordinary transparent soda bottle. What a wonderful mouse came out.
Or make regular pots and plant any climbing plant or flower there.
It looks quite wonderful and cute, they even built a magic ball.
Whoever is good at something creates. It surprises us, but we follow the example and don’t lag behind.
This picture is also very beautiful, but imagine if you also plant daisies or other flowers and how it will all bloom.
Unusual butterflies will also be an excellent decoration. They will cheer you up and make the interior even more beautiful.
You will need a template, cut it out of paper, and then attach it to the bottle.
Trace and paint with acrylic paints, and then cut out along the outline.
Or these funny turtles.
Make them with your children and decorate the veranda or dressing room. Here's a step-by-step photo instruction in detail; by the way, it's also a piggy bank.
Large bird
This craft will be an excellent decoration for any garden. Owls of this type look best in trees. To make it you need the following materials:
DIY garden path shapes - step-by-step instructions and arrangement methods.
Step-by-step instruction
The basis for the owl's body will be an inverted 6-liter bottle. In the side, bottom and near the neck it is necessary to make holes for the wings, ears and paws.
We make holes in the bottle for wings, paws and other elements of the figure
From half of the second bottle you need to cut out the owl's wings, nose and ears. All parts must be cut taking into account allowances - on each of them you need to leave 1.5-2 cm strips of plastic, which are then pulled into the holes of the body and bent. This way, all parts will be held together without the use of glue or wire.
From the second bottle we cut out wings, ears and other elements
Painted bottle caps will make excellent eyes - their diameter is quite consistent with the size of the owl's body. First, you can paint them completely yellow, then paint the pupils with black paint.
Using lids to make eyes for an owl
It is necessary to cut off the neck parts from liter bottles - they will become the basis for the bird's legs. The fingers and the paw itself must be made of wire and screwed to the neck of the bottle.
Finished parts must be dried twice and fastened together only after complete drying.
All that remains is to glue the eyes and nose to the body with hot glue, and the owl is ready.
Thus, with the help of available tools you can make a beautiful decoration for your home and garden. If desired, the figures can be supplemented with any details - feathers from brown plastic bottles, foil.
Source
Volumetric owls
From wood cuts
For the base we will use tree trunk cuts. If you take a large branch, the owl will turn out to be large. But size is not the main thing in such a craft, so you can also use saw cuts of small diameter.
From a log
You can make a large owl from a log. A piece of the trunk will turn into a body, a cone into a beak, and saw cuts into eyes. Such owls will be a good decoration for a summer house.
From the bark
You will need a large piece of tree bark. Cut it to an oval. You need to leave two triangular protrusions on top - these will be the ears. Use scissors carefully so as not to accidentally cut them.
Original eyes are obtained from acorn caps, dried pieces of apples, large autumn flowers (bush chrysanthemums or asters), small saw cuts, buttons and even large bagels. The wings are made of cardboard or fabric, give them the shape of a sheet. An interesting option is autumn leaves.
From the cones
To make the craft large, use a pine cone as a base. But if you don’t have one at hand, pine or spruce will do. The first will become the head, the second - the body of the bird.
We will fasten the elements using plasticine. You can use glue, but it is more convenient for a child to work with plasticine.
You can use one cone for the owl, rather than two - this craft is simpler. Eyes made of cardboard or paper are glued onto the “body”, wings and nose are made from dried orange peel, cut into pieces, ears are made from leaves. Place the owl on the moss and the composition is ready. Try attaching another piece of moss to your head, it looks funny.
You can not use the whole cone, but only the scales. Carefully remove them and place the owl competition on a sheet of plywood. Glue the scales. Fill the remaining part of the plywood with twigs, autumn leaves and any other available material.
A simple but original composition can be made from a glass jar. Throw small cones, chestnuts, acorns, spruce branches inside and decorate the outside of the jar as an owl: with eyes, ears, beak and paws.
From twine
From the bottle
Even a simple plastic bottle is great for making an owl out of. The bottom should be cut off from it (it will turn into the upper part of the head) and the top without a neck (it will become the body). We put the parts on top of each other and paint them “like an owl” with paints. Please note that after drying, the gouache must also be treated with hairspray on top - otherwise it will get dirty.
Craft owl from pine cones
If there is a lot of natural material, then you can make a large owl.
Owls
For a big owl, invite the children to make her babies - little owls. Under the guidance of an adult, the children will make several chicks and place them around their mother, the owl. This composition will decorate a corner of nature in a school or kindergarten.
Its production will require a lot of natural material, a lot of time, perseverance and skill. From durable cardboard, cut out the silhouette of an owl with open wings. Glue on pine and fir cones to create a large bird with round eyes and powerful wings. Use the entire supply of natural materials: acorns, dried leaves.
Those who love to craft from natural materials make a wide variety of crafts. You can admire them at fairs, exhibitions and sales. There you can see a brownie, a turkey and other domestic birds, a bear cub, a fox, and a hedgehog. And all this is made from natural materials. Inspired by this beauty, try to create crafts yourself to decorate your country house.
This owl is made from natural materials and is made in the form of a panel. For the master class there is a step-by-step video on how to make an owl from the author, very detailed. Later I will describe in detail the preparation of natural materials for work, but now in a nutshell: the pine cones need to be baked in an oven heated to 200 degrees for no longer than 40 minutes.
Warm up very small cones for about 20 minutes to prevent them from burning. This is necessary, since a lot of living and dangerous creatures are hiding in the cone - from ticks to spiders.
We invite you to familiarize yourself with Crafts from leaves - 100 photos of the best ideas for crafts from dry autumn leaves
You can get creative with the eyes, tail and wings of an owl.
The second version of the owl made from cones is less labor-intensive, but still requires the help of adults.
Choose several colors of felt or crochet circles of different sizes and colors. The size of the blanks for the eyes will depend on the size of the cone. Another master class below.
Another cute owl made from acorns, pine cones and leaves. You will have to remove a couple of the woody petals of the pine cone to get the eyes to fit properly.
To make an owl we will need:
Wrap a thick layer of yarn onto the cardboard, remove the strip and secure the skein in the middle with a long string of yarn.
The rope will not be cut later; with its help, our owl will be suspended and attached to the wall. Cut the ends of the yarn to create a pompom. Glue the pine cone with the wide part to the pompom.
Owl wreath
This is a very beautiful and simple composition. In order to create it, you will need natural materials and a large piece of cardboard - part of pizza packaging or household appliances.
Manufacturing
Useful tips
Owl appliques
For applications you will need a cardboard blank in the form of a silhouette. And then give full scope to your imagination. Materials can be varied:
All these and any other (whatever you can think of) materials are glued onto a cardboard base. To make eyes and beak, you can use any of the above options.
Of course, there is no single generally accepted way to make an owl. All techniques can be combined. The more different ideas you use, the funnier your owl will turn out and the more interesting the process of making it will be.
Source
DIY owl made from plastic bottles
The flight of imagination of a creative person knows no bounds. Taking used material as a basis, you can create an innumerable number of masterpieces that are especially relevant in the landscape design of the site. Usually crafts are placed on the ground; an owl made of plastic bottles, conveniently located among the branches of the garden, will surprise those around you. There are several ways to make a night bird, they differ in degree of complexity. The proposed master classes will help you choose the appropriate option for making an original owl from plastic bottles with your own hands.
Children and teachers: we create crafts from bottles for kindergarten together
Colorful flowers, birds and animals will decorate the kindergarten if adults, along with children, show imagination and ingenuity.
Video lessons for different age groups will help you make unusual crafts from plastic bottles for kindergarten. The best master classes on crafts made from plastic bottles are presented on our website. After familiarizing yourself with them, you will understand the magic of creating hand-made beauty. Having set the goal of decorating a kindergarten area from plastic bottles, you can come up with three-dimensional compositions, paintings, panels and other decorative items. The smallest pupils can create a bright bouquet that does not fade.
How to create a simple bouquet from plastic bottles with your own hands:
- We paint the inside of a plastic bottle in different colors.
- We attach the “vase” to thick cardboard.
- We attach several tubes for juice in the form of stems.
- We glue the multi-colored caps with hot glue in the shape of flower petals.
- We cut out leaves from paper that complete the original three-dimensional composition.
A colorful airplane made using the papier-mâché technique will become an indispensable attribute of boys' battles.
Impressive night hunter
Let's start with the most time-consuming option. To work you will need:
Be patient and get started:
Work begins with the formation of the owl's frame. Pipes that serve as claws are fixed onto the plastic canister with self-tapping screws. Cone-shaped shapes from the top of plastic bottles placed on the pipes with their necks down will help to give them volume. Part of the 5 liter container plays the role of an owl's breast.
When some of the parts are ready, they begin to cover the owl's paws. Having previously pierced the elements of the owl with an awl, the feathers are fixed to a plastic frame with wire.
The next stage is the torso. Usually the back of the bird is decorated with feathers first, then the sides and belly. The owl's back is left open for further fixation of the wings from plastic bottles.
In order for an owl to sit on a branch, it will need strong claws on its feet. The part is made of wire, which is decorated with a corrugated pipe. When constructing the shape, space is left between the fingers for the PVC pipe. This will give the owl additional stability. The wire part of the claws is clamped between the pipe and the bottle and secured with electrical tape or tape.
The basis for the bird’s head will be a fragment of foam plastic; the optimal thickness is 10 cm. Cutting out the desired shape will be easy with a stationery knife. The top of a 5 liter plastic bottle will help you create a voluminous nape.
The head is covered with fragments from plastic bottles. The eyes are framed with two rows of small feathers using Moment glue.
The head is attached to the body with self-tapping screws and proceed to the formation of the wings. Chain-link mesh is used for the frame. The optimal cell size is 25x25 mm. Main stages of the process:
It is preferable to paint an owl from a plastic bottle with aerosol paint, which goes on in an even layer. The areas around the eyes are highlighted with a different shade. There are many options for eye design; in our case, they are made from ready-made beads. The final touch is mounting the wings and tail onto the rest of the body.
Such an owl will successfully participate in an exhibition of folk crafts.
Simplified version
The following master class will help you make an owl with less time and effort. For creativity you should prepare in advance:
Owl made from plastic bottles master class:
Finally, the remaining elements are treated with paint and the owl from a plastic bottle is ready to take up residence in the garden.
By choosing different categories of difficulty, you can make an original bird within a day or by spending more time and effort, but the result will impress everyone around you.
Another unique design option for the nocturnal predator is presented in the video:
Source
Decorative crafts from plastic bottles for the garden: ideas with photos
It’s nice to have a dacha, and if it’s also beautiful, then it’s a hundred times more pleasant. As you know, you won’t surprise anyone with crafts made from plastic bottles. But such decorative elements are practical, inexpensive and beautiful. You can make bird feeders from plastic bottles, which will be a wonderful decoration for your garden. Large bottles and containers can be an excellent material for exclusive flowerpots.
Small colored bottles can turn into ever-blooming plants that will never wither. And if you have a large number of bottles, you can “plant” a tropical palm tree in your dacha. Plastic is very versatile: a little imagination and you will turn it into an exclusive decoration for your dacha.
Owl made from natural materials
In the world around us, you can always find materials for creativity that nature gives us completely free of charge. Children often make crafts from natural materials in kindergarten or school. This is a great activity to develop your child's sensory skills. Doing this kind of work is a pleasure.
Owl made of pine cones
For such crafts we need fir cones (pre-dried). They will serve as the basis and body for the owl, but the remaining parts can be made from anything. The work will require good wood glue, natural materials and additional decor.
Felt is an excellent material for arts and crafts.
Decorative panels
Panel painting is a labor-intensive type of activity. However, the time spent and hard work will bring great success. Panels made from natural materials will richly decorate your interior.
Wooden owl
Wood is an excellent material that can be found everywhere. The most amazing thing is that for crafts, unwanted wood cuts, twigs, edged blocks and even bark are often used. Let's consider several such options.
From wood cuts
For this craft you will need wood cuts of different sizes. A large blank is suitable for the base (body) of the owl, and small ones for the eyes. The wings and beak are made from wooden pieces. For the eyes you will need plastic bottle caps with pupils painted on them. All parts are connected with nails, the gaps are glued with PVA glue.
Such an owl can become the basis for an entire composition.
Owl from saw cuts and logs
The head is made from saw cuts, and the body is made from logs and bark. We glue everything with glue suitable for wood. The beak can be made from pine cones or felt.
Such crafts can be an excellent decoration for your summer cottage. And some even play the role of a scarecrow.
Craft owl from plasticine
An owl from plasticine can be made in several versions. We would like to invite you to make crafts and appliques. Now we will tell you about them.
When making an applique, we will need to print out a drawing of an owl on cardboard. Using a knife, cut off pieces of brown or black plasticine and roll them into small feather-shaped sausages. Cover the owl's body with feathers, starting from the bottom.
Use the same technique to make the beak and legs.
The first craft is ready.
Now let's start sculpting the owl figurine. Roll two balls, one should be larger than the other. Make them the body and head of an owl. Our preparation is ready.
Cut out 2 triangles and attach them to the ears. Let's roll two more balls of white plasticine and make eyes out of them. Let's flatten them a little and attach them to the head. Roll out the pupils from black plasticine and attach them to the eyes.
The next step is to create the beak and wings. Roll out the plasticine and cut out the wings and beak with a knife. We fasten everything in place.
We cut out the legs and install the owl on them. Now the second owl is ready.
Little owls
Wood can be either the main or secondary material. We use a cut of wood as a base.
Button eyes
For small wooden owls, you can make eyes from different materials, including buttons.
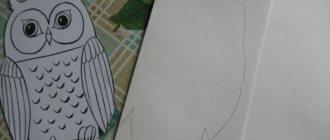
Paper owl
Paper is an affordable and easy-to-work material that can be used by many.
Applications
Children really enjoy making applique. This is not only an interesting activity, but also very useful. Working with your hands develops fine motor skills of the hands and fingers. For this work you need to have paper, scissors and glue.
A great activity to spend your free time. Applications can also be voluminous. But this activity is more suitable for adults.
Applications using quilling technique
Quilling is translated as paper twisting. This technique involves twisting strips of paper to create chic compositions. It is quite common and beginner handicrafts can easily master this art.
To work with the quilling technique you will need:
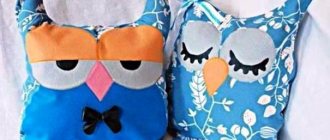
Felt owl
Felt is a very popular material among needlewomen. It has a lot of advantages:
Toys. Soft decorations
To make such toys, you need to have hand sewing skills.
Draw the necessary details on paper. Transfer to felt. Cut it out. We sew it together, filling the inside with sandwich. We decorate the finished toy.
Felt handbags
What could be nicer than receiving a stylish felt handbag as a gift? Little fashionistas will especially appreciate this gift.
The handbag is sewn like a toy. We cut out the necessary parts and sew them together using special fittings. The edges do not need to be overlocked or hemmed, which simplifies the execution technique. Also, don't forget about the straps.
Here are examples of how to make an owl craft with your own hands. Using these examples, it's easy to create a wonderful owl decoration for your home or gift. Imagine and you will succeed.
Source
Shampoo Bottle Owl
When making crafts to decorate your garden plot, various plastic containers from household chemicals will be useful. Most often, plastic containers are simply thrown away, but original crafts can be made from them.
For this craft you will need the following:
- container for shampoo or detergent;
- felt in brown and gray colors;
- scissors;
- super glue (hot glue).
Making this toy will not cause you any difficulties. Invite children to take part in working on a homemade owl - they will be interested not only in the process itself, but also in joint creativity.
To make the felt parts even and identical, first make templates from cardboard. Cut out pieces from material of different colors and glue them to the bottle.
You will be surprised how your garden will be transformed, decorated with such bright crafts in the form of a wise owl. And the children will be proud that they were the ones who took a direct part in the transformation of the plot.