In this article you will learn how to make a little fairy costume for a New Year's party with your own hands.
On the eve of the New Year holidays, many mothers have a question about what costume they can make for their daughter so that she is satisfied with her appearance. In addition, you won’t always surprise little fashionistas with a princess or snow queen outfit. They want to look modern, in the style of cartoon characters. For such a girl, a fairy costume may be suitable. Let's find out in detail how it can be made from scrap materials.
How to make a New Year's Winx Fairy costume with your own hands?
All fairies love outfits made in the latest fashion. And the Winx Fairy also dresses stylishly. Her attire consists of:
- pink dress
- Wings of the same color
- Shoes to match the outfit, high knee socks
Winx Fairy costume for girls
You can sew a dress with your own hands. To do this, prepare the following tools and materials:
- Satin for the top of the product
- Tulle for a skirt
- Threads, needles, scissors
- Sewing machine
Top pattern for a Winx Fairy costume
How to sew a dress?
- First, make a pattern for the top and flared skirt on paper.
- Transfer the cut details to the material, and to make the skirt fluffy, make several tulle underskirts.
- All that remains is to sew the details of the top, and assemble the upper part of the skirt, the petticoats onto the elastic belt.
- To design an outfit, you can use ribbons, brooches, fabric flowers, etc.
Wings for a Winks Fairy costume
How to make wings yourself?
- To make fairy wings beautiful, all you need to do is take wire, bright nylon tights, glue, and glitter.
- Then make the desired wing shape from the wire. And carefully pull the tights on top.
- Dip a brush into glue, draw a pattern on the surface of the wings, then sprinkle the pattern with glitter.
Completely finished suit in 1 hour
- Tutu skirt.
- Cape - dress.
- Wings.
- Shoes.
- Decorations.
We will need: for a cape - a dress - a satin cut, where the radius of the circle is the desired length of the dress.
Cape - dress
- For the cape, take a green satin fabric - 1 by 1 meter and fold this square in half and in half again and cut off the bottom so that you get an arc. It turns out to be a quarter circle.
- Take the T-shirt and attach it to the corner, folded in half - this is the neck of the future dress, using chalk or soap, measure the size of the neckline, as in the photo.
- On the second side, turning the T-shirt horizontally, mark the location of the sleeve cutout.
- Using the marked measurements, we make a semicircle for the neck and sleeves. Let's cut them out.
- We draw petals along the bottom of the semicircle of the dress so that there are so many of them without halves, or we draw half a petal on the side, but cut off not half.
- We glue the bottom of the dress with a thread of sequins; for a green dress we take golden or yellow ones. We glue it well so that the bottom of the fabric does not fray.
- We decorate the neckline by cutting off a strip of tulle and gathering it into strings; it should look like rain. Glue it onto the fabric around the neck, press it with your finger and hold it so that it grabs.
Tulle skirt
Take an elastic line and for a girl 3-4 years old - 3 meters of light green or yellow tulle.
Cut the tulle into strips and collect these ribbons on a needle with an elastic band. It should be a fluffy skirt. When everything is assembled on the fishing line, tie a knot so that your daughter can put it on.
For wings
Required: aluminum wire covered with insulation - 4 m, masking tape - 5 cm, glue, tulle, elastic bands - 50 cm for attaching the wings..
- It is important to try on the size of the wings so that they do not turn out too big or too small. The guideline could be a piece of paper.
- We make them according to the desired shape, for example, triangles. It is important to make the upper part of the 2nd wing, and then the lower one. Ask your future fairy or butterfly for advice, what kind does she want?
- Cut out a shape for the wings from tulle, making allowances of 1-2 cm so that it is easy to wrap around the wire and glue.
- Connect the parts of the wings with glue and press, when dry, wrap with masking tape.
- We trim it with tulle braid.
- At the junction of the wings we glue elastic bands on which our wings will be held. The harnesses must be firmly glued.
- We make another tulle braid to glue around the perimeter of all the wings.
Belt
Satin ribbon 5 cm - yellow. We make flowers from fabric or buy ready-made ones and glue them to the belt.
Make a hairpin in the same way.
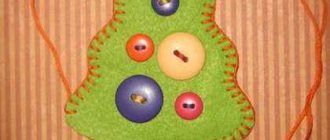
Shoes
We choose green felt, thickness - 3 mm, size A3.
- We take the child’s foot and trace either the insole of the shoe and apply it to the material, tracing the patterns. Be sure to allow an allowance of 0.5 cm from the edge. Strip height 5 cm.
- Measure the perimeter of the resulting part, make an overlap of 5 cm.
- Before sewing, we lay it out and the overlap should be about 4-5 cm. We sew the slippers after trying them on the child, pinning them in front of the pin.
- Sew the sides of the slipper with a slip stitch.
Make a pompom from threads
- Cut half a disk out of paper, then lay a thread inside the arc - this is for collecting.
- Wind white threads around it. Tie the bottom thread so that the threads do not fall out; the more threads are wound, the more magnificent the pom-pom.
- Cut along the edge, the side of the threads. Cut off the protruding threads of the pompom. We thread the remaining thread into a needle and stitch the overlap of the slippers.
- Trim off excess threads.
We decorate existing shoes or sandals with butterflies cut out of paper or made from a plastic bottle.
Headdress
Tinker Bell does not have any headdress, but you can make your own, for example, take a light hat and add organza to match the dress and a flower or leaf.
Crown or tiara
If you decide that you will have one, then here you will find many options for making it. From a plastic bottle to a beaded version. And this article describes in detail how you can crochet a crown and attach it to a hoop or hairpin.
If you choose a bun as your hairstyle, then around it put a crown crocheted from threads to match the dress or gold, like the pollen of the Tinker Bell fairy.
How to make a Flower Fairy carnival costume with your own hands?
An outfit for the Flower Fairy would be a beautiful fluffy dress or a top and a stylish skirt. If you embroider the dress yourself with flowers that you make yourself from multi-colored satin ribbons or bright pieces of fabric, then the dress will look advantageous against the background of other holiday dresses. To decorate your hairstyle, you can make a wreath of paper flowers. And make the wings from wire, beautiful guipure fabric.
Beautiful costume for a girl - Flower Fairy
Top for Tinker Bell costume
There is nothing complicated here, we take a piece of lycra, fold it face to face, take a suitable T-shirt for the child and trace it directly over the fabric. We immediately model it - make a one-shoulder top. We process it on an overlocker, while grinding it down. The shirt is almost ready.
We cut out facings for the neckline and armhole. Fold in half and iron.
Next is another one of my problems. I decided to put an Epaulet on the shoulder of the top. I took the remains of the gabardine crepe, cut out a rectangle, and extracted the shape of the leaves from it.
By the way, here in the photo below you can see how best to process the transition between the leaves; do not lay the line at an acute angle, but so that it runs as if perpendicular to the cut. The skirt is the same. After notches along the perimeter, with this stitching, the part will fit better after turning it inside out.
We take double-sided interlining and cut it to the size of the part or a little smaller by a few millimeters. We turn the part inside out and put it inside. Iron it. It turns out like this. Small creases between the leaves need to be straightened immediately after turning the part inside out. And also make notches as close to the stitch as possible.
Next, we make leaf veins on the epaulette in the same way as on the skirt, and sew them to the Tinker Bell top. From the remnants of the satin ribbon I made droplet-shaped petals, carefully processed the edges over the candle, not until they were black), they bent a little and took on a concave shape. Then I sewed them with monofilament to the top. It turned out so airy and unusual.
How to make a forest fairy carnival costume with your own hands?
The Forest Fairy outfit can also be in the form of a dress, top, or skirt. Let's look at the second option - how to make a forest fairy outfit from a top and skirt. You can use a ready-made top, but for the skirt you will need:
- orange and green satin fabric
- elastic belt
- thread, needle, machine
Costume for a girl - Forest Fairy
How to sew a skirt?
- Cut the orange satin into rectangular strips.
- Finish the edges of the strips with a zigzag to prevent the fabric from fraying.
- Carefully sew the clapti to the elastic waistband.
- Cut out large petals from green satin and also stitch them along the edges so that they do not fray.
- Sew the petals to the belt, decorate the outfit with flowers and leaves.
Fairy costume options for girls
You can borrow an image to create a masterpiece from fairy tales, cartoons or even movies. There are many options, but the basic elements are similar for all, only the colors change and details are added.
You can choose the following options:
- Forest Fairy. Suit in green color, suitable for the image of nature.
- Fairy from the cartoon Winx. Little girls really like it.
- Mistresses of Winter. Add tinsel, glitter and choose fabric in blue shades.
IMPORTANT! To be different from others and conquer everyone with your uniqueness and beauty, add your own decorative jewelry to your costume. Your imagination will help with this.
How to make wings for a Fairy costume out of paper with your own hands?
If you have papyrus paper, then making wings for a Fairy costume will not be difficult. Prepare in advance:
- Wire - for the frame
- Scissors, glue, markers
- Tape
How to make wings from paper?
Progress:
- Come up with the shape of the wings and make it out of wire
- Wrap this wire with ribbon to make the wings look nice
- Carefully cover the frame with papyrus paper
- Decorate the product with drawings and appliqués
Outfit options
There are many different fairies . Adults can hardly remember the names of the cartoon heroines of the Winx Club, but girls adore these sorceresses, because they have a kind heart and they always oppose the evil character, and also have a sense of style.
Since there are six fairies in the Winx Club, and they change their outfits in almost every frame, parents can easily choose one of the outfits they like: Stella, Muse, Bloom, Layla or Flora, and make it from scrap materials.
Fairy Winx
Modern cartoon fairies do not wear complex hairstyles and fluffy dresses, so a costume for a fairy can be made from a girl’s everyday wardrobe . Elements of the outfit can be:
- a bright T-shirt or top with rhinestones or other decor;
- short shorts;
- leggings in bright colors;
- colored knee socks or fishnet tights.
Things need to be decorated , correctly arranged in color and, if desired, complemented with a fluffy tutu skirt. To make it you will need:
- two colors of tulle - ribbons 15 cm wide and 22.5 m long;
- elastic for belt;
- centimeter;
- scissors;
- glitter hairspray:
- glue gun;
- rhinestones, beads, stones - for decoration.
A skirt made of ribbons of different lengths, which can be alternated - one or two, will look original. The result will be an asymmetrical bottom of the product.
DIY fairy wings made of tulle
Any mom can make these wings at home if she puts in a little effort. They will need:
- A small piece of tulle
- Wire
- Silicone glue
- Ribbon
- Scissors
Do-it-yourself tulle wings for a little Fairy
Work progress:
- Make a frame, wrap it with tape
- Then glue the tulle onto the finished structure with silicone glue.
- Carefully trim off any remaining fabric
- Make a glitter design on the wings
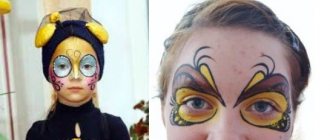
Wings like the Winx fairy
- Make a wire frame, 2 upper wings and 2 lower ones. We wrap the fastening points with electrical tape or tape.
- Glue white fabric to the wings. Having cut along the contour, leaving an allowance of up to 1 cm, we sew it around the wings.
- Draw the outline of the pattern onto the fabric with a pencil.
- Then we heat up the wax and apply along the contour of the design + spray so that the contour does not spread. We apply it in places where there will be glare and white colors. Let it dry.
- First moisten the cloth with water. We paint the wings using acrylic paints or fabric. Let the paint dry.
- Lay newspapers under the dried wings and on top in several layers. Iron them with a hot iron on top of the newspapers - this will remove all the wax.
- We paint unfilled areas with white paint.
- We fasten all 4 wings together and sew fastenings from underwear elastic.
Video master class on making Winx fairy wings - Stella
How to make Fairy wings from wire and gelatin?
If you want to make wings from gelatin, then know that you cannot make them big. These wings are suitable for toy Fairies.
How to make wings?
- Soak gelatin at the rate of: 1 spoon of gelatin, 2 spoons of water.
- Make the frame of the wings from wire.
- Take a regular document file and grease it with vegetable oil.
- Place the frame on the file and use a brush to place gelatin inside the wing so that it covers the borders of the frame.
- Wait until it hardens. Carefully remove the file from underneath.
- That's it - the wings are ready.
How to do a hairstyle like the Tinker Bell fairy
This hairstyle will suit medium to long hair.
- Tie a high ponytail, put a hair donut on it, if you don’t have one, cut off the end of the sock, roll it up and put it on the ponytail in the same way.
- Spread all the hair over the donut, covering any empty spaces. Then put an elastic band on the base and, turning the edges in a circle, secure with pins.
- Fairy hairstyle is ready!
Video on creating a bagel, hairstyle like the Tinker Bell fairy:
How to make a crown for a Fairy costume?
Crown for a fairy - do it yourself
In order for the crown to go perfectly with the Fairy costume, you need to select its shade to match the outfit. A wire crown decorated with beads, beads, and sequins will look beautiful. In order not to lose the accessory during the holiday, you should secure the crown to your hair with hairpins.
What costume does the fairy Tink wear?
Cartoon lovers will be looking for a DIY Tinker Bell fairy costume (photo) to make for their princess.
This costume does not have a strict age limit, so schoolgirls and kindergarten visitors can try it on.
This is a green strapless short dress, the slippers with white pompoms on the front are also green.
She also has transparent wings - 4 pieces and a bun hairstyle made of wheat-colored hair.
She is all glowing with magic.
What can mothers do for girls?
- To understand what is most important and beautiful in the opinion of its owner in a suit: a dress, wings, a crown or a magic wand - you need to emphasize it by focusing on it.
- Perhaps your girl wants to be different, for example a forest fairy or a Winx fairy.
- Then the costume version will be different. To do this, look at the photo of the heroine and work on a new costume.
We approve the image and costume with the main person. Ask her what she really wants to be?
And only then, depending on the answer, select suitable ideas. To do this, draw or show an approximate version of the costume.
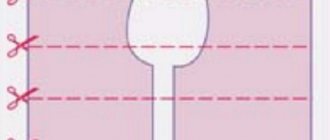
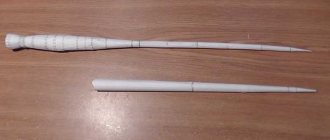
How to make a Fairy's magic wand out of paper with your own hands?
Fairy is a fairy tale character. And what is a fairy tale without miracles? And miracles happen when the Fairy waves her magic wand. In order for the fairy-tale character costume to be complete, you will need to make a wand. Let's find out how to make it out of paper.
Magic wand for the Fairy
Materials, tools for making sticks:
- velvet pink paper, red colored cardboard
- scissors, glue, ribbon for decoration
Progress:
- Cut out two hearts from red cardstock.
- To make the magic wand look beautiful, make two more smaller hearts from different paper.
- Glue together the main part of the stick from velvet paper.
- Decorate it with ribbon and glue a heart at the top, as in the image above.
Additional accessories
In addition to the costume, for the image of a sorceress you need to make a headdress . Some decoration options:
- cap;
- hoop;
- hairpin decorated with flowers or leaves;
- crown.
You can make a chic crown from cardboard, decorated with shiny paints and flat stones, wire and beads, and felt.
Making fairy wings
The easiest option is to draw the wings on cardboard or print them using a template. After that, paint by hand or decorate with glitter varnish.
To make creative wings from wire, nylon or tulle for a sorceress, you need to prepare:
- thick wire;
- nylon tights - flesh-colored or another color;
- satin ribbons of different colors;
- acrylic paints in a can;
- glitter and rhinestones;
- glue gun;
- scissors;
- brushes;
- scotch.
Bend the wire to form the outline of the wings using pliers. Connect the ends of the wire together with tape. On each of the wings, leave small ends of wire, with the help of which the wings will be connected to each other.
Place nylon tights on the frame. Tie the nylon at the junction between the wings. Wrap the connection itself with tape. To create a perforated wing, burn holes in it with a match.
Decorate the wings: paint them with paint in a can, paint them with acrylic paints, decorate them with sparkles, glue rhinestones and stones.
You can attach the fairy wings to the girl’s back using rubber bands or satin ribbons.
Delicate translucent fairy wings can be made from wire and tulle. Necessary materials:
- thin wire;
- tulle;
- pliers;
- acrylic paints;
- rhinestones, sequins, beads, sparkles - for decoration;
- elastic band or ribbons;
- glue gun
You can draw the wing pattern yourself or download it on the Internet.
Bend the wire frame accordingly. If necessary, paint the wire. Cut out two tulle pieces for each wing and stitch together so that there is no seam in the center.
Stretch the tulle over the frame and sew in the middle. Attach elastic bands to the central part of the wings, with the help of which the wings will be put on the child’s shoulders - over the costume. Decorate the wings as you wish.
Magic wand
A magic wand is a fairy's constant accessory. To make sticks from ribbons and decor you need:
How to decorate a Fairy costume?
The smallest, most insignificant additions to the Fairy's outfit make the costume complete. Thanks to various accessories, the image takes on a unique look.
Fairy Costume
- It is enough to sew beautiful rose flowers, daisies made of paper or other material onto the dress, and you will see how the costume will be transformed.
- Wings decorated with all kinds of patterns make the Fairy's image more natural.
- Shoes can also be decorated with leaves, flowers or beautiful accessories, such as colored stones or brooches.
Instructions for creating a costume
When all the materials are prepared, you can begin making the main elements of the costume.
Tulle skirt . It is better to choose a wide elastic band that matches the color of the future skirt. We measure the length of the elastic according to the girl’s waist and sew it together. We pull the finished belt over the back of the chair. Next you will need tulle of one, two or three colors. The number of shades depends on the author’s idea. Tulle must be cut into ribbons about 15 cm wide and about 50 cm long. The length can also vary.
Advice. It is better to make the ends of the tulle segments beveled. Then the skirt will look fuller.
Now let's assemble the skirt. To do this, we fix each piece of fabric with a knot on an elastic band, alternating shades. The skirt is ready!
Wings . First, let's make a pattern. We draw the chosen shape of the wings on cardboard. Now bend the wire or cord along the contour. We wrap the junction of the ends of the wire with tape.
If there is a transition of the wings from large to small, then you can fix the fold using thread, nylon or silicone. We stretch the fabric over the finished structure. To do this, cut off the “legs” and socks from tights or stockings and tie one end with a knot. Now we stretch this blank onto the frame of one wing. We tie the edges of the stocking into a knot using thread. We place the resulting knot on one side - closer to the back, so that it is not visible. We do the same with the second wing.
The wings can be attached directly to the suit or additionally attached with elastic bands to be worn on the shoulders. To make elastic bands, take a wide satin ribbon in the color of the wings, fold it in half and sew it together. We pull the elastic band inside. She should pull the tape a little.
To fix the elastic, sew a piece of felt and sew elastic bands to it. Now we sew this blank directly to the wings themselves. On the outside, the place where the wings are fastened can also be decorated with a felt overlay decorated with flowers or beads.
Now let's start with the design. Here you can give free rein to your imagination. Rhinestones, sequins, beads, sparkles, beads, and a volumetric outline will be used. All small parts are glued with glue.
Advice. Use a cardboard pattern of wings as a rough draft. Draw your designed design on cardboard, place a wing on top and start decorating along the outline.
Magic wand . To create a magic wand you need to make a star-shaped blank from felt. To add volume, you can stuff the star with cotton wool or synthetic padding. Now we place the resulting blank on a wooden stick.
The pattern on the star is embroidered with beads and sequins, and New Year's rain or flowing ribbons of various colors can be attached to the base.
Headdress . There are many options for fairy headdresses. For example, you can decorate an ordinary children's hairband with ribbons, flowers or tinsel. According to the diagram, you can make a small crown from wire and decorate it with beads and beads. In children's stores, closer to the New Year holidays, small tiaras with fastenings in the form of a headband or scallop begin to be sold.
The most touching image for a girl for the New Year is a sorceress or fairy. A carefully thought out fairy costume, made by yourself, can become a real masterpiece.