Heating appliances operate continuously during the cold season, distributing heat throughout the apartment. Since Soviet times, radiators have been used to heat rooms and for more prosaic needs: they were used to dry clothes and clothes.
Clothes dryer with battery
A home-made clothes dryer on a radiator is compact and can be easily removed if necessary. The lightweight design successfully replaces bulky balcony counterparts, where drying things in winter is difficult and time-consuming. Near the radiator, laundry will dry faster and will not take up much space, as is the case with large floor drying structures.
Features of dryers
You can dry clothes directly on the radiator. It's convenient and fast. True, there is little benefit from such drying - neither for things, nor for the radiator.
Dryers for heating radiators
Advantages:
- speed of the process.
Flaws:
- the fabric dries out too much when in contact with hot pipes;
- Do not dry clothes and linen made from synthetic materials;
- stains on the surface of batteries;
Important: drying clothes on oil radiators without using a dryer is strictly prohibited.
You can hang some clothes on the radiator: at most a blouse or shirt and several pairs of tights or socks. There are more problems with bed linen. If the pillowcases fit completely, the sheets and duvet covers will hang down to the floor. You will have to dry them in parts. After such merciless drying, all the laundry will be hard and unpleasant to the touch - this is how too hot air acts on the fabric.
Ready-made clothes dryer for battery
For the reasons listed above, the best option would be to dry clothes in close proximity to the radiator using a dryer placed nearby.
Ready-made battery dryers are a structure consisting of a rectangular frame and two holders attached to the battery in the manner of hooks. Inside the frame there are tightly stretched strings.
This dryer is not designed for large amounts of laundry - maximum 5 kg.
Drying things on the dryer
Advantages:
- clothes and linen dry quickly due to the constant flow of dry warm air;
- the design takes up little space and is suitable for rooms of any size;
- easy to install and does not require additional fasteners, unlike wall and ceiling dryers;
- light weight;
Flaws:
- the capacity of the structure is greatly limited by the width of the radiator;
- not intended for large quantities of linen and things such as sheets, duvet covers and curtains;
- the clothes dryer is located close to the floor, some things will have to be folded so that they do not hang down;
- proximity to the floor causes dust to quickly collect;
- availability of clothing and linen for children and animals.
Floor dryer option
Important: synthetic items must be hung further from the battery, otherwise they may lose their shape.
Battery-powered clothes and shoe dryers, what types are they?
There is no point in jumping into work without seeing alternative options. Let's evaluate them together.
It is easy to make a hanging dryer from thick wire. Of course, it will have to be painted several times so that the linen does not get dirty. Additionally, you can put a PVC tube on the wire. The basis of the design is two hooks and a shelf of several lines of wire. In the absence of welding, the joints can be fixed with thin copper wire and wrapped with white electrical tape.
If we are talking only about drying shoes, you can make special hooks for each shoe. Their number is determined by the length of the radiator.
Nothing prevents you from making a structure from wood. It is convenient to screw self-tapping screws into the wood, which secure the required number of rows of ropes.
The dryer is very simple: two hooks made of slats are connected to each other by a crossbar. The frame with ropes is held on hangers. In my opinion, the structure should be strengthened with an inclined stop between the horizontal bar on the hooks and the far edge of the frame.
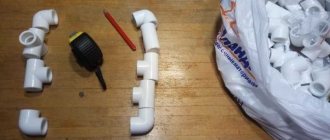
This original dryer is made of two boards and transverse tubes. The items mentioned can be purchased at a building materials store. Pipe plugs are easy to pick up at a furniture hardware store.
Homemade dryers made from polypropylene pipes are popular. They are suitable for drying clothes and shoes.
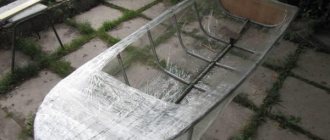
If the issue of drying clothes is urgent, a large spatial dryer is possible, through which hot water circulates. The structure is connected via flexible hoses through two taps. For the summer it can be detached and put away.
How to make your own dryer
DIY designs can come in a variety of shapes and sizes: from the simplest to the most complex. It all depends on imagination and skills in handling tools. The simplest option is two smooth boards with ropes stretched through the holes. This dryer can be used at home and outdoors. It can be placed next to the battery or hung on brackets from the wall.
Floor clothes dryer
Structures of more complex types are assembled from spacers, PVC pipes, etc. Dryers are made in the form of a lattice and mounted into the wall with construction hooks. This approach is the most labor-intensive, and the installation process can easily damage the wall covering. While the paint can be renewed, replacing chipped tiles will be more difficult.
Below we will discuss several options for radiator dryers.
Features of working with polypropylene pipes
Plastic tubes of different diameters are easy to process. A reliable connection is ensured by accessories that are also on sale - corners, splitters, clamps, clamps and others.
Clamps, clamps, angles, tees and other accessories for plastic pipes
Any product can be made from pipes, like a “construction set”. Then, if necessary, it can be easily disassembled for transportation or storage. And when needed, it can be easily reassembled. One of the main tools that you will need to purchase for the job is a pipe cutter (see photo below).
Tool designed for cutting PVC pipes
In addition, a special soldering iron for plastic pipes will be useful, with the help of which tight connections of parts with corners, tees (fittings) and other accessories are obtained.
Apparatus for heating and welding plastic pipes
Before you make a clothes dryer with your own hands from plastic pipes, you need to prepare a sketch, accurately calculating the dimensions of the product and the pipes from which it will be assembled. Then you should take measurements with a tape measure, make marks with a pencil and cut off the required pieces of material.
Installation of fitting and angle on a plastic tube
Wooden box-shaped structure
This option is compact and simple, can be easily removed if necessary and does not take up much space. The lightweight design is made taking into account the size of the radiator. Before starting work, you need to measure the height, width and thickness of the battery.
Clothes dryer in the form of a box
To make a box with your own hands, you need two smooth boards 10 cm longer than the height of the heating device, as well as a set of pipes of smaller and larger diameters for installing the crossbars. There is no need to fuss with pipes at home, wasting time on cutting. They can be bought at furniture stores. There they will quickly be cut into pieces of the required size.
Materials for making a dryer
You will also need wooden dowels. To assemble the structure, you will need a screwdriver and drills of different diameters for woodworking.
How the workflow goes:
- Mark the holes for pipes and dowels on the wooden planks.
- First of all, it is necessary to drill recesses in the upper part of the boards specifically for dowels. Do this carefully so you don't accidentally drill through the wood. The holes for the front crossbars of the dryer can be through. Their dimensions must correspond to the diameters of the pipes.
Drilling holes
- The last thing you need to do is drill holes for thin pipes that rigidly fix the entire structure at the top and bottom, so that the boards do not move apart and are at the same distance from each other along the entire length.
- After the preliminary stage, it’s time to assemble the entire structure. Lubricate the dowels with glue (you can use regular PVA) and insert them into the holes at the ends. Place tubes of a suitable diameter on the dowels and align the wooden parts of the dryer with each other.
- Through holes are used to install the remaining pipes. To prevent pipes from falling out or sliding, secure them with flanges purchased from stores specializing in furniture fittings.
- To avoid accidentally injuring yourself on the elements protruding from the sides or tearing your laundry on them, install plugs or wooden balls. This is not only additional protection, but also decoration.
Finished clothes dryer
The fully constructed dryer is placed on top of the radiator. Sometimes the faucet head gets in the way; in these cases, before assembly, you need to cut an additional hole for it.
How to choose a ready-made option
If you decide to buy a finished product, it is important to consider several useful recommendations:
| Design Compliance | Not all such products are the same; some of them are made for a certain type of radiator and are not suitable for others. Be sure to take this nuance into account, since returning the product after unpacking can be problematic |
| Element strength | On the market you can find options whose price is low, but the quality leaves much to be desired. Make sure that the slats do not bend from the slightest effort, otherwise you will hardly be able to use the product normally. Also pay attention to the quality of the parts; there should be no visible flaws or manufacturing defects. |
| System size | Options may be of different sizes; you must decide for yourself for what purposes the dryer will be used and what size structure will be optimal in your case. Of course, it makes more sense to purchase more options; as a rule, the system will always be filled with some things |
Important! Sometimes purchasing two of these items will make more sense than purchasing a hanging dryer or other expensive design, so weigh the pros and cons and decide what you want to end up with.
This system is not only easy to use, but also attractive in appearance.
Wooden structure made of beams and ropes
This option is somewhat simpler than the previous design. To make a dryer with your own hands, you will need a 20x30 piece of timber, a coil of strong rope, and self-tapping screws for working with wood. In addition to the self-tapping screw, you need to prepare a screwdriver and a hacksaw in advance.
Assembly instructions are as follows:
- Measure the radiator parameters and draw a scale sketch of the future dryer. The structure will be attached to the battery using hooks. External crossbars act as a support, making the product more stable. Make sure that the width of the supports matches the dimensions of the radiator.
- The appearance of the dryer is simple - it is an ordinary frame with twisted screws that protrude slightly outward so that you can hook a rope onto them and pull it like strings. The design only seems flimsy in appearance, but in reality it is very reliable.
- Sand the wood with fine-grain sandpaper to ensure a smooth, pod-free surface. It's very simple and won't take much time. Carry out sanding work wearing thick gloves and a respirator to prevent wood dust from getting into your nose and mouth. If desired, make the sharp rectangular edges of the timber rounded so as not to accidentally injure yourself on them. This is especially true if there are children and pets in the house.
- Assembly of the frame is simpler than in the previous version. Cut the timber into parts of the required length and assemble first the frame, and then the supports. When both parts are assembled, connect them to each other.
- Wood is a material vulnerable to water. Cover the surface of the finished structure with a layer of a special composition that protects the wood from moisture. The dryer will look beautiful and last longer.
- Wait until the clothes dryer is completely dry and stretch the clothesline tightly between the screws screwed into the frame. Now you can hang this frame on the radiator.
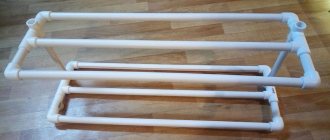
Dryer, in the form of a wooden frame
Battery dryer made of plastic pipes in bookmarks 2
Such a dryer will be useful in absolutely every home, especially for those who have small children. Since they need to constantly dry diapers and undershirts. The dryer is made in 15-20 minutes from polypropylene pipes. This is not a stand-alone design; it is designed to be attached to an existing heating battery. But there is a plus here that, if desired, you can hang the dryer on all radiators and dry clothes or shoes on them. It looks very aesthetically pleasing:
For manufacturing you will need pipes 20-25 mm in diameter.
Tees and 90 degree angles.
First you need to measure the battery. And decide how the dryer will be attached to it, since all batteries are different, and you may have to make the design differently.
We begin soldering with a soldering iron for polypropylene pipes. You can do without such a soldering iron by using a portable gas burner.
We ended up with two sides of the dryer. Now they can be tried on the battery to determine the size of the longitudinal pipes.
Now we solder the middle pipes.
Finished dryer with three poles.
Before this I made an earlier model with two bars.
Folding version
This DIY option is best suited when the battery is recessed into a niche. The dryer is attached to the wall above the heating device and unfolds and folds when necessary.
You will need:
- plank or slats made of wood (future frame);
- thin but durable wooden rods;
Wooden slats and rods
- plywood or drywall as a base;
- furniture hinges (1-2 pieces);
Furniture hinges
- folding mechanism;
- hooks for drying towels (you can use furniture handles instead);
- fasteners;
- paint (acrylic or water-based);
Folding mechanism
Having prepared the materials, it’s time to get down to business:
- Drill holes in the side bars of the frame corresponding to the size of the rods. Make sure that the rods are the same length, secure them in the holes. For convenience, sharpen the ends of the rods a little. After this, you can completely assemble the frame using regular nails.
- The base should be 1-1.5 cm larger than the frame on all sides. Fasten both parts of the structure using one or two hinges, depending on the dimensions of the dryer itself.
- Queue for coloring. Paint the structure with one color or use a combination of several shades. Wait until the paint is completely dry before the next stage of work.
- Install a clamp at the top of the dryer and a folding mechanism at the sides. Here it is important to accurately calculate the opening angle. It must be strictly 90 degrees.
- At the bottom of the structure, attach hooks in any way intended for small items of clothing (gloves, hats, etc.) and underwear.
- Drill a hole in the wall above the radiator and install the dryer.
Clothes dryer on the wall above the radiator
DIY clothes dryer-hammock in the yard
There are many options for rope dryers designed for outdoor use. One of them is a hammock. The design is portable. If necessary, it can be taken into the house and hung from the ceiling.
To hang a hammock you need two supports, which can serve as tree trunks
Two wooden slats are prepared for the hammock. Drill holes at a distance of 10-15 cm and tighten pieces of cord of the same length. Secure the end of each rope by tying knots.
To hang it on a tree, tie a rope to each hammock strip to form a triangle.