Types of laces
Laces can be classified according to several parameters: shape, length, thickness, material, processing, color. Next we will look at all these classifications.
Let's start with the form. The laces come in round and flat. The first option is often combined with classic shoes, and the second - with sneakers, sneakers, and sneakers. However, some flat laces are combined with Oxford shoes, suits and even very formal clothes such as tuxedos, but it should be noted that visually such models differ from those flat laces that are worn with sneakers. They are smoother and thinner, and sometimes even slightly glossy. In addition, they are almost always waxed.
Simon Crompton, author of the blog Permanent Style, says he wears these flat laces with his formal shoes - and argues that they are better suited for formal shoes than rounded models.
Oxfords with flat laces
The material for high-quality laces is usually 100% cotton. Budget items can be made from cotton with synthetics or pure polyester. Synthetics can be very durable, but laces made from them can often come undone. However, 100% cotton in the composition does not guarantee high quality, since the level of cotton varies within a very wide range. Extra-long-staple and long-staple cotton are valued most highly, since long fibers make the laces strong, smooth, and durable. This kind of cotton comes from Egypt, the USA, Peru and some other countries (it is worth keeping in mind that cotton with medium and short fibers is often grown there).
Long Staple Cotton Shoe Laces
Laces for very formal shoes worn with tuxedos can be made from natural silk satin or barathea. Some models are made of velvet. If you decide to use this type of lace, make sure that the material of the lace matches the material of the bow tie.
Oxfords with satin laces
Oxfords with velvet laces
Of particular note are the leather laces that are often found on boat shoes. As a rule, they are made from the same leather as the upper of the shoe. Such laces are always informal and sometimes they look quite cumbersome.
Boat shoes with leather laces
Thick laces are intended to be worn with informal shoes, while thin models look good with formal and elegant shoes. Universal laces of medium thickness are very common, which can be worn with both Oxford shoes and much less formal boots. However, aesthetes prefer to wear thinner models with formal shoes, which are rarely found on sale and are expensive.
Thick Herring shoe laces
Herring Standard Shoe Laces
Let us add that the laces also differ in the type of processing/finishing. Some of their copies do not undergo additional processing; they are dry to the touch and often a little loose. An alternative to such options are waxed laces - or laces with other types of impregnation. They seem more “put together”, tight, sometimes greasy to the touch (however, tactile sensations vary noticeably). Such laces, as well as laces without impregnation, can be supplied with both formal shoes and informal boots. Choosing one over the other is somewhat a matter of personal taste and preference, but it's worth keeping in mind that waxed laces tend to be less likely to come undone. Sven Raphael Schneider, editor-in-chief of The Gentleman's Gazette, argues that quality dress shoe laces should be waxed.
Wax-impregnated shoe laces
Shoe laces without wax impregnation
LiveInternetLiveInternet
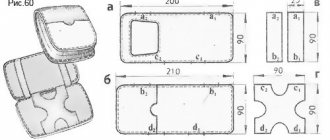
cords Knitting round cord
on the simplest device. My grandmother made this device herself: she drove four nails into a wooden spool (to about the middle) and removed the loops with a needle. Now there are more aesthetic devices for this, they are usually larger than the reel, they themselves are of different sizes, there are different numbers of “studs” on them, and we are offered to remove the loops with a knitting needle or crochet. And this is one of mine, it is larger, it is no longer woven with a lace, but quite a lace, suitable for the handles of a bag. It is done like this. A thread is pulled into the hole of the super device
All nails are wrapped with thread so that the working thread remains outside
The loop on the nail is grabbed (with a needle, knitting needle, crochet - whichever is more convenient for you) so that the working thread is above it. We throw the loop over the nail and through the working thread into the inside of the spool, so that the working thread forms a new loop on the nail.
We knit all the loops in a circle until... to the required cord length
We finish by simply dropping all the loops and tightening the working thread.
Faceted multicolor cord
.
You can use 4 colors, you can use 2, or you can make it monochromatic. Claims for the size and quality of the scan are not for me. The pictures are quite clear, and with excellent vision, you can even make out the text. A simple faceted crocheted cord
(from some Chinese magazine)
More complex crocheted cords
1. Do 2 ch.
p., without tightening the initial loop. Insert the hook into the starting loop of the chain and knit st. b/n, insert the hook under 2 threads located at the bottom right, grab the thread and, turning away from you to the left, pull through 2 loops on the hook, then again grabbing the thread, knit 2 loops, i.e., a column b/n, turning the cord away myself . Insert the hook again under 2 loops from the bottom right and knit st. b/n, turning the cord. Next knit st. b/n, inserting the hook under 2 threads from the bottom right, turning the cord away from you. Knit loosely, without tightening. 2. Another crochet cord MK for knitting the same cord with detailed photographs from LJ Variants of cords on knitting needles Lace on a knitting machine
Method 1. Cast on 3-6 loops.
We install the carriage for tying in one direction only. We knit - it will fit as much as possible. The broaches on the inside will disappear when you pull the lace. Method 2. Lay the thread from left to right, knit a row. Then with your left hand, twist the thread 1 time clockwise around the needles, with your right hand move the carriage to the left, with your left hand twist it clockwise, move the carriage to the right, etc. (taken from here) Hollow round cord on knitting needles
Cast on the required number of loops.
Knit 1 row. Remove the loops from the knitting needle, fold them in half - the edges of the rows are on the right, the fold is on the left. We put 1 loop on the knitting needle from the first half (which is closer to you), the second from the second. And so on until the last loop. We knit the 1st row: knit, from the wrong side, remove the thread before the loop. 2nd row is the same. At the end of the work you will get a cord knitted in a circle. (taken from here) Twisted lace
1.Take two threads, twist them tightly together, secure the ends with knots.
Disadvantages: the twist is not textured and can easily unravel. This cord is called filigree
, and for better fastening, a metallized thread is added to it - it holds the cord in a twisted state. 2. Fasten one edge of the thread, move away (holding the second edge in your hands) the entire length of the thread so that it is taut, and begin to twist the thread strictly in one direction. Twist until the twist is evenly distributed along the entire length of the thread. After that, grab the thread in the middle and, holding the middle taut, combine both ends of the thread (the one that was in your hand with the previously secured one) and release it. The thread itself will twist into a beautiful, smooth and embossed twisted cord. Options: a) one end of the thread is not secured, but another person holds it in the hands, and then they both twist the thread (both, standing facing each other, twist it to the right, or both to the left). This makes it faster and more even. Then one of them (or even a third) intercepts the thread in the middle, and they come together and combine their ends of the threads; b) if you need a fairly short lace, then you can also not fasten the end of the thread, but simply take it in your second hand and stretch the thread. But then the hands must twist the thread in different directions, and this is a skill that requires training. Yes, and then you have to intercept the thread in the middle with your teeth; c) if you need a very long cord, or if you are too lazy to twist it yourself, you can fasten one end, and make a loop on the other and adapt this loop either to a mixer or to a drill. We turn on the tool, pulling the thread, and the technique works for us! Then we release the loop, keeping the thread taut, intercept it in the middle, combine the ends of the threads and let the lace twist. And since such a twisted lace is often decorated with a tassel or pompom, we will immediately learn how to make tassels and pom-poms correctly and quickly
Weaving braid on planks
Flat ornamental cords.
This picture gives an idea of the process And this one gives an idea of the possible results And here are detailed instructions with illustrations And more lessons on this technique 1. Master class from the site “Needlewoman” 2. Master class from the site knitter.spb 3. Master -class from myJane Lace weaving using the Kumihimo technique
Detailed and thorough video tutorial.
It’s strange: my grandmother didn’t know about any kumihimas, but she wove such laces. And not only she... And it was called the “gear wheel weaving technique”... And the middle of this wheel did not rotate, like these Japanese, to show us, unreasonable, where exactly to throw the next thread...
You can make such “wheels” yourself from thick cardboard.
To do this, you need to take a circle with a diameter of about 10 cm and make a hole in the middle with a diameter of about 1 cm. The edges of the hole should be smooth so that the threads do not get caught. You need to make triangular notches along the edge of the disk. Usually they make 32. (Fig. 1), but for starters you can get by with 16. The simplest cord is woven from 4 threads. To begin with, it is more convenient to take 4 different colors. The same cord can be knitted from threads of 2 colors. There are two options: either the same-color threads in the starting position are located next to each other, or opposite. The threads on one side must be tied into a bundle and this knot must be lowered into the hole. The ends of the threads are threaded through the notches so that a cross is formed and the threads are stretched. Now the actual weaving begins. We hold the disk with one hand, and with the other hand we move the threads according to scheme 2. For simplicity, the scheme is usually written as in Fig. 3 Here are drawings with diagrams of patterns, and here the whole process is shown in pictures on a simple device cut out of cardboard (the device is quadrangular, but this is completely unimportant). From the pictures everything is absolutely clear, but those who know the hieroglyphs can even read it. And here and here everything is also very clear. Weaving a cord on a slingshot (or on a “fork”)
This is what this slingshot fork looks like And here’s what the process looks like Here There are also step-by-step pictures, but they are, in my opinion, less clear.
Two-color cords are woven using a double slingshot, and the process itself is here. A cord made of loops
is also woven from fairly thick threads. Simple option Complex option This second option comes out differently on both sides:
Simple two-color cord
Attach 2 dark threads and 2 light threads of equal thickness to a stationary object.
Place the threads in the following order: one dark at the back, the second dark at the front; one light on the left, the second light on the right. Swap the dark lines (interlink) from right to left. BETWEEN the dark threads, one of which is at the back and the other at the front, intertwine the light threads from left to right. Continue weaving, making sure that the dark threads constantly intertwine BETWEEN the light ones from right to left (counterclockwise), and the light ones - BETWEEN the dark ones from left to right (clockwise). If you need to weave a cord of considerable length, it is better to start weaving from the middle. Fasten the threads in the middle and weave one half. Then turn the cord and weave in the other direction. Here is a sample of the cord that I have now woven from shoe laces and photographed with my phone. Cords using the fingerloop (“pulling”) technique.
A very old weaving method that was used throughout medieval Europe.
In Rus', such shuras were called “twitchers”. Using this technique, a wide variety of single or multi-color cords are woven. Here, there is a detailed description of the process. But I'll try to explain it more simply. 8 threads are cut: 4 of one color and 4 of another, folded in half and tied with a knot at the cut ends. In this case, the resulting loops should be approximately the same length. Then we put 4 loops of the same color on 4 fingers of one hand (from the little finger to the index finger) and the other 4 - respectively on the other hand. Now we begin to weave. We change the loops on the index finger of the left hand and the little finger of the right hand: from the index finger we transfer the loop to the little finger by the loop already there, which we then lift with the index finger. That is, the loop from the right hand passes inside the loop from the left hand. They threw it over, slightly spread their arms and stretched the weave. Now we change the loops from the ring finger of the right hand and the middle finger of the left in the same way. The loop from the left hand is thrown over the other. Then the loops on the middle finger of the right and the ring finger of the left change in the same way, and then the index finger of the right and the little finger of the left. Don’t forget to stretch the weave a little after each throw. And everything, everything is exactly the same from the beginning. The result is a round spiral cord
.
Weaving a flat cord
depends on the order in which the loops change their position on the fingers.
And on the direction in which the loops are threaded. For a round cord, the left thread always goes through the top and the right thread goes through it. For a flat one it’s the other way around. The method shown in the pictures below is a method of weaving flat braid. For round - description above. Here are many patterns with samples of weaving various cords. And a few more links to other numerous English-language resources https://fingerloop.org/ (the main site entirely dedicated to this technique) https://www.flinkhand.de/index.php?aid=150&print=1 https://lists .whatwg.org/pipermail/h-needlework-ansteorra.org/2006-March/013777.html https://math.ucr.edu/~xl/san_antonio.ppt#257,2,Slide 2 Cord-braid Cord- aiguillette Cord using knot weaving technique
The main knot of this weaving is very simple, and those who are familiar with macrame know it as a “rep knot”, “brid knot” or simply - brida.
We tie several (at least three) threads into a knot. We fix it on something. The threads can be either one or different colors (but then you need to remember in what order the colors come). We take the outermost thread on the right and use it to tie a knot on the next thread after it, which must be stretched (in the picture, we tie a knot on the blue one with a red thread). Then we tie this (red) thread in the same way on the next thread, then on the next one, etc. This is how the first row turned out: Now we take the thread from the same side where we took the red one (we now have the red one, after passing the row it ended up on the opposite side) and knit the next row with it: “Nail” the second row to the first, so that between them there was no gap, and...weave the next row: This is what happens after just a few rows: Photos taken from here In fact, there are many options for the bridging knot in this technique, and their combinations give birth to amazing patterns and ornaments, for example for those interested - here variants of such knots, and in general on this site all the possibilities of this amazing technique are demonstrated (with video tutorials and diagrams) Cord tied with fingers
1. The ends of two threads are tied into a knot.
After this, take one thread in the left hand and the other in the right. From the thread of the right hand, make a loop near the knot, which is put on the left index finger. The index finger of the right hand is inserted into the loop and a new loop from a different thread is pulled through it. The first loop is lowered from the left finger and tightened to the knot; insert the left index finger into the loop of the right hand and pull a new loop through it, tighten the loop of the right finger again, etc. 2. And this is a more detailed explanation with other illustrations: Tie the two ends of the thread, take one end in the left hand, make loop, passing the thread onto the right hand and raising the index finger, and pull the thread with the left hand. Then, holding the stretched thread with your left hand, insert the index finger of your left hand into the loop located on the index finger of your right hand, grab the thread lowered from your left hand and located behind the loop, and pull it towards you. The minute the left index finger comes out with a new loop, lower the loop from the right index finger, move the end with the knots from the right hand to the left, grab it between the thumb and middle finger, and tighten the knot with the left hand. In the figure depicting the 4th position of the hands, you can see how the index finger of the right hand grabs the thread and threads it through the loop on the left hand; then the end with the knots is immediately moved to the right hand, and the knot is tightened with the left hand. Then the knots are tightened alternately, now on the right hand, then on the left. This is what you get in finished form Pictures from here Variants of cord-braids
(from the book “The Complete Encyclopedia of Women's Handicrafts”, vol. 2) A simple braid of three threads is known to everyone, and these are the patterns for weaving more complex braids. The pattern for braiding from four threads. The patterns for braiding from five. threads 1. The first method 2. The second method (we already know it as an
aiguillette cord
) 3. The third method [Weaving patterns of six threads 1. The first method 2. The second method
A cord of seven threads
. Pin 7 threads with a length of 40— 50 cm and divide them into 2 parts - the left one is one more - start with it.
Place the outermost thread of the left side on the 3 adjacent ones and attach it as an additional thread to the right one. Then place the outermost thread of the right side on top of the other three. Continue weaving, each time placing the outermost thread on top of the three adjacent ones. “Lotus” cord
It is so called because it is woven with one of the many types of Chinese knot, namely, the knot that is commonly called “lotus.” Place 2 crosswise, and secure them with something at the intersection.
You now have 4 ends: bottom (1st and 2nd), top (3rd and 4th). Place the 1st end in a loop on the 2nd. 2nd end - on 1st and 3rd. 3rd end - to 2nd and 4th. 4th end - to the 3rd and pass under the 1st into the loop. Tighten the knot by pulling all ends at the same time. Continue weaving in the same direction (from right to left, counterclockwise) and you will get a round twist cord. Knots can be tied either clockwise or counterclockwise. If you alternate these directions, you will get a cord with a square cross-section rather than a round one. You can weave a “lotus” cord from threads of 4 different colors. By the way, other cords are woven using the same principle: from 3 or 5 ends, as well as a “crown cord” of 8 threads (for this, 4 threads are laid crosswise and attached to the middle). Here is a diagram of the “ crown cord
”
Checkerboard cord
1. Simple checkerboard.
The figure shows weaving with threads of two colors to make it easier to navigate the weaving. But such a cord, woven from single-color threads, looks more impressive. 2. Complex chess. In this figure, multi-colored threads are also shown only to make the diagram easier to read. Chain lace
(also called “snake”) This lace is well known to macrame lovers, because...
it is woven in alternating “tatting knots.” Of course, tatting lovers are also very familiar with this knot and this lace. Fasten two threads (of the same or different colors). With your left hand, pull the left thread, with your right hand, take the right thread and make a loop around the left thread, as shown in the picture. Tighten the working one (yellow), while the knot one (blue) should be taut. Now, with your right hand, pull the right thread, and with your left, take the left one and make a loop around the right one. Tighten the working thread (now it is blue), while not forgetting to pull the knot thread (yellow). Continue alternating right and left knots until you get the desired length of lace, and this is what you get. Snake Knot Cord
Fasten two threads and use the right thread to make a loop around the left one, and then with the left thread make a loop around the right one.
Tighten the knot, but not tightly. Increase the loop slightly from the left thread. Make a loop with your right hand, as shown in Fig. 4, threading the end into the loop from the left. Pull up the loop - now the right thread+ has formed two loops passing through the knot. Turn the weave over - the threads have now swapped places. Take the right one, pass it under the left one, around it and into the second loop formed by the second thread. Tighten the knots and turn the weave over. Continue tying knots, turning the braid over and bringing the right thread under, around, and into the bottom loop. And you will get this beauty. Cords from “flat knots” of macrame
To make a flat knot, fold two threads in half and secure them.
4 ends were formed. The two outer threads will be the working threads, and the two middle ones will be the base, the “core,” of the flat knot. Take the leftmost thread and bring it to the right at a right angle, over the two non-working threads. On the left we form a loop. Now we take the rightmost thread, cover the left thread with it, and wind it to the left under the two middle non-working threads, and then thread it from the bottom up into the loop formed by the left thread. We tighten the knot by the working threads, holding the non-working ones. And now we have a left single flat knot (middle picture). We repeat everything from the beginning - and now we have two left flat knots (right picture). And if we continue this simple operation further, then we get a twisted lace from left flat knots. But if we start the knot from the right thread and perform the same actions in a mirror way, then we will get a right single flat knot. And a twisted cord tied with such knots will twist to the right. Here it is in the photo - a lace made from the right knots (and the lace from the left ones looks like a mirror). But what will the lace look like if you alternate right and left knots when weaving it? Right! It will not be twisted, but flat, like this Decorative cord “Josephine”
The cord is very decorative.
To weave it, it is advisable to use a fairly thick and stiff thread. It is more convenient to weave it not on weight, but on some kind of plane. 1. Josephine cord with one end of the thread. 2. Cord “Josephine” with two ends of a thread (or two threads of different colors) Cord
with the life-affirming name
“Hangman’s Knot”.
We thread the thread into the hole to which the cord will later be attached, leaving about a quarter of the length motionless, and folding the rest of the length into a loop. Having folded three layers of motionless thread, we begin to wind the long end onto them in turns.
Apply even and tight turns. Once we have determined that the length is sufficient, we thread the movable end of the thread into the loop formed and tighten it with the other end. This cord can be easily unwoven if necessary, simply by pulling the desired end of the thread. Cord-braid
Dea threads are tied in such a way that there are three short ends of equal length, and one much longer than the rest.
We leave the three short ends of the thread motionless, and the long one will be a runner. The long end is woven between three short ones in a checkerboard pattern, for example from left to right. Having reached the far right end of the cord, we also weave it in a checkerboard pattern from right to left. So we weave to the required length. You can make the ribbon wider by taking not two cords but three. And if you need a long cord, then it is more convenient to weave from the middle: first in one direction, then in the other. Round two-color cord
is woven from 8 threads, four of each color.
Fix the ends of the threads and arrange them according to the pattern: 4 threads of one (white) color on the right, four threads of another (black) on the left. Start weaving with the leftmost (black) thread. After completing what is shown in the diagram, repeat, starting with the thread (black), which is now the leftmost one. Accordion cord
You can weave it from one thread, or from two threads of the same or different colors.
For clarity, the picture shows weaving such a cord from strips of paper. Fold the ends of the thread at an angle of 45*. Bend the end of the thread that is at the bottom and place it on top. Now the other end of the thread is below, bend it too and put it on top. And repeat this until you get the “accordion” of the required length. Braided cord
Resembles a cord woven with flat macramé knots, but looks different.
It can be woven from any number of threads, because... Only the two outermost ones are working, and in the middle there can be as many threads as you like. First, thread 1 is inserted under the middle threads, and then thread 2 (b, c). Then thread 1 is laid on top of the middle ones, pulled from above by thread 2 (d) and bent in the opposite direction over the middle (e). Already on the other side, thread 1 is again attracted by thread 2 (e). The rest of the weaving is carried out in the same sequence (g, h). The width of the finished cord depends on the number of middle threads. Cord “Nibbler”
is woven with four threads or two, folded in half.
What’s good about it is that it doesn’t stretch at all. And simply beautiful. They begin to weave like a regular braid of four strands, but after the first four movements (a-d) the teeth begin to form. The right end of thread 2 is inserted into the weave, bent around thread 2 on the left and brought out over thread 1 (e, f). In turn, thread 2, located on the left, is inserted into the weaving and brought out on the right (g). As a result of these operations, a second clove is formed. When starting to form the third clove, thread 2 drawn out on the right is bent around thread 1 (h). All further operations for the formation of the remaining teeth are similar to the previous ones. Cord “Butterfly”
We already have a very similar one in our collection, but they are woven a little differently.
Taken from here Cord “Tornado”
Super lace!
Taken from here Volumetric spiral-shaped two-color cord
On page 1, a volumetric cord made of strips of two colors looks like this when woven: In order for the colors of the threads in the same cord to go in a spiral, it is woven slightly differently and looks like this when finished: Taken from here
Ladder cord
It is similar to the Snake Knot cord, but the “steps” in it do not go at an angle, but evenly
Eglet - tips of laces
The tips of the laces are called aglets/aglets. They are made of plastic and metal. Even on high-quality laces you can see plastic tips, so you shouldn’t be afraid of it. The design of the tips varies, but most often they have a minimalist appearance. Egglets have not only a decorative, but also a functional meaning: they protect the ends of the laces from unraveling and make it easier to thread the laces into the corresponding holes on the shoes.
Plastic and metal eyelets for shoe laces
Bauble made of two ribbons for beginners - master class
To make such a decoration, you need to prepare all the materials in advance. Purchase ribbons of the same width and colors you need. The length is calculated so that the fabric strip is three times longer than the finished product.
To make such a bracelet you will need 2 ribbons of different colors, each 1 meter long. The colors of the ribbons can be any, but it is better if they are combined with each other.
As you can see, the most difficult thing is the beginning. Here is a diagram to help you understand how to start weaving:
The video shows how to weave a bookmark from ribbons:
Lace length
When choosing laces, special attention should be paid to the length. First of all, you need to count the number of pairs of holes for laces on the pair of shoes for which you are purchasing laces. You can also measure your existing laces and determine your preference regarding the length of the ends of the tied laces. After this, you should read the recommendations of the manufacturer or seller of the laces, and then make a purchasing decision. Keep in mind that the optimal length of laces varies depending not only on the number of holes and the preferred tip length, but also on the lacing method.
For shoes with five pairs of holes for laces, laces of either 75 or 90 centimeters in length can be used.
The “golden mean” is often 80 centimeters.
If there are six pairs of holes, then it is better to choose 80 or 90 cm laces, but 75 cm may also be suitable. For boots or shoes with 2 or 3 pairs of lace holes, 45 or 60 centimeter laces usually work well, but you can try longer ones if you wish. If there are seven or more pairs of holes, then you need laces at least 90 centimeters long. For high boots, laces are available in lengths of 120, 150, 180 centimeters. Occasionally you can find even longer models.
It is worth adding that different manufacturers may have different length options. Let's say Saphir offers laces with lengths of 75 and 90 centimeters, but this does not mean that there are no intermediate options on sale - for example, Herring Shoes and Fort Belvedere laces are 80 centimeters long.
Saphir laces of different lengths
Materials and tools
The easiest way to make laces shorter at home is to trim off the excess with scissors and singe it with a lighter. The procedure takes a minimum of time, but has a significant drawback - the cut ends look ugly. In addition, over time they may begin to bloom. It is also worth considering that a fixing element processed in this way simplifies the appearance of the shoe and makes it less presentable. That is why it is better to use more careful methods to shorten laces. Depending on the method, to carry out the procedure you will need:
Lace colors
If you want to get a win-win look without flashy contrasts, you can follow a simple rule: the color of the laces should match the color of the shoes. For black shoes you need to choose black laces, for brown ones - brown, for burgundy - burgundy, and for blue ones - blue. In this case, the shade of the laces may differ from the shade of the shoes - there is nothing wrong with that. So, dark brown laces will also go well with fairly light tan boots, and they won’t look too flashy or eccentric.
Burgundy oxfords with burgundy laces
If you wish, you can go beyond the classical rules and start experimenting with laces of non-standard colors: yellow, blue, green, purple, red, orange. Thanks to colored contrasting laces, you can transform already boring shoes or boots. We recommend starting experiments with more or less restrained tones such as dark green, blue and burgundy.
Keep in mind, however, that in an official or simply business setting, even such contrasts on shoes are undesirable - you should not wear shoes with laces of a different color to business negotiations, important meetings, or official events.
If you decide to try contrasting colored laces, combine them with any other accessories involved in a particular look. For example, the color of the laces can match one of the colors of socks, a tie, a pocket square, a shirt, and even cufflinks. Shades and tones do not have to match completely - the main thing is that the overall look is harmonious.
How to match contrasting laces with shoes
There are no clear generally accepted rules here, because the very fact of combining bright contrasting laces with shoes is already going beyond generally accepted norms. At the same time, however, it is not at all equivalent to wearing two different shoes or two different socks - we will talk about eccentricity only if you decide on a very controversial and catchy combination, wearing, for example, yellow shoes with red laces.
Since the main colors of classic shoes - black and brown - are restrained and fairly neutral, the colors of the laces can be very different. So, red, yellow, blue, burgundy and pink laces can look good with both brown and black shoes. Dark green laces usually go well with brown and red shoes, and gray laces with black ones. For blue shoes or boots, you can choose yellow, red or blue laces (but blue or dark blue, of course, are also suitable).
Red laces with black oxfords