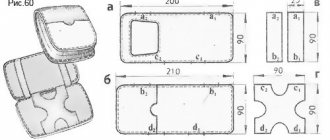
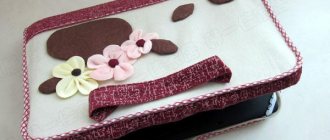
In this master class we will make a rose that can be used to create a brooch, hairband or other decoration. The same leather can be used for different types of colors. The main thing is its thickness. In order to make a flower from leather, you will need a pattern of sepals and petals. You can do it yourself or search on the Internet. An example for self-printing will be given below. It is best not to redraw or photograph the diagrams, but to scan them so that the proportions are not distorted. Then the flower will turn out uneven.
How to choose leather for creating flowers?
We begin our master class “DIY Leather Flower” with how to choose the appropriate material for the job. It can be any shade, but red roses are considered classic. Some artists prefer to work only with light leathers for flowers. It is important to consider that, like fabric, this material has transverse and longitudinal fibers. Therefore, somewhere it will stretch more, and somewhere less. Therefore, before work, you need to determine the directions of the fibers and find a place with an oblique guide. It is along this line that flower masters cut out details from leather.
It is important to consider the location of the fibers so that the petals do not become distorted at the end of the work. But, if this is not possible, and, for example, the piece of leather is very small, we cut out the details as best we can. The leather is suitable for haberdashery or clothing. The main guideline when purchasing material for creating leather flowers with your own hands is the thickness of the material. It should be 0.5-0.8 mm. There are cases when thick skin becomes thinner during processing, and a flower can be made from it, but this is an exceptional case.
Product “Christmas tree” made of plastic suede
This material is suitable for creating decorations for the New Year. Foamiran will make a beautiful Christmas tree. For the Christmas tree you will need:
- Foamiran is green.
- Various beads to imitate Christmas tree decorations, preferably red, gold or silver colors.
- Sheet of cardboard.
- Iron.
- Pencil.
- Stapler.
- Glue.
Even a beginner can do this craft, it’s so easy to create. To complete the craft, you need to cut several strips, about 2 cm wide, and cut them, thereby making a fringe out of it. Make a cone out of cardboard, securing the corners with a stapler.
Next, cover the resulting cone and decorate with beads. The product is ready!
Tools for working with leather
We continue our master class on leather colors. Let's consider the features of workplace preparation. The surface on which the buds will be created must be smooth and hard; it is advisable to use a special mat. To soak the moistened petals, prepare a wide lid from a plastic container or other device to make it convenient to remove the product from it. The pattern of leather flowers, including leaves, can be absolutely anything.
In our case, it is not necessary to use a template specifically for a rose. Usually the blanks are cut the same, but it is permissible to change the size or shape. The templates do not have wavy edges or jagged edges as it is very difficult to cut such patterns into leather. There is no need to transfer the drawing onto the material. The pattern is made like this: a template is pressed to the skin, and a section is cut out from it. Only after this can you begin to cut out additional ornaments and add wavy edges. The same goes for the leaves - after you make the blanks, you can change their shape and make a jagged edge.
Processing methods
French knives and boules are used primarily when applying patterns, lines and veins to petals and leaves. This is done in order to give the product the most natural look and ensure similarity with natural flowers. When creating models of roses, poppies, chrysanthemums, chamomiles and many other types, you will have to resort to hot or cold stamping. This type of work involves the relief processing of natural leather.
It is very important to take into account the structure of the material and thickness.
Cold stamping is ideal for creating lines along edges, as well as for creating complex designs on natural materials with a smooth surface. Acceptable skin thickness can range from 0.7 mm to 1.3 mm. For convenience, you can use a pre-prepared cardboard template during the stamping process . It is worth cutting it according to the size of the workpiece. The necessary designs and patterns are first drawn on the template, and then cut along the lines with a sharp knife.
Hot stamping requires longer preliminary preparation, but allows the surface of very dense leather to be processed.
Thickness can reach 4 mm. For embossing you will need a set of several metal stamps. You can make them yourself at home. After preparing a set of materials, it is necessary to heat the dies and emboss by pressing the work surface onto the workpiece.
Blanks for roses made of leather
Let's start creating leather flowers with our own hands. We take the material, cut out a leaf, a sepal and two types of petals. For one flower you will need 5 small and 5 large petals, 1 sepal and 2 leaves. The number of petals can be increased to 6 to make the flower more magnificent, and, if desired, it can be made from leather of different colors. It all depends on your imagination and ideas. Then we give the edges of some parts a waviness by cutting out small areas of the skin with scissors. There is no need to try to make all the petals the same, then the rose will look more natural.
Making a flower and a bouquet of flowers from leather
1. EXCELLENT HANDMADE LEATHER CRAFTS. TECHNIQUES FOR MANUFACTURING ARTIFICIAL FLOWERS Genuine leather is one of the most popular materials for making different flowers and other beautiful crafts. Craftsmen make beautiful roses, large chrysanthemums, romantic daisies, bright irises and other flowers with their own hands. Many craftsmen make entire flower arrangements and bouquets from artificial flowers, some of whose petals are made of genuine leather, and others from foamiran, satin ribbons (folded using the kanzashi technique), and corrugated paper. Original handmade leather and suede flowers often decorate women's shoes, hats, handbags, belts and straps, hair accessories, bracelets and rings, earrings and brooches, photo frames, topiaries. To make flowers with your own hands, you can use scrap material at hand - an old leather jacket, unnecessary suede gloves without a pair, leather shoes.
Generally speaking, the technique of making a flower from leather consists of cutting out blanks according to templates, obtaining the desired shape using glue or flame, folding the prepared petals, leaves, stamens and other parts of the artificial flower craft. If you correctly understand the principle of working with natural leather, you can easily make a flower of absolutely any complexity with your own hands. What tools will be useful to you in your work: • construction knife with replaceable blades. This is the most convenient tool for cutting leather, since dull pieces can be broken off immediately; • long and short metal rulers. Choose wide rulers to avoid injury from the blade jumping off the cutting line; • a base on which it is convenient to cut leather. A flat surface that is not too slippery (plastic cutting board, hardboard, linoleum, plexiglass) is suitable; • tailor's scissors. They do not chew, cut the skin well and evenly, and in addition, they are a self-sharpening tool; • French knife. This tool is for carefully thinning leather blanks for flower petals (the so-called leather polishing); • gurgles. It is advisable to purchase a set with these tools in different sizes. With the help of rolls it is convenient to give volume and shape to the petals, to make the edges of flower leaves wavy; • silicone mats, on which it is convenient to process individual parts of the flower. You may need rugs with different degrees of elasticity - hard, soft and semi-soft; • tube punches and hole punchers-tongs, with which you can make holes along the edges and in the center of a leather workpiece. Methods for processing flower petals and leaves: There are two main methods of applying veins and line patterns to the surface of a leather petal - hot and cold stamping. Embossing (or stamping) is a relief treatment of the surface of the leather, in which it is important to take into account the thickness and structure of the material. Cold stamping. This method is great for making lines along edges to create complex patterns on leather with a smooth surface. Leather thickness for cold stamping is 0.7mm–1.3mm. For such stamping, you can use a cardboard template cut to the size of the workpiece. A pattern of lines is drawn on this template, and then carefully cut along the lines with a knife. Hot stamping. To hot stamp on the surface of the leather, you will need a set of different metal stamps (which you can make yourself). This method is ideal for processing genuine leather workpieces with a thickness of 1.5 to 4 mm. Metal stamps are heated and embossed by pressing the work surface onto the workpiece. Patterns of individual parts of the flower: In order for the leather flower to turn out beautiful and similar to the original, it is important to cut out each element of the craft as accurately as possible from a piece of leather. Therefore, it is advisable (especially for novice craftsmen) to make a cardboard template for each petal or leaf. Some craftsmen prefer to disassemble a natural flower into pieces, make a herbarium out of them, placing them between book pages, and then glue them to a cardboard sheet and cut out templates. But you don’t have to make your own flower parts templates this way. Today you can find patterns of any flowers on florist or handicraft websites. These patterns can be printed on a printer. It is advisable to outline with a gel pen. Below you will find master classes on making leather crafts, as well as patterns of petals and leaves of different types of flowers. Painting leather craft parts: To paint leather petals, you can use nitro paint from spray cans. But it is best to purchase special oil paints that artists work with - with their help, you can make transitions more accurately, carefully apply the shade, and the assembled flower will look brighter and more realistic. To create beautiful halftone transitions on parts for leather crafts, many craftsmen use solutions that can be used to etch the product (for example, soda ash is suitable for working with a brown color, and iron sulfate can be used for a gray tint on the surface of a leather workpiece). To make the transition of shades smoother, apply the solution to the skin with a soft squirrel brush. The collected flower can be additionally soaked several times in gelatin and coated with colorless furniture varnish. 2. INSTRUCTIONS: HOW TO QUICKLY MAKE A BEAUTIFUL FLOWER FROM GENUINE LEATHER FOR DECORATING A BROOCH Beautiful large flower:
- to make this flower you can take a piece of suede; - first we will make a solution in which we will process the material. Stir 2 tbsp into half a liter of water. spoons of PVA and let the solution sit for about 50 minutes. Then put the solution in a water bath and stir until it becomes transparent; - now apply the solution evenly with a squirrel brush on both sides of the suede; - dry the suede by hanging it on a rope with clothespins; - using the patterns, we cut out the details of the flower and give them shape with our hands; — we put together a flower from the parts and decorate it with stamens on a wire. An example of making a flower with a photo of each stage of work:
3. MASTER CLASSES ON MAKING FLOWERS FROM GENUINE LEATHER AND SUEDE Master class No. 1: THIS CRAFT
. Master class No. 2: MAKING A FASHIONABLE FLOWER
. Master class No. 3: LEATHER ROSE
. Master class No. 4: HOW TO DO
. Master class No. 5: HOW TO DO
. Master class No. 6: BIG ROSE
. Patterns for making different colors of leather: COLLECTED HERE
. 4. STEP-BY-STEP VIDEO LESSONS. HOMEMADE LEATHER FLOWERS How to make a large leather flower with your own hands for decorating hairpins, brooches, handbags. Video MK:
How to correctly cut flower petals from genuine leather, tint and fold the craft. Video lesson: We make an elegant craft with our own hands in the form of a three-dimensional flower to decorate a brooch. Video MK: How to make small roses from leather to decorate women's accessories: Step-by-step training on making a large rose from leather at home: Dear needlewomen! If you already know how to make different flowers from leather and suede, please share your knowledge with our visitors in the comments. You can send your master classes and photos of finished crafts to the following email: This e-mail address is being protected from spambots. You need JavaScript enabled to view it. We will definitely publish your materials on the site! to Home Page
ALSO FIND OUT...
| Comments | Add new | Search |
| Alyona | |2017-06-04 00:20:30 |
| Answer |
| Angelina - leather for crafts | |2017-06-04 00:17:32 |
| Answer |
| Anfisa - leather crafts | |2017-04-11 00:08:28 |
| Answer |
| Larisa Popova – Natural leather scraps | |2016-01-22 21:07:34 |
| Answer |
| Alina - Excellent master classes! | |2016-06-28 01:43:14 |
| Answer |
| Tatiana - We need coordinates! | |2015-02-10 23:04:00 |
| Answer |
| Arina – Genuine leather for your handmade | |2015-02-10 23:01:41 |
| Answer |
| Julia | |2015-02-10 23:04:45 |
| Answer |
| Elena - leather | |2015-02-10 17:08:35 |
| Answer |
| Irina – Leather scraps | |2015-08-30 22:06:36 |
| Answer |
| Lida | |2017-03-24 01:11:30 |
| Answer |
| Natalya - Flaps | |2017-07-05 23:39:42 |
| Answer |
| Dasha - Thanks for the advice and lessons! | |2014-10-16 01:10:41 |
| Answer |
| Zoya – DIY leather crafts | |2014-10-16 01:06:44 |
| Answer |
| Anonymous - re: DIY leather crafts | |2015-01-27 22:52:42 |
3.26 Copyright (C) 2008 Compojoom.com / Copyright (C) 2007 Alain Georgette / Copyright (C) 2006 Frantisek Hliva. All rights reserved."
Related materials:
- Fashionable hairstyles with intricate braids look very stylish and attract the admiring glances of others everywhere. Take a look at the photos of chic hairstyles...
"> Braiding your own hair to create fashionable hairstyles
- If you prefer to do voluminous nail designs yourself at home, but acrylic sculpting causes you to be allergic to harsh...
">Volume nail design with 3D or 4D gel (plasticine)
- The large and expressive eyes of the fair sex always attract the attention of men. Every woman's eyes are beautiful in their own way, to ruin this...
“>How to paint your eyes to make them look bigger
- Today we will tell you about what wonderful crafts you can make from leather with your own hands, and with the help of photos and video master classes you can make…
“>We make flowers from leather with our own hands
- A bouquet of sweets made with one’s own hand is an excellent and, most importantly, unusual gift that you wouldn’t be ashamed to give for any celebration, be it a family party…
“>Do-it-yourself flowers and bouquets of sweets. MK for beginners
The following materials:
- Homemade mastic for cakes and for sculpting flowers 1. WHAT IS MASTIC. MODELING CRAFTS AND DECORATING CAKES WITH EDIBLE FLOWERS Recently published on our…
">Cakes and flowers from homemade mastic
- Bouquets of soft toys with sweets and crafts from fresh flowers1. HOW TO CONGRATULATE A WOMAN ORIGINALLY. PLUSH BOUQUETTS AND TOYS FROM REAL FLOWERS Beautiful…
“>Gifts in the form of animals made from flowers and bouquets of handmade toys
- How to make a flower from maple leaves and crafts from dried flowers1. HANDMADE CRAFTS FROM AUTUMN LEAVES AND COMPOSITIONS FROM DRIED FLOWERS: IDEAS AND PHOTOS, …
">Topiary, a bouquet of roses from leaves and other DIY autumn crafts
- How to make a flower from cold porcelain1. COLD CERAMICS AND TOOLS FOR MAKING DECORATIVE FLOWERSMaking all kinds of crafts is one of the most…
“>How to make cold porcelain at home and sculpt flowers from it
- How to make flowers from polymer clay (plastic modeling)1. POLYMER CLAY FOR MAKING CRAFTS Many needlewomen successfully use it for...
“>Ceramic floristry for beginners. Modeling flowers from plastic
Previous materials:
- Homemade organza flower. How to make a rose or a large bouquet1. METHODS OF MANUFACTURING ARTIFICIAL FLOWERS FROM ORGANZA. BEAUTIFUL CRAFTS FOR DECORATION…
">Homemade organza roses and a bouquet of artificial flowers with your own hands
- How to make a plastic flower from bottles (photo and video tutorials)1. ORIGINAL BOUQUETS AND BEAUTIFUL COMPOSITIONS FROM ARTIFICIAL FLOWERS Plastic is one of…
">Compositions and bouquets of flowers from plastic bottles
- How to make a flower from a paper napkin (rose, chrysanthemum, carnation)1. ELEGANT CRAFTS FROM PAPER AND FABRIC NAPKINS IN THE FORM OF FLOWERS A few previous…
">Lessons on making flowers from paper napkins
- How to make flowers from beads with your own hands. Weaving patterns, photos and videos1. TECHNIQUES FOR MAKING BEAUTIFUL CRAFTS FROM BEADS IN THE FORM OF FLOWERS AND TREES WITH...
“>Bouquet of beaded flowers. Schemes, video
- Making flowers from fabrics. Master classes with photos and videos1. MANUFACTURING CRAFTS FROM FABRIC. SECOND WIND OF A UNIQUE DIRECTION IN HANDCRAFTS Art…
">Satin fabric and other materials for making decorative flowers
- How to make a flower ball1. ROMANTIC GIFT FOR THE BRIDE OR LOVED. CRAFTS IN THE FORM OF A BALL FROM LIVE OR ARTIFICIAL FLOWERS If you want...
“>Crafts made from fresh flowers and paper using the kusudama technique
- Flower made from sausage balloons (SBM). Video and photo MK1. AERO DESIGN BASICS FOR BEGINNERS. ORIGINAL CRAFTS IN THE FORM OF FLOWERS AND UNUSUAL COMPOSITIONS…
“>We twist crafts in the form of flowers from SDMM
- How to make a flower from a ribbon with your own hands. Video and photo lessons1. THE MAGNIFICENCE OF ARTIFICIAL FLOWERS FROM RIBBONS OF DIFFERENT KINDSIn previous materials in the section...
“>We make flowers from ribbons at home
- DIY paper flowers. Photo and video master classes1. THE BEAUTY AND VARIETY OF HOMEMADE PAPER FLOWERS Real flowers will never cease to amaze…
">Homemade paper flower
- How to make a paper flower with your own hands1. USEFUL PROPERTIES OF CORRUGATED PAPER FOR MAKING FLOWERS Corrugated paper is widely used…
">Corrugated paper for flowers
| Answer |
How to treat petals with a solution?
Turn all the petals inside out. Sometimes the skin on this side looks unsightly, it is uneven and lumpy. In the process of work, we will correct these shortcomings using painting and treatment with PVA glue. We take all the petals and coat them with the solution one by one. There is no need to completely immerse the workpieces in the solution, otherwise they will take a long time to dry. We lay out the processed ones on a previously prepared surface and wait until the surface is well saturated with moisture. Usually it is enough to coat them with glue once, but this largely depends on the skin.
Some types of material absorb water for a very long time. The second time you need to soak such petals with the solution after drying them a little. Do not allow the parts to get too wet and the glue to come out on the front side. On some types of leather, bleed-through glue leaves stains.
Foliage for a flower
Having finished with the petals, we coat two leaves for the rose. If desired, the amount of foliage can also be increased. Much in this case depends on the product itself. Brooches and headbands need a backing, so a larger number of details will look more attractive in the composition. But sometimes extra leaves only get in the way, so you should focus on what you want to get as a result of your work.
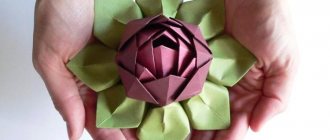
Aerobatics: peony flower
Delicate and luxurious peony is a complex design made of many petals of different shapes and sizes. In the center there are sharp parts with uneven edges, along the edges there are rounded blanks.
This design will take more than one hour, but the result will certainly please you.
We invite you to read the detailed step-by-step instructions from experienced craftswoman Nadezhda Konovalova:
Forming petals using the blind man's buff technique
Now we check how well the parts are saturated and proceed to forming the petals. Each workpiece is processed manually. For work we will use the well-known “blind man’s buff” technique. Almost all leather flowers are made using this method. The exception is products that are created by firing over a candle flame or frying in a frying pan. The “blind man’s buff” technique involves folding folds on a workpiece.
We take the petal in our hands and begin to drape it, collecting it with our fingers from one side to the other. The softer and thinner the leather used, the smaller the folds will be on the workpiece and the more graceful the flower will be. Having collected the folds, we begin to twist the petal in the same way as we wring out the laundry. Repeat on all other parts. Another option is to lay the petal flat on a flat surface and start draping it using only your nails. This method is suitable for those with long nails. The result will be approximately the same, but in the second case the folds can be made smaller and neater.
How to make perfect folds?
It is advisable to protect your hands with thin gloves while working, but experienced needlewomen prefer to feel the process and say that this allows them to better feel exactly how to assemble the product. To prevent folds from appearing across the petal, mentally imagine the center line of the part as if it were divided into two equal parts - this will help not to displace them during assembly. Ideal folds should diverge radially to the sides.
Another way: immediately lay the central fold, and then follow it and align the edges of the product, pulling it towards the center: first on the left, then on the right. This will help you not to lose your bearings and make even folds diverging from the center. If you do not follow the radius, the folds will turn out ugly, and the petal will skew to the side. This can also happen from an incorrect pattern or carelessness.
Master class on hairpins and headbands made of foamiran
Women's jewelry is made from roses, sunflowers, peonies, chrysanthemums and other flowers: headbands, hairpins and pendants. These realistic floral decorations are used to decorate books, handbags and refrigerator magnets. You learned how to make a flower from previous master classes. To make a hairpin, brooch or headband, you need to glue one strip of porous foam, 1 cm wide, to the base of the flower and make a loop. Then all you have to do is attach a pin, hairpin or headband to it, and the stylish decoration is ready.
How to thin the material?
When the skin is thin, there is no need to stretch the edge of the workpiece to make it wavy. But if the material is dense, it needs to be thinned. This should be done after you have wet the petal from the wrong side and it has become a little saturated. It is enough to wait about 3-5 minutes and walk along the edge of the petal with your fingers, stretching it a little and bending it in different directions. Sip it carefully, trying not to tear it. After this treatment, the flower will turn out more graceful, and the petals will be easier to fold. When processing a leaf, the same principle is used, but try to lay out folds so that they imitate the direction of the lines in a real living leaf. The workpiece can also be twisted to increase the number of folds.
Foamiran as a material for scrapbooking
They can decorate albums, diaries, postcards. Various photos of postcards are worth searching on the Internet, as well as step-by-step products. From revelour it is possible to make not only flowers for scrapbooking, but also various geometric shapes and shapes. This material goes well with other elements such as beads, rhinestones, lace and ribbons.
In addition to all of the above benefits of revelour, it is also safe, non-toxic, and quite easy to use. Even a beginner can make beautiful things from it.
Products made from this material can bring needlewomen not only pleasure, but also good profit, because revelour is in great demand. A gift made of plastic suede will definitely not go unnoticed.
What to do if the workpiece is dry?
If you feel that the petal has dried out too much, wet the brush in the solution and lightly rub it along the underside. After completely processing all the workpieces, leave them for 5-10 minutes. During this time, you can cut additional teeth on the sepals. Then we begin to carefully open the petals. In this master class “Do it yourself leather flowers”, we will not use special tools, so we create indentations on the bottom of the petal by hand. We press our finger to curve it, and then change the shape of the edge, making it more curved. We often bend the lower petal forward. The photo shows leather flowers created in this way. They look neat and natural, like real ones.
Sunset and mask
Most often, it is floral motifs that become subjects for leather paintings, but some artists manage to make unique works of art from the simplest leather scraps. But not only flowers can be made from a leather product; we bring to your attention a video tutorial, after which you will be able to make a beautiful “Sunset” painting.
It will be a little more difficult to create such a picture, but the result will exceed all your expectations. We invite you to watch a video tutorial from which you will learn how to create such a masterpiece.
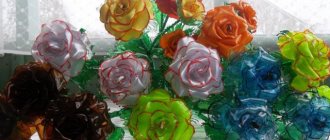
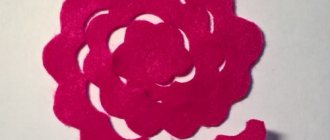
We invite you to look at other paintings made from leather.
These are the beautiful roses you can make from leather, you just need to use your imagination.
Such works of art will perfectly act as a gift; the recipient may think that you purchased such a masterpiece in a store or from some famous artist. You should definitely try yourself in this art, even if it seems difficult at first. Over time, your skills will progress and you will reach a high level and be able to create your own leather paintings.
Center for the flower
We put the leather parts aside and begin to create the core of the flower. For this we will need beads and seed beads. There are several ways to make a neat and beautiful center:
- Use a metal strainer and sew beads through its holes.
- Cut a small circle from a plastic bottle and burn it with a lighter to create a curved shape. Using a large needle, you need to make many holes in the plastic and string beads through them.
- Make a ball of wool and sew beads on it.
Another simple option to make the middle:
- Take a button, cotton wool, thread, wire and a small piece of fabric.
- Thread the wire through the holes in the button and make a leg.
- Then wrap the cotton wool around the button and pull the fabric over it.
- Sew the material at the bottom. You should end up with a shape that resembles a mushroom cap.
- Embroider the blank with beads.
Having finished creating the middle, we begin to assemble the leather flower.
Ranunculus from Foma: elegant and simple
Ranunculus is a very delicate creature with lush buds and a variety of colors. This flower can now often be found in the most luxurious bouquets. The size of the ranunculus is from 7 to 10 centimeters in diameter, and in appearance it looks a little like a peony or rose. A blooming ranunculus can look like a poppy.
Ranunculus made of plastic suede
How to make a ranunculus from plastic rubber:
| Illustration | Description of action |
| To give texture to the petals, the foma leaf needs to be ironed through crepe paper. This way it will become a little thinner and get a characteristic relief. | |
| You can pull out the petals on bottles or a small light bulb. | |
| Trace the petal templates. It is better to do this with a white pencil, this way there will be no marks left on the material. Do not use sharp objects for tracing; they may tear the sheet. | |
| Before cutting out the petal, shape it on a convex object, slightly stretching it in the desired direction. | |
| After stretching, cut out the petal so that the template mark line is not visible. | |
| After making petals of different sizes, make several of the smallest blanks, shading them with a sponge and pastel. | |
| Make the core of the flower from a bead or a foil ball. Wrap the workpiece with foamiran and stretch the material so that there are no folds. | |
| Secure the center of the flower with hot glue. | |
| Trim the head with scissors at the base. | |
| Secure the base to the wire for the stem and glue it with second glue. | |
| Wrap the stamens around the head and glue them with hot glue. | |
| Fasten the tinted petals together so that you get a small circle with a diameter the size of the center of the flower. When gluing, make sure that the petals are about halfway over each other. | |
| After creating the core of the ranunculus, glue the petals sequentially from smallest to largest in a circle. | |
| The gluing technology is simple - each petal should be approximately halfway over the previous one. | |
| In this way, glue 4-6 layers of petals. The more petals, the larger the flower. | |
| Cut out the sepals from the green fom and lightly pull them to shape. | |
| Glue 5 sepals onto the base of the flower; they can be lightly tinted with powder. | |
| Place a floral tube onto the wire and secure it with instant glue. |
Assembling a leather product
Before we start gluing the flower, we attach the parts to the center to understand what the final result will look like. Then we twist the petals again to make them more curved. See for yourself how best to change the shape to make the bud look more natural.
Let's start assembling - for this we will use instant glue. We start assembling with small petals. Apply a small amount to the inside of the stem and apply it to the underside of the core. Moving in a circle, we glue the blanks, forming a flower bowl. Place the fifth petal under the first. Press the edges with your fingers so that the glue adheres better. In order to press the petals to the center, you will need a cap from a regular one and a half liter bottle or a small glass, depending on the diameter of the central part. We turn the petals away from the core, coat the lower part with glue and place the flower in the container for a few minutes.
Glue the second row of petals in the same way as the first, avoiding spiral movement. The movement should be in a circle. We compare the petals in height so that they are all at the same level. When the flower dries, take the leaves and sepals and try them on. If you need to adjust the size of the parts, cut off the excess and curl the edges. We glue the leaves first, focusing on our taste.
Foamiran dolls
Foamiran dolls are considered popular products, although they are more difficult to make than flowers.
The dolls require the following resources:
- Sheets of foamiran, different shades.
- Blank made of polystyrene foam.
- Markers.
- A simple pencil.
- Wire.
- Glue.
Cut 5 strips from the material. Let each be 3 cm wide and 15 cm long. Glue 3 strips into rings, glue 2 strips to form a bow.
Cut a circle with a diameter of 10 cm and wrap it around a piece of polystyrene foam. Use markers to draw eyes, mouth and nose.
Make the frame of the future doll from wire. Wrap the frame with flesh-colored foamiran. Connect the frame to the head. For clothes, take pink or blue foamiran. Cut out the back and front.
What's left to do is the hair? To do this, you will need material of a yellow, brown or black hue. Cut out several strips of different lengths and attach a bow.
Those who already have experience working with this material can try the second option. The doll's head is created from foil, which is stuffed with cotton wool. A circle of plastic suede is heated and wrapped around the head blank, and a seam is made at the back.
A hairstyle is made from foamiran: strips are cut out of a material of a different shade and twisted or braided. They draw eyes with a felt-tip pen and add blush with blush. The body is also made from a frame, which is then covered with revelour.
Making a brooch with a leather flower
If you plan to use the flower as a brooch, prepare a pin or a special blank to attach it to the bud. We begin to coat the sepals with glue from the middle. We apply it to the flower and press it. Then we begin to attach the pin, placing it under one of the sepals. You need to keep in mind that the center of gravity of the flower is above the center, so you can’t attach the clamp in the middle. Unscrew the petal and apply a thin strip of glue to the sepal. Press down to secure the pin in place.
You should not use a glue gun to glue leather parts; it will make the product heavier and may leave an unsightly mark on the petals. The product is ready. We made a flower out of leather with our own hands, and the master class is over.
Bouquet of foamiran
For beginners, it is better to find ready-made templates from which you can cut out petals and leaves. For the bouquet you need:
- Foamian in different colors.
- Foil.
- Wire.
- Ribbons.
- Iron.
- Thick paper.
- Glue gun.
- Toothpick.
- Scissors.
On thick paper you need to draw several rose petals of different sizes. Cut out the blanks, put them on a sheet of revelour, and trace them with a needle. Make small droplets out of foil and secure them to a wire.
Place the petal on the iron for a few seconds, stretch it in the center and shape it into a rose petal. Repeat the same with others. Attach foil drops to the petals. These will be unopened buds. Make the rest of the roses in the same way.
Just as in the case of petals, draw leaves on thick paper, cut them out and trace them with a needle on a sheet of revelour. Attach the finished sheets to the wire.
Collect the finished buds, leaves, flowers together, fasten with glue and tie with ribbons. Tapes will hide imperfections. Flowers made from foamiran are suitable as a craft for Easter or for any holiday.