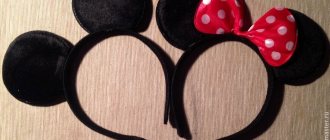
One of the criteria for female beauty is an elegant and long neck. For many peoples, she is the standard of femininity. The neck requires some attention, and, of course, jewelry! We will talk about the oldest, but still ultra-fashionable decoration - the choker. You will learn how to make a choker for your neck with your own hands using available materials.
When translated from English, “choker” means “strangler.” This is a short necklace, its length is 35-40 cm, when worn, it is located at the base of the neck and is adjustable in girth. The choker is also called a “standing collar”.
If you have a short or wide neck, then a choker necklace is not the best option for you, because visually this decoration makes your neck even wider and shorter. In this case, it is better to give preference to thin chokers and colors that are not very contrasting to the skin. Chokers with long elements will make your neck look longer, such as a lace choker.
Very often, a choker is confused with another type of necklace - a collar. A collar is also a short necklace, but slightly shorter than a choker (30-35 cm), it fits tightly to the neck. Visually, the collar creates a transverse division of the neck, and very often consists of several rows of beads or pearls.
History of origin
There are many versions of the origin of this decoration. According to one of them, the Indians also wore items made of straps, beads and animal claws around their necks. They believed in the mystical protective power of these decorations.
Europe was also conquered by this accessory. Thus, French women of the 16th-18th centuries also preferred chokers; they were worn by both ladies from high society and courtesans. By wearing a red ribbon around their necks, women expressed their grief to those who died during the revolution.
In the 19th century, the English princess Alexandra of Wales hid a scar on her neck using a choker. Imitating the princess, many ladies of that century began to wear similar jewelry.
Queen Elizabeth I of England also adored this decoration.
Princess Diana also loved this pearl accessory and more.
The inimitable Coco Channel preferred choker necklaces in her collections. Her jewelry consisted of ribbons made of velvet, leather, silk and pearls. An innovation was the tablet insert.
In the 90s, a choker often expressed belonging to a certain subculture (punks, rockers, hippies).
The fashion trend of “choker mania” has survived to this day. You can make a choker with your own hands with minimal time, effort and money! The materials from which a choker can be made are simply amazing in their diversity.
What do you need to make a choker necklace?
Materials
The materials for making a choker can be different: leather, suede, velvet, lace, wires, threads, ribbons, cords and much more. All of them can be used both to make the base of the choker and to secure pendants.
The basis for weaving chokers from beads and beads can also be different.
Beading line (nylon). Products on a fishing line turn out to be more “rigid”, that is, they hold their shape, unlike products on a thread. The disadvantage of fishing line is its ability to deform, i.e. it is better to store products made from it in a straightened form, or use braided fishing line. When weaving a product from large beads, it is better to take a thicker line, with a diameter of 0.2-0.25 mm.
Elastic thread or elastic (spandex) comes in various diameters and colors. The heavier the beads used in weaving, the stronger the elastic should be.
Nylon thread is used in beading and bead making, but it is better in two folds.
Jewelry cable (lanka) is a metal string coated with a layer of polymer that comes in different thicknesses, flexibility and different colors. Very convenient for making jewelry from beads.
The wire is soft and comes in different diameters (0.3-04 mm is suitable for beading). From wire with a diameter of 0.5 mm you can make a frame for beads and stones.
Memory wire (with a memory effect) is sold in the form of springs and is highly durable.
Accessories
A carabiner is one of the types of clasps for jewelry. Locks come in the form of a simple hook, and there are also carabiners that are more reliable in use.
Clamps are used to secure the ends of the product. A lock is attached to the hole in the ear.
Rings are necessary to connect various elements. They can be solid (cast) or split.
End caps, calottes - used to disguise knots.
Chains with different sizes of links are used to decorate and lengthen necklaces.
Decorative elements
In addition to all of the above scissors , pliers ( needed for compressing and unclenching rings and other accessories), wire cutters (needed for biting off excess materials), as well as glue (Superglue or epoxy-based glue are suitable) will be useful for this work.
Why and where can you use a thread with an elastic band?
Elastic in the form of a thread is widely used in sewing to increase the fit of clothing parts to the body, sewn into cuffs, neckline, and waist area. It is convenient to use an elastic thread when creating elastic gathers. Unlike elastic tape, the thread does not require a drawstring and can be sewn directly onto the fabric .
Elastic thread is thin, it can be easily threaded into a sewing machine and used like regular thread. A wide selection of colors will allow you to use it in products of any color without masking, if necessary, sewing it on the front side.
In knitting, elastic thread is added to the yarn when knitting elastic bands on the cuffs to increase the elasticity of the fabric. It is very convenient to use spandex on the top of socks. This increases the tightness of the elastic of the sock to the leg, while eliminating contact of the rubber with the skin.
Fasteners and fastening methods
The choker should have not only a beautiful, but also a reliable clasp. Handicraft stores and online stores offer various types of accessories for jewelry.
Let's look at how to attach some types of fittings to a product.
We fix the ends of the product with adhesive tape or tape and align the ends. Next, we put the clip on the end of the product, while hiding all the protruding elements and threads. Using pliers, carefully press the clamps on both sides and place a lock on the ears of the clamps.
The end cap can be fixed to the ends of the product using glue. At the same time, using rings and wire, you can insert natural stones into the middle of the choker.
You can connect the ends of the decoration using pieces of a chain on which the lock will be attached. In this way you can increase or decrease the length of your product.
You can do without any accessories at all. The simplest thing is to make a loop of lace that will hold the bead, thereby forming a lock.
Using the same principle, you can weave a buttonhole from threads.
A lace choker will look much more interesting if its ends are metal.
Using wire cutters, bite off two identical pieces of metal tube. We put them on the end of a wire or cord. Use a hammer to fix it at the ends and give it the desired shape.
If you are making a choker from threads, you can weave such a neat loop.
To do this, fold the four threads in half and fix them. We begin to braid with one thread all the others according to the principle of tying knots in macrame. We weave about 1 cm on one side and the other. Next, we continue weaving in any way you choose.
Beaded chokers
Beads are an indispensable material in needlework and, of course, in the making of jewelry. Even one or more strands of beads strung on a fishing line will add uniqueness to your look. And if you weave a beaded choker with your own hands, it will turn out even more interesting!
To do this, we will need beads of two colors, fishing line, pliers, wire or ready-made rings, a lock and a pendant. We collect 4 beads on the fishing line and form a “cross” from them. In a circle between each two beads we add one more, you should get a diamond.
We make the next diamond in the same way.
Visual weaving diagram
We continue to weave diamonds to the desired length. Such a choker can consist of one woven strip or 2 or more. To fix the strips together, we insert diamonds of beads of a contrasting color between them. The result is an openwork choker around the neck.
You can make chokers from beads, beads, and bugles for everyday wear and for festive events.
Choker mesh
Pearl choker with pendant
Black beads and seed beads look very impressive!
By experimenting with other colors, you can weave bright decorations:
YOU WILL NEED IT
Archive with patterns for weaving a choker from beads with your own hands. Downloading is free !
For those who don’t want to bother with beading patterns, we offer this option: we braid a braid from prepared bead strands.
Another option for making a beaded choker is bead embroidery.
For those who know how to weave beads using “canvas”, we suggest weaving a choker using ethnic motifs.
You can weave beads or an embroidered piece of fabric or leather into the beaded “canvas”, making a color accent in the middle of the choker.
You can decorate the choker with a pendant.
A pearl choker on gold wire will look very impressive. It is both durable and very beautiful!
What you need for simple and complex beaded rings
To create a homemade finger decoration you will need a little patience, free time and materials with accessories. Instructions for beginners usually do not involve materials that are difficult to handle. Everything you need can cost several walls of rubles.
It is worth noting that ready-made beading kits are also available on the modern market. Their equipment is different, but you can choose from the picture of the product that should be obtained after work. Such sets consist of beads, a base and simple fittings.
Materials for creating simple beaded rings
To create a unique, simple decoration with your own hands, you will need the following minimum set of components:
- Beads;
- The warp, represented in most cases by monofilament;
- High strength adhesive;
- Copper wire;
- Stones for decorating the product if necessary;
- Cutting to give shape.
What you need for complex homemade products
If a creative person wants to make for himself or as a gift not just a woven ring, but a complex one with a metal base, then in addition to the basic set of components for the work, you will need to take as a base a metal ring without decoration or a metal bezel of the required size.
In the process of purchasing materials, it is necessary to remember the complexity of the work that will be performed. Their initial layout depends on this.
Tattoo choker
A tattoo choker is a trendy piece of jewelry; its main feature is an elegant weave of black fishing line that resembles a tattoo.
Such a choker can be made from wires from broken headphones. To do this we will need scissors, headphone wires and tape or a paper clip.
Afinka DIY reveals all the secrets of creating a choker with your own hands from headphones in his master class:
A visual diagram of a snake weaving tattoo choker:
Using this simple weaving technique you can make a whole set (rings, bracelet and tattoo necklace)
Using imagination and sleight of hand, you can get a tattoo choker in the form of flowers connected by wire rings. It is better to make the product from black fishing line, and its ends are thermally treated using a candle or lighter.
A tattoo choker can be decorated with beads by stringing them onto a fishing line when weaving.
Tattoo choker can be of different colors. Beads and seed beads will make the usual black look bright. The decoration can be combined with other jewelry, while correctly combining the color scheme.
A small themed pendant will give a highlight to the choker.
Flower weaving
This cute bracelet will highlight the fragility of a girl's wrist. No wonder girls and teenagers love him so much! And even preschoolers can figure out how to weave beaded baubles using this technique.
The standard flower weaving pattern looks like this:
- 6 – 8 beads are strung on a fishing line, depending on the size.
- The circle closes and the fishing line is passed through it again to secure the element.
- The working end is brought out from the 8th bead to the center of the formed circle, and the 9th bead is strung on it.
- The end of the working line is brought out through the 3rd or 4th bead (depending on their number in the circle).
- To weave the next flower, take 2 fewer beads (let’s designate them as 8.9, 10, 11 or 10.11, 12, 13, 14, 15 - according to the original quantity), string them onto the working end.
- A new circle is closed by passing the fishing line through the 4th and 3rd or 5th and 4th beads, respectively.
- Pass the fishing line in a circle, fixing the shape, and place the next core in the center.
- The end is brought out through the 9th or 12th bead.
- The process is repeated until the chain of the desired length is obtained.
- Connect and fix in the same way as when weaving with a cross.
Variations in the colors and sizes of beads or small beads, transitions without cores or made in the form of thin chains help to diversify the weaving. This method allows you to weave baubles consisting of several rows. Then your wrist will be decorated with a bright flower meadow.
Lace chokers
Lace chokers differ from all others in their sophistication and sophistication. Depending on the color, their thickness and the decorative embellishments on them, they will look great with all sorts of things in everyday life.
To make a lace choker with your own hands, you only need a piece of lace (about 30 cm for the circumference of the neck) and accessories. A lace choker can be decorated with various decorative pendants.
Pearl beads will help make your choker more delicate and noble. You can simply embroider lace with them, glue them, or hang them with soft wire. The lock on the choker can be replaced by an ordinary thin elastic band fixed in the middle. The lace seams can be hidden under the satin ribbon at the ends of the product.
Narrow light chokers are a great option for light summer outfits. They can also be complemented with a pendant in the form of a decorative stone.
Wide light lace chokers are perfect for “going out” and will make your look more romantic; sequins will add extra shine to this look).
Chokers made of black lace are an irresistible decoration for any fashionista’s evening dress. Brooches can also be used to decorate a choker.
By decorating a black lace choker with beads and chains, you can make such a creative decoration. It can be worn both in everyday life and combined with an evening dress. If you focus on the central part of the choker, thereby lengthening it, then it is better to wear such jewelry with a neckline.
Using metal decorative ornaments, ribbons and lace, you can create such a small masterpiece!) In this case, the clasp will be a thin satin ribbon connecting the edges of the choker.
If you don’t have the necessary accessories for a choker on hand, then a simple Chinese clasp can help out, which you can also make yourself.
Black lace and pearls still look elegant.
The following master class will show us how to make such a choker with our own hands:
A choker with a medallion pendant has an extraordinary antique charm.
How to choose beads?
It is almost impossible to make a beautiful decoration from low-quality beads, so you need to carefully consider the choice of material. Savings here should be reasonable, without compromising quality.
Let's consider the main points that a beginning craftswoman needs to take into account.
Material
We associate classic beads with glass, but they are made not only from this material. There are ceramic and even metal beads! Small beads made from natural minerals are theoretically not classified as beads, but stones and beads often complement each other, especially in designer items.
And for children's creativity, plastic beads are often used. Products made from it do not look so impressive, but beads made from artificial polymers do not have sharp edges that can hurt you, and their cost is minimal.
It is believed that the art of making beads originated at the dawn of glassmaking, about 5.5 thousand years ago, in Ancient Egypt. Glass beads were made by hand and were quite expensive.
Manufacturer
Nowadays, hardworking Chinese make absolutely everything, including beads. The cheapest Chinese beads can be immediately discarded due to poor quality: they are uneven, different sizes within the same size, and there are many defective beads in the batch. Even if you manage to weave something more or less decent out of it, the product will quickly lose its attractive appearance due to poor-quality coloring.
The beads offered by certified Chinese manufacturers are much better. It can be used for the first jobs until you get the hang of it. Beads of similar quality are produced in India and Taiwan.
And experienced craftswomen prefer to work with high-quality and expensive Czech and Japanese beads. It doesn’t cost a penny, but the weaving is dense and uniform, and the products are stronger and more durable.
Form
A classic of the genre is round beads, which are balls with holes. But the variety of bead shapes does not end there. Often used in weaving:
- bugles, which are pieces of glass tubes of different lengths;
- a cutting that looks like a very short glass bead;
- drops - sort of droplets with holes near the top;
- Charlotte, which has a cut edge;
- figured beads, which can be anything: cubic, pyramidal, cylindrical, in the form of stars, barrels, and so on.
Weaving with beads can be interspersed with other elements. Beads of all shapes and sizes, artificial pearls and metal charms are often used.
Size
The size of the beads is usually indicated on the bag. It indicates how many beads can fit on an inch of base. That is, the larger the number, the smaller the bead size. This rule applies to Czech and Chinese beads.
Czech bead sizes
The beads are very small, so size errors are inevitable. But the Japanese have achieved outstanding success in this field: they make the smoothest beads. It is ideal for dense weaves, including strands. Openwork decorations, paintings, beaded trees and others like them are not so demanding on the sizing of beads.
Palette
Beads can be matte, transparent or translucent, painted in hundreds of colors, coated with metal and various pigments. Even individual beads can be two or three colors!
Transparent beads can contain colored elements inside, shimmer with all the colors of the rainbow, and change color depending on the lighting. There is a very complex gradation of bead types by color, which is worthy of a separate article, but beginning craftswomen don’t have to bother with this: just create for yourself for pleasure.
The most important thing is the quality of painting: the durability of the product depends on this parameter. The most preferable in this regard are beads with coloring throughout the entire mass, and not just on the surface. And, of course, Japanese.
Ribbon chokers
Satin ribbons are an excellent material for creating chokers! Even a small thin black ribbon, tied in a bow and decorated with a small pearl, can be a decoration on your neck.
Afinka DIY demonstrates the simplest options for making a choker with your own hands from ribbon in its master classes:
A voluminous bow secured with a satin ribbon will add a piquant touch to the look. It is better to dilute the black color with something bright, for example, such a bright red center.
A wide satin ribbon will enhance the effectiveness of the image of an attractive woman. Shades of red always attract attention.
Satin combined with multi-colored stones will make your look more interesting and sophisticated.
Ribbon chokers are very popular due to their ease of manufacture and sophistication. Brooches, beads, seed beads, rhinestones, etc. are suitable for decorating them. It is also not necessary to make a clasp; the ribbon can simply be tied at the back.
Or make an elegant bow on the side, the long ends of which will hang beautifully in front. In this case, you can combine ribbons of contrasting colors.
If you have various decorative “things” left from a bag, belt and clothes, then you can safely decorate a satin ribbon with them.
If you have a necklace lying around that no one has worn for a long time, you can also use it to make a choker. You wrap the necklace with bright ribbons, and the decoration can be made from threads in the form of fluffy tassels.
Beads of different sizes can make a voluminous choker.
An ornament made of simple checkered fabric will look very cute on a child’s neck. You can decorate it with bows and a strawberry-shaped pendant.
Bracelet with letters
Make your own bead bracelet by following simple steps.
Material:
- Threads of any color of your choice
- Beads with letters
- Buttons
- Scissors
- Thread fastening tape
Operating procedure:
- First, you need to measure the required length. Cut the lace to 4 times the length of your wrist. You will need 3 pieces of this length.
- Fold the thread in half and tie a knot at one end.
- Make the loop large enough to fit your button, but not too big that it can be easily undone.
- Glue the end of the rope to the table.
- Divide your string into 3 groups so you have 2 in each group. Start weaving a bracelet.
- Having reached a little less than half the way, you can string beads with letters. Children can also write their names or their friends' names on the bracelet.
- Before you start stringing beads, you need to tie a knot in the place where you stopped weaving. String the letter beads onto the two middle pieces of twine.
- When you're done, you'll need to tie another knot.
- Continue weaving until you reach your desired bracelet size.
- Thread 2 or more pieces of rope through the button. Buttons with 4 holes can be threaded a couple of times. Tie a knot at the back of the button and trim off any excess thread.
The design possibilities are endless with different colored threads, fun shaped buttons and different words. Each bracelet will be unique!
Velvet chokers
A velvet choker is a universal decoration and looks organic with almost all clothes, if you choose the right color scheme.
Based on the basic colors of your wardrobe, you can make chokers of various colors, as they say, “for all occasions in life.”
You can decorate a homemade velvet choker with anything you have at hand: bows, beads, rings, decorative crosses.
A black velvet choker does not tolerate competition, so it is better to wear it on an open neck without any other jewelry, or with thin chains that match its style.
Velvet is a material that looks very impressive in itself. Therefore, you should not overload your product with various decorative decorations.
We use plastic
Plastic hair ties are quite popular because they are beautiful and sophisticated. Luckily, you can also make them yourself.
Note. You can buy soft plastic in specialized stores for creativity. It can be very different.
For example, thermosetting, requiring heating up to several hundred degrees to harden. And there is one that only needs to spend about twenty minutes in a regular oven.
Example of a plastic rubber band
This material has many advantages:
- sculpting with it is a lot of fun;
- it has a great variety of shades;
- You can make any shapes from it.
For example, it is easy to sculpt ordinary ladybugs. Or some other similar beautiful composition. You can paint the product using ordinary acrylic paints - they are very durable, do not wash off and will ensure the brightness of the product.
Once the plastic is finished in the oven, glue a rubber band to it.
Literally anything can be made from plastic:
- bows;
- flowers;
- insects and other figures.
Thread chokers
A thread choker is no less original. This decoration will enliven any everyday look: be it jeans with a shirt or a dress.
Olga Konovaltseva tells in her master class what materials and in what quantities are best to use when weaving a choker from yarn:
You can make a calmer version of a braided choker using pastel-colored threads. For ties we use a simple satin ribbon.
By decorating our braid around the edge with beads, we get such an elegant choker. It can be worn with an evening dress or simply with a white shirt.
By weaving beads directly into a braid, you can make such variations of “modest” chokers. You can wear them either one at a time or several at once. When making them, you can use any thread and even bleached twine.
There are different options for weaving a choker with your own hands from threads. This is a great option for baubles lovers.
You can decorate a choker made of threads with various pendants, for example, in the shape of a sun, or by attaching your amulet, a cross or any natural stone to it.
Using metal elements (rings, chains) you can get such a “rich” braid for the neck.
The braid can also be woven into a large metal chain.
Using a blank, a thick cord or an old necklace, you can make a bright choker by tightly wrapping it with threads of various colors.
Bead bracelet
Materials:
- Silk cord,
- Bakery,
- A selection of beads.
Operating procedure:
- Let's start the master class on making a bracelet with a cord approximately 10 cm long. Pass the end of the cord through a crimp to create a small loop. Pinch the crimp to secure it.
- String the beads. You can choose only one color for each bracelet to make it look less fussy. We used about 14 beads per bracelet which was about 4cm long. Once you are happy with the length, repeat the process in step one with the other end of the bracelet.
- Tie a knot at the end of the cord and string three beads and a bead onto it. The very first bead will become a decoration at the end of the cord, and the next two will become a clasp.
- Thread the silk thread through one of the loops of the beaded piece and back through the crimp. Make a very small loop and squeeze the crimp. You need a bracelet to be able to wear on your arm, you can add a few extra centimeters to this length in advance.
- Tie a knot at the end of the cord and thread the thread through the bead, using the same color as the beads in step 3. Thread this cord through the two anchor beads in the opposite direction of the first thread.
Cut off the excess cord. Check the length of the bracelets, if they look a little long, simply cut them shorter.
Leather and suede chokers
Products made from leather and its substitutes always look stylish and impressive, especially in costume jewelry. Such jewelry is mainly preferred by fans of casual and military styles. To make a leather choker you don’t need any special skills.
A narrow strip of leather will further emphasize the slender neck of its owner. As a lock, you can use ties made of thread or suede cord with “brooms” at the ends.
A laconic strip of brown suede will perfectly complement the delicate look.
Using a metal ring, rivets and pink leather, you can create a trendy accessory.
A strip of leather, a chain, glue and accessories - all this in deft hands gives birth to a stylish decoration. It will look extremely good with both a dress and leather items.
From a small piece of leather stitched along the contour on a machine, as well as metal rivets, you can create a designer decoration. Be individual!
DIY leather bracelet
A woven leather bracelet is a universal piece of jewelry that is suitable for both men and women of all ages. This type of jewelry looks best when paired with similar ones - weave several bracelets at once and wear them as a bunch. And so that they don’t look boring or untidy, beads, spikes, stones, lace or scraps of colored fabric can be glued or sewn on top of the leather.
Okami leather bracelet (look in the SUNLIGHT catalogue)
In order to create both women's and men's leather bracelets with your own hands, you do not need special skills. All you need is leather, scissors, bracelet clasps, an awl and additional accessories depending on the type of bracelet. Let's talk about two leather bracelets that you can easily recreate at home.
Bracelet with adjustable girth
The pattern for such a decoration can be any bracelet from an all-inclusive hotel - an ordinary plastic ribbon with several holes for fasteners and a wide, decorative part.
Make a leather pattern for the main part of the bracelet and a small piece for the button clasp. Install the clasp and attach the small part to the main one using special leather snaps. On the main part, make several holes to adjust the girth. Ready! Any decoration can be glued or sewn onto the wide part.
Bracelet made of cords
Boho-chic lovers can weave an interesting bracelet from leather cords. The easiest way for such decoration is to use a double flat knot pattern.
For this technique you will need two leather cords and a crossbar to secure the cords to while weaving. Once you have mastered the double flat knot, you can experiment with other techniques - there are dozens of them.
Chokers made of laces and beads
Even a child can make a choker from lace and beads with his own hands! But this fact does not take away from this product its charm.
Such chokers can be connected to each other, forming, for example, a triangle from beads in the middle.
Chokers made from laces can simply be tied around the neck. You can also use the laces to weave a neat braid and tie the resulting choker into a bow!
You can use a small piece of a large chain as a choker decor.
Decorative embellishments (rings, hearts, leaves, etc.) will make string jewelry more interesting. Note that the laces can be used in various colors, and not just the usual black and brown. Red color will always make you stand out from the crowd.
Braided cords can be used to create a choker, and together with beads you will get such a creative decoration.
Features of creating bead rings
Today there is a large selection of patterns for bead weaving of rings for every taste. They are intended for beginners and experienced craftswomen.
Needlewomen can easily understand any instructions if they understand the basic principles, paying attention to such parameters as:
- Size range;
- Weaving direction;
- Creating the desired ornament.
What types of weaving exist
Another factor that should not be ignored. DIY decorations can have different patterns, but the most often used in patterns are:
- Mosaic;
- Chess;
- Wave.
There are also types of weaving that use a combination of two tapers.
Tips for beginning needlewomen
If you still have very little experience in creating beaded jewelry, beginners should follow the following recommendations:
- Weaving should begin with a training cloth;
- For the first execution, it is better to choose flat ring options;
- At first, refuse expensive beads and accessories.
If you follow these measures and gradually increase your skills, you can learn to create luxurious jewelry.
Choker scarf
For inventive fashionistas - a choker made from a small scarf!
A bright scarf, tightly tied around your neck, can radically change your entire appearance, as well as enhance all the necessary accents.
For girls who prefer calmer colors in everyday clothes, a good option would be to combine a neckerchief in unison with the color scheme of the rest of their clothes. For example, a shirt with pale blue stripes will complement a dark blue scarf.
A universal option for many: a white shirt and a bright or more discreet choker scarf! A win-win!
A choker neckerchief is a truly fashionable accessory that will add charm and enhance the glamor of any lady!
For those who always want to be original and stand out from the crowd, you can combine several chokers at the same time. For example, a choker made of rhinestones and beads will perfectly complement a black leather cord.
Thin lace, selfish velvet, daring lace and you are unique!