Return to list of articles Processing animal skins and dressing them is one of the ancient crafts. But only hundreds of years later did craftsmen begin to put marks on their products. This is how embossing appeared.
Today the craft has reached industrial proportions. The patterns are stamped on special presses. Cliches (stamps with a cut-out design, when pressed, a pattern appears) have been used for many years in a row. Jackets, diaries, bags, belts made of artificial and natural leather are embossed.
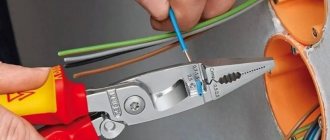
Embossing at home takes a lot of time and is performed only on natural raw materials. It is more difficult to achieve evenness in the drawing; the quality of the work directly depends on the experience, knowledge and skills of the master. But with your hands you can create very complex designs and motifs with small details and different textures. The works turn out to be exclusive.
You can decorate the cover of your diary, belt, purse, keychain yourself with embossing.
How and where to learn leather embossing with your own hands?
Going to special courses in your city (if there are any) is the fastest and most effective way. The master will help you choose materials, show techniques, correct mistakes during classes, and answer questions. You can take paid courses remotely.
Many people learn from YouTube videos and open-access master classes, communicate on forums, but this is more difficult, since there is no one to correct and monitor during work.
What kind of leather is suitable for the job?
Vegetable tanned leather is used for home embossing. The material is elastic and flexible, making it easy to emboss. The relief lasts well for many years. Among other advantages:
- naturalness;
- no chemical treatment;
- softness of products;
- beautiful natural light and beige shades;
- painting with environmentally friendly water emulsions.
Skin thickness
The choice of thickness depends on the method of processing (hot or cold stamping), as well as the planned finished product (whether it will be a belt or a bracelet).
For cold stamping on leather (cold stamps), you can take material with a thickness of 0.8 mm and above. The final indicator depends on the properties of the raw material to maintain its shape and relief. Hot (with heated stamps) is done on workpieces with a thickness of 1.2-1.4 mm. For beginners, it is better to start with thick leather 2 - 2.4 mm.
Types of leather for various products:
- Cheprak is the most dense and durable raw material. Suitable for making straps, sheaths, cases and bracelets. Thickness – from 1 mm.
- Yuft is a material up to 2 mm thick with a high level of plasticity. Suitable for making any small accessories.
- Crust is thick, dense leather with a smooth surface and a thickness of 2 mm. Used for wallets, key holders, purses and other accessories.
If you are in doubt about your choice, you can ask for advice from the seller from whom you buy the leather fabric.
Treatment of leather after embossing
You already know how to emboss leather, but you are not yet familiar with the finishing process of the material. So, when the drawing is ready, you should go over each line with a stylus and try to make it smoother so that the drawing looks less rough. Then polish the product with a soft cloth. When the treatment is completed, it is advisable to wipe the skin with water and leave to dry.
When you first get involved with the work of a leatherworker, you will experience conflicting feelings. Firstly, you saw the immediate result of your work and realized that amazing designs on the skin are quite accessible to you with patience and some experience. On the other hand, it became obvious that this work is not as simple as it seemed at first glance. Applying each print requires precision of hand, care and certain skills.
Some remain a fan of leather embossing for many years, while others, realizing that it is safer to get a high-quality result from professionals, order embossing in workshops equipped with a press and other special equipment.
How to prepare leather for embossing?
- First you need to thoroughly moisten the material. The piece is placed in a container of water and kept there until the material is saturated with moisture. You can focus on the bubbles: if they stop appearing, then it’s time to remove the piece from the water. Moisturizing time depends on the thickness and type of skin and varies from 10 to 30 minutes. Once wet, the fibers soften and are easier to process.
- Then you need to let the skin dry a little - it should not be too dry or wet. One way to determine the appropriate degree of moisture is the color of the material. It should be close to the original shade before soaking.
- A properly prepared base allows you to apply the clearest drawings and stamps. With experience, the master begins to determine the ideal humidity level visually.
Hobby: leather embossing
Post your work and technology. We are not your competitors, you can safely share.
There are no competitors in this business at all. Everyone shares and helps each other. Because they understand that in the modern world everything is easier and cheaper to order from China, and individual production is not profitable. Twenty years ago we had 2 or 3 times as many people in the guild. It hurts your heart when you see that the average age of the craftsmen is somewhere around 50-60. Old people are dying, but there are no replacements. I'm one of the youngest.
maker2013,
Evgeniy - tell me how to prepare the skin before work. It is moistened with ordinary water or there are special compounds that protect against excess moisture and retention of the pressed pattern.
And dyes and varnishes on what basis. Read more about them.
How to prepare your skin before work:
The skin is moistened with plain water; there is no need to prepare anything special. There are special compositions for wetting, but I have not seen anyone use them. The secret to proper wetting is not to have too much or too little moisture. If the skin is too wet, the stamp will bounce off like rubber and the design won't be as clear. If there is not enough moisture, the leather fibers will still be pressed against each other, and the stamp will not be able to compact them where needed.
The easiest way to tell if leather is 'ready' for work is when leather absorbs water, it darkens. You need to wait a few minutes until its color begins to return to its original color.
Experts advise moistening the skin not with a sponge, but by dipping it in water, or even soaking it. After this, it is placed in the refrigerator for 12-24 hours. Then they take it out and wait for its color to begin to return. During work, cover with glass that part of the drawing that is already wetted, but are not working on it at the moment - so that its humidity does not change. However, this is already aerobatics; I have never done this.
About dyes:
There are 3 types of dyes: paints, stains (dye) and aging agents (antique - I honestly don’t know what this type of dye is called correctly in Russian).
The colors remain on the surface, the stains are absorbed between the fibers of the leather. Accordingly, stains are more resistant to mechanical damage to the surface; they are used where the skin will touch - belts, saddles. Because paints remain on the surface, they can be rubbed off or damaged. The advantages of paints are that they are much brighter than stains and paint can be used to cover another paint. Theoretically, several layers of white paint can be used to cover black paint. This will not work with stain; you always need to start with a light one and (if necessary) continue with a darker one.
Stains differ from each other in color and base. The colors are blue, green, red, yellow, but their shades are not produced and if you need to get shades, stains can be mixed with each other.
A short digression about mixing paints and stains .
When mixing, it is necessary to consider which colors complement each other and which are opposite. For example, if you mix blue and yellow, it will be green. And if it’s blue and orange, then the dirt will be an incomprehensible brown color.
Traditionally, stains of brown shades are used, and it is these shades that are sold in large quantities.
The basis of the stain.
They are water-based, alcohol-based and oil-based.
Water-based: non-toxic, can be used by children, does not require ventilation, it is easy to change their concentration by adding tap water, mixes well on the skin because they do not dry out so quickly. Minus: they are not as bright as alcohol and oil ones.
Alcohol: brighter than water. Disadvantage: they dry quickly; when painting, the previous stroke does not always want to mix with the new one. In the video above I use an alcohol stain.
Oil-based: the most expensive. Their main advantage is that all other stains make the leather tougher. Only oil-based stains do not change the hardness of the leather.
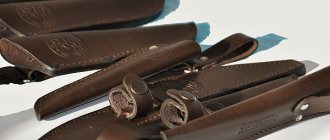
This belt is painted with a water-based stain:
Base paints.
Paints are water-based or acrylic-based. Water-based paints are produced specifically for leather. They are duller and I personally don't like them. Any acrylic paint can be used; it should not be written on them that they are made specifically for leather. Naturally, the higher the quality of the paint, the better it will behave during painting and then when it dries. I use Liquitex paints, they are expensive (I bought them on sale! ) but worth it. This drawing is painted with acrylic paint:
I don't advertise this manufacturer, it's just what I use and am very pleased with. For example, this drawing was bent into a pipe and the paint did not burst or cracks appeared.
Flat sheet with pattern:
The sheet is bent into a pipe:
antique is a water-based paint that 'doesn't stick'. Cover the entire drawing with it, and then wipe it with a damp cloth or paper towel. After this, the paint remains only in the recesses and emphasizes the contours of the design.
Protective layers
When the design is cut out and extruded, and you are 90% satisfied with the work (even if others don’t see, there are still mistakes and problems that are visible to you...) the skin is covered with a protective layer so that it does not absorb water, deteriorate, or rot. There are several types of protective layers.
Historical skin protection is oil or wax. The wax remains on the surface, the oil penetrates deep. The disadvantages of both are that they need to be updated periodically.
Acrylic protective layers - protect well and adhere well to the skin. There are shiny and matte.
There are also many modern products based on oil or fats
It should be added that paints and protective layers are usually used only on the grain side of the skin.
To protect the inside (suede), two pieces of leather are glued and/or stitched, with the insides facing each other. Modified October 29, 2013 by maker2013
DIY leather embossing tools
- Of the main ones:
- sets of cliches (stamps) with which drawings and inscriptions are embossed;
- rotary knife for outlining contours - a special knife with a beveled blade, which is convenient to “turn” when drawing curves; it comes in different shapes and dimensions;
- a hammer made of nylon (or similar material) - it has a slight recoil when striking, which will not damage the prints;
- styluses made of plastic or wood, with which you can extrude the contours of patterns;
- markers with wheels for marking leather; they can also be used to draw raised lines on leather;
- needle file sets - small files for cutting a very small amount of leather (for example, if you need to remove protrusions and irregularities on the edges of products);
- smooth wood base as a substrate;
- a soft sponge that can be used to wet and soften the skin right before starting work;
- bone smoother - for smoothing skin edges, kinks, for marking kinks, made from camel bone;
- artistic cutter (hair knife) - allows you to emboss bird feathers, animal hair and other components with small lines located in parallel;
- set of cardins - a tool similar to a stylus with a non-standard tip (spatula-shaped, spherical rectangular or any other), used when modeling different textures, contours, backgrounds, “raising” the picture.
Additional tools include devices for sharpening rotary knives, stencils with patterns of trees, birds, ornaments and symbols, and others.
Tools can be bought in specialized stores, ordered from a craftsman, or made yourself.
Different application techniques
The imprint on genuine leather can be either convex or depressed. There are several embossing techniques, the choice of which determines the result obtained.
A colorless indented pattern is obtained using blind embossing. It has another name: blind (from the English word blind). Both hot and cold application methods are used. The main tool in the work is a cliche, which is placed on a leather blank. The master hits it with a special hammer in a perpendicular direction. The depth of the impression depends on the force of the impact.
You can apply a pattern using blind embossing at home. The main condition is the correct preparation of the base for work (the canvas should be well moistened). The pattern looks impressive on backpacks, bags, covers, and belts.
The convection technique got its name from the name of the English innovator William Congreve. Unlike blind embossing, the leather blank is pressed on both sides. The following tools are used in the work: a punch (a special convex stamp for pressing on one side), a matrix (a structure whose shape follows the bends of the punch).
The canvas is laid between these devices. As a result of embossing, an original convex pattern is obtained. This type of image can be distinguished by the reverse side of the product, on which a concave mark is visible.
It will not be easy for a novice artist to achieve an even application. Anyone can do embossing on leather with their own hands if they wish and have free time, but the quality of the work depends on the person’s experience and skills. Craftsmen apply complex motifs and patterns consisting of small details to the skin. They know how to change the texture of a product during work. Each leather item made by hand becomes exclusive.
Types of embossing
Before embossing the leather, the master chooses:
- processing method: hot or cold;
- technique: blind (blind), embossed, with or without foil.
Cold and hot stamping
With the cold method, the image is applied to the leather surface with the usual blow to the cliché. The method is suitable for thin and thick raw materials (the latter is a little more difficult). The principle of operation is simple, but you need to “get the hang of” the force of hitting the cliché. If it is too weak, the print will be barely noticeable, but if it is too strong, it can damage the thin material. It is recommended to start training with a thicker stock.
With the hot method, the cliche is preheated. Under the influence of high temperature, the upper layers of the skin are burned, resulting in a brighter and more durable image. The method is not suitable for thin raw materials up to 1.2 mm (there is a risk of burning), but is ideal for thick leather. When working, it is important to monitor the heating level of the cliche: too high will ruin the structure of the material. The hot method produces the most original products, since not only the relief changes, but also the shades of the designs.
For a beginner, it’s easier to start with a cold one: you don’t need to select the temperature and work with hot tools. The hot method will be more difficult for a beginner: you will have to experiment with both temperature and pressure so as not to burn the skin and get a uniform pattern.
Blind, embossed, with or without foil
You can apply relief to leather using various techniques. Each requires specific tools, skills and knowledge.
The finished imprint on the surface of a leather product can be convex or depressed. The depth of the resulting cliche print also varies depending on the manufacturer’s design idea. Craftsmen distinguish between blind embossing on leather and embossing. With and without foil.
Blind (blind) embossing
The name comes from the English word “blind” (translated as “blind”). Blind embossing means producing a colorless image. The technique is used when it is necessary to obtain an indented impression. It can be cold and hot.
It is performed using a cliché: the master places it on each workpiece and hits it perpendicularly with a nylon hammer. The depth of the resulting impression depends on the force of the impact. You need to be especially careful when embossing designs using typesetting clichés (i.e., individual stamps to create a whole composition, for example, a word), since all components of the pattern must have the same depth.
At home, blind embossing is quite easy to do. The main thing is to choose and prepare (moisten) the base correctly. Looks good on diaries, belts, bags, backpacks.
Embossing
The name was given in honor of the English inventor William Congreve. The technique is used when you need to get a convex, volumetric embossing on the skin. It can be cold and hot.
Unlike the blind technique, the leather blank here is pressed on both sides. On one side - a punch (a convex stamp), on the other - a matrix (a concave structure that repeats the shape of a convex punch). The workpiece is placed between these two structures and the result is a convex pattern. It is also possible to obtain concave patterns in this way. You can recognize the embossing technique by the reverse of the embossed product, on which a corresponding concave mark will remain.
The convection method is only suitable for thin and flexible skin. At home it is done by more experienced craftsmen. This will require the manufacture or purchase of a matrix.
Foil stamping
Allows you to obtain a colored embossed pattern. Foil can be used in blind and embossing techniques, but only in their “hot version” (cold foil stamping is done on special equipment and using a different technology).
Only special thermofoil is used for leather embossing. Available in a variety of colors from silver and gold to blue, green and red. An ordinary kitchen one is not suitable, as it is not completely sealed and peels off quickly.
With the blind method, foil is placed between the skin and a heated cliche. The same is true with the convection method. Under the influence of temperature and pressure from the stamp (or punch), it transforms into the formed relief and sets together with the surface. The relief depth of the pattern when using foil is usually less, but multi-color complex patterns can be made.
Production of stamps for embossing using the electroplating method
Greetings, friends!
As promised in the comments, today I will show you the process of making stamps for blind leather stamping and foil stamping. Even though I have a store on Etsy and make stamps to order, I have never seen this method again. I will not make any secrets out of this and will tell you everything I know. The method, to be frank, is complex and requires knowledge from a variety of areas. It can hardly be put into production and mass production due to its labor intensity, and I am never a competitor to the guys who have CNC.
The undoubted advantages of the method • You are your own designer (you do whatever you like, the main thing is to find or make a template) • There is no need for expensive equipment and space (I have a window sill of a city apartment designated for the whole process). • Silence (can be done at night). • The cost of stamps is low
Disadvantages (where would we be without them) • The process is labor-intensive (a lot of manipulations and movements) • Constant adjustment of the electrolyte • Unpredictability of the process (I’m still not completely sure of a good result, from batch to batch it can be excellent or complete slag. Physical factors have more of an impact here -chemical properties of the electrolyte, its acidity, temperature, ratio of solution components, density and current strength and sometimes, it seems to me, the cycle and phase of the moon, as well as vibrations of the astral plane))) • Consumables. The electrolyte requires periodic adjustment, you need copper for the anodes (grade M-1 or AMF), you need solder.
The manufacturing process can be divided into stages. 1. Creating a matrix (what we will grow copper from). At this stage, we are looking for a template from which we will create a matrix. The template can be almost anything - anything you like, no matter what material it is made of, can be made of copper. 2. Galvanoplasty itself. 3. Foundry business. 4. Mechanical processing of the finished stamp.
1.Creating a matrix. I mainly use photopolymer stamps for scrapbooking as a template, but with skill you can hand-cut whatever you want from jewelry wax. I have enough of these purchased ones. I’ll show you the process using this corner stamp as an example.
To make the matrix, I use a two-component silicone compound with a Shore hardness of 60-70 units. It is sold by weight and lasts a long time. 2 kg of silicone costs around 1600 rubles + shipping. I have ordered twice in all this time. Despite the fact that I make forms not only for stamps.
I take a silicone impression. I try to fill in more details at a time. Doing each element separately is quite time consuming. So in this case, taking advantage of the writing of the article, I took a cast from several stamps.
To accompany the corner, I have identified two linear stamps (I will make a fillet, although I have not yet figured out how to give it a radius and attach it to the handle.) As soon as the silicone has hardened and stopped being affected by chemicals (it needs to be kept for about two weeks, preferably in the sun), we prepare it for bathing in electrolyte. The photo shows the matrix in the process of laying conductors. I stitch around the entire part with a regular needle using copper wire. I tried silicones of different hardness, but these were the most convenient to work with. Since silicone does not sink, you need to attach a weight. I tie a lead rod. The metal can only be used that is listed after hydrogen in the voltage table, otherwise contact copper will precipitate in the electrolyte and contaminate it. Lead is perfect for this and is heavy and intact.
To make the form electrically conductive, I use graphite spray from a radio parts store.
To load into the bath, I prepared several blanks at once. Buying one stamp there is a great luxury.
There are many ways to create a conductive layer. Graphite spray is the best option at the moment.
A few words about the required minimum for electroplating. Firstly, this is a current source . The laboratory power supply, which I purchased specifically for these purposes, did not work for various reasons, and I successfully bought a battery charger. It's just an unkillable thing. Enough for my modest level. You will need a bath heating element . The optimal solution temperature is 20-32 degrees. The most budget option turned out to be an aquarium heater. Magnetic stirrer . Well, I had to spend money here. There’s no way without her. Stirring the electrolyte is very important. I ordered a small 5 liter stirrer from the Chinese. Works very well, making a tornado in the bathroom easy. Actually the copper plating electrolyte . The most unpretentious and stable of all electrolytes. You will also need consumables in the form of thin copper wire and a copper anode (I buy it from companies that sell non-ferrous metal). Buy a high-quality anode of the M1 or AMF brand right away; you don’t need to shove all sorts of rubbish into the electrolyte. You can kill him in one go.
In general, we immerse our preparations in the bath, and for a couple of nights (during the day, when I’m at work, I don’t leave the device on, but you never know) they bathe there. At first I used scales to determine the thickness of the sediment, but now, as they say, only by eye. And the eye told me - it’s time to take it out.
Beautiful pink copper.
My favorite moment.
Next comes the foundry business. Again, I like to do everything in batches. And this time five stamps for leather and two stamps for wax seals fell into it.
This device was described in one of the MKs. Briefly, it is needed for precise positioning of the die mounting nut when filling it with solder.
I use this type of nuts. When pouring, the sleeve remains above the solder level.
I screw the nut onto the holder and prepare the stamp for pouring.
I melt solder on gas.
Using the movable corners of the structure, we make the formwork for pouring and actually pour it. It's not a tricky thing.
These are the bricks we got.
Now processing of the workpiece.
It is more convenient to sharpen the solder with a rasp like this.
The handle is the most common wooden one. Suitable for all stamps with this thread.
Not the most filigree of my stamps, but the corner is neat :)
That's all, bye everyone!
| Sergey Salamatin is an active member of the “Manual Binding” community, a bookbinder. Nizhny Novgorod |
If you find a typo, please select the fragment of text with this error and press Ctrl+Enter
How to make an impact stamp with your own hands
Making a striking stamp for blacksmithing is not difficult, the main thing is to approach this issue competently. As a workpiece, you need to use a round or square rod made of tool steel (for example, 9ХС, ХВГ, etc.).
Using homemade impact stamps, you can apply different patterns, letters and ornaments not only to the surface of metal, but also to leather products. Typically, electrochemical etching or CNC mechanical engraving is used to transfer the pattern to the impact stamp.
However, in this case, we will consider the manual method - using metal files. At first glance, this procedure may seem complicated and time-consuming, but, as the saying goes: “You can’t catch a fish out of a pond without labor.”
The process of making an impact stamp
We clamp the workpiece that will be used to make the impact stamp in a vice and process it with a file, giving it the correct square shape. Then we mark the silhouette of the letters on thick paper, glue the stencil to the working surface of the stamp and “cut through” it with a file.
How to apply text to leather using a burner and embossing foil
Today we will tell you how to make an inscription using a burner and embossing foil.
To do this you will need: a burner, a piece of leather, a pre-prepared font, a pen, paper clips, scissors, nozzles for the burner.
First you need to print the text. If you are learning, start with a simple font; italics are more difficult to write.
Place the printed font on the embossing foil. Translate the font. You can use a carbon copy, you can see it a little better.
Place a piece of foil on the skin. Secure the foil with paper clips to prevent it from running across the skin.
Place the foil with the gold side up, not the other way around; the adhesive layer of the foil is on the back of the gold.
How to heat the burner correctly? Typically, gold embossing is placed on the skin at 100-130 degrees. It all depends on the foil and skin. I don’t have a sensor on my burner, so I found the desired temperature by trial and error. Sorry for being blunt: I turn on my burner, count to 10 (10 seconds) and turn it off. If you leave the burner on, the foil will burn - it will melt from the high temperature. So first learn to catch the temperature. When you get a golden line, even, it means you have caught the desired mode. Well, if you have a burner with a timer, it will be much easier.
Guide the burner along the lines with the same pressure, then the line will not break. You need to conduct it quickly, with every second the burner loses temperature, and there is a high probability that by the end of the phrase there will be no gold left.
I made a couple of impressions with tips. The principle is the same, pay attention to the photo that where I did not press, the edge of the design was not printed, and where I pressed hard, the design stuck.
Please do not judge strictly by the lines, in this master class I wanted to tell you that there is such a way to transfer an image and that, in general, it is accessible if a person sets himself the goal of learning how to do it. Good luck and patience everyone!
Best regards, Russian Workshop.
www.livemaster.ru
Making a homemade stamp with your own hands
In this project we will make wood branding tools. It’s always nice, after finishing a project, to record the ownership of the product and put a homemade stamp of your own brand on it.
Materials
- Nails. In this case, the nails were 12.5 cm long. The head had a diameter of 1 cm.
- The block from which the handle is made.
- Vinyl fox with adhesive side
- Propane gas
Tools
- Etching tool – you will also have to make this yourself.
- A solution of salt in water.
- Hammer
- File
- Sharp knife
- Bulgarian
Step 2: Hammer
We drive a nail into the end of the block. This will make it easy to hold it while working.
Use a file to clean the nail head so that it is smooth. This will make etching easier.
Cut out the desired design from a sheet of vinyl. It will have to be made absolutely tiny!
Remember that the design will have to be drawn backwards, especially if it is text - as with everything related to printing. It must be flipped horizontally to show up properly on the wood.
Firmly glue the workpiece to the nail head.
Step 5: Etching
You will have to make an etching tool. This tool is quite simple to make. And you can even use a battery as a source of electricity.
We attach an etching tool to the nail and supply electricity to it. Pour the salt solution into the container. We put a nail there. We hear hissing - this is the etching process.
And yes, harmful gas will flow. Be sure to do this in a well-ventilated area and do not inhale the fumes.
Step 6: Cleaning
Etching usually takes ten minutes before the design, cut from the vinyl, appears on the nail.
A layer of oxide forms at the end of the nail. It is loose and easily scraped off with a knife. And under it there will be a finished design.
Step 7: Saw it off
- Cut off excess metal at the edges.
- This will allow the stamp to be as visible as possible - you won't risk the excess metal on the edges pressing into the wood and ruining the stamp.
- But you should file the nail carefully so as not to touch the design with the grinder.
The smaller the disc of the grinder, the better. A file will do the job no worse than a grinder.
Step 8: Handle
We saw off the block to a convenient length to make a good handle.
We refine the handle with a plane, chisel or sandpaper to the desired shape that will fit comfortably in the hand.
Step 9: testing
Now you can start branding.
Heat the end of the nail with a propane torch.
This may take some practice before you discover the right temperature for branding. But for testing, you can use any available piece of wood.
Press it against the tree for a couple of seconds.
We shoot and get the result.
Step 10: Branding the brander
Why not put a stamp on the instrument itself.
This will be very useful so that you can easily see what the mark looks like. Especially if you have several such tools.
Remove the nail from the handle.
We heat up the nail as before. This time you need to be careful, because there is no wooden handle - you can get burned.
We put a stamp on the handle.
Carefully return the nail to its original place.
Step 11: Ready-made homemade stamp of various types (photo)
The tool is small but very useful. They can put a mark on even the smallest object.
Source: https://themechanic.ru/samodelnoe-klejmo
Burning stamp
| Wood burning stamp with a raised image | |
| Area up to 10 cm2 | 1800 rub. |
| Area from 10 to 25 cm2 | 180 rub./cm2 |
| Area from 25 to 50 cm2 | 150 rub./cm2 |
| Area from 50 to 80 cm2 | 130 rub./cm2 |
| Soldering iron 200 - 300 W (with adapter) | 2500 rub. |
| Soldering iron 500 W (with adapter) | 3500 rub. |
| Handle 150mm (brass + textolite) | 500 rub. |
| 350 rub. |
- Engraving depth over 1.5 mm + 50% for each additional. mm
- Coat of arms + 50%
- Complex image with high labor intensity from + 25% to +100% to the cost of the product
To order, contact us by phone +7 (499) 3940020, mail or use the online chat in the left corner of the screen.
- ———————————————————————————————————-
The process of burning a design on wood is known to us as an ancient art form that is found in the culture of various peoples.
For quite a long time, the process of burning was perceived only as folk art, and even now many people are interested in wood burning as a hobby.
But already at the end of the last century, wood burning firmly entered the professional environment, where this fascinating process began to be used for commercial purposes.
In a professional environment, wood, leather, plastic and other materials that can withstand high temperatures are processed using burning clichés.
The essence of his work is simple - an exclusive text or design is engraved of a wood cliche a stamp is obtained on the wood .
Using a burning cliché
At all times, they sought to protect their product from counterfeiting and, caring about preserving the authorship, tried to gracefully sign their work. Nothing has changed now. Artists, workshops and various enterprises use cliches for burning on wood - they leave a brand mark on objects and products, which serves to distinguish original products from fakes.
Equipment and tool kits
To obtain a high-quality image on the skin, you will need special equipment. It is sold at craft centers, ordered online, or made by hand. Embossing masters use special presses. There are presses for applying images to leather: printing (for industrial use) and compact (for small-format workshops and private users). When choosing which leather embossing press to buy, a person will be faced with many offers, and making a choice is not an easy task.
Currently, the industry produces embossing machines of various types and designs, which can be used to perform the following types of work:
- cold stamping;
- foil crimping;
- hot foil stamping.
Suitable leather embossing machines are available in a wide variety of designs.
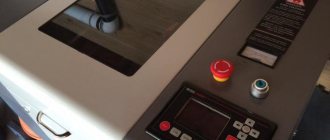
The MGT0051 heat press shown in the photo is capable of performing not only blind embossing, but also embossing and hot stamping. This press also gives excellent results for both cold and hot stamping on leather. He gets excellent results when stamping with foil.
The basis for the press can be not only leather, but also paper, plastic, wood and various fabrics. The heating temperature of the cliche on it is controlled using a thermometer, and the pressing time is estimated using a stopwatch. This allows you to avoid burning or melting of the material on which the relief or image is applied.
Another version of the pressing device is VEKTOR WT-2-210, which allows you to perform gold stamping on leather, create designs using cold and hot methods on products made from different compositions based on leather, leatherette and paper.
Specifications:
| Die size (mm) | 220x295 |
| Drive type | Manual |
| Maximum pressing load (kilograms) | 3000 |
| The size of the working stroke of the slider (millimeters) | 40 |
| Largest workpiece size in height (millimeters) | 100 |
| Foil feeding method | Mechanical |
| Maximum cliche heating (degrees) | 300 |
| Supply voltage (volts) | 220 |
| Weight (kilograms) | 125 |
This machine produces foil stamping on materials of different nature. This can be not only leather and its substitutes, but also cardboard, paper, wood and plastic. The machine allows you to use the following types of clichés: photopolymer, magnesium, steel and brass. The technique of embossing images is somewhat different. In this case, relief type clichés made from materials of the previously described composition are used. The reverse matrix is made of materials with high elasticity. In order to maintain constant pressure for a given period of time, a special clamping handle is used.
Other advantages of this press include electronic heating temperature control, a rotary table, and automatic foil feeding. Price 104 thousand rubles.
In addition, the customer can buy equipment in a specialized store:
- stamping cliche;
- cliche holders;
- thermal handles;
- thermal stamps;
- die forms.
Using these leather embossing tools, a craftsman can uniquely decorate with contour patterns any products made from leather and its substitutes, paper, cardboard, plastic or fabric.
Popular publications :
Bronze casting at home as a business.
Business idea: printing business cards on metal.
Which foil stamping press should you choose?
Features of stamps on leather
Leather is one of the most wear-resistant materials and is used to make various items: shoes, clothing, office supplies, document covers, cases. Procedures for processing and decorating leather and leatherette must be of high quality, which is why embossing is used.
Its main advantages:
durability - the stamp cannot be washed off or wiped off;- spectacular look - embossing on leatherette and leather looks interesting and expensive;
- the use of additional materials - foil and other materials can give the effect of gold stamping on the skin;
- the ability to apply a print over a large area allows you to cover the entire product with a pattern;
- the owner of a leather product can independently select a design or make a cliché.