The use of jute in needlework
Jute thread is affordable and easy to find in stores. To create crafts from jute twine with your own hands, you will need a standard set of stationery. Having started getting acquainted with this type of needlework with simple products, it will soon be easy for the master to move on to the most complex works.
The technology for creating such crafts does not require the purchase of expensive additional equipment. It is easy to apply the skills to make crafts from rope and twine with your own hands.
Jute cords are actively used for the manufacture of various openwork weaving items using the filigree technique and for interior decoration.
Using string or twine, you can quickly and easily transform any item.
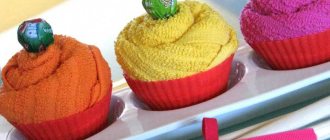
Making an unusual vase
Such simple and boring things as ordinary glass jars, bottles and glasses can be transformed and become an excellent decorative item. You can turn them into a vase, or into a container for small items with the help of a fantasy of jute twine. The manufacturing process is simple:
- You need to find the necessary tools in advance, which will become simple things stored in every home. Among them are a rope-sword, reliable glue, and ordinary scissors.
- The container that we will decoratively wrap should first be washed and dried.
- Next, the container or container is carefully treated with good glue.
- The next stage of manufacturing will be the direct wrapping of the product using twine rope. We carry out the winding carefully, and slowly move from the bottom of the vase to the top.
- After the winding is completed, the thread should be cut. This must be done in such a way that its end does not unwind. Next, we hide it by smearing it with glue and attaching it to the vase itself.
- After the glue has completely dried, you can give free rein to your imagination. Whether you decorate the product with artistic painting or use the appliqué technique – it’s up to you!
Using this technique, you can give a second life to any old pot at home. Also, twine can be useful for updating cereal cans or even some furniture elements. Open up new possibilities for your imagination and use such a wonderful material as a sword for your pleasure!
Advantages and disadvantages of jute
Jute is a fiber of natural origin. It is grown in India. The technology for producing jute fiber involves cutting the long stems of the plant and soaking them in water.
After two to three days of soaking, the jute stems are dried and processed. The technology does not involve the use of active chemicals, so jute is absolutely safe for human health.
Its advantages include flexibility and ease of use.
The disadvantage is the ability to actively absorb moisture and susceptibility to rotting.
Jute cord must be stored in a dry place, since when wet it is less susceptible to processing and takes a long time to dry.
Differences between jute and flax and manila hemp
Manila hemp is durable and does not absorb moisture. It produces a very strong rope with a pleasant shade, which is especially valued for its strength and durability. The cost of Manila hemp determined its use for the decoration of rich rooms.
Linen twine has a dull grayish tint. It is fragile and soft, which makes the work very simple. It is flax that is most often used to make burlap.
The pleasant golden-yellow hue of jute makes it an excellent option for decorating wooden surfaces. Jute is quite durable, and making jute crafts with your own hands is not particularly difficult.
Christmas tree made of jute
One of the most popular New Year-themed crafts is a Christmas tree. You can make it beautifully and originally with your own hands, using jute for the base. For this New Year's craft you need to prepare:
- jute;
- glue gun and rods for it;
- sheet of cardboard;
- beads of different colors.
- Make a cone out of cardboard and glue the base.
- Starting from the bottom of the cone, wrap it with jute using a glue gun.
- Cover the workpiece with another layer of jute so that there are no gaps.
- Glue beads of different colors across the entire area of the tree in a fairly orderly manner.
Thus, the New Year's decor is ready for use. As a decoration for a jute Christmas tree, you can use thin rain and various sparkles.
Jute filigree technique
The method of weaving jute crafts with your own hands for beginners is quite easy to learn. An important component of success is the placement of the product on a flat surface during the production process.
Filigree involves creating openwork patterns by interweaving fibers in different ways.
Modern jute filigree techniques suggest:
Note!
- Quilling crafts: features of the working technique, step-by-step instructions and clear diagrams for beginners + ideas for creative crafts (150 photos)
- Crafts made from corrugated paper: 100 photos of creative solutions for crafts + step-by-step diagrams and instructions for making your own
- Crafts from foamiran: ideas for creating crafts and interesting patterns for making flowers
- using transparent glue to connect parts of the craft;
- selection of strong threads for the base of the product;
- painting with acrylic paint.
The absence of a wire frame and the adhesive joining method allow you to make crafts from twine in a relatively short period of time.
Petals using the kanzashi technique
It’s easy to make flowers from burlap with your own hands. Let's look at a craft made from five petals with a hemp thread center. The fabric should be soft, so there is no need to soak it in the adhesive solution. Cut squares of the same size and fold them in half diagonally. Take a needle and thread, gather the triangle with all corners at one point and sew with stitches. Attach all the details of the craft to each other and secure the end of the thread with a knot on the back side of the flower.
Next, do-it-yourself burlap flowers (photo above in the article) are decorated with hemp thread. This element serves as a decorative finish for the core of the flower. For a thick thread, prepare a gypsy needle with a large hole. Sew with stitches in a circle in several turns. Some craftsmen attach this part with hot glue.
Creating stencils
It will greatly simplify creating crafts from twine with your own hands by preparing a stencil with a sketch of the invented pattern.
Stencils are a schematic representation of the design of the future product. Their use helps to create symmetrical patterns and speeds up the process of creating crafts from jute twine using the filigree technique.
The main rule for making convenient stencils is to apply a clear image on white paper.
It is not difficult to come up with a pattern to create a template yourself. It is wise for beginning craftsmen to look for jute crafts, patterns and new ideas on the Internet.
Note!
- Crafts made from polymer clay | Step-by-step master class on creating beautiful crafts
- DIY epoxy resin crafts - options for original crafts, step-by-step instructions for pouring and making them yourself
- Lego crafts: step-by-step master class on creating simple DIY crafts + original versions of Lego products (photo + video)
Design masterpieces
Man-made design allows you to find optimal interior decoration solutions.
Handmade crafts made from jute and burlap are a great help in this. These materials combine perfectly, creating a special aesthetic of simple beauty and natural charm. Burlap, as a rule, serves as the basis for such crafts. It is stretched onto a stretcher, glued onto a sheet of thick cardboard, and given its original shape using starch.
This is how wall panels, hanging flowerpots, decorative rings, vases and other designer items are obtained. Design details are created from twine using various techniques: leaves, flowers, spirals, curls, etc.
They decorate with what is most suitable for realizing a specific idea: dried flowers, leaves, cones and ears of corn, artificial flowers, ribbons, beads, buttons, etc.
Simple craft ideas
You can start creating interior items using jute cord by making your own crafts from burlap and twine.
Bottle animals
It’s easy to make a series of animals using a bottle wrapped in twine. Most often they create cats and cats, and owls are created from wide egg pods. The technology for making rope crafts is the same, you just need to make another head and decorate it accordingly.
For the base of the head, it is good to use a foam ball of suitable diameter. If you don’t have this at hand, you can make a base from wet paper and PVA glue using the papier-mâché technique. Soft paper is best - toilet paper, newspaper.
Frame
Any beginner can make a stylish frame for a family photo.
You need to prepare:
- thick packaging cardboard;
- a sheet of dark A4 paper;
- wooden skewers;
- wire;
- a piece of burlap;
- jute twine;
- universal glue;
- scissors;
- decorative elements (coffee beans, beads).
Operating procedure.
- Cut out the base of the frame with a window for the picture from cardboard. Glue a piece of paper to the back so that you can insert a photo.
- Cover the workpiece with burlap.
- The pattern for decorating the frame must be thought out in advance and a sketch made. The twine is twisted and glued to the burlap base, forming its own pattern. The twine must be cut at an acute angle. This makes it easier to glue the edges of the cord together. It is convenient to trim the twine with a skewer.
- After completing the pattern, the product is additionally decorated with beads, coffee beans or other decorations.
Using a similar technique, it is easy to make various crafts from burlap and twine.
Note!
Christmas crafts - how to make them yourself? 150 photos of the best themed crafts- Crafts made from stones: creative options for crafts made from stones + step-by-step instructions for making your own, methods and schemes of work
Crafts from disks: a step-by-step master class on how to create them yourself, creative ideas for crafts of varying complexity + simple patterns for beginners
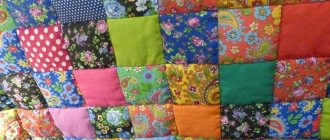
Jute rug
Crafts made from jute can not only serve as interior decorations, but also perform certain household functions.
Any novice craftswoman can make a simple rug.
At the preparation stage, it is necessary to determine the size of the product.
To work you need to prepare:
- thick fabric or cloth for the base;
- universal glue;
- stationery knife or scissors;
- jute cord.
Operating procedure.
- Cut out a fabric base of the desired shape and size.
- Form spiral elements from cord or twine on a flat surface.
- Carefully glue the finished parts onto the fabric base.
The size of the product directly depends on the number and diameter of spiral blanks. It is easy to use cardboard as the basis for twine crafts.
To form spirals, a cord or twine of any cross-section is suitable.
Craftswomen use strong thread to crochet rugs, washcloths and bags of various shapes and sizes. The patterns depend on the skill and imagination of the needlewoman.
An original rug will effectively complement any room.
How to make beautiful flowers from jute with your own hands
Jute flowers can decorate many interior items and clothing. Even a novice craftswoman can make them if you follow a detailed master class.
Jute for making floral ornaments
You need to prepare the following tools and materials:
- Super glue;
- jute of different shades;
- scissors;
- safety pins;
- pencil;
- office file;
- cardboard;
- compass;
- needle;
- ruler.
The simplest flowers from twine
Features of making chamomile from jute:
- Using a compass, form a circle of the required diameter from cardboard. It is this parameter that will determine the size of the bud. Cut out the part.
- Using a ruler and a simple pencil, draw a cardboard circle according to the principle of a snowflake. It is necessary to carry out 6-8 diameters.
- Stick safety pins along the edge of the cardboard circle, along the outer diameter.
- At the point where the diameters intersect, use glue to glue the tip of the jute.
- Next, wrap each pin with thread, forming loops. It is necessary to alternately wind each pin 2-3 times.
- After finishing the winding, cut off the thread, leaving a tip 25-30 cm long.
- Thread the tip of the thread into the needle and sew loops through the middle of the flower. Grab bundles of thread in equal quantities and pull the needle through the middle of this ring. Tighten the knot.
- Glue the tip of the thread to the middle. This way, the complete product will be fixed.
- Carefully remove the needles and pull out the cardboard circle.
Note! All work is done on a stationery file so as not to stain the table surface.
You can make a flower like this and decorate the middle of the product in an original way. Place a few coffee beans in the center and sprinkle some with cereal. Other types of powder can be used. The main thing is that the material is natural.
You might be interested in this: Simple patterns and sewing procedures for Baby Bon
Flowers with a natural center
A flower can be made from the same materials by forming jute filigree. A figured flower is printed on a sheet of paper, which is then placed in a stationery file. After smearing the file with glue, use tweezers to lay the twine along the contour of the design. Additionally, all connections and intersections of threads must be additionally glued.
Filigree technique
Note! Flowers made from jute and burlap look even better. The materials are similar in texture and structure, so they fit together perfectly.
Dish rack
An example of a rope craft for beginning needlewomen would be a stand for hot dishes.
To create it you will need:
- rope or jute cord;
- base (cardboard, cloth, wooden blank);
- universal glue;
- scissors or stationery knife.
Operating procedure.
- Give the base the required shape. Usually stands are made round or square. It is easier for beginning craftsmen to use a circle as a basis.
- The desired pattern is formed from rope or cord. It's easier to start with a spiral blank. The base is covered with glue, the cord is carefully laid in a spiral.
- The edge can be decorated with a cord of larger cross-section.
It is not difficult to depict any ornament on a wooden base. If you pre-impregnate the wood with stain and varnish it, the result will be a unique interior element.
Simple techniques for working with jute material
Inexpensive jute material is often used in creativity and handicrafts, not only as an additional decoration. From strong and relatively smooth rope of different diameters or jute ropes, you can create truly beautiful and impressive crafts, for which the following techniques are used:
- macrame, a unique and simple weaving technique, it helps to create practical and openwork products from jute threads and ropes;
- filigree, in this technique magic curls and openwork monograms are created from pieces of rope, they are used to decorate objects;
Wrapping is the easiest way to use jute; it is used to wrap things of any shape, decorating a worn or inconspicuous surface.
The basis of each product is an interesting and unusual idea; it can be easily supplemented with unusual elements, increasing the originality of the product. Without being afraid to experiment, you can take the proposed photos of finished products as the basis for crafts, combining different materials and decorations or homemade decor.
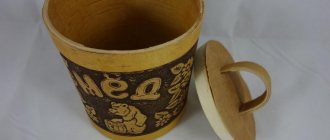
Decor of containers
Using a jute cord, it is easy to give an original look to any storage container, transform a jar beyond recognition, or decorate a bottle.
For gluing, experts recommend using PVA glue. It does not leave streaks after drying.
The selected container will need to be pre-rinsed, dried, and glass or plastic degreased. After this, cover with an even layer of glue. The cord is laid in even rows and pressed so that there are no gaps.
In a similar way, you can decorate flowerpots, interestingly shaped boxes, and pots for indoor plants.
You can complement the decor with pebbles, beads, lace or fabric appliqués.
Stool decoration
Jute cord is highly durable. Therefore, it is used for the manufacture and decoration of stool seats.
It is easy to knit a decorative cover for a stool using knitting needles or a hook made of natural thread.
Another way to make a cover for a stool is to glue a spiral blank onto a fabric base. This method is suitable for those who do not know how to knit.
To make a seat, you need to wrap the opposite edges of the frame with cord.
Jute lampshade
You can also use natural cord to create a new lampshade for home lighting fixtures.
The first step is to carefully consider the design of the product, the theme of the ornament and select additional decorative details.
You can come up with patterns yourself. It’s easy to look for topics for inspiration on the Internet by studying DIY jute crafts and their new items.
It is convenient to use an inflatable children's ball as a base for a lampshade. The cord is impregnated with PVA glue and wound onto the base in any order or according to a stencil.
After drying, the ball must be pierced, and the product must be additionally decorated with pebbles or other decor.
The basis for making a lampshade will be a glass jar wrapped in cling film.
Making a wall wreath from twine
If you use the wrapping technique, you can make an excellent interior detail that will look great at home and be pleasing to your eyes. Such a wall composition will serve as the center of attention for guests, and you will get special pleasure from telling them that you made it yourself, and even from such a simple material that you turned it into a real art object.
The craft is very simple to do; you just need to wrap a square frame or a small diameter hoop with twine. The secret here is the advice to wrap the winding tightly enough, because the resulting voids can ruin the appearance of the product. You can also decorate such a composition using the appliqué technique, or just a can of spray paint. By adding knitted figures of some animals to it, you will get great pleasure from contemplating the work of your hands.
All kinds of ideas for creating crafts using twine and other similar materials are very easy to implement. You can expand the methods we have described with a huge collection of techniques using the Internet. You can find a huge number of ideas online that almost anyone can implement, because you don’t need any hard-to-find materials to make crafts.
Everything you need to get creative is at your fingertips, and something as beautiful as twine is clearly one of the ways to express your design mind. The filigree technique can be a great activity for you that will help you take a break from the routine of everyday life and keep your hands busy, soothing and relieving all sorts of irritants.
In addition, making crafts with your own hands from twine will be an opportunity for you to please your family and friends. They will be pleased to receive as a gift something to which you put some effort.
Clock decor
It’s easy to decorate a wall clock with twine, changing it beyond recognition.
It’s easy to give a watch any shape, for example, turn it into an owl or a cat.
To decorate a watch in the shape of a cute cat you will need:
- a clock mechanism with a dial or a regular watch;
- jute cord;
- cardboard;
- universal or PVA glue;
- scissors.
Operating procedure.
- The dial is wrapped with a cord, having previously smeared the base with glue.
- For the animal's head, a round shape is cut out of cardboard. A cord is glued onto it in a spiral.
- The cord is formed into oval legs and an elongated tail by creating spiral blanks.
- The front legs are fixed closer to 1 and the number 11 on the clock.
- The tail is attached at the bottom and directed along the product.
- The cord is used to make triangular ears, rounded cheeks, paw pads and mustaches.
- The tongue is cut out of red cloth or felt.
- Buttons or beads are used for the eyes and nose.
It’s easy to complement the craft with a satin bow tie.
There are many options for decorating watches. For decoration, it is easy to use twine patterns on a floral theme.
Twine crafts
Twine is used for knitting macrame, making handbags and lace napkins. By wrapping twine tightly around vases, glassware and even glasses, you can significantly update them, giving them a new look.
Paint adheres well to jute. By painting small patterns and small contour drawings, the decorative properties of jute crafts are noticeably enriched.
Candlestick
An original handmade candlestick will not only serve as an interior decoration, but will also be a pleasant gift for loved ones.
For production you will need:
- jute cord;
- cardboard base;
- glue;
- scissors.
To decorate the product you will need a stencil with a pattern.
Operating procedure.
- The cord is laid in rings, the diameter of which is approximately 5 cm. A cylinder of 12 turns is formed.
- To decorate the base, openwork twisted loops and ribbons are made from cord according to the stencil.
- They are glued to the base according to the chosen pattern.
- Ribbons and beads are used for additional decoration.
It’s easy to come up with a lot of options for decorating lamps. It’s easy to use the idea with a candlestick as a basis when planning to make New Year’s crafts from jute with your own hands.
In addition to candlesticks, interesting crafts for the New Year holidays can be created by familiarizing yourself with the technique of modeling openwork cord products.
Making flowers from twine
All kinds of handicrafts can also be decorated with decorative parts made by yourself. These decorative little things also include openwork flowers, which can be made using ordinary twine. Also, with the help of a craftsman, such designer curls can become the basis for a pendant or brooch. You can make such flowers according to the following instructions:
- First, you will need to cut the strings of twine into long strips of the same size.
- If desired, the fabric on the burlap can be painted using regular fabric paint or stain.
- The previously cut strips will need to be cut into equal lines, the length of which will be exactly seven centimeters.
- Each piece must be aligned, and one side must be left curled.
- Next, all that remains is to put together the flower, in which wire will be used as stamens. The end of the wire can be decorated with beads.
There is also a slightly different way of making openwork flowers from twine. Five or six pieces of rope circles of the same diameter must be placed on top of each other and filled with glue. Next, some colored thread marks the edges of the petals and the center of the flower. Twine of a different shade can also be used as a colored thread.
Openwork crafts
Original decorative elements from cord are made using the air weaving technique.
The basis for creating any pattern are:
- loops;
- bends;
- leaves;
- rings.
It is easy to give the loop any shape using a toothpick.
First of all, to work, you need to think through the design of the product and create a stencil. It is used as a basis for forming patterns from thread or cord.
The cord is impregnated with PVA glue and laid according to the template. This creates an openwork pattern.
After the glue dries, the product will retain its shape.
Using modeling techniques, it is not difficult to create snowflakes, butterflies, dragonflies or various flower patterns from thread.
The items can be used to decorate the interior and decorate the wardrobe.
Products can be not only flat, but also three-dimensional objects. It’s easy to decorate a box or cup stand with openwork details.
It’s easy to get the basis for creative ideas by looking at do-it-yourself twine crafts and all the new items on the Internet.
LiveInternetLiveInternet
To obtain this wonderful three-dimensional flower, we will use a simple technique:
Step 1. We cast on the loops with a braid on 12 needles and knit a straight strip with a stockinette stitch about 80 cm long. Step 2. We determine the place on the fabric where the flower will be located. Draw a circle with a washable water-based marker or chalk on this area of the canvas. Mark the center. The diameter of the circle will be equal to the diameter of the future flower. In our case, this is approximately 6 cm. Step 3. Imagine that our circle is the dial of a watch. We mark the points on the circle corresponding to “12”, “14”, “17”, “19” and “22” hours. Step 4. We thread the needle into the thread from which the strip-blank for the flower was knitted. We fix the thread on the wrong side of the fabric and bring it to the front side at the “12” o’clock point. We stick the needle into the center of the circle and pull the thread to the wrong side. Step 5. We make such ray stitches from the marked points on the circle line “17” and “19” o’clock to the center. Step 6. Similarly, we lay stitches from the points corresponding to “22” and “14” hours. We fasten the thread on the wrong side. We got a star with 5 rays. Step 7: Attach a safety pin to one end of the strip. Step 8. Using a pin, bring the tip of the strip to the front side through the canvas near the center point of the circle. We secure the other end of the strip on the wrong side with a thread and a needle. Step 9. We stretch the strip under the beam from the “22” o’clock point. Step 10. See photo 010. Step 11. Twist the strip 180 degrees counterclockwise and place it over the beam from the 12 o'clock point, then pull it under the beam from the 14 o'clock point. Step 12. Twist the strip 180 degrees again and pull it under the beam from the 19 o’clock point. Step 13. Twist the strip again 180 degrees and pull it under the beam from the 12 o’clock point. Step 14. We stretch the entire strip under the rays of the “web”, moving counterclockwise. Before the next beam, be sure to twist the strip 180 degrees counterclockwise. We tuck the tip of the strip under the flower and secure it to the fabric with a thread and a needle. We got a rose - a “cobweb”.
Step 15. If we want the flower to be more voluminous, we perform a larger number of stitches - rays. The number of stitches should always be odd. Using the same “spider web” principle, you can make a finishing pom-pom from a round cord knitted by machine. Step 16. We knit a round cord on 4 needles about 1.5 meters long. For the cord, we cast on loops with a braid on 4 needles, set the idle speed on the carriage in one direction, and the weave stitch in the other direction. We hang a “cat” weight for the guy and knit it straight. Attach a safety pin to the end of the cord. With its help, we bring the cord to the front side of the canvas. Step 17. We lay out the rays of the “web” from the cord using a pin. Step 18. We begin to weave the cord above and below the ray stitches, moving counterclockwise. Step 19. Tighten the laid cord during installation. We continue to weave the cord in this way until we completely cover the warp stitches. We secure the tip of the cord with a thread and a needle to the canvas under the flower.
Design of costume jewelry
Jute thread is often used to make unusual jewelry. Using a cord or thread, you can decorate an old bracelet, hairband, or make an unusual pendant.
As a basis for work you will need old jewelry. The item will need to be cleaned of old decor and its surface degreased with a solvent.
Having thought through the pattern, the thread is glued to the product according to the template.
Additionally, it is easy to glue beads or rhinestones for beauty.
Take a non-standard approach, it is not difficult to create many interesting items from jute.