Preparatory work
In order to make a mushroom from plaster, you must prepare:
- PVA glue;
- acrylic paints;
- compass;
- set of cutters;
- stationery knife;
- two cups;
- waterproof glue;
- soap;
- varnish;
- brushes;
- pencil;
- cellophane film;
- empty plastic bottle;
- decorative elements;
- water.
The basis will be sculptural plaster, which will need about 500 g. You can replace it with a cement mixture, in which case the figurine will be more durable. Construction PVA is used as glue. When choosing paints, you should prefer acrylics designed for working with ceramics or glass.
For registration you will need:
- beads;
- figurines;
- flowers;
- artificial leaves;
- molds for creating figures.
To securely fix the wooden elements, waterproof glue is required.
Making the legs
If you want to decorate your garden with a gypsum mushroom, then you can make it yourself. The first step is to perform the leg. To do this, cut off the neck of the plastic bottle, which will serve as a shape for the stem. The walls can be coated with a solution of grated soap, water and vegetable oil. To do this, the soap is grated on a fine grater and poured into a jar. Water and vegetable oil are poured there. The composition is mixed well and applied to the inner walls of the bottle using a brush.
When making a mushroom from gypsum, you must adhere to technology. The next step is to dilute the plaster. You will only need that part of it that will be used to make the legs. The solution is poured into the mold and left until it hardens. To reduce material costs, gypsum can be poured into a hollow mold. To do this, select a smaller bottle and insert it into the hardening material. The diameter of its neck should be less than the diameter of the neck of the mold itself.
To prevent the bottle from floating in the plaster, it can be pressed down with a press. The material will set in just 6 minutes. After 40 minutes you can continue working with the figure.
Crafts for home interior
Not only the garden, but also the room can be decorated with plaster products, which are very easy to make with your own hands. To create interior decor, you can use combinations of gypsum with stones and other tandems of materials. You can practice creating crafts by building a house from plasticine and plaster.
To make a house you will need:
To create a house you will need a plasticine mold, which you should sculpt yourself. You will need a lot of plasticine, so you can use cheap one-color material, which is used to create sculptural sketches.
The correct mixture can be prepared by mixing seven parts of the powder with ten parts of clean water. Having fashioned a mold for the house, it is filled with plaster mixture.
It is worth waiting until the liquid hardens. After this, carefully remove the plasticine. You should act with care, since the damaged form will have to be redone.
When the last particles of plasticine have been removed, the resulting product should be prepared for the next pour. To do this, the gypsum craft is generously lubricated with vegetable oil. It is important to coat every millimeter of the mold so that the fresh mixture does not mix and stick to the existing workpiece.
When the poured mixture dries, the oil will allow you to remove it from the mold. The finished craft may need some adjustments. Using a blade, cut off excess parts. Use a sharp object to draw windows and doors.
Sand the craft with fine-textured sandpaper. The sanded surface of the sculpture can be painted and decorated in any way.
Making the base platform
Before you make a mushroom from gypsum, you must think about its features. Among other elements, the base should be highlighted. To do this, you need to choose a cup that is suitable in size and shape. It is also covered with cling film or lubricated with an emulsion prepared according to the recipe described above. Now you can dilute another portion of plaster and pour it into a cup.
The leg is immersed in the same place, but it is better to make it removable; it will be more convenient to work with the design of the mushroom. The leg is covered with cling film and immersed. After 40 minutes the product is removed. If desired, you can use figures, leaves or flowers for decoration. They are easily made from plaster, poured into molds and left to harden. Before you make a mushroom from gypsum with your own hands, you must think through the nuances of the technology. It involves drying the figurine before painting. It is left in a warm place for 2 days.
Paper mushrooms
Paper mushroom crafts at home can be made using different technologies. For example, the following sequence of actions is popular:
- take a sheet of colored paper and assemble it with an accordion in increments of 5-7 mm;
- then the structure is straightened and the top is cut off to form a dome of the cap;
- the reverse side of the cap is glued to an ice cream stick;
- You can attach white circles to the hat, and decorate the wand with a perky face.
An interesting model can be made from a disposable paper plate. Our master class on how to make a mushroom craft yourself will help you. A fold is made on the plate and a slightly convex shape is formed.
The fold must be treated with glue and clamped with a clothespin. To make a leg, roll a sheet of cardboard into a cylinder and glue its edges. An alternative could be a toilet paper cylinder.
The hat is painted red, and white paper circles or cotton wool flakes are attached to the top. The cylinder leg can be wrapped in colored paper or painted in the chosen color. The hat and knife are glued together using glue and then left to dry.
Sometimes the twist is pulled into a cylinder or dome. The result is interesting 3D compositions. Original ideas for DIY crafts can be offered to children who know the origami technique. Of course, it will take a little longer, but the result will justify the effort.
Mushroom crafts can be made from a variety of materials. Along with the options discussed above, more complex models are created from papier-mâché, felt and felt, etc. Your work together with your child will be exciting and interesting for all participants in the process.
Mushroom decoration
The design of the figurine can be spontaneous. Ideas may arise during the process. However, it is recommended to think through the drawing in advance by drawing it on paper. When the sketch is ready, you can start drawing the pattern. Using a simple pencil, you can draw on the mushroom everything that you subsequently want to see on it.
Having looked at the photo of gypsum mushrooms, you can understand that their outer surface can be made in relief. This is usually done using a large needle or woodworking tool. To ensure that the paint adheres better and costs less, the mushroom is pre-primed. This can be done using special mixtures. An alternative solution is construction adhesive diluted with water in a ratio of 1:2.
Using a brush, the primer is applied to the surface. It is left for 2 hours until the mixture dries. Then the mushroom can be painted with paints according to the intended and cut out design. The paint is left until it dries, and then the figure can be varnished. It is applied in several layers, leaving no unpainted areas. The figurine is left for a while, and then the design details can be fixed in the right places using glue. It is necessary to use a composition that is resistant to moisture.
Conclusion
Plaster sculptures do an excellent job of decorating a garden. Making them is quite possible with your own hands. We described the entire process above using the example of creating a decorative mushroom. The video in this article will provide you with additional information. Good luck with designing your own site!
Relatively recently, it has become fashionable to make DIY crafts for the garden using plaster. Today, in almost every family that has a private house or cottage, there is someone who expresses a desire to decorate the local area in this way. For your garden plot, you can make various items not only from gypsum, but also with the addition of polymer clay, seed beads, beads, shells, bottles, etc. By using your imagination, you can create a real work of art for your garden with your own hands using improvised means. Such different figures will enliven your garden and bring new and bright colors to it.
Everyone can get acquainted with several master classes on making interesting items for decorating the local area or cottage from plaster. Working with such material is a real pleasure, and it also has a pleasant price. In addition, handmade plaster crafts can be painted in different colors, which allows you to decorate the entire garden with interesting and bright objects.
If you have no experience working with plaster, then it is recommended to start making simple crafts with your own hands. In this case, we will consider making multi-colored stone leaves, which can later be placed along the path or near shrubs and favorite plants. Such a master class requires the following materials (photo 1):
- rhubarb or burdock leaf;
- sand;
- cement;
- paint as desired.
The sheet must be pre-rinsed to remove unnecessary dirt and dust. After this, you should lay out the sand on paper or oilcloth, place the sheet face down on top, compact it well and pour the already diluted cement on top (photo 2-3).
Cement must be diluted as follows: the dry component is mixed with water until a thick sour cream consistency is obtained. When pouring it onto the sheet, you need to make sure that the solution completely covers the workpiece. All that remains is to let the sculpture dry.
When the craft for the garden or vegetable garden hardens, it must be freed from sand and leaves. Now you can start decorating the craft (photo 4). It can be decorated with multi-colored stones, drawings on top or highlighting the lines with paint. The craft also looks good in its natural form. Colors such as bronze, pink and green are often used for the vegetable garden. Finally, it is recommended to cover the top of the sculpture with a water-repellent mixture or primer so that water does not spoil such beauty over time.
Recommendations for making mushroom
If you decide to make mushrooms from gypsum for the garden with your own hands, then you can purchase the material for the base at any relevant store. The figurine will be fragile, so when decorating you need to try not to damage it. You can also purchase the form in the store. However, plaster can have such a structure that it can be sculpted by hand.
You can supplement the mushroom with artificial caterpillars, which are made from flattened circles. It is better to make them of different diameters, combining the elements with each other. The head is made round. Eyes in the form of small balls are placed on top of it. If everything is done correctly, the figures will cope well with high humidity and precipitation, as well as temperature changes. However, the figurines must not be dropped.
Concrete or plaster figures for gardens
Decoration for parks and gardens - sculpture is, one might say, a design classic. But if it will be difficult to make a figure of a Greek goddess with your own hands, then such a simple option as a decorative figurine of a fungus made of plaster or clay is quite feasible for many. Below is a detailed master class on how to create a fly agaric that will look no worse than its store-bought counterpart.
Master class - how to make a fly agaric for the garden with your own hands
Mushroom production will require the following available materials and tools:
- stump or log;
- gypsum;
- mixing container and bowl;
- plastic bag;
- water;
- white and red paint;
- fine sandpaper;
- 2 brushes.
The log is the base from which we will make the leg. The size of the log does not matter - the larger the log, the larger the mushroom will be. If the log is large, part of it can be cut down.
- We mix the plaster; to do this, pour the gypsum into a container and pour water into it. While adding water, the plaster must be stirred. The consistency should be like thick sour cream, but it’s better to make it thinner, since the plaster dries quickly:
- Coat the log with plaster (as in the photo) so that you get a shape in the form of a mushroom stem:
Cooking the mushroom stem
- While the leg is drying, we make the hat. We take a bowl or plate, the size of which will be proportional to our leg. We put a plastic bag on a plate, pour plaster into it, and leave it to dry;
- After drying, we take out the cap, remove the bag and begin to remove and smooth out the unevenness on the parts. This is easy to do with sandpaper;
- The next stage of creating a mushroom from plaster with your own hands is drawing. We take paints and apply the desired colors to the cap and the stem.
- After the cap and stem are dry, you need to glue them to each other - and the mushroom figurine is ready.
Garden figurines made of plaster in the form of mushrooms (pictured) can be placed anywhere; they will organically fit into many styles of landscape design.
Another material from which sculptures can be created is concrete.
- Making concrete begins with working on a metal frame.
- The frame is made in the shape of the shape you want, and then a solution is applied to it.
- To obtain thick parts, the frame must be wrapped with fine wire.
But let's go through a tutorial together that describes in detail the production of such a figurine. The most popular sculptures often used in garden plots are gnomes. Gnomes have long been considered the guardians of plants, and making a gnome with your own hands is not as difficult as it might immediately seem. The frame for the gnome figurine is also made of wire or twigs. After making the frame, you can start pouring the solution. Then, the dried concrete is painted in the desired colors - and the sculpture is ready. But this is in a nutshell - in more detail how plaster or concrete gnomes are molded, presented in the video:
They are made from polyurethane foam and clay using the same principle.
The sculpture of an angel looks very unusual and beautiful, using a frame and shape.
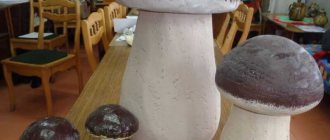
Gypsum mushrooms
What kind of mushrooms do you like – porcini mushrooms, aspen mushrooms, honey mushrooms or champignons? I am sure that you have never seen mushrooms like those of Anastasia and Seryozha Ivanets. Mom and son prepared... mushrooms from plaster . Yes, they turned out so beautiful that now everyone in Seryozha’s kindergarten admires them.
I pass the word to the crafts masters.
Well, the school year ends and the decoration of playgrounds in kindergartens and schools begins. Last year we made an Elephant out of plastic bottles for the kindergarten playground, and this year Seryozha and I decided to make mushrooms from plaster. At first they thought of one mushroom, but during production they decided to make three)))
There was also an option to make mushrooms from polyurethane foam, but since I am more accustomed to working with alabaster (plaster), we decided to stick with it.
Liebster Blog Awards!
And now I will answer 11 questions from Irina and once again write 11 facts about me. Irina has a wonderful blog about needlework https://handportal.ru/, where you can find a lot of interesting things and learn how to knit correctly.
- Is this your first blog?
Yes, this is the first blog and I love it very much.
- What crafts do you prefer to do with your own hands (if you do anything)?
If you read my articles, you will find out that I can knit and sew and work with plaster and weave flowers from beads... and I can do a lot of things.
- What can instantly cheer you up?
Flowers. I love flowers madly. And so, I have no time to be sad.
- What do you do in bad weather?
For me, all weather is the same. The main thing is not what is outside the window, but what is within the walls of the apartment.
- What is your favorite activity?
I love everything. I don't like washing dishes.
- What does fashion mean to you - the ability to dress beautifully or dependence on the mood of clothing designers?
I don’t really follow fashion, but I don’t lag behind it either. I definitely don’t wear bast shoes).
- What is closer to you - a noisy city or a calm village?
I grew up in the village, but live in the city. Every weekend I travel 100 km to my parents. It's good there, mom is there.
- Do you like to go to “live” stores or prefer online shopping?
Of course, live stores.
- Do your friends and family keep in touch with you on your blog?
Gypsum mushrooms
So, we will need:
- About 3 kg of gypsum (we used about 3 kg for THREE mushrooms)
- Water (dilute plaster)
- Milk and water bottles (for legs)
- Sushi sticks or something you can use to stir the plaster
- Paints (any)
- Transparent varnish is a MUST, NO WAY WITHOUT IT.
- Jar, glass, bucket - a container for diluting a mixture of gypsum and water
- A deep plate and a bag (for hats).
ATTENTION: the plate will not be damaged. ))))
Gypsum mushrooms - work progress:
1. Take the bottle, the cap is screwed on!! cut off the bottom of the bottle.
2. Pour plaster into the jar and pour water, and stir with a sushi stick, the consistency is approximately 15% sour cream - not thick and not liquid. This will be the stem for the plaster mushroom.
Stir thoroughly so that there are no lumps and pour into our bottle without a bottom.
I diluted the plaster several times, poured it out, then diluted it again, poured it out, diluted it again and poured it out. Then I left it for half an hour for the plaster to harden.
3. After half an hour, when the plaster has hardened, we take a cut into the bottle and, as it were, tear it.
If you can’t tear off the neck where the lid is, it’s okay - just remove the lid.
4. Then take a bag and a deep plate. We put a bag in it, this is so that the plaster sticks to the plate)))
We spread the plaster, this time a little thicker than for the leg.
And we put a small amount of this gypsum in the middle of our plate. While the plaster has not hardened, place the leg, neck down, in this cake)))
We hold the leg a little, the thick plaster hardens very quickly.
5. Then we add more plaster and pour plaster to the desired height of the cap (plate). Leave for half an hour.
6. When the plaster has hardened, remove it from the plate and remove the bag.
Here is a mushroom made from plaster.
Because of the package, folds were created, so when the mushroom is finished, painted and patched, the folds will give it more naturalness.
7. LEAVE THE MUSHROOM WITHOUT COLORING IN A DRY PLACE TO DRY. IT MUST DRY FROM THE INSIDE. WE STANDED IT FOR THREE OR FOUR DAYS!
8. When the mushrooms have dried, we begin painting.
It's up to you to decide what kind of mushroom you want.
We have two white ones and one fly agaric. Seryozha and I first painted the hats, the bottom of the hat and half the legs. Two or three layers. Both acrylic and gouache.
9. After a day or two, when the gouache had dried, the remaining parts of the leg were painted.
BY THE WAY, DRYING CAN GO FASTER IF YOU LEAVE THE MUSHROOMS FOR A SOME TIME ON THE BALCONY, AND NOT IN THE APARTMENT.
10. The next day after work and kindergarten, they began to varnish it. This is also best done on the balcony. The varnish dries quickly, so I varnished the caps and half-legs with the first layer and then the second.
11. I left it on the balcony overnight to dry and air out! The next evening, we finished off the remains of the leg in two layers)) and again on the balcony at night.
Here are our gypsum mushrooms:
Porcini mushrooms made of gypsum
In your hands, plaster mushrooms still look like crafts. But when they were dug into the garden, they actually looked like real ones:
Our mushrooms on the playground:
And a close-up of porcini mushrooms:
And, of course, the fly agaric:
And here it is morning)) the varnish is all dry and there is no smell!! HOORAY! Mom (I) quickly took pictures, and dad and Seryozha took them to kindergarten!)) The teachers and children liked our plaster mushrooms ! I’ll be sure to attach a photo once they’re dug in on site—I’ve already shown it above!)) Have a great summer everyone!!