What can be done using the tatting technique
An unusual art of weaving from cords and rigid threads arose as a way of making durable openwork elements for decorative finishing of clothing or interior decoration.
Currently, in addition to the traditional use of elegant lace products, needlewomen make many unusual accessories, such as bracelets, pendants, earrings, fans, summer bags and umbrellas, as well as other cute little things.
Made from multi-colored ropes, strands and thick threads, these items retain their original shape for a long time and serve as original decorations.
Preparation of materials and tools
This type of needlework involves the use of various threads, preference is given to natural ones - cotton, linen, nylon or wool. But they also use artificial ones. Their thickness and color are chosen in accordance with the pattern. The tools you need are a needle and a shuttle, as well as a hook and scissors. Additionally, a variety of decorative details may be useful.
To make tatting jewelry with beads you will need the following materials:
- weaving needle;
- 2 earrings;
- acrylic threads;
- 18 transparent beads;
- hook No. 1;
- clasp;
- 2 rings. Material for MK
Origin of the tatting technique
There are several controversial versions about the history of the emergence of the art of tatting:
- Weaving intricate patterns using shuttles first appeared in the East, and from there it spread to Europe along trade routes.
- Another opinion suggests that this method of knitting was invented by fishermen who made various gear for their fishery.
- Another version says that the technique was invented in one of the Catholic monasteries.
- Finally, the fourth opinion is in favor of unknown craftswomen-inventors, of whom there were many among the common people.
It is now difficult to judge what this type of needlework was like in the depths of centuries, but in the form closest to the modern one, it manifested itself in the 19th century.
European magazines from the century before last contain clothing models with recommendations for weaving openwork inserts and collars made of thick lace.
The new technique was quickly picked up by many needlewomen, for whom making beautiful lace trim using a shuttle turned out to be a simpler and faster task than sitting for a long time over thin lace with many bobbins.
A little history
It has long been known that technology came from the East to Europe. For the first time they started talking about it in Spain. After a while, she appeared in France and Russia. It was very possible to decorate interior items in this way. After all, it was suitable for everything - umbrellas, handbags, gloves, collars. By the way, now it’s also fashionable to decorate, but not only at home, but also to make accessories. For example, bracelets, pendants and necklaces.
And with the help of such a scheme it is easy to make a real simple masterpiece.
Related article: We sew pillows with our own hands
Let's take a needle thread. Now let's look at the pictures. First, thread the needle. Place the thread on your finger and place the needle on top. Now we repeat the steps until the desired lace size. To make the pattern more understandable, beginners need to become familiar with picot. Having completed the loop, go to the previous step. We knit four knots. Let's leave a thread of about 6 knots. Now we make a new knot. And now make as many knots as you want. The result is a lot of drawings that everyone will like.
Weaving methods (instructions)
While the patterns for making patterns using the tatting method remain the same, they can be woven using a thick needle with a blunt end or a special shuttle.
Using the shuttle
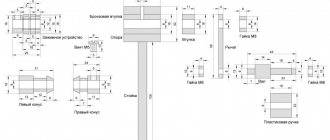
To work, you need to prepare rigid threads of different colors, crochet hooks that match them in thickness, 2-3 special shuttles, scissors and a needle. Hooks are useful for connecting individual woven parts of a product, and a needle is useful if you need to unravel an unsuccessful section of the work.
- The shuttle is the only accessory for this type of needlework.
- It is made of wood, metal or plastic and is a kind of spool with a thread wound on it, which is located between two plates narrowed to the ends.
- The thread is clamped between elongated stops, which allows it to be held at the desired degree of tension.
Weaving with a needle
To perform tatting patterns, you need to select a large, “gypsy” needle, about 13 cm long, which maintains the same thickness along its entire length, without widening in the eye area.
The sharp tip can be dulled by rubbing it with sandpaper. In addition to a needle, you will need threads, scissors and a regular crochet hook.
Earrings for the fashionista
When initially learning needlework, it is enough to have basic knowledge of working with knots. By the way, try making simple home accessories. But let's get back to fashion. For the product you will need:
- lavsan thread, preferably No. 33. You can use nylon thread;
- wire for beads;
- small beads;
- two earrings for threading the product;
- 16 beads, 2 faceted beads. The diameter of the beads should be 5 mm;
- 2 drop beads, but not more than 10 mm.
It is easier to do ordinary weaving, but you also need to learn complex weaving. Remove unnecessary material from the table and place a towel. Thread the thread into the hook. Use a needle to thread the threads into the beads.
Now let's look at the diagram. It is on this basis that the work will be carried out, pay attention even to the little things. We will have a "full node". Instead of picot, we will weave beads step by step. About 1 or 3.
We finish the work with beads. We will braid the rounds into rings and place the droplets at the bottom. Then you can decorate it yourself.
Here are more options for decoration patterns:
Now let's look at lighter earrings:
Let's take thread, needle and hook.
- We put 8 knots on the needle and make a picot. We collect a half knot. And now we finish it by dialing 3 more.
- We pull them off the needle, pulling them along the thread, without tightening them. At the end a loop is formed; we thread a needle into it, closing the ring. Again a regular knot for fixation.
- Again we take 4 knots. We hook the thread with a hook, putting a loop on the needle. This is how they connected it in the first ring.
Related article: DIY concrete planters
- We again weave 8 knots, picot and 4, closing the ring.
- Let's repeat the first steps, where we weave 4 knots, crochet the third with the second, finishing the work.
- We weave 16 knots, pulling them off the needle. Don't close the ring. Pull the thread, creating an arch. It needs to be secured with a knot. Let's connect the arch and the ring. This is how we complete the product.
- We connect 12 knots with a hook to the center of the arch. Let's do it from the new side.
This is how the product ends.
Weaving material
In order to quickly master the tatting technique and clearly see all the mistakes on the fragment made, it is best for beginners to choose a thick thread of a light shade for the first steps. The quality of the threads should not be slippery or too fluffy.
Natural, slightly harsh types of simple threads, which are usually purchased for crocheting openwork items, are well suited. These include crochet or toffee made from natural cotton.
Basic techniques for creating tatting patterns
Crochet and needlework can be combined. One of the most important elements of the basic technique is the double loop. Let's take a closer look at this part of knitting:
Having mastered several techniques, you can create original masterpieces
- Having tied a slip knot, we throw it over the working end of the hook.
- We put the thread on the finger, its position should resemble regular crochet.
- Then the end of the thread that is behind the finger needs to be wrapped around the hook.
- Drop the thread from your finger. Thus, the first part of the knot is ready.
- Throwing the thread over again, bend your finger slightly and insert the hook behind the back side.
- Drop the thread again and move both loops together. The double loop is ready.
Important: All the variety of lace weaving motifs comes down to a few basic elements, such as an arc and a ring. After mastering them, it will not be difficult to understand any patterns and you will be able to create unique patterns yourself.
Tie a double knot
The second element that diagrams very often contain is a ring. To avoid mistakes when connecting a row, you need to follow the following sequence of actions:
- We hook the working thread with our little finger.
- Having caught the thread with a hook, we carefully draw it through all the loops (and yarn overs) on the hook.
- We throw a loop from the little finger to the working end of the hook.
- Tighten the loop that was removed.
- Then we form a loop from the leading thread on the hook, draw it through 2 loops that were already on the hook. The ring is ready.
Often when weaving, the
Pico ring pattern is used, which is done using a small space (pulling the thread) before the next element.
Tatting ring weaving
Basic handicraft techniques (step by step)
Of the main elements of this technique, three stand out, which are called:
- Ring;
- Rounded arc;
- Decorating picot loop.
In practice, all complex patterns consist of various combinations of just three main techniques.
The entire openwork product is woven using a tatting knot, which can be double or single. To study it, you need to take a hook or a large needle and press the end of the thread against the side line of the tool from behind.
One end of the thread must be thrown over the needle, towards you, and then the piece left behind should be drawn from below and thrown from the left side through the needle, passing it symmetrically first through the loop formed.
This creates a double knot, from which work on most products begins. Pieces of different threads can be connected using the common “Hercules knot”. It is made from two pieces of different threads folded in half, in each of which the ends of one thread are passed through a loop formed by the other.
Few additions
By the way, it's easy to make a collar. The process will take longer, but it will be more interesting to create. We offer the best schemes:
The size and width depend on the thickness of the threads. If the threads are thick, the collar will be large. It can be used as a complement to large products.
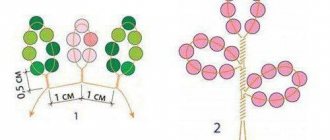
If you plan to work with beads, then string the required amount onto the thread (like picot in the diagram).
First steps in tatting technique
To the beginning, made from a double knot on a needle or hook, you can add several simple knots, making them one part of the thread on the other.
It turns out a whole segment made of identical, even knots.
Having connected the resulting chain into a ring, you need to continue knitting, making another double knot next to it on the needle. It will inevitably end up at a noticeable distance from the finished fragment, but if you tighten the thread, then only a small loop, called a “picot,” will remain between them.
- The resulting loop can be smaller or the same diameter as the first circle of knots. You can continue tying knots around it.
- To connect with other connected fragments, some picot loops are left small and loose.
The unconnected ends of the tied chains are arcs that become elements of lace if other similar elements located at different angles to each other are attached to them.
When a beginner can master simple combinations of rings and arcs, he can make beautiful objects and jewelry, decorating them with beads, rhinestones or seed beads.
We knit tatting lace using a crochet hook
Openwork tatting lace
The word “tatting” refers to lace woven using knots.
Most researchers believe that this technique first appeared in Eastern countries. And the tools for weaving were special shuttles. Today, in addition to shuttle weaving, you can knit tatting with a crochet hook or with a needle.
Tatting in European and Russian culture
There are many names for this lace: occhi for the Spaniards, tatting for the English, Schiffchenspitze for the Germans. The French term frivilite, which has two meanings, has settled in the Russian language. The word “frivole” can indicate both the perforated, airy structure of the lace, and the “frivolity” of needlework, which was popular in high society.
Beautiful lace earrings
In Europe in the 17th century, tatting was used for interior decoration (curtains, drapes, furniture covers), as well as for outerwear. The threads were thick and coarse, and sometimes the lace was woven from thin cord.
By the beginning of the 18th century, this weaving was increasingly found on clothing, not only women’s, but also men’s. Tatting made of silver and gold threads decorated collars and cuffs, frills and aprons, skirts and caps.
Tatting in the interior
In the middle of the century, thin threads of silk and linen appeared, which made lace even more versatile.
Russian craftswomen of the 18th century not only successfully copied foreign weaving techniques, but also supplemented them with their own unique motifs.
Lace could be found on gloves, capes, handbags and many other items of ladies' clothing. Of course, only people from the upper strata of society could afford such things.
Clothes decor using tatting technique
Handicrafts, including embroidery and lace weaving, were considered mandatory skills for every woman, as evidenced by the fiction of Leo Tolstoy’s time.
Girls were taught this from childhood both at home and in educational institutions.
Weaving lace did not require too much concentration, so it could be easily done at social evenings, conducting casual conversations.
Materials and tools for knitting lace
Everything you need for crocheting tatting can be found in a regular store for needlewomen and can be placed in a small cosmetic bag, which, if desired, can be carried with you everywhere. So, for work you will need:
- Crochet hooks. Their size and thickness depend on the diameter of the threads. To weave lace, you will also need thin hooks; if possible, you should purchase a small set of such hooks. The handles should be long and round, and the heads should be thinner than the handle. It will be most convenient to knit with such tools. It is possible to use wooden hooks, the size of the head of which can be slightly reduced using sandpaper.
- Threads. The thickness of the threads can be different, depending on what kind of lace you want to get. Beginners are advised to choose thicker threads (for example, iris-type threads), as they will make it easier to understand the principle of operation.
- However, classic tatting is knitted with very thin threads (simple sewing threads). For such work you will need to be patient and knit very carefully, but the result is worth it. In any case, the main requirements for threads are smoothness and the ability to easily tie knots.
- In addition, you will need scissors.
