I sell decorative wooden products online in my city and region. Even at the beginning of my peculiar career, I needed a jigsaw guide for cuts and cuts at different angles. Recently I saw my competitors... These unfortunate turners made terrible cuts, constantly drawing angles on the boards. Not only did the cuts turn out to be uneven, but this method was also very labor-intensive. This gave me the idea that it wouldn’t hurt to talk about how to make a guide for a jigsaw with your own hands. Hope it helps someone.
Source usamodelkina.ru
Profile rail guides
Such guides are installed in CNC machines of special precision, fixed directly to the frame, they can be ball or roller.
Ball profile guides
The profile guides have tracks along which the carriage moves. Therefore, the load is distributed evenly along the length of the track: the carriage ball is adjacent to the rail in an arc. Guide rails are characterized by geometric accuracy. When moving a heavy carriage, their straightness is not disturbed. They serve for a long time and have virtually no backlash.
Disadvantages of ball rails:
- there are high requirements for straightness and roughness for fastening points;
- They are quite difficult to install on a CNC machine.
On sale you can find models of carriages and guides with different load capacities and preloads. Rail production is expensive and the technology is complex. Therefore, artisans do not manufacture them, and the products on the market are of quite high quality. Decent guides are produced, for example, under the TNK and Hiwin brands.
Roller profile guides
This is one of the varieties of profile rails with flat rolling grooves. The support modules are equipped with rollers instead of balls. Thanks to this difference, the guides are even more rigid, withstanding heavy loads and a long service life. Such rails are installed on intensively working equipment for milling stone, durable steel and cast iron.
Workbench table top
The first step is to cut out the tabletop from the workpiece and cut an arc-shaped groove in it. First you need to mark the groove. To do this, we nail the rail with a nail, and with a pencil we draw two arcs at a distance of 6 mm from each other.
READ Disassembling the Makita 24 50 rotary hammer
Next, drill the beginning and end of the groove and carefully cut out the outline with a jigsaw.
But it’s more convenient and smoother to make the groove with a router. In this case, you don’t even need to mark the contour of the arc. It is enough to take a straight cutter with a diameter of 6 mm, screw the router onto a sheet of hardboard or laminate, secure it with a nail in the center of the circle and make a groove.
At the next stage, you need to cut out an opening for the “guide” with a jigsaw. Use a Forstner drill to drill into the corners.
We cut out the outline with a jigsaw.
Now we screw in the stops, and the guide with the jigsaw will rest on them.
Drill holes for the parallel stop.
We cut out the sides for the tabletop from plywood; they will give the tabletop rigidity, and in addition, the legs will be attached to them. Now we glue them to the tabletop with PVA glue and press them with clamps.
DIY parallel fence for a jigsaw: instructions
- For manufacturing you will need a metal strip 2 mm thick and 350 mm long. The width of the strip is selected according to the size of the bracket on the sole of the jigsaw. If there is none, you will need to do it yourself.
- To do this, you need to drill 2 holes with a diameter of 4–5 mm in the base of the power tool. Then threads are cut into them. Then, from a 2 mm thick strip, 2 brackets are bent along the profile of the rod, having previously drilled holes in them for fasteners and a fixing screw. A thread is cut into the hole for the screw. The brackets are installed on the sole of the jigsaw and secured.
- After this, a corner 80–100 mm long is welded perpendicular to the rod. The bar is bent in the opposite direction through the upper shelf of the corner. In this case, the distance between the surface of the angle shelf and the bottom side of the rod should be equal to the thickness of the jigsaw sole. The free end of the device is inserted into the brackets on the sole and secured with wing screws.
How to use a jigsaw
Jigsaw blade speed
Most modern models provide adjustment of the stroke frequency of the equipment. For different models, the adjustment range can range from 500 – 800 to 2800 – 3000 strokes/min. They cut wood, plywood, steel, and aluminum at high speeds. Low speed is needed for plastic and stainless steel. Adjustment is also necessary when choosing the type of cut: fast straight cuts are carried out at high speed, figured cuts and finishing of edges require accuracy, which means the speed of movement of the equipment should be low.
How to achieve maximum efficiency when working with a jigsaw
When guiding the tool along the cut, you do not need to put much pressure on it. Excessive force can lead to deterioration in the quality of the cut and breakage of the file.
When working with a jigsaw, it is recommended to move the jigsaw along the drawn line, and not directly along it. This way, the line is better visible and the cut is made smoother. In addition, you do not have to include a tolerance for the width of the cut into the size of the workpiece.
When processing decorative materials, the workpiece is placed face down. This way, scratches will not appear on its surface.
Do not overload the tool. If there is a lot of work, let the engine cool down periodically so that it does not overheat.
This is especially important when working at low speeds, when the fan does not have time to cool the jigsaw mechanisms.
Why does a jigsaw cut crookedly?
The saw blade leaving the pre-planned line may be due to several reasons. The operator may not have enough experience in handling the tool, the file may be defective, and the rod and guide roller for the jigsaw may have serious play. In order not to guess from the coffee grounds, it is worth starting to sift out the factors that determine the accuracy and evenness of the cut line in your individual case.
As usual, it’s better to start with yourself and your approach to sawing. Often, novice craftsmen rush things and, wanting to speed up the cutting, apply a lot of pressure to the jigsaw. The tool does not have time to bite evenly into the material and create a clear groove for the file, which begins to follow the path of least resistance and makes unpredictable movements. This problem is especially common when working with thick timber (from 40 mm) and varnished plywood from Soviet times.
This is one of the reasons why the jigsaw moves to the side. What to do about this? The answer is obvious. Apply the minimum pressure sufficient to guide the tool along the line and set the maximum number of revolutions (when working with wood). The pendulum mode usually does not affect the evenness of the cut if its design is in good order.
The quality of assembly and wear of tool parts can be a good reason for the formation of beveled lines when sawing. There are basically no complaints about devices from the budget segment (up to 2,500 rubles), as well as hopes for their conscientious assembly. It’s another matter when original, branded instruments begin to perform such tricks. Often, the cause of a crooked cut is the guide roller, the jigsaw rod or its sole.
You can check the reliability of the element’s fixation by simply tugging it with your hand. Loosening of the rod or roller by more than 1 mm determines that this device is not capable of producing a perfectly even cut. The more play there is in the parts, the less accurate the cutting line they form. This problem should be corrected based on the circumstances. If the part itself is worn out, it can be replaced with a similar one. It is difficult to fix a breakdown if the attachment point to the mechanism is worn out. Not every modern Kulibin undertakes such repairs, and this problem is usually solved by purchasing a new tool.
Unfortunately, the products of many trusted brands are often counterfeited, and jigsaw files are very popular in this regard. It so happens that low-quality and counterfeit products have a rather short service life, which brings many problems to the owner. One of these problems is a crooked cut. An initially smooth blade can bend due to poor-quality metal, which can cause deformation of the tooth set, if it was present at all. In this regard, if your jigsaw cuts crookedly, replacing the saw blade can correct the situation. The process of choosing a high-quality jigsaw file was discussed in detail in a separate topic.
To get an absolutely even cut, you don’t have to be a master or have a professional tool with original consumables. For such purposes, there is a very simple and useful device, which we will discuss below.
Features of using a jigsaw
Despite the fact that the principle of operation of a jigsaw is quite simple, there are nuances that you need to know. They relate to cutting modes and materials
I will try to focus on the most common questions that arise for those who pick up a jigsaw for the first time
What can you cut with a jigsaw?
If there is a large amount of work to be done with a specific type of workpiece, for example, laminate, it is better to choose specialized equipment specifically for this task. The right choice is the key to quality work. It is worth noting that files are only suitable for working with homogeneous material. You cannot make a cut in a wooden workpiece with metal inclusions - nails or screws, as you can damage not only the equipment, but also the jigsaw itself.
Jigsaw cut thickness
For each tool, the maximum permissible values for the thickness of the workpieces to be cut are determined, and the rules for operating a jigsaw do not allow exceeding the recommendations specified by the manufacturer. For example, the parameters may be 75 mm for wood, 15 mm for metal.
Peculiarities
The operation of the jigsaw can be adjusted by the following elements.
- By tilting the sole, due to which you can make oblique cuts. Used quite rarely.
- Stroke frequency, thereby adapting to the material. If they work with wooden materials, then use the maximum frequency, in other cases - the average.
- Pendulum motion of the canvas. This regulates the vertical and longitudinal movements of the tool.
But the accuracy and quality of cuts are ensured and controlled by the jigsaw’s guide elements. These include the following devices: guide rail, support roller, ruler and laser illumination. The latter, however, is not present on all jigsaw models.
Let's take a closer look at the various jigsaw guides.
Support roller
This part of the tool is a wheel that guides the main working body (the file) and at the same time serves as a support for it, absorbing the forces on the file from the process of cutting a particular material. The function is actively revealed when the volume of work and the dimensions of the workpiece are large. When using a pendulum stroke, the saw blades begin to move more efficiently - not only down and up, but also back and forth. At the same time, dust and sawdust are better removed from the groove being cut, which means the jigsaw produces a better quality cut.
The support roller is a necessary part in a jigsaw; without it, neither high-quality cutting nor long-term operation of the engine, files and other elements are possible. Due to frequent jamming and jamming of the saw blade in the material, overheating of the moving mechanisms and overload of the electric motor would occur. And this all leads to their rapid wear and failure.
For the quality of the video to work, the following rules must be observed:
- cutting blades must be of good quality;
- threading modes must comply with the instructions supplied with the tool;
- Do not allow wood shavings to get into the roller, and after use, clean the product from dust and debris.
Guide rail
This is a simple piece that resembles a large ruler; it can be up to 1.5 meters long. The tire is made of metal, often aluminum. It has a groove in which the sole of the jigsaw is located and it moves along it. The guide may have rubber strips on its base that prevent sliding along the workpiece. The clamps for the tire are small clamps.
Some features when choosing a jigsaw tire:
- the price is determined by the size, quality of the materials used, as well as the brand, which indicates the durability of the tires used;
- it is important to use only products from trusted companies to avoid damage to essential equipment and situations associated with injuries;
- if you use significant force when cutting, you can damage the tire and material;
- Lack of lubrication leads to overheating of the tire.
There is a peculiarity when choosing a tire for each tool. There is a wide variety of them on the market, but each brand produces this auxiliary device only for its specific models, thereby reducing the versatility of the jigsaw addition to a minimum.
Rip fence
The device necessary for straight cutting: aligns the edges, makes a high-quality cut at the edge of the workpiece. The stop is similar to the letter “T” and consists of a fixing bar and a long ruler attached to the body of the jigsaw.
This structure is installed parallel to the plane of the file, and the unit itself must fit tightly to the surface of the product workpiece.
It is possible to make a high-quality cut with this additional device only in the following cases.
- Choose a flat and parallel plane for support.
- The jigsaw should not move to the side when working.
- The stop must be rigid and durable to use.
- It is necessary to press the shoe firmly against the support when working with the tool.
Ruler
The guide ruler is a product with an aluminum profile, 1 meter long. Most often comes complete with clamps. Clamps are universal - they are inserted on both sides of the ruler and tighten well, fastening it to the workpiece. The jigsaw in its kit has a parallel stop, which was mentioned above, with a fixing bar at one end. This device is inserted into the groove of the guide ruler and it turns out that the jigsaw is fixed to the guide.
Device
The general design diagram of Fiolent jigsaws differs little from the generally accepted one. All models are equipped with a staple-shaped plastic handle, which facilitates visual control of the cutting line, but makes it difficult to work on inclined surfaces. All models are equipped with a pendulum mode of the blade (the so-called “pumping”), which has three modes that differ in the amplitude of the longitudinal movement of the file.
Unlike most competitors, the saw holder in jigsaws from the Crimean plant is a reliable steel lock, which is secured with one flat-head screw. This simple design provides a strong clamp on the file, securely fixing it without play or distortion. The gear housing in all versions of the tool is made of durable aluminum alloy, which significantly increases its reliability compared to products where this part is made of plastic.
The design of all models uses a stamped steel sole, which is attached to a steel ski. This increases the reliability of the structure, although it noticeably makes it heavier. Moreover, all models have the ability to install the sole at an angle of 45° to the plane of travel of the blade (in two directions). All variants of jigsaws have a sawdust blowing function and are equipped with a mount for additional connection of a vacuum cleaner.
Jigsaw Interskol: correction of sawing curvature
It is worth paying attention to the domestically produced Interskol jigsaw. It is produced in Izhevsk
For domestic use this is a completely acceptable option. It has many positive qualities, and the most impressive is its low cost. But there are also disadvantages.
Replacing the quick release saw blade mount
This is the curvature of the saw. What is the problem, and is it possible to get rid of it? The culprit was the quick-release fastening of the file. The fact is that it is designed for saw blades of maximum thickness. All cutting tools of smaller thickness simply dangle in the mount.
How to get out of this situation? You need to replace the quick-release mount with a simple device with regular bolts. It's not difficult to make. You need to take a square rod, cut two blanks, drill holes in them and connect them with two M5 bolts and nuts. The procedure for attaching the saw blade will become somewhat more complicated, but the tool will produce an even cut.
Refinement of jigsaw design
In addition, you can modify the design of the tool itself and limit the movement of the file in the transverse plane.
To do this you need:
- take sheet aluminum and cut the plate to the size of the jigsaw sole;
- In the front part of the workpiece, it is necessary to make a cut to the size of the working area of the cutting tool. File all edges, make bevels on the inner longitudinal edges of the cutout;
- You need to cut a plate from plexiglass to the size of the working area of the saw blade. File all sharp edges and make reverse bevels on the outer longitudinal edges;
- The aluminum plate must be marked for its installation on the jigsaw base. Drill holes and make chamfers for installing countersunk screws;
- A piece of plexiglass must be inserted into an aluminum plate, having first made a cut at its location.
Now, during operation, the saw blade will be limited in transverse movement almost in the cutting zone, which will give it even greater straightness.
How to choose an electric jigsaw for your home
To optimally select a jigsaw, you need to take into account the characteristics and availability of additional functions.
Criteria for choosing a jigsaw:
- power. Shows energy consumption and operating efficiency. The ability to cut thick parts, cutting speed and continuous operation time depend on the power;
- sole. Each jigsaw has a support plate that improves precision. For sawing at an angle, the sole rotates in both directions. For some models, you can choose any angle up to 45 degrees, for others, rotation occurs only at certain angles, which is not very convenient. There are jigsaws with the ability to adjust rotation without additional tools;
- speed adjustment. The presence of this option expands the capabilities of the tool, because different materials cannot be cut at the same speed. If the number of revolutions of your jigsaw is less than 1000, then it will not take plastic. But do not forget that at very high speeds, such as for wood processing, the plastic will melt;
- canvas pumping. It is also called a pendulum stroke. This is the movement of the saw forward and backward. Increases cutting speed, but quality deteriorates. If speed is important for a large volume of work and without high requirements for cut quality, this is a very useful function;
- laser pointer. Makes it possible to make very precise cuts according to the markings. Even sawdust getting into the cutting area does not spoil its trajectory;
- fastening the file. The type of attachment can support different types of shanks or one used in a given tool. Also, in specific models there is the ability to quickly replace equipment with one hand;
- illumination of the working area. The entire working surface with its irregularities is visible. Convenient when working in low-light areas;
- ergonomics. Due to balancing and rubber inserts. If the instrument is comfortable to hold in your hand, then the ergonomics are good;
- equipment. Jigsaws are supplied with a box, canvas bag or case. The bag does not get wet, but it does not have additional compartments for accessories. The case is shock-resistant and does not get wet. It has special departments for consumables and accessories;
- connection to a vacuum cleaner. If there is a pipe for blowing sawdust, you can connect a vacuum cleaner to it;
- the presence of additional functions: increasing the stroke rate improves performance, but the equipment wears out quickly;
- automatic blowing of sawdust from the cutting line;
- Rotating the blade 360 degrees is useful when cutting circles.
Choosing a jigsaw
Additional jigsaw accessories:
- table for attaching tools at the workplace;
- connector for guides; Connector for guides
- guide with millimeter scale kwb line master 7844 00;
Guide with millimeter scale - guide square;
Square for guide - anti-splinter liner. Anti-splinter liner
Jigsaw guide
Measure the width of the jigsaw sole.
This is the width you need to cut the workpiece to fit the jigsaw guide.
We cut out a window in the workpiece itself, such a width that when sawing at an angle, the file does not touch the guide.
Cut out and glue the sides.
You need to place stops on the edges of the stop by simply gluing rectangles of plywood. A slider-stop for cross-cutting and angular sawing is also manufactured - circled photo.
We move on to making a stop for cross-cutting and sawing at angles. To do this, we cut out two strips from plywood.
We cut a through groove in a narrow strip with a jigsaw. The stop pin will subsequently move along this groove.
Glue the cross stop with PVA glue.
Use a miter box to trim the angle of the stop.
Blade clamp repair
Not every manufacturer of power tools uses high-quality materials, which is why their service life may even be disposable. Frequent breakdowns, especially due to pressure on the tool, also occur with the jigsaw blade clamp. Below we will describe the course of action to eliminate a broken block fastening.
During prolonged cutting, the jigsaw block clamp may become deformed, because there is a serious load on the saw attachment. The breakdown may be easily repairable, the file may be slightly deformed or cannot be repaired at all.
To restore the operation of a jigsaw, the easiest way is to buy and install a new block of the same type. This part can be purchased at markets and hardware stores. Of course, this does not mean that the new mount will be better, but the main thing is that the tool can be used.
How to cut laminated chipboard with a jigsaw without chipping
In the process of making furniture yourself, the contractor may need to cut or trim the laminated chipboard for subsequent use. Of course, it is best to perform this operation by sawing, but if necessary and to reduce labor intensity, it is quite possible to cut laminated chipboard at home (using a jigsaw). Moreover, it is very important to implement this procedure in such a way as to minimize the number of chips and thereby create an even cut.
vote
Article rating
Types of tires
They fall into two broad categories:
- double-sided and one-sided;
- symmetrical, asymmetrical tires.
The main characteristics of the classification are:
- design features of the saw;
- geometric dimensions;
- the material used;
- availability of replaceable and complex tires.
Variety of guides
Based on the first feature, tires for electric and gasoline tools are distinguished. Dimensions indicate the processing capabilities of wooden products (depending on the length and cross-section of the block). The materials can be used: wood, wood boards, metal guides. The presence of tires of complex shape makes it possible to process wooden workpieces of complex geometric shape.
Based on the nature of their application, they are divided into three main categories:
- Universal tires. The design allows them to be used for almost most types of circular saws.
- Specialized guide rail. These are guide bars that are designed for use with a circular saw.
- Homemade. This type has great variety and is determined by the imagination and skill of the developer.
Universal guide rail
Types of jigsaws
Before moving on to the immediate specifics describing the process of installing a file, it is worth clarifying the types of tools involved.
Since the jigsaw device has quite a few incarnations, we inform you in advance that in this guide we will touch on 3 of its varieties: manual, electric and stationary. A band saw, which is also sometimes called a jigsaw, will not appear in this article. Now a few words about each type of device under consideration. Hand jigsaw
The cheapest option for a tool for making figured cuts in wood and its derivatives. When using special blades, it can be used for cutting metal of small thickness. The speed of work and the quality of the cut depend entirely on the experience and physical characteristics of the worker. Quite easy to use and does not require hours of study.
Electric jigsaw
A more advanced and expensive type of tool for making straight, transverse, inclined and figured cuts. Depending on the installed saw blades, it can work with wood, plastic, metal and even ceramics. It has a high saw stroke frequency, which usually reduces the quality and accuracy of the cut. Sometimes an electric jigsaw is rightly called a manual jigsaw, since it must be held during use. This tool is considered one of the most popular in everyday life, second in popularity only to the screwdriver and drill.
Stationary jigsaw
A very convenient and functional machine for amateur and professional work. Widely used in industry and at home. It works with thin files like a manual jigsaw, but the cutting speed is not inferior to an electric one. The main advantage of using a stationary jigsaw machine is complete freedom of both hands, which allows you to more accurately control the position of the workpiece during processing. The device copes well with straight cuts, but is primarily intended for figured cuts.
Having finished with a brief description of the devices, you can move on to the main question of the article. Let's look at how to insert a blade into a jigsaw and what nuances should be taken into account. Let's start with electric models.
Cylindrical shafts
The design of the cylindrical shafts allows you to maintain the level along the entire length, completely eliminating sagging under the weight of the carriage or your own. Such guides are also called linear support shafts; they are fixed directly to the body of the CNC machine through the threaded holes provided in the supports. Large carriages can move along such guides without sagging.
Disadvantages of cylindrical shafts:
- short service life;
- noticeable play in the bushings.
If linear-type bearings work equally well with loads in different directions, then carriages on cylindrical shafts show less stability. This is explained by the closed surface of the bushings, which carriages do not have. Therefore, you should be prepared for the fact that a small CNC machine with a heavy carriage on support shafts will operate with a greater error than the same CNC machine on conventional round rails.
The technology for manufacturing cylindrical rails is very simple, so they are produced by both well-known companies and handicraft workshops. This explains the variation in technical characteristics and prices. Often, carriages and rails from the same “know name” manufacturer do not match.
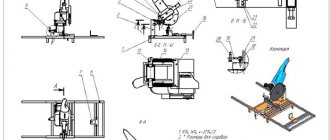
Adjusting the bed to the jigsaw blade for various needs
First you need to make the main cut for the electric jigsaw blade. It will be used for a straight saw at 90°. To do this, the jigsaw is installed in the groove of the support, on which the entry point of the blade is marked. After this, 2-3 thin holes are drilled in the marked places. The blade is mounted on a jigsaw, after which a through cut is made of the support and base along the entire length of the groove. Now the bed can help, if necessary, saw off a board or aluminum sheet at a right angle.
PHOTO: YouTube.com The main cut has been made, but this is just the beginning
45° cutting slot for slopes
It was planned to manufacture a frame for various needs, which means it was necessary to make it so that parts could be easily sawed off at an angle of 45°. To do this, the jigsaw is again installed at the beginning of the support, while a mark is made along the far side of the inner recess.
PHOTO: YouTube.com Another mark to increase the functionality of the bed
Here the platform of the electric jigsaw is loosened and set at an angle of 45°, after which the through cut is made again. However, this time it is not necessary to do it along the entire length; 15 cm is enough.
PHOTO: YouTube.com The platform is set at 45°, after which the support and base are sawn through approximately 15 cm
Excess wood remaining on the support and base is removed. On the one hand, we could stop there, but we need to add one more function - the ability to cut 45° angles for cashing.
PHOTO: YouTube.com Excess has been removed, less and less work remains
Making a protractor for a bed
Having removed the frame support from the studs, it is necessary to outline two perpendicular stripes from the cut at the base. The stop will be fixed on one of them, and the protractor itself will be located on the second.
Using a regular school protractor, angles of 45°, 90°, 135° and the center are marked along the second line.
PHOTO: YouTube.com A school protractor will come in handy here
A 6 mm hole is drilled at the central point for the same furniture anchor. From the pieces of slats you need to glue something like the letter “T” with a very small central leg. It may be difficult to understand this in words, and therefore it is better to pay attention to a photographic example.
PHOTO: YouTube.com The stop for the inclinometer is glued and tightened with a clamp until completely dry
You need to drill a hole in the protractor through which it will be fixed in the desired position on the base using a bolt.
PHOTO: YouTube.com The protractor will be fixed in the desired position using a bolt with a wooden washer
Fixing the platform support to the base
In order to fix the support of the jigsaw platform, you can use ordinary nuts, factory-made wings, or you can make these elements yourself from wood and furniture nuts with spikes. Now the work on the jigsaw stand can be considered complete, and we can move on to the first tests.
PHOTO: YouTube.com The last elements are in place, which means the work is completed
Device and principle of operation
Let's take a closer look at the jigsaw device
What does a jigsaw consist of?
Jigsaw device
- Power cord.
- Cord terminals.
- Trigger stopper.
- Trigger.
- Speed selection regulator.
- Eccentric hinge.
- Cooling fan.
- Gearbox.
- Pendulum action regulator.
- Pendulum mechanism.
- File.
- Safety limiter.
- Blade support roller.
- Air duct.
- Base plate.
- Electric motor.
- Output of sawdust.
- Base plate adjuster.
In simple jigsaws, the equipment moves only up and down. And when using a pendulum mechanism, it goes back and forth. This tool cuts faster. How is vertical movement generated? The engine transmits its rotation to the gearbox. An eccentric hinge is attached to it, which creates the up and down movement. The base plate presses and holds the tool on the work surface, eliminating hand tremors. The sawdust is blown out by a cooling fan and discharged through a special pipe.
Setting up and starting a jigsaw
What material can a jigsaw guide be made of?
The layout here is quite simple. No one will see this device except you. Therefore, there should not be any complexes when using even waste. The length of the guide will depend on your needs, and the principle of its manufacture will remain the same in any case. For me personally, a length of 30 cm is optimal.
There are other useful homemade products on our website. For example, you can read about them here.
Replacing the saw holder
Replacing some types of fasteners is much easier than finding these parts. To perform a similar operation with block and screw clamps, you do not even need to unscrew the tool body. Saw holders of this type are attached to the end of the rod using one or two screws, which makes it quite convenient to change them. In the case of some screw fasteners, replacement will require removing the rod to more conveniently and securely fix the holder. The video below about repairing a jigsaw with your own hands clearly demonstrates the process of replacing the shoe-type fastening.
If things are relatively simple with simple saw holders, then replacing a quick-clamping one can cause some difficulties, especially for an inexperienced craftsman. Let's start with the fact that these types of fastenings, according to the location of the levers, are divided into radial, lateral and frontal. The first type is the most common and spare parts for its repair can be found, but the last 2 are unique, which can be ordered directly from the manufacturer. In the case of a radial type of fastening, you can purchase a repair kit and try to sort it out yourself, but it would be best to buy it assembled, along with the rod.
How to insert a file into a jigsaw
Shoe mount - how to insert a file into a jigsaw:
- Loosen the block by turning the two bolts counterclockwise.
- The canvas is placed with the teeth forward.
- The bolts are tightened evenly to their original position.
It is important to ensure that there is no skew, otherwise the cut will be uneven.
If only a bolt is installed on the block, then it needs to be loosened and tightened. There is no need to tighten the screw all the way, as unnecessary vibration will be created during operation. This data is enough to understand how to insert a file into a jigsaw with a block mount.
Quick-release technology - procedure:
- Press and hold a special key.
- Insert the shank of the file into the corresponding slot.
- The key can be released.
If you hear a click, it means the operation was successful.
The easiest replacement option is with radial mounting, but you need to choose the correct shank shape (there are U-shaped and T-shaped). The second option is the most common; the u-shaped model has special holes for additional fixation.
Jigsaw with file
How to change a file on a jigsaw:
- Rotate the device head 90 degrees.
- Insert the fabric into the special slot.
- Release the jigsaw.
The clamp will return to its original position under the action of the spring.
The jigsaw broke. The file does not hold. DIY repairs.
Hi all. I often have to work with a jigsaw. Three years ago I bought myself a new inexpensive Bosch pst 800 pel.
The tool cut well, but not so long ago the file began to bite in the holder, which made it difficult to replace. And yesterday, when sawing boards, the file began to fall out on its own.
The first thing I did was remove the outer mount housing.
In order to remove the inner casing, you need to tilt the jigsaw with the blade mount facing down. This action will cause four pins to fall out of the housing. After this, you can remove the housing.
As you can see in the photo, the holder is cracked at a weak point.
After removing the rod, you can get a better look at the holder. It turns out that he no longer has two cones that guide the pins. The body literally burst in half and is held together by rivets.
I decided to adapt to this jigsaw a mount from another, broken jigsaw, from STURM.
This poor fellow has been waiting in the wings for six years already. I sawed off the mount from the rod and tried it on. It turned out that this mount would touch the plastic body of the instrument and this could not be fixed.
Since it was not possible to quickly repair it, you will have to do the fastening yourself. In the holder of a broken cutter, I make a cut with a grinder. The rod should go into the cut to the same depth as in the previous mount.
I semi-automatically welded the parts to each other. When welding, it was necessary to cool the rod so as not to burn the rubber boot.
I cut off the excess part of the holder and drilled holes in which I cut M5 threads.
After that, I installed a grinder circle on my sandpaper and leisurely made a slot for the file. On a piece of chipboard, for the correct positioning of the rod relative to the disk, I drew a line on the support pad with a marker. The speed of the emery, compared to the grinder, is much lower and it turned out to be more convenient to work with.
We install the broken file into the holder and fix it with screws in the desired position.
After this, we weld the slot so that the two halves do not diverge from each other when tightening the screws. The main thing is not to weld the file to the holder.
I assembled the jigsaw and tested it. The file holds securely and does not jump out. The holder is sold only with a barbell and costs about 1,500 rubles, plus shipping. A new jigsaw costs 4,000 rubles. As for me, for that kind of money I’ll come up with something myself. This is how the repair turned out
Thank you for your attention
Jigsaw sole
After the cutting tool, the main place in a jigsaw is occupied by the base. This structural element of the device is called the sole. It serves as a support for the entire tool, which ensures convenient cutting.
The soles are stamped and cast. Cheap models of jigsaws are usually equipped first; the aluminum casting base is much stronger, more reliable and easier to use. The sole can be with or without an anti-splinter liner.
You can make such a device yourself. To do this, it is enough to cut a plexiglass plate to the size of the sole, drill holes in it for fastening and exiting the cutting tool, then install it on the base. This will prevent the formation of chips on the surface of the material and provide a more even cut by reducing the deflection of the saw blade.
On some models of jigsaws, a sole tilt mechanism is installed. With it you can make bevel cuts at an angle of 15, 30 and 45°.
Malfunctions and their elimination
The main problematic points are the following:
- Failure of the rod due to improper use of the tool.
- Insufficient or improper lubrication.
In the first case, the rod will need to be replaced. The first step is to pull out the stem. Then dismantle it and lubricate all components. And finally, install all the components back so that the design remains the same. Before use, a check is carried out, and only after that the housing cover is installed.
In the second case, it is necessary to disassemble the entire jigsaw
This is important to lubricate all internal components of the tool. This requires special oils.
There is no need to do this often; once a year is enough. This problem is more serious than stem failure.
Linear motion technique. Mechanical components.
Detailed descriptions, catalogs and engineering information are located within individual subsections. If necessary, our specialists will help you select the most suitable products for your task.
Guiding mechanisms:
- High load capacity
- High accuracy
- Self-centering
- Compactness
- In stock
Drive mechanisms and devices:
- High efficiency
- High accuracy
- High load capacity
- In stock
Electromechanical linear actuators
- Actions
- Search for spare parts from other manufacturers
- Go to catalog library
- EcoPRO products - inexpensive solutions for professionals
- Products sorted by category
- Guides
- Ball profile rail guides
- Roller profile rail guides
- Ball bushings
- Linear blocks
- Precision round shafts and bearings
- Spline shafts
- Precision rail guides and tables based on them
- Guide protection systems
- Lubricant for linear guides and ball screws
- Drive technology
- Ball Screws, Roller Screws, Supports
- Racks and Gears
- Actuators and positioning systems
- Coordinate tables
- Linear modules
- Electromechanical Rod Linear Actuators
- Other product groups
- Electric drives and electronics
- Industrial pneumatics
- Ready-made systems
- Other products
LLC "Aketon"
Official distributor of NB in Russia and the former CIS countries. Direct deliveries of industrial goods and components from Japan, Europe, America.
Copyright 2006-2020 Aketon LLC, All rights reserved.
105523, Russia, Moscow, Shchelkovskoe highway, 100, bldg. 6, office 202 (diagram)
Characteristic
The manufacturer of the instrument in question is Simferopol, created in 1913, named after the Sevastopol cape
An important feature of the power tools produced by the plant, including jigsaws, is their high reliability, achieved through a combination of high-quality materials and thoughtful design solutions that have stood the test of time.
Another important advantage of Crimean-made tools is the availability of spare parts on the Russian market and the presence of an extensive network of service centers. Thanks to this, it is usually possible to repair a damaged instrument within a few days from the moment of breakdown
The entire model range of the company is designed for use both for cutting wood and for processing plastics, ceramics and metal (both aluminum and steel). This versatility is achieved due to the fact that, at a similar cost, the company’s products are characterized by noticeably greater power than competitors’ products.
The cutting speed is controlled by changing the force of pressing the start button, which significantly facilitates the operation of the tool, although it requires certain skill from the craftsmen. The power button is also equipped with a lock that allows you to lock the tool in the on or off state.
Build quality and wear of jigsaw parts are the reasons for curved cutting
What to do in a situation when a jigsaw cuts crookedly, the cost of which is no more than 2-3 thousand rubles? In this case, you need to thank the manufacturer for the quality of the build. However, there is a compromise here, since manufacturers of household jigsaws indicate recommendations that such a tool can be used for no more than 20-30 minutes. Working hours should be alternated with long pauses. In addition, household tools are not designed for long and hard work, so if the device begins to malfunction, then it is, first of all, the fault of the owner himself.
It’s another matter when a malfunction in the form of curved cutting of material occurs on professional-type jigsaws, the price of which is at least 5 thousand rubles. Rushing to take your instrument to a workshop is the last thing you need to do. To begin with, we begin to independently diagnose and repair them.
- Check for play in the rod on which the head or saw holder is attached.
If the amount of play is more than 1 mm, then it is necessary to look for a breakdown in the rod design. The rod moves along guides, which wear out over time. To reduce backlash and return the tool to normal operation, you should replace the guides or the entire mechanism - Unreliable fixation of blades in the saw holder - this type of malfunction is often associated with wear of the fastening mechanism.
If, after installing and securing the blade in the tool chuck, there is play, it means that you need to check the head and, if necessary, replace it. If the saw holder malfunctions, a breakdown occurs such as blades falling out of the tool, which is associated with wear of the mechanism parts - Malfunction of the guide roller - if it dangles and vibrates, then naturally the jigsaw will not cut smoothly.
It is easy to fix the breakdown by replacing the roller, but first make sure that this is the cause - Blade defect - if the file has a slight bend, then it will no longer be able to cut straight.
The presence of a defect in the canvas may not only occur from the factory, but may also arise during operation. For example, if you press it hard against the workpiece when working with a jigsaw, the blade may jam and bend. The curvature of blades is sometimes difficult to determine by eye, so a new file is installed and the quality of sawing is checked. The choice of blades will require an appropriate approach, so it is strongly recommended not to buy the cheapest blades from unknown manufacturers. After all, this affects not only the quality of the work performed, but also the safety of the master.
Read also: How to attach a foam canister to a gun
How to make it yourself
A guide for a jigsaw can be purchased at a specialized store or, if you have enough free time and desire, you can make it yourself.
Required materials and tools
Making a guide for a jigsaw with your own hands does not require special technical skills or the use of special tools. The required list of materials and equipment includes:
- wooden blocks;
- chipboard or OSB sheet;
- furniture nuts and washers;
- wooden slats;
- fastening material.
Step-by-step manufacturing instructions
To make a multifunctional customizable guide for an electric jigsaw, you need to follow these steps:
- Apply markings according to predetermined dimensions on wooden blocks and a sheet of chipboard or OSB. After this, put them together and secure them with wood screws.
- Assemble a guide platform for a jigsaw from wooden blocks and slats. In the central part it is necessary to leave a gap of 5-7 mm wide for the saw blade.
- In the base cover, where the guide is installed, cut a longitudinal groove for the saw blade.
- Drill two through holes in the guide platform and press a metal pipe into them.
- Screw the studs into the holes and secure the platform with wing nuts.
- Make a movable stop. To do this, you will need to prepare a piece of wooden slats 15-20 cm long and, placing it on the work surface, drill a through hole.
- Insert a piece of tubing into the hole in the lid. Then, using a pin and wing nut, secure the wooden stop.
- Using an angle, set the position of the stop at an angle of 90ᵒ to the guide and drill a hole in it for fixing with a pin. Repeat a similar procedure for the 45ᵒ angle and apply the appropriate markings.
Angles of 90ᵒ and 45ᵒ are the main ones and are more often used. If necessary, you can apply markings for any required angle.
A more detailed process of making a guide angle for an electric jigsaw can be seen by watching the video below.
Stop ruler is a simple and clear element
This type of tire as a thrust ruler is the simplest, easiest to manufacture and use. When manufacturing it, it is necessary to remember that no matter how simple the design is, it must ensure reliability and safety. A high-quality stop ruler can be used for an electric jigsaw, a hand-held circular saw, or a simple hand saw. Manufacturing is carried out according to the following sequence.
- Prepare a wooden or plywood strip. The width should exceed the width of the platform of the circular saw used by 20 centimeters.
- A ruler is made from this strip. The remaining sheet of plywood is used to make the base.
- The finished structure is screwed to the base. For this purpose, wood screws are used.
- The protruding part of the ruler is carefully trimmed. The edges should be milled.
Stop ruler
When starting to work with a finished tool, it is advisable to carry out several test cuts on secondary wooden products. You need to get used to the fact that when moving the saw along the length of the ruler, you need to apply different forces. Therefore, you should gain some experience. Then proceed to the finishing cut.
What are miter saw stops for?
All kinds of additional devices: stops, clamps, fasteners are used to securely fix the workpieces. The miter saw guide helps you make precise cuts across the grain of the wood. The factory stop has one drawback, which significantly reduces the scope of application. The cut cannot be made larger than the width specified by the manufacturer. This parameter is individual. Cutting boards of greater width requires rigid fastening of the stop.
Guide fence for electric jigsaw
On the upper side, the guide has two T-shaped grooves into which devices are inserted to fix the power tool and allow it to move freely along the ruler. Clamps are supplied with the guide; accessories are sold separately.
The ruler is attached to the workpiece with clamps, and the cutting is carried out with a jigsaw. If there is no device for fixing the tool, then during the cutting process the jigsaw is pressed against the guide with the side of the sole.
You can make a guide ruler at home. To do this you need:
- Take a timber without knots, 1.9 meters long. This is a more acceptable size, because the cutting width of chipboard and laminated chipboard sheets is 1830 mm.
- All surfaces of the timber are processed in compliance with strict perpendicularity relative to each other.
- After this, a groove is made on the bottom side and a T-shaped profile is inserted. Clamps will be placed in it to secure the ruler to the workpiece.
- Graduation is attached to the outside. To do this, you can use metal rulers, attaching them with round-head screws.
Cutting is carried out by moving the jigsaw with the edge of the sole resting on the side surface of the guide ruler.
How to choose a good circular saw?
When purchasing a hand-held circular saw, the buyer should pay attention to the following parameters and technical characteristics of the tool:
- engine power. It determines how much work the unit can perform, how successfully it will cope with the task and whether it will cut thick, rough wood;
- cutting depth. It should be enough for the operator to cut the necessary materials and workpieces;
- cut at an angle. This makes the circular saw more functional and significantly expands its capabilities;
- the presence of a lock for accidental pressing of the “start” button, which increases operational safety;
- the presence of additional functions: protection against overheating, connecting a vacuum cleaner, blowing sawdust, etc.
For more detailed selection criteria, watch the video:
Electrical problems
Problems with the motor and electrical components of a jigsaw can cause a variety of consequences. There is a list of typical faults.
The brushes sparkle
The graphite brushes that transmit voltage to the motor rotor are subject to wear. This is a planned phenomenon. Therefore, if sparks appear in the tool body or incomplete power delivery, it is enough to replace a pair of brushes. Most jigsaws are equipped with units for quick installation.
Graphite brushes wear out over time and need to be replaced
Floating speed
If the jigsaw does not maintain stable speed even at idle, and stops working briefly when the position of the body changes, it is worth examining all the attachment points of the wires and their integrity. Especially if such malfunctions in the operation of the instrument are accompanied by a burning smell. To do this, open the case and carefully inspect the wiring, paying special attention to the connection points of the engine and the start button.
To check the wires, open the instrument body
The saw stops under load
The reason the motor rotor stops under load is partial damage to its windings . Most often this is an interturn short circuit. In this case, the engine gets very hot. Repairing such a malfunction is quite complicated. This could be rewinding the motor or completely replacing the motor with a new one with its correct connection. A multimeter will help determine interturn short circuits by measuring the resistance of the windings.
You can determine the interturn short circuit using a multimeter
Finally, we cannot fail to mention the malfunction indicated in all jigsaw operating instructions: the tool does not turn on. In this case, it is recommended to check the correct voltage in the outlet and the integrity of the power cable. And do the same work as when floating engine speeds occur. If the measures taken do not help, you will need the help of a qualified technician.