The history of wood burning, or pyrography, dates back hundreds of years. Since its inception, technology has undergone many changes. Artists have been honing their skills for years and applying new technologies.
It is based on drawing a design on a wooden board with a hot tool. Pyrography will be interesting for children, especially boys. This article will help beginners step by step understand the technique of wood burning.
What is pyrography
Pyrography is the burning of various patterns and designs on wooden plates using a special device - a pyrograph. This activity has a rather interesting history, because even ancient people were engaged in burning on wood. Of course, it is difficult to compare the drawings of that time and today’s, because the technology of this craft has greatly advanced.
In the process of work, stencils for wood burning are used, which can be purchased separately from the pyrograph, or painted on special boards. This activity can be both fun and beneficial, because burning trains hand motor skills, imagination, and also develops artistic skills.
Numbers on the stencil
Burning inscriptions on wood in the form of numbers is best suited for boys, since they are unlikely to want to draw various patterns, circular curls, floral designs or cartoon princesses on the wood. Most of all, they enjoy architectural structures, cars, ships and other equipment.
The best option for a boy who likes pyrography would be images not of still life or painting, but of architecture, transport, airplanes, and weapons. For example, a parent can download an image of a house (a summer house, a large high-rise building or a plot of land). The boy will transfer even an easy-to-apply license plate at home onto a wooden surface with passion and enthusiasm.
Technology and features of wood burning
There are several technologies and features of this process. They look like this:
- Contour technique. All the main lines are drawn on the board, along which a simple picture is gradually sketched. This is a beginner's technique, it is better to choose it to understand the principle of operation of the device.
- Silhouette technique. In this technique, only the background is burned out, and the design itself remains the color of the board. An interesting way, because the pictures then turn out not dark, but on the contrary – light.
- Artistic technique. This is the most complex technique, as it combines the two previous methods. In it, the artist works not so much on the figures, but on the incidence of light, shadow, volume, and so on.
Interesting: Companies and organizations that are engaged in burning logos and inscriptions on various objects, of course, without using a pyrograph.
This would be strange, because the process of applying a design with your own hands takes too much time, which would make it impossible to put production on an assembly line. For this purpose, special laser machines are used that are connected to a computer. A design for burning is entered into the program, and it is gradually applied to the object.
Overview of options
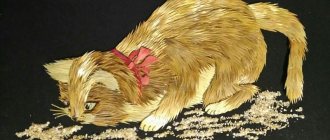
In certain cases, the child chooses a drawing to burn on a cutting board in accordance with the theme of the upcoming holiday and writes a suitable inscription there, for example, “March 8.” Students in grades 1-5 can choose easy options for decorating wooden boards. But since most often these are kitchen boards, the pictures chosen are related to a similar theme. But in general, nothing can limit the flight of imagination, since a cute cat depicted on a board, beautiful fruits, and a cup of coffee with coffee beans will look equally good in the kitchen interior. But all options can be divided into certain groups.
Still life
Still lifes are considered a common option. Moreover, the choice here is very extensive. As a rule, such drawings represent fruits in a vase or flowers. To make a still life look complete, it can be supplemented with various details. For example, not only fruits in a vase, basket or on a platter look good, but also a few berries scattered on the table. The following fruits and berries can be beautiful and easy to depict:
- grape;
- strawberry;
- pears;
- apples;
- peaches;
- lemons;
- bananas;
- raspberries;
- cherry.
Three-dimensional objects complemented by details look good on such objects. For example, it could be a watermelon or melon with slices next to it.
A vegetable still life also looks appropriate, and here, too, you can use any specimens based on your own preferences: radishes and cucumbers, tomatoes and zucchini, pumpkin and eggplant.
A separate type of still life is flowers in a vase, which always look advantageous. And here you can depict any options. But most often the choice is made in favor of such representatives of the flora as:
- chamomile;
- sunflowers;
- cornflowers;
- dandelions;
- pansies;
- lilies;
- tulips;
- carnations.
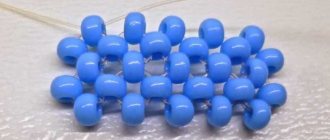
Animals
When depicting animals, a certain level of skill is already required. Although it all depends on the style in which you want to draw it. If realistic, then a certain artistic talent is required. If in a cartoon style, you can copy from any picture, even without any special drawing skills.
You can choose different options for the image on the boards. For example, various insects look good, such as:
- ladybug;
- bee;
- butterfly;
- dragonfly.
Often the choice falls on the image of domestic animals and beloved pets. And here you can depict:
- cat;
- dog;
- hamster;
- a rabbit;
- parrot;
- turtle;
- fish.
Whether it will be just an animal or should be supplemented with some details is up to the master to decide.
For example, a bee can be depicted near a jar of honey. The bird will look more harmonious on the branch, and the kitten can easily be complemented by a ball or ball of thread.
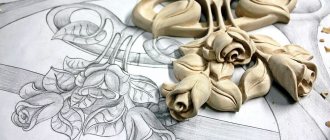
Patterns
It will not be difficult to depict patterns. You can make them, focusing on a specific example and copying them exactly, or you can come up with your own ornament and even put a certain style into it. Most often, geometric shapes of different sizes, smooth lines, and plant elements are used in patterns.
Other
On the kitchen board, which will become an interior decoration, you can depict everything related to the kitchen theme. This could be: a cup of coffee and coffee beans nearby, sweets on a beautiful plate, a large cake.
If you have certain skills, you can depict:
- a scene from a cartoon or fairy tale;
- a favorite hero who will be easily recognizable;
- undersea world;
- seascape;
- forest or mountain motifs.
Burning set
To create art and act as a pyrographer, you will need a set of several items. You should start with a burner, of which there are two types.
Loop pyrograph
This is a classic tool for burning on plywood, which was invented in the middle of the last century. It is a handle at one end of which there is a sting and a loop. It is by heating the loop that the process of depicting various figures occurs.
This tool has a power supply with a temperature controller. The only downside of this device is the fact that it cools down quite quickly. But heating does not take much time.
Soldering iron burner
This is a tool for higher level pyrographers. The tool looks a lot like a soldering iron, but performs different functions. It burns wood faster, although it takes a little longer to heat up than its loop counterpart. The advantage is a large number of replaceable nozzles, as well as a long cooling process.
After applying the drawing, the picture is processed. In addition, pictures for burning are first applied to the board, and this requires tools. The set here is:
- A simple sharpened pencil, carbon paper.
- Paints, varnish, masking tape, scissors.
- Sandpaper, pliers.
- Wet cloth, dry towel.
Having assembled this set, you can begin wood burning.
Different stencils for burning, from simple to complex
To learn how to burn beautiful paintings on wood that are worthy of becoming masterpieces of home creativity, you will need not only a professional tool (electric pyrograph), but also perseverance and a little imagination. The basis of any burnt pattern is sketches, diagrams or templates, according to which further work is carried out. You can make sketches in different ways.
Experienced pyrographers prefer to draw blanks themselves - they have a good eye for this matter. However, it is easier for beginners to use special stencils for wood burning for practical exercises. You can find them on the Internet. All that remains is to download and print on a printer. In addition to the stencil itself, you will also need carbon paper and a pencil (or pen).
Still life
How to make a KAR98K rifle from wood
It will be easiest for beginning pyrographers and children to master the technique of “drawing with fire” in still life style. Find a suitable contour pattern for burning on the Internet and get to work. If you choose a vase of flowers as a base, try to immediately filter out designs that have a lot of shaded areas. It is better to burn such images when you get the hang of them.
Still life will be more to the liking of girls than boys. A beautiful drawing with fruits, plants, kitchen utensils or other inanimate objects is by default considered a purely feminine hobby. For boys who are learning to burn, you can choose simple stencils with cars and cartoon characters.
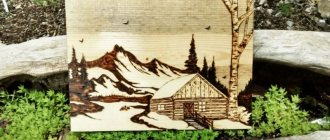
Nature
Beginners in pyrography sometimes find it difficult to find different patterns for burning wood, so it’s better to start “trying out the pen” with the simplest images. What could be easier than making wood burning designs in nature style with a wood burning device? You can take as a basis either a beautiful country landscape or a simple sketch of any pet - for example, a dog or cat. Experiment and create your own unique masterpieces. Natural phenomena always look very interesting if burned onto a wooden piece.
Tiger
Unlike a complex picture, even a small child can burn out animals if you choose the simplest sketch for him. For adult craftsmen with experience, you can find a more complex stencil, with many small strokes. But the image of a tiger on the board is ideal for beginning pyrographers.
How to “burn” a drawing or make an inscription on wooden surfaces without a soldering iron
To further train a small child, it is better to choose a picture for children with additional elements - trees or other animals. Such designs are often used to decorate cutting boards or act as independent compositions. Gradually, the child will master complex techniques in pyrography, and over time will learn to burn portraits.
Airplane
Simple pictures for burning for children aged 7–9 years are contour sketches that can be easily transferred to a wooden blank using carbon paper. As you master the “drawing with fire” technique, you can move on to more complex sketches.
For example, on the Internet there are many models of military and passenger aircraft - pictures for wood burning. All that remains is to print, draw and burn. This is how easy it is to master pyrography with the help of stencils and templates. As they say, from simple to complex. Success in creative work!
Pyrography has long become an integral part of folk art - this type of decorative art is enjoyed by people of different professions, regardless of age.
And all because every person is capable of mastering this technique. The main thing is desire, perseverance and accuracy, since “drawing with fire” does not like haste. In addition to the main tool (pyrograph), you also need an idea.
That is, a sample or sketch according to which you will burn.
An old friend or a new look at wood burning (Discussion)
Experienced pyrographers (usually artists or designers) prefer to take interesting images from their heads. However, it is much easier for beginners to draw pictures using ready-made drawings and stencils.
Start with simple subjects (for example, outline sketches of animals or motorcycles) and gradually move on to more complex exposures.
This article presents the most popular ideas for pictures and drawings, which, with the proper level of preparation, you can easily burn onto a wooden blank with your own hands.
Tips and secrets for beginners
To ensure that your drawings are neat from the very beginning, it is enough to follow simple rules:
- In the process of applying the first point, you can blow a little on the sting, so it will turn out neat.
- Contours are done with slow movements and one line. It is important not to scratch the wood.
- The tip often needs to be cleaned to remove burn marks. A metal brush is suitable for this.
Note!
Plasticineography - interesting options for creating pictures from plasticine on cardboard for children
- DIY scrapbooking for beginners: what it is and how to do it. What you need to create a beautiful album or notebook (photo + video)
How to make a craft with your own hands: what you can do with your own hands at home
Important: There is no need to overheat the pyrograph, otherwise the lines will turn out too black.
All experienced pyrographers give this advice to their students.
Characteristic patterns
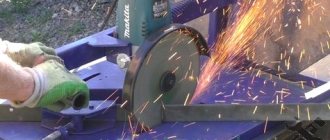
To make special images in the form of curling patterns on wood, it is best to use plywood for this - it is soft, light in color, and can be easily processed, so it is best suited for this type of work. Pattern application:
- Sketches of patterns for burning can be found on the corresponding website and downloaded for free. It is important to choose the pattern that you like the most. Such patterns are transferred to a wooden surface and creatively designed.
- Any artistic type patterns will look attractive on any furniture (for example, on wall shelves, cabinets, decorative elements), as well as kitchen items: rolling pin, cutting boards, wooden spoons.
- Particularly widespread are burning patterns with different floral images that will advantageously decorate any tree. Drawing such patterns is much easier than more openwork designs or lace.
Sources used:
- https://hendmeid.guru/podelki/sozdanie-trafaretov-dlya-vyizhiganiya
- https://hendmeid.guru/podelki/eskizyi-dlya-vyizhiganiya
- https://sdelala-sama.ru/podelki/1164-trafarety-dlya-vyzhiganiya-po-derevu.html
- https://sdelala-sama.ru/podelki/1045-kartiny-dlya-vyzhiganiya-po-derevu.html
Safety precautions
There is a set of rules that must be followed when burning designs on wood. The safety rules look like this:
- You cannot play with the instrument. Even a simple touch with a hot sting will cause a severe burn.
- You can only hold the pyrograph by the handle - you cannot grab the tip, even if it seems more convenient.
- Nozzles need to be changed only with pliers. You shouldn't grab it with your bare fingers.
- During operation, the device is placed only on a special stand. Remember that even after turning off the tip will still remain hot for several minutes.
- Exposed wires are wrapped with electrical tape before use. Accidental touch will cause electric shock.
These simple rules will make a picture for burning on plywood not only beautiful, but safe.
Important: If a child is working, at first an adult should look after him.
Creating a still life
It will be much easier for beginning pyrographers, as well as young children, to learn how to paint with fire in the still life style. To do this, you need to find a more suitable design with contours for burning on Internet sites and begin the procedure. If the basis is a vase of flowers, then you need to try to choose those sketches that have as little shadow as possible. Such images can be started only after obtaining certain skills and preparation.
Girls will like still life more . Boys cannot always appreciate the creation of such compositions. An attractive design with flowers, fruits, a room or other harmoniously composed objects is immediately classified as a woman’s hobby. When burning out drawings, it is best for boys to take on cars or favorite cartoon characters.
Where to begin
First you need to correctly position the tools at your workplace:
- A soft towel lies under the elbow of your working arm.
- The tool is located on a non-stick stand.
- Not far from your work area there are pliers and a damp cloth.
- The hood or fan is turned on in the room.
You need to start working by preparing the surface.
Surface preparation
The lighting above the board should be sufficient to see the lines when drawing. Next to the board there are attachments that can be quickly changed if necessary. It is better to wear a respirator to avoid breathing smoke.
Note!
DIY foam crafts: snowman, Christmas tree, sculptures, original figures with instructions (photo + video)
- Papier mache from egg trays, boxes, cassettes: the best ideas on what can be made from egg packaging
- DIY vase: step-by-step photo instructions, master class for a beautiful and unusual craft
Drawing
If designs for wood burning are applied from a stencil already prepared on a sheet of paper, then you need to use carbon paper. The image transfer looks like this:
- First, a sheet of copy paper is placed on the board.
- The printed image is placed on carbon paper.
- The image is outlined with a pencil.
- The carbon copy and printout are removed from the board.
Now you pick up a wood burner and begin the main work.
Burnout
First, the external and internal contours of the design are burned out, gradually moving to the central parts. Wood burning for children can be tiring for a child - you don't have to paint everything at once. You can rest a little and then get back to work.
Finishing
The finished pattern is sanded with a fine-grain sanding sheet. After which the picture is wiped with a towel to remove wood dust. Wood burning for beginners often occurs without the use of stencils, but if the artist liked the design, it should be coated with wood varnish. All that remains is to let the painting dry.
Learning to translate
Many people ask the question “How to transfer a drawing onto a board?”, so this is done using a stencil. You need to find and download pictures of fruits, flowers or animals that interest you, as these are the most commonly used patterns for wood burning. It is best to choose simple templates, especially if you are doing pyrography for the first time.
Print the downloaded stencil and cut out the figure if the figure in the picture is empty. If there are additional internal parts, you need to use carbon paper. Place it on the wood, place the printed stencil on top and trace the design. Try not to let the image move.
There is another way to transfer a picture to the board. You also need to print the stencil you like, printed in a mirror image. Prepare a bowl of water, decoupage glue, wood varnish, acrylic paints, a brush and a sponge.
Cut out a stencil or finished design, then carefully coat it with decoupage glue and attach it to the wooden surface with the design facing down. Smooth the design with a sponge so that it does not “bubble” and also so that there is no excess glue left. Let dry. It is best to leave the work to dry overnight.
Once dry, moisten the motif with a damp sponge and begin to erase the paper until the design appears on the wood. Carefully get rid of all the paper. Then we begin to rub the remaining paper with our fingers, making pellets that remain on the wooden surface. We brush them off the tree, and what remains is a finished design, which, after complete drying, can be supplemented by burning (for example, burning its outlines) or simply decorated with paints. Then coat the work with varnish.
Paintings for wood burning
Sketches for wood burning can range from large projects with shadows and three-dimensional figures to simple drawings. It is better for beginning pyrographers not to take on complex tasks, but to gradually learn this craft.
Note!
- Paintings from buttons, panels, appliques and compositions with your own hands: how to make flowers, a butterfly, a fish or a tree craft from buttons
Flowers made of wool (85 photos) - how to felt a flower from felt or a wool brooch. Step-by-step instructions for beginners
What can be made from wool (95 photos): felting for beginners, master class, felting techniques
Popular stories
You can draw scenes from cartoons or films. Characters from various books, stories, and so on are suitable.
Drawings of patterns for frames
Wood pyrography also includes the application of various frames in which photo cards will later be placed. You can draw both ordinary patterns and national sketches.
Animal sketches
In addition to conventional animals, you can try to draw your pet.
Nature theme
Trees, fields, flowers and other plants - all this is suitable for paintings.
As you can see, pyrography is a fascinating and interesting process. Not only an adult can be interested in it; a child or teenager can also be interested in it. And what could be better than to distract a child from gadgets and teach him such an entertaining hobby.
Please repost
0
Methods of burning drawings
Sketches are preliminary drawings with clear contour lines, along which master burners apply the image to the base. They reflect the main idea and concept of work:
- color and light planning;
- composition;
- proportionality of forms;
- plot component.
Stencils are also used, the main function of which is to apply complex compositions to a wooden surface.
The more carefully the sketch or template is worked out, the better and more professional the result will be. Unfortunately, not all pyrographers are high-class artists - mostly they are lovers of creating something with their own hands, people who gravitate toward beauty and grace, but are far from perfect in using a pencil.
Beginners just starting to dive into this fascinating field of study can be advised to use the following methods:
- search the Internet for the image you are interested in and print it on a printer;
- visit a large market that sells goods for handicrafts and creativity, and choose from a wide range of products any burning set you like, with ready-made templates, stencils and sketches;
- Alternatively, you can find a similar product in a highly specialized online store and place an order.
The last two options require some financial costs, but the first one is quite economical and affordable. Needlewomen and craftsmen often resort to it in a variety of handmade areas. Even without the necessary equipment - a printer, it will not be difficult to implement your idea by using photocopying services in any photo printing salon or office supply store.
The variety of topics and wide range of applications in various household areas place pyrography on a par with the most popular types of crafts.
If we look back at the times of the Soviet past, we can remember that burning was one of the popular activities for schoolchildren. Club activities in pioneer homes and labor lessons in schools were often devoted to this applied type of creativity. Boys and girls enjoyed burning out a variety of pictures for their mothers, fathers, and friends.
Now this direction, gaining strength, is being born anew, adapting to modern realities. New interesting topics are appearing, tools and imaging technologies have been modernized. With their help, professionals create masterpieces of wood art.
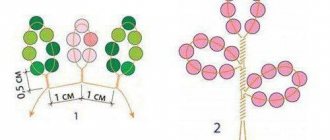
Step-by-step instructions for decorating a cutting board
- Using a simple pencil, draw the outlines of plants and insects. Draw a border along the edges of the board and around the hole. If you do not have great artistic talent, and also do not want to spend time drawing each flower, then simply transfer the objects you like using carbon paper. You can find drawings suitable for copying in various books and magazines dedicated to floriculture. The main thing is to be logical when composing your composition. You should not combine, for example, flowers that occur at completely different times of the year (for example, asters and snowdrops).
Plug in the burning device and wait until the tip heats up. Proceed to burning, carefully tracing the contours of each element of the design. Take your time, because you won’t be able to remove the extra scorched line.
When finished burning, unplug the device from the outlet. Use an eraser to erase all pencil lines.
Now prepare a jar of water, a set of watercolor paints, a sheet of paper and brushes. Round brushes made from kolonka or squirrel hairs are suitable for painting. A more economical option is brushes with synthetic hairs.
Start coloring with leaves and stems. To do this, mix different shades of green with yellow and brown colors.
Then start coloring the flowers and berries. To color rosehip petals, mix pink and white paint.
Then color the snail and butterflies. Paint the border brown.
Set the board aside for an hour to dry thoroughly.
Prepare acrylic varnish and a brush. The varnish can be either glossy or matte, depending on what effect you plan to get in the end.
- Apply varnish to the surface of the board. During application, do not press the brush too hard to avoid smearing the paint. Leave the board to dry for a couple of hours. When it dries, you can apply another coat of varnish.
Your DIY cutting board is ready. Such a gift will please any housewife, because it is not only beautiful, but also functional.
Project work on technology for a 7th grade student of the municipal educational institution secondary school in the village of Nikifarovo, MR Alsheevsky district of the Republic of Bashkortostan, Kamaletdinov Iskander (2017-2018 academic year)