How to work with the test
DIY lamb made from dough
Before you start modeling, you need to make the dough itself. To do this you will need ingredients that can be found in any kitchen:
- a glass of wheat flour;
- a glass of finely ground salt;
- half a glass of cold water.
They look nice and are cheap
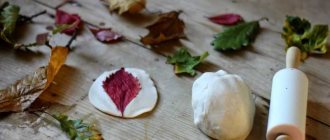
To make the dough easier to knead and hold better, you can add three tablespoons of starch to the list, but even without them the result for modeling is suitable. First, pour flour into a bowl, then add salt and, optionally, starch, then dilute with water.
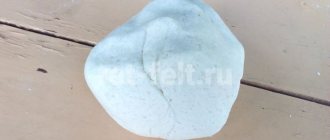
Then all that remains is to mix the ingredients first with a spoon, and then put the dough in a lump on the table and roll it out thoroughly and knead it. As a result, it should be elastic, soft, and should not stick to your hands or crumble.
It is important to make the dough correctly
If the dough is too crumbly, add water. If too sticky, add flour and salt.
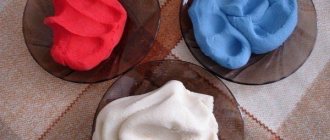
To further add color to the crafts - after all, the dough itself is yellowish, and this is boring - you can use one of the following methods:
- add food coloring at the kneading stage - then you need to mix the dough in several different bowls to get several pieces of different colors;
- use pencils, paints, markers and glitter when the crafts are ready.
DIY step-by-step master class
Tip The first method allows you to achieve a more stable color. The second one is more flexible and allows you to apply complex patterns, funny designs and not depend on the shape in any way.
To give finished crafts strength, you can dry them in two ways:
- slowly - to do this, put the finished craft on a plate and place it in a warm, dry place, away from direct sunlight, for a week;
- quickly - put the finished craft in the oven for several hours so that it bakes there (the main thing is not to overcook, otherwise it will crumble).
This decor can be used for any occasion
The first method is slower, but the result will be achieved absolutely accurately. The second one is faster, but there is a chance of ruining the craft by overexposing it, underexposing it or breaking it.
And, of course, the simpler the form, the less chance there is of ruining it.
Bright ideas that attract everyone's attention
Play dough recipes
Typically, play dough is used immediately after preparation, so it makes sense to knead it in small batches. The finished material can be stored for a short time in the refrigerator in a tightly closed container or plastic bag. In the open air, the dough quickly withers and becomes unsuitable for creativity.
Since everyone has their own goals and ideas, the amount of material needed will vary from case to case. Therefore, the amount of ingredients in recipes is indicated in proportion: the number of parts in relation to other components.
In recipes with food coloring, if a specific company is not indicated, you will have to experiment with the amount of pigment yourself.
Sometimes food coloring can be replaced with acrylic paint by adding it to the mixture when mixing.
Universal recipes
There are two basic types of dough that consist of the fewest ingredients but are suitable for almost all crafts. It’s worth starting with these compositions.
The first is not only the easiest to prepare, but also the strongest and least pliable type of dough. It may contain grains of salt, which will give the product a rough texture.
Stars, balls, lollipops and other simple shapes
The easiest way to make salt dough decorations is to take cookie cutters and use them. The algorithm is simple:
- roll out the dough into a layer about a centimeter and a half thick;
- Using molds, cut out stars, hearts, and circles from it;
- make a hole in each craft using a sharp stick and bake the resulting flat toys in the oven;
- remove them from the oven after two hours and color them.
Using cookie cutters
There are different ways to paint crafts to make them look good. For example:
- one color - then you get just bright, shiny toys;
- stripes - narrow, wide, horizontal, vertical, diagonal;
- peas - larger, smaller, one color, multi-colored;
- patterns - geometric, floral, abstract, you can take them from postcards, for example;
- drawings - snowflakes, Santa Claus, Snow Maiden, falling snow, Christmas trees.
New Year's toys for the Christmas tree
When the coloring is finished, all that remains is to thread the laces through the holes, tie them - and you can hang the finished toys on the Christmas tree.
If you need to keep a child from three to six years old busy, making such figures will benefit him as it develops fine motor skills, coordination and imagination.
You can keep your child busy for a long time with dough modeling
Other ideas for crafts made from salt dough for the New Year
Products made from salt dough are not only painted and varnished. They are also decorated with rhinestones, sequins, and beads. In this case, the crafts are dried naturally so as not to damage the decor.
Let's get acquainted with this method of decorating crafts, such as decoupage.
Decoupage of finished products
To work, you need a New Year's napkin with a suitable pattern for the size of the finished product, PVA glue and a brush.
We coat the craft with PVA glue, place the desired piece of napkin on it and smooth it with a brush. Leave the product to dry
This is one of the easiest ways to decorate smooth crafts.
Round flatbread toys are perfectly decorated with napkins
Flat Christmas decorations
Let's learn how to make figures from salt dough, a small master class will help with this.
| Illustration | Description of action |
| We will need dough, a rope, a straw for juice, molds for toys, acrylic paints - white, silver and gold, a brush, beads. | |
| Roll out the dough with a rolling pin and use molds to make shapes. | |
| In each figure we pierce holes for the rope with a tube. Dry the figures. | |
| We paint the finished products with white paint. | |
| For decoration, it is better to use gold and silver paints. But you can use any color of your choice. | |
| We paint parts of the figures with small strokes and leave the paint to dry. | |
| We insert a string into each hole and string both ends onto a bead. We tie a string and hang the toy on the Christmas tree. |
We hope that our information was useful, and you, too, will want to try to revive dough from flour, salt and water at home, turning it into wonderful products.
More complex crafts: Santa Claus and Snow Maiden
It’s also not difficult to make Santa Claus and the Snow Maiden, but you can’t get by with the simplest forms . There are several ways:
- Palms . A good idea for playing with small children is to place your palm on the dough, cut it out along the contour, bake the resulting print, and then paint it: your fingers will become a beard, your thumb will become a hat, and small blue eyes and a drawn mustache will remain in a small free area.
A more complex craft, but anyone can do it
- A drop . It’s also not difficult - you need to cut a drop from the dough, and then a wide strip, the edge of which is cut into narrower transverse strips and applied to the drop. All that remains is to lightly curl the narrow strips, place a circle of the nose and a slightly curled mustache on top of them, and put everything in the oven. And then paint it in white, red and flesh colors.
- Mosaic . You need to find a beautiful paper sketch of Santa Claus, then cut out a figure from dough using it, and then, using it, separate parts - arms, beard, face, hat and put them on top. The result will be something like a three-dimensional coloring, the main beauty of which will be imparted with the help of colors.
Gorgeous and not at all difficult - please your children
For older children - and for adults who want to test their skills - a flat image of Santa Claus's face, which is made up of individual elements, is suitable. Do it sequentially:
- first they cut out the background - a circle, or a star, or any other beautiful shape;
- then they cut out an oval for the face and a triangle for the hat, put one on top of the other;
- they supply the hat with fur - that is, a thin strip of dough;
- they make a round red nose and pink cheeks, the mouth can be pressed in, like the eyes, or they can be made bulging;
- put a curled mustache on top - they can be made lush, or they can be made from two thin strips;
- put a beard on top - you can draw it, you can make it from thin curled strips, you can simply make it flat, with a smooth wavy edge.
Sometimes it's daunting because it's difficult to do
The result is baked and painted. And if you don’t make a beard and mustache, and instead make bangs and a braid, you’ll get the Snow Maiden - and her hat, of course, needs to be painted blue.
This will be interesting to you: REVIEW: Crafts from plastic and cork corks (130+ Photos): We make unique items with our own hands
Volumetric figures
An even more interesting way to make Father Frost and Snow Maiden from dough is to make them three-dimensional. This is, of course, more difficult than making a silhouette and coloring it, but also more fun, especially since you can experiment in the process. The basic steps look like this:
- make a frame - you can from foil, you can from a glass jar without a label, you can from an old light bulb, you can from a clay cup;
- stick the dough onto the frame, evenly and neatly - this will be a fur coat;
- make a ball, stick a nose on it, press in the eyes - a head;
- make a cone - a hat, and then two smaller cones - handles.
You can experiment as you go
The Snow Maiden needs a braid of woven flagella, and Santa Claus needs a beard that curls at the ends and a mustache to go with it. When the figures are ready, they can be baked and then added with accessories. You can make a bag for Santa Claus - it’s better to sew it, but you can also make it from dough - and a long silver staff made of foil . The Snow Maiden does not have such recognizable objects, but you can give her a bunny made of cotton wool, for example, or a large star made of foil.
Master class “Animal”
Even such seemingly complex crafts as three-dimensional figures of animals are quite simple to complete if you break them down into their component parts. It’s even easier if these parts consist of balls, flatbreads and sausages - elements that any child can easily handle.
From such elements you can make universal blanks for animals, and then add details and distinctive features: horns, hooves, manes, long necks, short limbs, etc.
Progress:
- The body consists of two balls connected to each other by a strip of salted dough. The size of the body determines the dimensions of the finished craft.
- The head is made from one larger ball and one slightly smaller one. This will be the muzzle.
- The limbs consist of three members (similar to the human shoulder, forearm and hand). You can sacrifice aesthetics and believability and put the animal on sausage legs.
- Other elements: what makes the animal similar to itself. You can make a neck for a giraffe by inserting a dough sausage between the head and body. A deer will immediately look like a deer if you give it branched antlers.
Modeling animals according to this pattern can turn into an exciting game if you invite the child to invent and sculpt non-existent animals.
THIS IS NOT JUST A GAME
In the seventies of the last century, (God, how long ago it was, if only someone had told me then that I would someday write such a phrase)