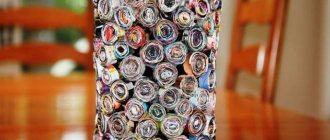
Box of newspaper tubes
To weave a beautiful box, you will need a ready-made square bottom, tubes and wooden skewers to align the corners.
Take a mold of a suitable size, insert it into the middle and start braiding from the corner post. Use standard chintz or checkerboard weave for two working tubes. In the process, carefully level and lift all the racks, and to prevent them from breaking, moisten them in advance. To make a right angle, wrap the stand with a loop from the inner working tube and cover it with the outer one - and then continue to weave as usual.
To prevent the structure from deforming, place additional racks with skewer in the corners. Continue braiding the entire structure around the perimeter until you have the required number of rows. If the racks at the bottom were too short, they can be extended.
To add a rope pattern, finish the weaving and trim the previous working tubes. Then insert three new ones behind three adjacent posts from the corner and secure with glue. Place the first tube over two racks behind the third, the second - behind the third free rack from it, and so on.
Carefully hide all ends inside under the pattern, trim and secure with PVA. Weave the box with regular chintz weave and close the last row with a braid made from uprights. Pull and compact the row, carefully trim the ends and coat with glue again.
Making a vine from newspapers
We cut strips measuring approximately 10 x 30 cm. Each piece needs to be twisted into a tube: to do this, take a thin knitting needle, place it at an acute angle and twist a cut piece of paper onto it.
At the same time, we use glue, coating the tip of the workpiece with it so that it does not unwind
In the process of making twists, you need to pay attention to an important point: one end must be wider than the other so that it is possible to lengthen the ends and form the tube correctly
Lane markings
Cutting strips
There is another simpler option: the tubes do not need to be twisted; they are finely folded lengthwise many times to form something like thick ribbons of the same width. Then you can make a braid from them - this is an excellent basis for the bottom and walls. This method is easier than twisting, but looks no less original.
How to roll newspaper tubes
Let's start with the first and most important thing - twisting the newspaper tubes themselves. Fold the newspaper in half twice and cut into four separate pieces. The width of a standard newspaper is already ideal for rolling tubes of optimal length and thickness.
To work, take long thin knitting needles of different diameters: for example, 2 and 3 mm for thin and thick tubes, respectively. Dilute PVA glue with water in advance in a ratio of 3:1 or in any other ratio convenient for you - be guided by the consistency as you work.
Take one sheet, unfold it with the fold upward, place the knitting needle on top slightly diagonally and wrap it with a corner. Roll the paper tightly until you reach the opposite edge. Lubricate the corner with PVA glue, wrap the tube tightly to the end, pull out the knitting needle and leave to dry. To make the finished tubes bend better when weaving, moisten them with water.
Making one box at a time
1 4
Any box with edges of the same height is taken as a basis. We turn it upside down and attach it to the bottom of the tube with superglue at a distance of 4-5 cm, creating something like stands. We turn the bottom down and direct the tube stands upward.
Using simple weaving, we make the first row, then the next, then glue a new tube to the bottom, threading it over and under the vertical ones, alternating the sequence. We continue the process until the walls of twists reach the edge of the base box. We fix the ends with glue, cut off the excess, and tuck the tails inward with a knitting needle.
Beautiful examples
Wickerwork not only decorates the interior, but also performs practical functions. Large baskets and boxes store laundry. Small ones can be used to store spices. The book box is a convenient place to store documents or jewelry.
The quality and beauty of the craft depends on the experience and skills of the craftswoman. Large wicker baskets are great for storing balls of yarn. Wicker boxes with an additional element inside are suitable for storing sewing accessories. This is a flat piece with sticks on which spools of thread are threaded.
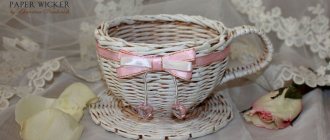
Wickerwork in the form of original souvenirs of various shapes is good. For skilled hands it will not be difficult to weave a box in the shape of an apple, melon, or mushroom.
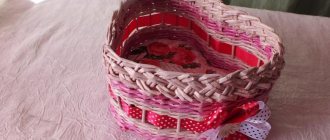
Heart-shaped boxes are popular. The bottom for this box is cut out in the shape of a heart from hard cardboard or plywood. Additionally, they make a decoration for it to cover the ends of the glued posts. Weave with any pattern upwards, maximally observing the shape of the heart. The lid for this box is made similarly to the bottom. Braid the workpiece in one of the ways. It is advisable to decorate a heart-shaped box with flowers, ribbons, beads and much more, which is up to the imagination of the craftswoman.
How to weave a box with your own hands, watch the video.
Options for decorating the box
Creating the product described is not an easy task, but if you still succeed, then it is recommended to move on to decorating the product.
To decorate a homemade box, you should use the following methods:
- decorate with acrylic paint;
- varnish;
- decorate with satin ribbons;
- decorate with various laces;
- attach bows, rhinestones, buttons;
- decorate using decoupage or scrapbooking.
Such a product will decorate almost any home, and the ability to place something in the box (jewelry, craft materials, buttons) is an additional bonus.
Master class No. 4
You will need:
- box (either a regular cardboard box or a cigar box will do);
- corduroy or velvet fabric;
- foam rubber 1.25 cm thick (the width should be equal to the width of the foam rubber pad, and the length should be twice its length (for example, if the finished pad measures 12.5 x 12.5 cm, then you will need a piece of foam rubber measuring 12.5 x 25.5 cm));
- thin cardboard (you can, for example, use a notebook cover);
- stationery knife;
- scissors;
- ruler;
- hot glue gun.
From thin cardboard, cut a rectangle 3 mm smaller than the bottom of the box. Use a pencil to mark where the foam pad will end and cut the cardboard at that point. Take the base cardboard for the soft pad and line it (the width of the strips should be approximately 2.5 cm).
Next, take a piece of foam rubber the width of a cardboard, but twice as long as it, line it into strips 5 cm wide, then cut along the lines. Apply glue to one section of cardboard and glue the foam rubber, after folding the piece in half lengthwise. Glue the remaining pieces of foam rubber in the same way.
Take a piece of fabric equal in width to the resulting base, but much longer than it. Glue one end of the piece to the back of the cardboard, wrap and cover the foam pads, inserting the fabric into the gaps between them. Use the remaining fabric to wrap the cardboard again and glue.
Now you will need a piece of cardboard 1 cm wider than the height of the resulting pad. Bend it, stepping back 1 cm from the edge (the bent cardboard should “cover” the foam rubber). Make a “wall” for the other side of the pad in the same way.
Take two pieces of fabric (they should be 2.5 cm larger than the cardboard itself), cut off the corners and cover the cardboard. Glue the “walls” on the sides of the pad.
Cover the cardboard that you are going to glue to the remaining area of the bottom of the box with fabric. Glue both pieces to the bottom of the box and you're done!
Crafts for beginners step by step
An important detail in weaving is that the tubes for the stands need to be dry, and the working tubes need to be moistened so that they become elastic. For beginning craftswomen, a step-by-step master class on weaving boxes with and without a lid will be useful.
- The bottom for the product can be woven. But it’s easier to make it from hard cardboard, plastic or wood. Handicraft stores sell ready-made perforated bottoms. The holes in the bottom are located at a distance of 1.5-2 cm.
- Take a tube, bend it in half and insert the ends into 2 holes in the bottom. All holes are filled in this way. These tubes will be the posts around which weaving is done.
- Fold the next tube in half and place it on the stand at the bottom, folding it in a cross. The stand will be surrounded by a working tube.
- Start weaving in the simplest way, “rope”. The upper part of the working tube is inserted behind the subsequent stand from the inside, and the lower part wraps around the stand from the front side.
- When the tube ends, it is extended - the next tube with its sharp end is inserted into the previous one and lengthens the workpiece.
- The “rope” method is usually used to knit the lower part of the box, 4 rows. This will be the edging of the bottom. At this stage of weaving, a blank form (pan, teapot, etc.) is inserted into the product to support the product.
- The middle part can be woven into a more complex pattern using numerous weaving patterns. These are chintz, vintage, cross, checkerboard and many others.
- For the beauty of the product, the color of the tubes is changed, then the box will come out with a pattern.
- If you add another tube to the work and weave three of them, placing them behind every third post, you get a different pattern.
- The final stage is bending the racks at the top of the product. First, bend the posts outward. To do this, we start each rack behind the next one and lower it down. Then bend them inward through the holes, secure them there and trim off the excess. The cut ends of the stands or working tubes are glued inside with glue and secured with a clothespin.
- To draw working tubes, craftswomen use a crochet hook if the weaving is tight and the posts are located close to each other.
Popular articles How to make a snowman with your own hands
How to make a lid
If the basket is woven open, then it is enough to make handles for it, and it will be ready. When it is intended to make a structure with a lid, the upper part of the product is woven separately. To make your own lid, you can use a simple master class for beginners.
Advice If you want to get a more patterned lid, you should choose those master classes that are based on openwork or checkerboard weaving - then the pattern will be clearly visible on the surface.
For work, prepare 2 circles of cardboard, the diameter corresponding to the finished basket. The circle can be immediately decorated: decoupaged, decorated with acrylic or covered with fabric. You will also need PVA glue, a lot of newspaper tubes of one or more colors and varnish.
Beautiful wicker cover
Let's begin the process of creating a simple but beautiful lid:
- Two circles of cardboard must be glued together, after placing rays of rolled newspapers around the circumference.
- Weaving is done using rope technique or layering. The four main twigs are inserted through one radial twist and the braiding of the cardboard circle begins.
- All 4 twigs are used at once: first they are placed over a newspaper tube, then passed behind the next tube. The result is a beautiful border along the contour of the cardboard. This way the entire circle is woven around the diameter of the basket.
- To make the sides of the lid, the workpiece is placed on the basket and the rays of the twists are folded down by bending the rack behind the rack. Weaving continues in the above technique. The ends are cut off and bent inward, gluing.
The finished lid should dry, then you can decorate it in your own way.
Weaving a heart-shaped box
This product is much more difficult to make than an oval one, but it is doable. To do this, just find or make your own heart-shaped base.
Execution principle:
From thick paper, in this case it is cardboard, cut out a heart twice, choose the size yourself. Prepare rolled newspaper tubes right away so as not to waste time on them during the gluing process.
Using a glue stick, glue all the diameter tubes to the bottom of the box, in this case to the heart, secure and let dry for at least half an hour.
Cover the second heart with a piece of fabric on one side, secure it in the same way and connect it to the second part, let it dry. Place the box mold in the very center and start creating it. After you finish gluing all the parts, attach the already covered heart to the bottom of the product.
Making a round box using newspaper tubes
You can decorate any box as you wish, be it paints or flowers, which will make it bright and colorful; you can give the product a shabby look, which will look original. Any housewife should have such a box in her everyday life, as you can store cosmetics in it.
For such a craft, you can use absolutely everything - from a plate to a vase. This is the most common type of box, so there are a lot of ideas for creating boxes from newspaper tubes and it’s not at all difficult to find them.
Step-by-step weaving instructions
Wicker crafts are made in accordance with step-by-step instructions. It is recommended to study it in advance so as not to encounter difficulties during the work.
Weaving stages
Before work, it is recommended to familiarize yourself with the stages of weaving a box. In the presented question, the following sequence of actions is distinguished:
- Preparation of materials. This stage includes not only collecting all the tools and materials for work, but also preparing the tubes. The blanks should also be painted in the desired color.
- Preparing the bottom. Weaving starts from the bottom. Several tubes are combined with each other by crossing. Then they begin to weave the tubes in a circle, forming a flat bottom of the desired shape. You can additionally add cardboard if you plan to use the finished craft for storing items.
- Weaving a box. Next, they continue to bend the base of the bottom upward. If the work is being done for the first time, a form is used. Weaving continues by analogy.
- Cover weaving. The lid is woven separately from the entire craft. It is made by analogy with the bottom. The advantage of this part is that it can be tried on to a finished box. As soon as the dimensions are suitable, you can stop working. If necessary, attach a handle to the lid.
At the end, the work is decorated in any possible way. You can attach additional beads, rhinestones, stickers and other elements.
The bend at the end of the weaving of the box.
At the end of weaving the boxes, a bend is always made. You can choose any fold, but simple folds are more suitable for boxes. When the bending is completed, the shape of the box becomes stronger and will not crumble. To strengthen the density of the boxes, it must be primed, and after the primer has dried, varnished.
How useful is the publication?
Click on a star to rate!
Average rating 5 / 5. Number of ratings: 3
No ratings yet. Be the first to rate.
Weaving methods
The most popular are boxes with a round bottom, so a step-by-step master class on how to create them will be given below.
For a round box we will need about 230 tubes. To make them, you need to cut each newspaper into strips about five centimeters wide. This can be done using a utility knife, folding the newspapers into a neat stack, or you can cut each one with scissors. Choose a method more convenient for you. If the box is light in color, it is best to use newspaper or other thin paper, since the letters of the printed product will show through the paint.
- acrylic primer (0.5 l), mixed with two spoons of color - this paint makes the tubes more elastic and easier to work with;
- water (0.5 l), mixed with two tablespoons of color and a tablespoon of acrylic varnish;
- fabric dye diluted in hot water with the addition of table salt and acetic acid - when dyeing in this way, the tubes will not break during weaving, and your hands will remain clean;
- food coloring, diluted according to instructions;
- water stain - for uniform coloring and to prevent brittleness, it is better to add a little primer to the stain;
- any water-based paints.
- You need to cut out a circle of the required diameter from cardboard. Glue 16 tube-rays along the edges at equal distances from each other, evenly diverging in different directions, and start weaving from step 6.
- It is necessary to arrange eight tubes in pairs so that they intersect in the center (in the form of a snowflake). Let's call these paired tubes rays.
- 5. Place a new newspaper tube under the central part of the craft and wrap it around pairs of rays in turn (in a circle), increasing it as necessary, as indicated earlier.
- 6. When seven circles are woven, the rays must be separated from each other so that there are sixteen of them. Just like at the beginning of weaving, place another paper tube down and continue weaving in a circle with a “rope”. To do this, the first ray must be wrapped in newspaper tubes at the same time from above and below. When braiding the second ray, you need to change the position of the newspaper tubes: the one that was below will now wrap around the ray from above and vice versa. Using this algorithm, continue working in a circle.
- 7. When the diameter of the bottom corresponds to the intended size, the working tubes need to be glued with PVA glue and secured with clothespins. And, after waiting for complete drying, remove the clothespins and cut off the working tubes.
- 8. To continue weaving the craft, you need to raise the rays up (we will call them risers below). If they are short, build them up. Each riser must be laid underneath the nearby one and bent upward. Thus, all 16 standing rays must be raised up.
- 9. To make the box even, it is advisable to place some form on the finished bottom: a vase, a salad bowl, a plastic bucket, a cylindrical cardboard box, etc.
- 10. Place a new working tube between the mold wall and the riser. Repeat this next to the second riser, taking another tube.
- 11. Next weave with a “rope” to the very top of the box. Weaving with a “rope” is described in paragraph 6. If the box has a pattern, then you need to weave tubes of the color indicated in your diagram.
- 12. Having finished the work, the tubes need to be glued, then the unnecessary long ends should be cut off.
- 13. The remaining standing rays must be bent. To do this, lead the first one behind the second one and go around it, the second one goes around the third one, and so on until the end.
- 14. After going around, a hole appeared near each riser. You need to thread the ends of the risers through them, glue them on the inside and cut them off.
- 15. Using the same principle, weave a lid, not forgetting to take into account that its diameter should be slightly larger than the box itself (about 1 centimeter).
- 16. To increase wear resistance, moisture protection, and add gloss, the finished product can be varnished.
The box with lid can be decorated according to your preferences. You can glue rhinestones, beads, lace; perform decor in the style of “decoupage”, “scrapbooking”. In the finished product you can store light small things: accessories for needlework (beads, buttons, seed beads, etc.), hairpins, jewelry, receipts, etc. Or you can simply use such a box as decoration, making it so that it fits according to the style to your interior.
Watch the video below for a master class on weaving a box from newspaper tubes.
Types of weaving
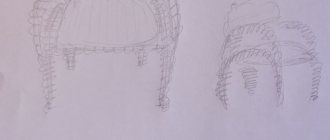
The work in this art form involves bending tubes. They can be completely different. Photos of diagrams of boxes made from newspaper tubes can be found in Internet resources.
Conventional weaving consists of prepared newspaper tubes, which are lined up and placed alternately, one after another. The bends can be round or have several tubes side by side.
Rope weaving - sticks are entangled simultaneously with two or more paper tubes, while connecting to each other.
Openwork weaving - this weaving is done according to patterns, because its essence lies in different weaves.
Round box with lid
Cut out two circles from thick cardboard, coat them with glue and cover them with newspaper or any other beautiful paper. To carefully wrap the edges in a circle, make cuts along them. If you wish, you can immediately paint and dry the workpieces well.
Popular articles Palm Sunday SMS
Using double-sided tape along the entire diameter, place stand tubes, the number of which must be calculated in advance. Fill everything with glue around the perimeter, place the second bottom piece on top and dry it under pressure. To start weaving, insert a working tube next to the stand or connect two and loop it on.
Braid the entire base around the perimeter with two tubes of a spikelet, pressing tightly. Moisten it a little, bend the racks, and lift them up on the next lap. To make the box more interesting, add a second working tube of a different color.
Build up all the details so that these places are hidden on the wrong side. And so that when weaving the box itself holds its shape, use a blank of a suitable size. You can braid any round box of the same diameter. Weave the last row, bending the racks inwards as much as possible parallel to the bottom.
Then carefully bend each post one after the other and cut it to the same length. Lift them back and braid them again with two long working tubes, just like the sides before. After three rows, cut all the posts as close to the edge as possible and tint the ends.
Make a beautiful decorative cover from cardboard, wrapping paper or napkins. Glue the posts into it in the same way as into the bottom, and use the same principle to weave a small lid. Calculate the number of rows during the process, based on your box.
How to make, twist newspaper tubes from newspapers and paint?
We twist tubes from newspapers
For those needlewomen who are taking on the process of twisting newspaper tubes for the first time, this task may seem very difficult and almost impossible. But over time, once you get the hang of it, you can achieve pretty good results when the newspapers seem to roll up into tubes themselves.
So, here is a list of materials needed for rolling newspaper tubes:
- Newspapers
- PVA glue or stationery glue stick
- Knife, stationery knife or scissors (whichever is more convenient)
- Thin knitting needle 0.5-1 mm or skewer
Materials needed for rolling newspaper tubes
Algorithm for rolling newspapers into tubes:
- Take a newspaper or a stack of newspapers.
- We fold all the pages so that they lie clearly under each other.
- Fold the newspaper in half.
- Again, make sure that the edges of the newspaper do not extend beyond each other.
- Cut the folded newspaper in half.
- We fold the resulting halves of the newspaper in half again.
- Cut the newspaper halves along the new fold.
- We sort the resulting newspaper quarters into two piles.
- We put strips of newspaper with white edges into one pile - the tubes twisted from them will be pure white.
- In another pile we put the strips with letters - the tubes twisted from them will be with a seal.
- We take one of the newspaper strips.
- We place the knitting needle in its lower right corner.
- The knitting needle is placed at an angle of 25-30 degrees.
- Holding the tip of the newspaper, we begin to twist the knitting needle, winding the paper around it.
- We try to roll the newspaper as tightly as possible.
- Having twisted almost the entire tube, coat its edge with glue and glue it to the tube.
- We take out the knitting needle.
- Allow the finished tube to dry for 15-20 minutes.
How to twist tubes from newspapers?
It is worth paying attention to the fact that the final version of the finished tube will have two ends of different thicknesses - on one side the tube will be thicker and on the other thinner. This structure of the tubes is necessary in order to “build up” them
“Extension” is a procedure based on the creation of long tubes. It consists in the fact that the thinner end of another tube is “screwed” into the thicker end of one tube and “glued” into place. This way you get one long newspaper tube.
Decor features
If you don’t like the grayish appearance of rolled newspaper tubes, you can give the surface a different shade. It can be achieved with acrylic paints of any shade. It is enough just to paint a thin layer of either ready-made rolled tubes or sheets of newsprint before the individual elements are obtained.
To give the product a different color, the box can be painted.
In addition, the application of acrylic varnish or paint helps to strengthen the mechanical characteristics of the finished product. Such a painted box, craft or box will not be affected by moisture.
The painted product tolerates moisture better.
Also, in addition to changing the color, you can give it a different structure. Initially, the twisted tubes look like an elongated cylinder. Therefore, when weaving, the outer surface of the product turns out wavy. Such waves travel in a horizontal direction.
If you don’t like them, you can roll the tubes with a rolling pin. At the same time, they turn out flat, since the paper crumples under mechanical influence.
If desired, the tubes can be made flat by rolling them with a rolling pin.
Necessary tools for creating a casket
Before you start making the casket, you need to prepare the basic tools. Below is a list of what must be at hand, since sometimes during the work there is no time to be distracted by searching for available tools.
- Scissors
- Paper
- Clear adhesive tape
- Glue
- Ruler
- Pencil
- Eraser
- Penknife
Materials for decorating the chest:
- rhinestones,
- clothespins,
- laces,
- ice cream sticks,
- threads,
- postcards, etc.
Regarding the last point, you can look for materials for decoration after the casket is ready, since it will take some time for the glue to dry well.
Also, if necessary, you can add to the above list, because making crafts is a purely individual process and each person’s imagination works differently, so other improvised means can be added.
Features of weaving various boxes
First, you need to decide on the shape of the future box. It can be round, square, oval, rectangular, or leaf-shaped. Beginners are recommended to use a ready-made template to work with.
A round box can weave around a jar or pan. A square or rectangular craft can be woven around a box of a suitable shape. Small crafts are used to store threads and other small items. You can make them based on a glass or mug.
Weaving a rectangular box
The rectangular shape of the box is rarely chosen for the first experiment. But it is easier to make only because you can use cardboard to form the bottom.
This requires:
- Cut the cardboard to the required size and glue the newspaper tube bases to it.
- Next, bend the bases up and begin weaving according to the shape. To do this, just take any shoe box.
- Finish the work by reaching the desired height of the box.
Detailed instructions and operation diagram are presented in the video.
Casket with lid
A box with a lid can be made by analogy with the instructions presented above. First you need to weave the base - a container of the desired shape, and only then proceed to making the lid. Depending on the shape of the craft, they determine how the lid will be made. If it is a square box, the top can be woven in the same way as the bottom - using cardboard as a base.
Square box
A square box can be woven similarly to a rectangular one. To do this, they also make the bottom out of cardboard, and then move on to weaving the walls. If necessary, a lid is made so that storing things is ethically attractive from the outside.
How to weave an oval box
To make an oval shape, it is also recommended to use a base. You can take it ready-made or make it yourself - you can use cardboard.
The complexity and peculiarities of manufacturing lie in the formation of the bottom. It is this that will determine the subsequent work. For it, the tubes should be connected to each other - only 2-3 pieces are used for the longitudinal part, and from 5 pieces for the transverse part. Next, the making of the craft occurs in the sequence presented in the video.
Round box
We recommend that beginners pay attention to round-shaped crafts. This is the simplest weaving, since the difficulty lies only in creating the bottom
To avoid problems with the presented question, it is recommended to watch a master class on making crafts.
Heart shaped box
Experienced craftswomen can take on complex shapes of boxes. One of the most popular is the heart. It’s easy to make – just use cardboard for the base, from which you cut out a blank of the desired shape. It can be not only a heart, but a leaf, a flower, etc.
Tubes are also glued onto the cardboard base as a basis for weaving, after which they are bent and work continues, forming the walls. If necessary, weave a lid.
Popular articles Poems for May 1
Weaving baskets of different shapes
Baskets of various shapes are used for different needs.
For example, a rectangular high basket is useful for storing linen, a square or round one is suitable for storing sewing accessories, and an oval design would be appropriate for decorating a room for the holidays. Detailed master classes on making each form are presented below. Square model
Square basket
This type of product is perfect as a tabletop bread bin. All you need to do is place a fabric insert inside and a beautiful bread box to serve to your guests – it’s ready. The work will be based on the use of a special device to help weave the base of the product faster.
Weaving a square basket
Detailed master class
To make such an auxiliary device, just take a sheet of cardboard, bend it in half lengthwise and use a hole punch to make holes for the tubes 2 cm from the fold. You also need to prepare a large number of paper or newspaper bundles.
To make the basket more like a straw one, make the twists flat.
- We insert the sticks for the base into the holes of the cardboard so that most of them are closer to the work.
- We begin to braid the bottom: take a long tube and insert it next to the cardboard, then we work using the rope weaving technique. When we reach the desired perimeter of the square, we finish the bottom.
- To form and lift the walls, we insert new splinters around the perimeter of the square: bend the twist in half and thread it into the hole, grabbing the nearest tube. We fix the fastening points with tape and clothespins.
- We begin to braid the walls until we get the height. For ease of work, we put the structure on a square box.
Can be used as a bread box
When the work is finished, you can attach a handle to it or weave an additional cover. Such a basket will not only serve as a bread bin, but will also be a good option for a packaging box.
Oval basket
The oval type product is considered the second most popular after the round basket. This form is more spacious and can be used as a box, packaging box, or simply for storing handy items. The product itself is decorated:
- flowers;
- ribbons;
- threads;
- various textiles.
All the same materials are needed for work:
- newspaper tubes made from strips measuring 11x28 cm;
- knitting needle;
- glue;
- stain;
- varnish;
- decor
The first stage is traditionally considered to be the manufacture of a cross: in a rectangular design it looks and is made differently. Since weaving the rope into 2 tubes is used, it is necessary to thread double twists across it.
One of the most popular forms
The first two rows are woven one and two tubes at a time, the remaining nine rows are woven one at a time. In the middle of the work, it is necessary to add additional racks in an amount equal to the number of main racks. After this, the transition is made to the sides. Next, the sides are woven, after 5 rows you need to make holes for the tape - you can omit them if you wish.
Decorative balls
To make openwork balls for a garland or decoration, take colored tubes from newspaper, pre-painted with acrylic. Place them on a flat surface and roll them well with a rolling pin so that they are flat. Stay a little short of the edges to build up the tubes as you go.
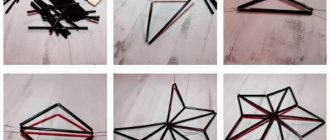
To make the balloons the same, make blanks from balloons. Start wrapping the first piece with a flat tube and glue the joints with PVA or wood glue. The main thing is to make the base frame even, because the balls can become deformed in the process.
First, make meridians for further winding - like tangerine slices. Then use the free end to walk around the ball in a circle, covering all connections and joints. In the process, hide the first tip, and then tuck the last one under other layers.
Do not overuse the number of tubes so that the ball is not too rough and massive. When the blanks are dry, carefully pierce and pull out the balloon, straighten the shape and leave them to dry completely. At the end, prime the balls in a bucket with primer, dry and clean with a dry brush to remove any smudges.
https://youtube.com/watch?v=eK2YGAu7jMc
About priming and painting
The finished basket must be primed in several layers with waterproof paint or PVA glue, which will have to be diluted a little with water. It should be applied with a brush with dense bristles. After priming, the product must dry, then only the outer side is painted. The paint is also applied several times, the basket is dried again, and then varnished.
Painting wickerwork
Tinting blanks
Many needlewomen use pages of colored glossy magazines instead of newspapers, then the basket acquires its charm, like a patchwork quilt, and resembles an ethnic style.
Rectangular tube bottom
Any basket, stand or box starts with a solid bottom, so first let’s figure out how to make it. And at the same time you will master the basic weaving technique, which will be useful in the future. To make it more convenient at first, make a blank with markings according to the dimensions of the bottom and add a centimeter along the edges. Lay the tubes vertically along the marking lines, and put two at the edges - they will come in handy later. If you have a large bottom, you can increase the number and thickness of the parts. To prevent anything from moving during work, secure everything with masking tape.
Along the horizontal markings just below the line, start weaving a horizontal tube. Weave each subsequent tube in a checkerboard pattern, as when darning - this is calico weaving. Make sure that the very first piece is level, because at first they move easily.
So that the protruding edges for the walls remain only according to the markings, the main mass of the whip is in one long tube, wrapping it with a snake. When it ends, increase it by carefully threading one into the other using PVA. You can carefully trim all the excess edges and add a little glue to make it secure.
When you finish the bottom, braid the entire rectangle with a kind of up-and-down braid. Essentially, this is the same weaving, but in a different plane and perspective. On the second circle, form corners with vertical posts - this is why the side tubes should be double.
Box made of paper tubes. MK for beginners
- home
- Blog
- Box made of paper tubes. MK for beginners
I really liked the box and the MK itself, very simple and easy to understand. Thanks to the author! (S.Z.) 1.
Good afternoon, masters and craftswomen. The most popular among my creations is this box, so I want to show you how I create it. First of all, of course, this lesson is for completely novice needlewomen, which I was quite recently))). I grouped many of the pictures so as not to lengthen the master class.
2.
I start by twisting the tubes. To do this, I use consumer paper and cut it lengthwise into three strips with a stationery knife. I lay out the strips - one on top of the other - in several rows, grease the edges with PVA glue or glue stick. I turn it on a drill and insert a 1.5 mm metal knitting needle into it. It worked right away, but over time she adapted. Approximately 5-6 tubes per minute. Length – 30 cm. In this box I used white, unpainted tubes, the rest were Walnut stain.
3.
Let's make the bottom. We cut out two identical pieces of cardboard to fit the bottom of the box. I covered it with self-adhesive film, it’s too convenient))).
4.
We take one of the cardboards - worse))))), this will be the very bottom. I'm making markings for future tubes. The distance between them is 2 cm, I use a ruler, since there is no eye gauge at all). In my product the number of racks is odd. To prevent the tubes from slipping, I glue double-sided tape to the edges. It can be seen in the picture. Then everything is clear - I attached the tubes, coated the entire cardboard with PVA, covered it with a second blank and pressed it overnight. If you want a faster option, use any other quick-drying glue.
5.
The tubes are resistant - must be solid. The working tubes with which we will braid are always moistened. I spray it with a spray bottle, leaving the edges dry, and wrap it in a bag, the edges facing out. This way it will be more convenient to build them up. Now you need to raise the working racks up. To make it neat, I lightly spray it at the very base. They soften and easily bend where we need them. And we need to go to the right and up behind the next counter.
6.
All racks are raised up. They inserted the box mold. I insert kebab skewers into the corners to strengthen the structure. I feel calmer this way)). Unfortunately they are not visible here. I often braid the first row with a rope of three tubes. We glue a tube to the three posts. We always start at the far left - through two posts - and beyond the third we take it outside. The next row has changed color - a straight rope made of two tubes.
7.
To make sure everything is perfect, we hide the connection of the tubes (looking from top to bottom). As a result, the upper tube will completely hide the extension.
8.
I wove three rows with a rope. I changed the color of the tubes, added a third one, and another row with a rope of three tubes. After weaving a row, I cut off two tubes, and changed the color on the third. And with one I start calico weaving (bottom picture). The simplest of all possible. Since the number of racks is odd, the pattern will shift.
9.
I wove 6 rows using calico weave. I prepared in advance a strip of thin cardboard, as wide as the future tape. In my case - 1.3 mm. I inserted it between the posts. And we weave further in mirror image for symmetry (second picture). Since we plan to make a fabric insert into this box, we need to weave a few more rows. The fold will turn over on them. This is where I got confused. The Walnut stain has run out. Both in my store and in my store. The deadlines were pressing. I had to buy Walnut stain from another manufacturer. And here we have such a different Nut))). Agreed with the customer - it will only be used in a case. That’s why I left this disgrace. I simply cut off the upper pillars. They won’t be visible either. The next step is to take out the cardboard tape. I prime the product with PVA glue diluted with water. Everything dries up. Next I cover it with acrylic varnish and everything dries.
10.
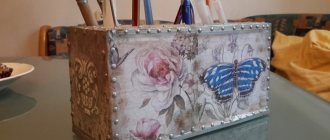
I decorate with ribbons. Everything is clear here. I use a hot gun to glue the bow.
11.
I need to sew a cover. I draw a pattern - that’s the kind of artist I am)))). The fabric is the cheapest, the main thing is that it matches the color of the box. Another thing - for the lapels on the front side - make a larger allowance, otherwise you won’t be able to pull it onto your braided fabric. The result is such a bag - on the edge of the lapel - a beautiful ribbon.
12.
All that remains is to insert it. And it turns out so beautiful! It’s all quite simple. Good luck to everyone in your creativity!!!
Box made of newspaper tubes - master class
The main 18 newspaper or magazine tubes are selected, divided into bundles of three pieces each and folded into a rectangular lattice.
Next, each bundle of the lattice is braided with a working vine, bent in half. The next two rows are woven, pushing the main tubes apart. The weaving is placed tightly to each previous row. The bottom is made in 11 rows of figure eight binding.
To move on to weaving the walls of the box, all the main tubes are bent at right angles, and the work continues with the same simple binding.
Having completed 13 rows, the excess ends are torn off, and the last turn is glued to the top row. The work is completed by folding the main vine behind each other in the opposite direction relative to the weaving. The entire top is smeared with PVA glue, dried, then the protruding remains of the vine are cut off.
An oval is cut out of cardboard; it should be slightly smaller than the bottom area. The same oval circle is cut out of thick paper, in this case from a piece of building wallpaper. 11 tubes of the same color are selected and cut in half; this length will be sufficient for this model.
The cardboard blank is covered with double-sided tape, then the top sticky layer is opened, on which short tubes in the amount of 22 pieces are evenly laid out. The structure is covered with a second oval circle on top and pressed for a few seconds.
Now the weaving of the lid begins. Using a working thread, folded in half, each main stick is intertwined until the desired size is reached; for this cover, 6 rows of weaving are made. The tips of the working vine are attached to the last turn, and the main rods are bent and threaded through the entire weaving area at an oblique angle onto the inside of the lid. In this process, the angle of inclination of the rods must not be disturbed so that the pattern is symmetrical.
Having pulled out all the main tubes from the inside, they are twisted behind each other. This weaving is done twice, resulting in a side. The finished element is thickly coated with PVA glue and after drying, all excess ends are cut off.
The wicker box is painted with oak-colored wood varnish and left to dry for a day.
Next, the box made of newspaper tubes is decorated with lace ribbons; the ribbon is glued to the inside with “cosmofen” universal glue. On the surface of the lid, the lace is gathered and also glued. Leaves are cut out of green satin ribbon, the edges are burned over a match flame. Flowers are twisted from a pink ribbon and fastened with a thread and a needle. The finished decoration is glued with universal glue in any desired order.
The box of newspaper tubes is ready.
Preparation of tools and materials
To make wicker newspaper boxes attractive, you must complete the following preliminary steps:
- Select the source material - sheets of newspapers and magazines in the required quantity.
- PVA glue - it is best to take one that has a dispenser.
- A knitting needle at least 30 cm long and small in diameter (up to 2 mm). If there is none, it can be replaced with a hard, inflexible wire.
To make tubes you only need knitting needles, newspapers and PVA glue.
The second stage of preparatory work consists of weaving, or rather, twisting individual elements. To do this you need:
- Cut the newspaper strip into several pieces. Most often, rectangles are made with an aspect ratio of 1:4. Dimensions in this case do not play a key role, but the longer the tubes are, the easier it will be during the weaving process.
- Then take a knitting needle and carefully wrap one corner of paper around it. Then you need to lubricate the surface of the paper with glue and wind it on a knitting needle.
- Carefully pull out the knitting needle without disturbing the integrity of the tube.
It is important to wind the strip of paper at an angle of 45° so that it is sufficiently dense, but at the same time flexible. - If the tube turns out to be short enough, then it will be necessary to merge several elements into one, longer one.
To do this, take two tubes. They find a thick part of one and drop PVA glue into it and carefully spread it. Find a thin edge of the second tube and insert it into the hole greased with glue. Fix for a few seconds so that the glue has time to set. After this, the tube of the required size will be ready.
Newspaper tubes are made using knitting needles.
The use of homemade boxes
A box in the house for a woman is a very useful thing, and for a needlewoman it is simply necessary. Moreover, the more of them, the better: in one there are embroidery threads, in the second - balls, in the third - knitting needles, hooks and needles, in the next - ribbons and braid. And somewhere else you need to put scissors, glue, a stationery knife, stencil staplers... The more hobbies you have, the more boxes, chests and boxes you need.
Small boxes are suitable for small items, and a large box can be intended for laundry prepared for washing.
In addition to the fact that the box is a necessary thing in the house, it is also a wonderful gift: as an independent gift or as a box for the main gift. A wide variety of design options will make it, depending on the occasion, spectacular and original, festive and discreet.