How to make beads with your own hands: tips for beginners
There are many different patterns and techniques for making jewelry, but they are not enough for a good result. To make bead necklaces with your own hands, follow these simple tips:
- There is no need to limit yourself in the choice of material. You can use either ready-made elements made of glass, wood or stone, or improvised means, such as foil, plastic and buttons.
- To beautifully assemble beads, calculate the length of the cable or fishing line in advance, and then attach the elements to it to understand the approximate number of elements required.
- If you plan to collect large beads on a fishing line, also stock up on decorative items of smaller sizes. This way you can diversify the design and fill the missing space on the cable or thread.
- You should not take on complex techniques right away. To start, buy regular beads, cable, end caps and a clasp. Try to make the simplest jewelry, and then move on to complex ones.
- If you are interested in jewelry made from polymer clay, we recommend that you first take a master class for beginners on working with this material. Remember that special equipment is required for baking and processing workpieces.
- If you notice that the thread has begun to “shag” during the process, it is better to replace it with fishing line or jewelry cable. Otherwise, the finished beads will quickly tear.
- The clasp should be in harmony with the style and color scheme of the beads.
You can simply string beads on a thread and tie its edges. But if you want to make a durable decoration, use special locks.
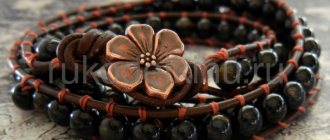
Master class on weaving a simple bracelet
To create a simple shamballa bracelet with your own hands you will need the following materials:
- 9-11 beads with a diameter of 8-12 mm;
- 2 beads with a diameter of 6-8 mm;
- nylon thread 30 cm long and 0.8 mm thick;
- two pieces of nylon thread 1.2 mm thick, 1 m and 60 cm long, respectively.
Before starting work, make sure that all beads can be strung on the selected thread. The work is carried out in stages, using a square knot.
Secure a 30 cm long thread to the pillow with a pin: this is our base. The meter thread is the working thread, we pass it under the warp so that 50 cm remains on each side, and tie the first flat knot.
Next, for reference: the working thread on the left is No. 1, on the right - No. 2.
Step 1 . We draw thread No. 1 over the warp. We pass No. 2 above No. 1 and under the base.
We draw No. 2 up to the left, into the loop of thread No. 1: it turns out that No. 2 passes under No. 1. Tighten.
Step 2 . Now No. 1 is on the right and No. 2 is on the left. We draw No. 1 over the base. We pass No. 2 above No. 1, and under the base. We pass No. 2 up into the loop to the right of the warp thread.
We tighten it. The first square knot is ready.
Step 3. Using the same principle, we knit 4 more knots or more if you are planning a long bracelet. We move the bead to the last knot, tie another one, fixing it in one place.
Step 4 . We move the next bead and fix it with a knot again. We do this until all the beads are attached to the bracelet.
Step 5 . We finish weaving with the same number of knots as at the beginning. We tighten the working threads as much as possible, cut and fix the knot above the flame of the lighter, at a distance of approximately 3 mm. You can use glue.
Step 6 . When the main part of the bracelet is completed, remove the pin. Making a sliding clasp.
Pay attention to the photo: to make the fastening, you need to fold both ends of the thread as shown in the example, insert a 60 cm long piece under them.
And tie a flat knot with this segment.
In total, about ten such knots will be needed to hide the warp threads. Secure by melting the ends.
We check whether the bracelet moves along the main thread to adjust the size.
Place a bead on each loose ponytail and tie knots to prevent them from falling off. Melt the knots. The bracelet is ready!
Important! When placing the tips on the glue, you must be very careful not to overdo it with the glue. Otherwise, it can get not only on the lock, but also on the tails along which it must move. If the structure is glued together, then it will no longer be possible to wear such a bracelet.
By the way, instead of ordinary beads, you can use personalized beads with letters. In this case, you can collect any name and weave a bracelet with any inscription.
You might be interested in learning “How to determine your bracelet size.” In the article you will find tables of wrist sizes for men and women with average standard values.
Making beads for a child with your own hands
Making jewelry is a great way to spend time with your child in a fun and rewarding way. The main thing is that for this you can use common materials at hand and not spend extra money.
DIY children's beads are also made from buttons. Take a handful of products and a couple of pieces of strong thread at least a meter long. The fastener is made in the form of a loop on one side and a button on the other. DIY beads made from buttons can be of any length and color, the main thing is that the child likes it and is safe.
You can also make beads for girls from plastic or foil. You will need:
- scissors;
- a thread;
- beads made of plastic or food foil;
- acrylic paints.
If plastic beads are sold ready-made, then you need to make them yourself from foil. Make several identical cuts of material and roll it into a tight ball. Then string the beads onto a thick thread and attach the clasp.
Bead layers
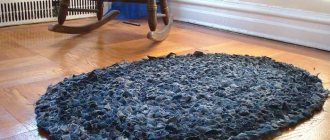
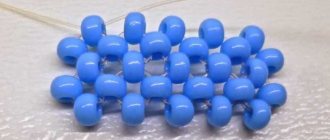
Most of the DIY photo beads that are popular on the Internet are made from seed beads. From glass beads, beads and decorative stones you can make string pendants and more complex pendants with several rows.
The algorithm in both cases looks similar:
- Prepare fishing line, beads (preferably large), scissors, matches.
- Tie a knot at one end of the fishing line.
- String the beads in a certain order (alternating colors, shapes and sizes).
- When the required length is reached, secure by tying a knot.
- Repeat the action several times.
- Burn the ends protruding from the nodules by holding them over an open flame for a few seconds.
- Gather the beaded strings into one bead.
Beads made of pearls are also collected, with the only difference being that the pearls are clinging in a random order and in one row.
To create more elaborate patterns, it is better to use special patterns.
Material consumption
An important step in the first stage is an approximate calculation of the required number of elements. This will help save work time.
For proper calculation, you need to measure the size with a centimeter tape in accordance with the design of the intended decoration.
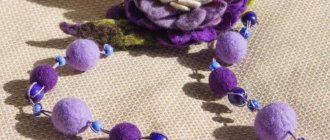
Wool beads
Those who master the wool felting technique will not find it difficult to make beads. The easiest way is to felt balls of different sizes. They can then be easily pierced with a sewing needle to be collected onto a thread. Wool sushi beads are a little more difficult to make, but the results are worth it.
You need wool dyed in different colors. Everyone chooses the number of shades according to their taste. Each piece must be carefully stretched to form a strip. Place them all in one row according to the zebra pattern. Make the outermost strip wider than the rest.
Place a mosquito net on the zebra and moisten it with soapy water. Then sprinkle the workpiece with water and crush the wool. Roll up the roll, wrap it in bubble wrap and roll the sausage for at least 5 minutes. Then remove the film and continue rolling on the rubber surface, pinching the edges with a cone.
You will also need to roll it through a terry towel and a mat. In total you need to ride for about an hour. Rinse the resulting dense sausage with water and leave to dry. Using a utility knife, cut the sausage into disks. They are colorful inside.
Thread onto a thread using a needle, selecting beads according to size. The result will be original handmade jewelry, which, by the way, is sold quite expensively in souvenir shops.
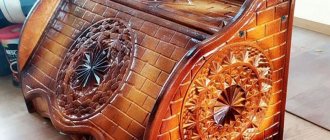
Clay or dough
Polymer and plastic clay, like salt dough, are excellent for modeling; using this technique you can create beads of different sizes and geometric shapes.
After heat treatment, individual beads are decorated, decorated with geometric designs or attractive paintings, varnished and combined into beads.
NOTE!
Decorating bottles - beautiful and original ideas for decorating bottles with your own hands (120 photos and videos)Hair jewelry: the best ideas for choosing hair jewelry and tips for choosing a design (105 photos)
- Sushi Master - Japanese restaurant in Chita