Types of suits
Depending on the age of the baby, you can think about the design of the little mermaid costume.
Interesting ideas can be found on the Internet and special magazines. The most striking character in this category is Ariel, Lily, Tilda. The manufacturing method and option also depends on the time frame. The simplest option would be to decorate a high-quality summer swimsuit, embroidering the top with shiny decorative elements. Sew, for example, a pareo to your swimming trunks. Start the pareo at a height of 15 centimeters from the bottom edge. This trick will give the scarf the shape of a tail. The same can easily be achieved with a one-piece swimsuit.
A little mermaid costume for a girl can be made from old things, which are presented in suitable colors. To create the outfit you will need a maxi skirt and a summer top. If you don’t have a sewing machine or you can’t devote time to work, you shouldn’t radically alter things. You can get by with matching tapes that will form gathers in the area of the tail and top.
If you have the opportunity to sew a full-fledged suit, then you should stock up on a piece of fabric and time to bring the idea to life. First, you should prepare a sketch from which to make a pattern. This may not necessarily be a clear composition of top and skirt. Little girls usually have dresses decorated with nautical motifs.
Model made from disposable tableware. This option is more labor-intensive and will work better for older girls. Cover the old bra with disposable spoons that have broken handles. With the help of a pussy you can repaint them any color. Cover any skirt with paper plates cut in half - they will imitate scales. The bottom of the skirt is trimmed with ruffles made of ribbons.
You can think through the sketch and option for creating a costume together with your child. The baby will show her imagination and offer her vision of the work. It is much easier for adults to work under such guidance, improving a ready-made model.
Goldfish costume made of shiny fabric
DIY Indian costume for a boy and a girl
To imitate the golden scales of a fish, you can buy fabric with lurex (with gold thread), sputtered or, even better, with sequins. It is better to take stretch fabric that stretches and flows well. You will also need yellow and orange chiffon or a similar light translucent fabric.
A goldfish costume for a girl can have several options. The easiest way is to sew a sundress from golden fabric with a length just below the knee. The sundress can be completely simple in cut - straight, with wide straps. To do this, sew a pipe of the required length from a piece of fabric (take the measurement from the chest to the middle of the calf). Do not make the sundress too wide, let it slightly hug your figure. From the same fabric, cut out the straps and sew them to the dress.
Another method is suitable for knitted or cotton fabric. Fold the cut in half and place on top any T-shirt that currently fits the child in size. Trace the T-shirt - and the simplest sundress pattern is ready. Extend it to the desired mark, cut and sew along the sides and top of the straps.
Cut out several pieces of chiffon in the shape of a diamond and sew them around the edges so that the fabric does not fray. Sew all the pieces of chiffon to the hem of the dress overlapping, so as to imitate the fluffy tail of a fish. Chiffon can also be sewn along the entire length of the skirt to imitate scales. You can also sew chiffon flaps onto the straps to resemble fins.
And don't forget the crown - make it out of paper and decorate it with sparkles and sequins to complete your goldfish costume. Photos of finished costumes, by the way, can tell you what other accessories are missing.
Making a fish costume
First you need to decide on the style and materials. Correctly calculate your strength and the time it will take to sew.
Let's show you several options for a DIY Goldfish costume for a girl.
Let's look at the easiest way to make a fish costume with your own hands, which is suitable for both girls and boys.
- orange or yellow T-shirt,
- felt (or thick fabric) in black, orange, light orange and yellow,
- a cap or a blank for a fabric cap.
We cut out circles from felt that will become scales. We sew them to the T-shirt, overlapping them so that the base is not visible. Sew over the entire area of the T-shirt or just the bottom half.
Next, cut out the tail and sew it to the back of the T-shirt.
Cut out two circles from white and black felt, one smaller and one larger. Place them on top of each other and glue them together to create eyes. Sew or glue them to the cap to create a fish's head.
Using this technique as a basis, you can make a paper fish costume. Cut out the base from whatman paper, glue on flakes of multi-colored paper - and you're done! Almost any material that is dense enough to hold its shape will do.
You can also make a fish costume for a girl in the form of a dress, in which case you will need golden-colored material and translucent organza, tulle or chiffon for decoration, which will be used for fins and a tail.
A simple option: a golden top and a tulle skirt.
- shiny golden fabric (choose the most spectacular one, because the whole look depends on it),
- tulle in white, orange, yellow, black (combine shades to your taste).
- orange satin ribbon and elastic band.
Step-by-step instructions for creating an adult goldfish costume
How to make a Papuan costume with your own hands for a boy or girl
The role of the magic fish at the New Year's party can go not only to the child, but also to one of the teachers. You can create a costume for an adult, just like you can for a child, using a tight-fitting dress of golden or yellow-orange color with 3/4 sleeves as a basis.
The step-by-step manufacturing process looks like this:
- On the front side of the finished dress, wavy lines are drawn with a dried piece of soap, which will later become scales.
- The second stage is the patch of shiny gold sequins and stripes drawn with chalk.
- The collar and sleeves of the dress are also trimmed with several rows of shiny sequins. To achieve maximum resemblance to a fairy-tale character, several layers of shiny organza are sewn onto the sleeves, which will act as fins.
- Several layers of organza or taffeta are sewn to the bottom of the dress, imitating a fish tail.
- A crown made of felt and attached to hairpins is used as a headdress. For greater similarity, two layers of organza are sewn to the bottom of the crown in the manner of a wedding veil.
- An adult “fish” can wear golden high-heeled shoes on his feet.
Pattern of a fish - carp. How to sew a goldfish
Quote from message by Irina_kondik
Read in full To your quote book or community!
Pattern of a fish - carp.
How to sew a goldfish Carp is a very resilient fish that can live not only in clean fresh water, but also in ponds and swampy areas. River carp are able to overcome enormous distances and enormous obstacles on the way to their spawning site. His goal is life. Therefore, carp is a symbol of perseverance, endurance, determination, perseverance, and the image of a carp helps to fulfill desires, achieve success, and never give up. We suggest you sew a carp with your own hands using the pattern below.
Pattern of a carp fish toy:
Our master class today is dedicated to how to sew a soft toy fish with your own hands, spending only an hour on it.
From felt
Dude outfits. costume for boys and girls: interesting ideas, descriptions and recommendations
Making your own felt fish costume will take a little more work. The work is simple, but painstaking. The fish doesn't have to be gold. There are many other types.
Our idea is to cover existing clothes with felt flakes. This costume is especially suitable for girls under 5 years of age. For the base, a jumpsuit, tracksuit or leggings and a sweater are suitable. It is desirable that the top part has a hood.
- Stock up on pieces of felt of different colors. Make sure that they are in harmony with each other or are in the same color scheme.
- We cut a lot of half-ovals or half-circles. These are our future scales. They shouldn't be too small or too big.
- Now we arm ourselves with a needle and thread and start sewing. Each scale can be secured with several stitches. We sew all the clothes. Glue will significantly speed up the process.
- The costume assumes the use of a hood. This will be a fish head. It is also covered with scales and large eyes are glued to it from cardboard on the sides.
If the clothes do not have a hood, then you can use an ordinary hair band. Paper eyes will also look good on it.
When getting started, remember that your hand-sewn costume should not only be recognizable, but also comfortable for the child.
Whitefish
This pattern is suitable for sewing whitefish or herring, in general, any fish with a similar structure. Looks great in home decor.
This master class will help you easily sew such a fish.
Dress for the queen of the bottom of the sea
We can also sew a Golden Fish carnival outfit for a girl in the form of a dress. The easiest option to make a dress is a gold-colored top and a tulle skirt. To do this you will need the following materials:
Gold fabric (this can be gold eco-leather, sequins, lurex, satin, etc.); Tulle (black, yellow, orange, white); Rubber; Orange satin ribbon.
Let's start with the skirt. The tulle must be cut into ribbons 2 times longer than the required length of the skirt. Tie tulle ribbons around the elastic and decorate the elastic with a satin ribbon. You can decorate tulle with sequins and rhinestones. Decorate your top or T-shirt too.
Craft components and materials
To make a craft in the shape of a fish, you will need to clearly express its components:
- Torso with head (fabric, felt, plasticine, foam rubber, CD, paper plate, sea or river shells, a Kinder Surprise jar, a children's sock). You can make a transparent insert on the tummy and fill it with sparkles or other products;
- Tail (thread, corrugated paper, plastic bag);
- Fins (wire or paper), in the form of solid processes or fringes;
- Gills (wire, fishing line, drawn strokes);
- Scales (glitters, rhinestones, sequins, buttons, natural materials - dried leaves, cones, homemade plastic particles);
- Eyes (toy, buttons, thread, etc.).
Goldfish costume for girls: 3 most popular ways
- Before you start making a goldfish costume, select the materials you will use. You also need to decide on the style of the dress for the girl, as there are various options.
- Next, ideas for the most original outfits will be presented. You can use those that suit your capabilities.
- To make the outfit, you will need gold glitter fabric, different shades of tulle and an orange satin ribbon. You will also need an elastic band so that the skirt fits comfortably on your belt.
Step-by-step instruction:
- Form a skirt. Cut the tulle into small ribbons, the length of which is 2 times the appropriate length of the skirt.
- Tie ribbons around the elastic band to create a full skirt. Combine shades of tulle with each other so that the design looks beautiful. You will need golden, white, red and black tones.
Skirt:
Embroider a child’s T-shirt or top with sequins.
Embroidering the top
Try on the outfit.
If you're short on time, go for a simple outfit. It is enough to cover your existing dress with sparkles and sequins. Before starting work, prepare the following materials:
- a T-shirt in a sunny color and the same or slightly brighter felt;
- hair band;
- everything for cutting and creating patterns.
Manufacturing instructions:
- Take the dress your daughter has as a basis. If this is not the case, you can combine a T-shirt of a suitable shade and a skirt.
- Cut circles and ovals of different sizes from taffeta. They will be used as scales.
- Glue the scale blanks to the dress.
- If there is a lot of shiny fabric left, form a tail out of it. For these purposes, collect a wide and long range of facts. Gather them on one side and leave them open on the other. Sew the edge that was gathered to the elastic band and put it on over the dress.
Scales and tail
Cut out a crown from felt. You will need 2 halves that are sewn together. Fill the space between the fabrics with filler. Sew rhinestones and sequins to the left side. Attach the crown to the headband using a glue gun.
Beautiful crown for a goldfish
Crown for a suit
- To make a suit using the third method, you will need a turtleneck and a skirt above the knee. Choose clothes in yellow, orange or white. Then start decorating. Sew and glue a large amount of sparkles, sequins and lurex fabric to the clothes. The more the suit shines, the better.
- Cut out a crown from cardboard and cover it with foil.
Crown for carving
- To make the fins, use light fabric - chiffon. Cut from the material, determining the length yourself.
- Wrap the elastic band with material to hide it. Sew the cut out fins to it. To make a goldfish tail, use a belt. Sew pieces of transparent tulle to it. Extend it a little from the back and tie the belt at the front.
- Place fins over the turtleneck and a ponytail over the skirt. Wear your crown and choose the right shoes. The suit is ready.
Light suit
Species diversity
By choosing a fish theme as a basis, you can use numerous images of underwater inhabitants. Fish come in different colors - this is a big plus if you sew yourself. For a boy, you can choose blue, brown, green or purple. A do-it-yourself fish costume for a girl can be made from brighter fabrics: red, yellow, crimson and others.
But that’s not all the advantages of this suit. Colors can and even should be combined. That is, you can choose as many shades as you can think of for one suit. Be sure to ask your child what kind of fish he wants to be. Show photos and choose a palette and shape together.
Pattern of a fish - carp. How to sew a goldfish
Quote from message by Irina_kondik
Read in full To your quote book or community!
Pattern of a fish - carp.
How to sew a goldfish Carp is a very resilient fish that can live not only in clean fresh water, but also in ponds and swampy areas. River carp are able to overcome enormous distances and enormous obstacles on the way to their spawning site. His goal is life. Therefore, carp is a symbol of perseverance, endurance, determination, perseverance, and the image of a carp helps to fulfill desires, achieve success, and never give up. We suggest you sew a carp with your own hands using the pattern below.
Pattern of a carp fish toy:
Useful tips
In order to make a fish costume for a girl with your own hands, as you can see, you don’t need a lot of expenses. All the materials needed can be found at home. If you want your child to stand out from the rest not only with his costume, we recommend adding face makeup. You can draw thematic images on the child’s face.
Choose the right shoes and tights for a girl in a fish costume. By the way, they can also be decorated with paints or stripes. And the main advice is this: don’t be afraid to experiment and try new options, then the New Year’s fish costume you make will delight your child.
DIY goldfish costume based on a tutu skirt
Also, a tutu skirt and clothes that you already have or that you can buy in a regular children's store and slightly modify can be suitable for the costume.
So, a great option is a tulle tutu skirt in orange and red tones and a white T-shirt with a goldfish image. You can buy a T-shirt with a suitable print at a children's store, or you can make it yourself. Look for heat transfer stickers at craft or sewing stores. Surely you will find a picture of a goldfish there. Transfer it to a plain T-shirt and the top of the suit is ready.
You can also buy a skirt ready-made, but you can make it from tulle. Besides this, you only need an elastic band. Measure it to the desired length, so that it fits well at the waist, and tie it with a knot. Cut strips from tulle of different shades of red-orange and fold each strip in half and tie it with an elastic band so that there are identical ends of the ribbon on each side of the elastic. Alternating colors, tie all the tulle ribbons with an elastic band and smooth them out. You should have a full skirt. By the way, the back of the ribbon can be made longer, like a train, which will resemble the tail of a fish.
Pattern of a fish - carp. How to sew a goldfish
Quote from message by Irina_kondik
Read in full To your quote book or community!
Pattern of a fish - carp.
How to sew a goldfish Carp is a very resilient fish that can live not only in clean fresh water, but also in ponds and swampy areas. River carp are able to overcome enormous distances and enormous obstacles on the way to their spawning site. His goal is life. Therefore, carp is a symbol of perseverance, endurance, determination, perseverance, and the image of a carp helps to fulfill desires, achieve success, and never give up. We suggest you sew a carp with your own hands using the pattern below.
Pattern of a carp fish toy:
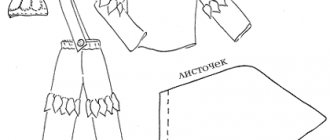
Making a Little Mermaid Costume
The most interesting thing about the look is, of course, the tail. As a rule, it is made as a skirt or part of a dress, then the outfit looks organic.
To sew such a little mermaid costume for a girl with your own hands, you need to have sewing skills. Therefore, we will start with a simpler model that is easier to manufacture.
Little mermaid costume with scales
Materials you will need:
- regular leggings of any color, according to the child’s size,
- translucent fabric (tulle, organza) green,
- felt or felt (green, light green and dark green), approximately one A4 sheet of each color,
- purple shirt,
- any plastic crown,
- sparkles, sequins, rhinestones, shells for decoration.
Let's start with the mermaid's tail, the role of which will be played by leggings.
From the bottom, cut them at an angle, as in the photo, stepping back about 5 cm from the edge. Then cut out a piece of organza or tulle 50 cm wide and 15 cm long.
Gather the tulle towards the center and secure.
Now sew the resulting fins to the bottom of the leggings. Sew from the front or back, as is convenient. The seams will be covered with decor.
Making the tail scales. From felt of suitable shades, cut out identical scales according to the template. To make the scale pattern more voluminous, we recommend using three shades of the same color, for example, green, light green and dark green. Sew or glue them, overlapping each other, like a ladder, as shown in the photo.
Tie the remaining green fabric around your waist.
The top is a purple T-shirt. It can be decorated with sequins, rhinestones or shells.
All that remains is to make the tiara. Take a plastic crown base and glue starfish and shells on top to make a sea princess crown.
Your DIY little mermaid costume from scrap materials is ready!
Realistic Printed Ponytail
For a more realistic tail, you will need the appropriate material: shiny fabric with a scale print.
Let's make a tail like in the photo.
Materials:
- elastic band for belt,
- purple mesh fabric for the fin,
- shiny fabric with scale print.
Take measurements, waist circumference and length from waist to ankles. Add 5cm to seam allowances. Cut the fabric according to your measurements: a rectangle as wide as the girth and as long as the resulting parameters.
Sew the elastic along the top edge using a simple method.
Sew the edges. Before sewing the waistband, pin the elastic and check on your child to make sure it is not too tight or loose.
For the fin, take the mesh fabric and fan it out.
Place it inside the tail from below and secure it so that the fan looks out from under the main fabric, as in the photo.
As a result, you will end up with a tail like this, which you can put on over your regular clothes at a party and turn into a mermaid.
Realistic tail by yourself
And finally, we'll tell you how to make a realistic ponytail without special printed fabric. Instead there will be fabric with sequins and tulle.
First make a pattern. Draw the tail and transfer it to the fabric, adding seam allowances. Cut out two pieces and sew.
Sew in the elastic for the waistband and sew the pieces along the second edge.
As a result, you will end up with a ponytail skirt. Cut out the scales from tulle and sew them on both sides.
Decorate the lower part with tulle stripes, as in the photo.
DIY children's little mermaid costume is ready! Choose a matching top to match the skirt and send your girl off to the party.
If you want to make your own unique and creative little mermaid costume with your own hands, the photos will inspire you and give you ideas for creativity.
DIY fish toy, goldfish, Nemo fish / DIY toys, patterns, video, MK
At the end of the last century, it was difficult to find a vehicle in the CIS without this charming Nemo fish, woven from transparent plastic tubes, hanging from the windshield. No one was embarrassed, or few people knew, that just recently these tubes saved someone’s life.
It’s interesting that in no other country has anyone thought of making a goldfish out of a used IV with their own hands.
We weave a fish from plastic tubes
In order to weave a fish toy you only need two used medical droppers, a good weaving pattern, desire and half an hour of free time. You already have time, desire and droppers. Good weaving pattern
Cut two tubes, 35 cm each, from the first dropper. Cut their ends into brushes: on one side, 8 strips to a depth of 10 cm, on the other side, 4 strips to a depth of 15 cm (tail). Now you will make the most beautiful fish eyes with eyelashes with your own hands. To do this, cut tubes 35 cm and 3 cm long. Cut them lengthwise. In a small piece of plastic, cut the fringe to a depth of 1 cm on both sides. These will be fish eyelashes. Place the “eyelashes” on the wheel and wrap them with 35 cm of cut tube. You can temporarily secure the resulting eye of the fish from the dropper with a safety pin. Take the second dropper and cut its entire tube lengthwise. Place the two tubes from step 1 together and, starting from the tail, wind the cut long strip from the second dropper onto them: two turns to secure, then alternately twisting and crossing, as in the photo. Having stepped back a little, so that our fish toy has a full-fledged muzzle, and the ready-made eye fits into the left niche, cross the tubes and move them back. Use the last stitches to secure the tubes on the back and belly of the dropper fish. Insert an eye. Cut the needle holder into a crown. Poke it with a needle. Insert the needle into the goldfish, securing the entire structure together. Slightly squeeze the narrow strips between your finger and the knife blade and pull them to the end. They will become curly. You can make a gold fish with your own hands by spraying it with bronze paint. But it seems to me that she looks much more interesting transparent and with blue eyes.
Colored fish There is a very simple way to make a colored fish with your own hands. It’s quite simple to cut the droppers into tubes and place some of them in one of the antiseptics: iodine, brilliant green or a saturated solution of potassium permanganate.
For example, a toy fish will acquire red eyes, and green fins and a tail, if the main 35 cm tubes are kept in green paint and the eye braid is dipped in potassium permanganate. Devil from a dropper Not only fish can be made with your own hands from plastic tubes.
DIY bunny costume
You'll get such a mischievous little devil if:
- cut off the tubes for the arms and legs and cut them in a spiral;
- take two tubes and cross them;
- weave 8 cm with a Chinese knot (square weaving);
- At the required level, insert the devil’s arms and legs into the weave;
- at the end, cut off two tubes completely, and two at a distance of 2 cm. These will be ears, which can be made sharp, with fringe or tassels;
- don't forget to attach the tail;
- designate two eyes using available means;
- make a face from a broken needle.
It is also easy to weave a donkey, a goat, or a little man from tubes. What patients from medical hospitals can come up with to pass the time. Nowadays, all used droppers in medical institutions are submitted for reporting, so, unfortunately, there are few such original crafts in our daily life.
Useful tips
To create a fish costume for a girl with your own hands, you don’t need a lot of time and money. All the fabrics and decorative elements you need can be found at home. If you want your baby to stand out from the group of other participants in the performance not only with his decoration, we recommend doing face painting.
Take care of choosing shoes and tights for a girl in a fish costume, which can also be:
- decorate with shells;
- paint;
- decorate with appliqués and stripes.
And the main advice is - don’t be afraid to explore new paths and try unknown options, then the New Year’s fish outfit created by your own hands will delight your baby.
From fabric
The most common option for creating a goldfish costume with your own hands is sewing from fabric. Even mothers who have little knowledge of sewing can cope with the task. You just need to choose the right material and use your imagination. A simple way to create a suit is to add individual elements to clothes you already have in your wardrobe. There is no need to invent anything new.
Take a turtleneck and short skirt out of your closet. It is desirable that they be light colors - white, yellow, orange, beige. Start decorating. You need to do:
We remember that our fish is a goldfish. This means we don’t skimp on sparkles, sequins, and fabrics with lurex. Anything will do.
- Cut out the crown from cardboard and cover it with gold foil. You can make it from colored cardboard, for example yellow, and generously decorate it with sparkles.
- For the fins, use light fabric. Chiffon scraps will do. You may have pieces of organza left over from sewing curtains. An ideal option if there is both organza and chiffon. We need to make fins out of them. They do not have to have a perfectly straight edge and the correct shape. How long the fins will be - up to the hand or even longer - is also up to you.
- Measure out a small piece of elastic. Make sure that the fins do not pinch your hand too much.
- You can pre-sew the material onto the elastic. It will hide it and expand the area for sewing on the fin parts.
- After all the pieces of fabric are sewn to the elastic, the fin is ready.
- Using the same principle we sew another one.
- A fishtail can be made from an old belt by sewing pieces of light and transparent material onto it. You can shape it noticeably elongated at the back. The belt will be tied at the front.
We put fins on the turtleneck, tie a ponytail over the skirt, put on a crown, and select elegant shoes. Your homemade Goldfish costume is ready.
The second version of the DIY costume is more complex. It will require a lot of shiny fabric. Sew a dress with flared sleeves and a flared hem. The miniature crown is also indispensable in this costume.
DIY textile fish. Patterns. Master class with step-by-step photos
Fantasy fish made from textiles and their practical application
Author: Chukreeva Alevtina Nikolaevna, technology teacher, additional education teacher at MAOU Gymnasium No. 202 “Mentality”, Yekaterinburg.
Description of the material: this master class presents two methods of making fancy fish from textiles. Bright textile fish can be made from leftover fabric that can be found in any home; you can make them fancy by offering different shapes, materials and interesting methods of decoration. Fishes are fast, playful and fun! Various options for such products and their practical use as decorative elements of the interior are also proposed. We make such fish with primary schoolchildren and students in grades 5-6 during additional classes at the Kolorit fashion theater. Purpose: this material can be useful in the work of educators, teachers of primary and secondary schools, both in educational activities and for decorating the interior of a group, playroom, and will also be useful to parents for their child’s leisure activities. Age of participants: this fish can be performed by junior and intermediate students. Goal: making a fish from textiles and presenting options for its practical use. Objectives: - introduce the technology of making fish from textiles and show options for use in the interior; — improve the ability to decorate a product in accordance with the theme; - develop creativity, sense of style, compositional skills, fantasy and imagination; - cultivate perseverance, accuracy, hard work. Materials: - bright scraps of fabric corresponding to the marine theme, it is better to use thick cotton fabrics; — padding polyester or holofiber for filling; - materials for decoration: braid, cords, sequins, beads, beads; - 2 large buttons and 2 small ones for the eyes.
Tools, devices and equipment: - hand needle No. 3; - tailor's pins; - threads in the color of fabric No. 60; - scissors; - remnants or tailor's chalk; - a peg for turning out or a stick for sushi; - sewing machine; - iron.
In my master class I will show two ways to make textile fish. The first method is more complex, since a figured seam is made to connect the parts of the fish (tail and head), and the second method uses a straight seam, it is easier to manufacture and can be used by less experienced performers. Method 1. Making a textile fish with a figured seam connecting the parts (tail and head).
The proposed pattern is made in full size with seam allowances, indicating the thread length and the number of parts. The pattern can be printed on a printer, the layout can be reduced or enlarged in advance.
After printing the pattern, we cut it out.
We prepare the fabric by ironing it on both sides. At this stage of work, it is advisable to carefully consider the compositional solution and color combinations in the product: the fabrics should be compatible in color and not cause visual rejection; you can choose colors for a specific interior. When selecting color combinations for a product, my children and I use the Oswald Color Wheel computer program, which can be downloaded from the Internet.
First, we connect the parts of the tail and body along a concave contour. To do this, fold the fabric with the right sides inward and attach the patterns to the fabric with tailor's pins to avoid shifting. We outline the contours with soap or tailor's chalk; on light details, in extreme cases, you can use a pencil (make sure that there are no pencil lines left on the front side). Make sure that the details of the fish are cut: - along the grain thread indicated on the pattern; - with the front sides facing inward, otherwise you will end up with pieces “for one hand.”
We cut out the blanks (you should get 4 parts), you can use zigzag scissors (there is no need to leave seam allowances, they are included in the pattern).
We fold the cut out parts of the head and tail with the right sides inward, align the cuts, pin them together, and mark control marks on one part—the place for turning them inside out. On the sewing machine, set the stitch length regulator to 1.5-2mm, the smaller the stitch, the neater the fish outline will look on the bends. At the beginning and at the end of the stitch we make 1 cm long bartacks. On one part we sew the seam completely along the connection line, on the second - up to the control marks, leaving room for turning the workpiece inside out. It is better to leave the place for turning inside out on the straight section of the seam to make it easier to sew it up with hand stitches.
Iron the seams towards the tail of the fish. We chop off the resulting 2 parts with the right sides inward, grind along the contour, the seam width is 3-4mm. We make small cuts at the bends, not reaching the 1mm line, then when turning, there will be no creases in the fabric in these places. We iron the blanks. Turn the pieces inside out and straighten the seams from the inside with a peg or sushi stick. In the areas where the fish’s nose is everted and on the caudal fins, we use a needle, carefully use the needle to pry the tip that is not completely turned out and pull it out little by little. Be careful not to pull the threads out of the fabric. Iron the inverted workpiece, straightening all the seams. We stuff it with holofiber or padding polyester. To stuff it with padding polyester, first tear it into small pieces. Using a peg or sushi stick, we stuff it tightly, first along the edge of the fish, and then stuff it into the body.
We combine the edges of the unsewn area on the abdomen and pin it together. We sew by hand with a hidden seam, inserting the needle exactly into the pressed folds.
We mark the place for the eyes (the diameter of the large button is 20 mm, the small one for the pupil is 10-15 mm). We sew on the buttons: we stick the needle in and out on one side of the fish, connect two buttons along the holes for sewing, string both buttons, insert the needle into the second button hole and pierce the fish all the way through. We take the needle out from the other side and string two more buttons onto it. We repeat this 3-4 times to consolidate.
We sew four buttons at once, slightly tightening the thread, the eyes are obtained in the recesses (eye sockets). Fish do not have eyelashes, but we have a fancy fish and we can create eyelashes for it, for example, from genuine black leather, the image will be flirty and kind. Eyelashes can also be made from sequins or yarn. We embroider the mouth and nose using hand stitches or machine stitching.
Let's start creating the image of a fish, for this we will use various methods of decoration: - sequins to imitate scales;
— bindweed braid or any other decorative braid to cover the seam connecting the parts;
- finishing fabric with lurex to make a goldfish. - a round cord along the contour of the fish to make it look elegant; Method 2. Making a textile fish with a straight seam connecting the parts (tail and body).
Let's add a little variety and make multi-colored fish with a straight seam. This method is easier to manufacture, since the parts are connected in a straight line. On the pattern, the seam connecting the parts is straight.
To do this, at the initial stage we sew together several fabrics from which the fish will be made. The head may be golden and the tail dark red. We sew the gold stripe for the head and the dark red stripe for the tail together. We bend the resulting cut in half, apply the pattern so that the seam on the pattern aligns with the seam on the completed part (we do not cut the pattern).
And then follow the algorithm outlined above: transfer the pattern to the fabric;
sew, cut; turn it inside out, stuff it, sew on the eyes;
we decorate, we get this “Goldfish”. We use textile fish as decorative elements in the playroom of primary school students at our gymnasium. To do this, we design and manufacture removable interior elements in a marine style, with which you can easily change it. The popularity of the marine style in the interior is explained by its lightness, unobtrusiveness, and special pleasant associations with summer and the sea. It is beautiful, stylish, original, festive and, most importantly, there will always be a good mood in such a room! 1. We attach the prepared fish to crocheted linen cords and hang them from the ceiling, creating a wonderful floating composition in the form of a curtain or panel. We knit linen cords (11 pieces) 2.5 meters long from linen twine and attach decorative rings to them, which form an arch in the composition. We also attach elements of marine paraphernalia to the cords: shells, starfish, an anchor, to create the “Underwater World” panel. 2. We will dream up more on this topic and make such a stylized “Pirate Fish”. 3. Next, let's add a touch of romance in creating the interior. “Lifebuoy with fish”, inside of which there are two fish, stylized as a pirate and a pirate, who look at each other. 4. Interior textile dolls on a frame “Pirate” and his girlfriend “Pirate” will complement the composition of the interior; The practical significance of the presented material is obvious: an algorithm for making a textile fish and a collection of decorative elements in a marine style for decorating a playroom for junior high school students are presented. Each product is unique, and together they create a single interior composition. In such a game room, children will enthusiastically study marine elements and participate in games and quizzes.
Video “Game room “Sea Planet”
We recommend watching:
DIY goldfish DIY fleece tulips. Master class with step-by-step photos Crafts for children from bottle caps. Master class with step-by-step photos “Fish” Crochet fish step by step with photos and diagrams
Similar articles:
Classic style in the interior
Art Nouveau style in the interior
Minimalism in the interior
Country style in the interior
High-tech in the interior
For the little ones
We are used to seeing children at least three years old in carnival costumes. But even younger kids can plunge into the festive atmosphere. You can create an image of a fish for a little girl at home from scrap materials. We will use an old bodysuit or light overalls as a basis. Any color is suitable, as is the material of the product. In order to transform the overalls into fish scales, you need to cut circles from the fabric. It is advisable to use a dense material to keep its shape. Felt is ideal for this task. Choose colors to suit your taste. It can be several shades or just one. We cut the fabric circles in half and begin sewing.
This can be done using a regular needle and thread, matched to the color of the semicircles. Helps to cope with the task and is hot. Attach the parts in rows to the overalls so that they lie on top of each other. You can consider the mini fish costume for a girl to be made with your own hands. It remains to add one detail - a headband, which we will decorate under the eyes of the fish. To do this, you can use ping pong balls cut in half. And glued to the bandage on both sides, while in the middle of each of them we draw a pupil with a marker. In the photo below you can see one of the costume options.
Costume for a little girl
If you want to make a goldfish costume for a baby who is not yet walking, then sew a onesie with a tail. Place the baby's onesie on a piece of orange fleece folded in half and trace it. Instead of legs, draw a tail. Cut out two parts of the jumpsuit - the front and back.
The front can be cut in half lengthwise and then a zipper can be inserted or buttons or snaps can be sewn on to fasten the future goldfish costume. Sew the two halves of the overalls together, finish the neckline and cuffs, and insert the fastener. By the way, the fin on the tail can be pre-stuffed with scraps of fabric so that it holds its shape well.
Decorate the front of the finished overalls with circles of multi-colored felt that imitate scales, and put on your head a hat with large eyes sewn on or a headband with a piece of golden tulle that looks like a fin.
How to sew a little mermaid costume from elastic fabric?
Sewing a children's little mermaid costume from elastic fabric is not difficult. After all, the fabric has the ability to beautifully fit the body and fit well. Tulle frills at the bottom of the skirt will look like a real little mermaid tail. Choose fabric colors at your discretion. If you want the little mermaid costume to be different from everyone else’s, make your own changes to the image of the heroine of fairy tales. You can sew on frills, decorate the top with accessories, etc.
Mermaid costume with tail
Materials and tools:
- organza or tulle for the little mermaid's tail
- elastic fabric for top and underskirt
- sewing machine
- needle
- threads
- scissors, tape for edging.
Tail for a mermaid costume based on the principle of a tutu skirtProcess:
- Before you start cutting out the material, you need to take the child’s measurements. You will need to know your chest, waist, hips, skirt length and top length.
- Then build regular rectangles on the fabric with seam allowances. One of the rectangles will be the top, the other will be the skirt.
- Machine sew the top and sides of the skirt. Also tuck the top and bottom and sew with a knitted seam. This way the products will look neat.
- To ensure that the top fits well, you can sew straps at the top. And at the top of the skirt, sew an elastic band that will emphasize the waist. It is advisable to choose an elastic band of the same color as the product.
- A fluffy bottom will come out if you cut strips from tulle and then tie them closely with an elastic band; above in the photo you will see how to tie knots correctly.
- One such product will not be enough, it’s great if you weave three of these skirts, then the tail will turn out perfect. For ease of weaving, elastic bands are placed on the legs of the chair and then removed when the product is ready. The result is a fluffy skirt, which will need to be sewn to the bottom of the elastic skirt.
You can decorate your top with organza. Make a fabric cape for your shoulders. The image of the little mermaid will then turn out to be romantic. It will be just as beautiful if you do a girl’s hair using kanekolon strands. See the image below:
Hairstyle for masquerade
Step-by-step instructions with photos
Step 1: pattern
The first thing you need to do is a sketch. We draw an image, outline the details. On thick paper, or better yet cardboard, we draw a life-size pattern. You can use our template - just copy the image to your computer, enlarge it to the required size and print it.
You choose the size of the toy yourself - it all depends on your needs. The length of our fish turned out to be quite large - 45 cm
If you enlarge the template several times, you can sew not only a toy, but also a pillow toy for the nursery.
Cut out the template.
Step 2: sew the fabric scraps together
Our fish consists of three parts: head, body and tail. We prepare the fabric - we select pieces that match the color and texture - for each part of the fish.
The soft fish toy will turn out more interesting the brighter we choose the color of the fabric
We sew the pieces of fabric together, iron the seams:
Step 3: transfer the pattern to the fabric
Fold the resulting fabric in half lengthwise. Transfer the pattern to the fabric. We cut it out.
What does the little mermaid costume include?
A children's little mermaid costume can look different. It’s beautiful when it consists of a long dress, like a fairy-tale heroine, because the little mermaid became a girl for her prince. The costume may also include such wardrobe elements as an upper part in the form of a bodice, and a lower part often in the form of leggings or a narrow skirt with a headband at the bottom in the form of a little mermaid’s tail. Moreover, the more magnificent the little mermaid’s tail, the better.
Little mermaid costume
What shades of fabrics are best to choose for a sea beauty costume? You can choose any color scheme. The only thing to keep in mind is that the sea beauty has beautiful hair of blue, red, red or green, and the tail is chosen the same shade as the color of the water in the sea or ocean: blue, greenish. And even better if it is turquoise.
It will also be beautiful if the fabric on the bottom of the outfit has scales, or imitates them. Material with sequins or a corresponding scale pattern looks good
You can choose any top, no matter what shade of material it is, the main thing is that the entire finished outfit looks perfect to your taste. To decide on the color scheme of the costume, look at the images of fairy-tale and cartoon heroines presented below:
The Little Mermaid from Andersen's fairy tale
Little Mermaid Ariel
What other wardrobe items and accessories will be needed for a little mermaid carnival costume?
- Young beauties should prepare shoes of a suitable color so that they blend in with the mermaid's tail. If it is not possible to find suitable shoes, then buy Czech shoes and paint them with acrylic paint to match the suit.
- You can make rings and bracelets for your hands from beautiful beads or seed beads. Bracelets made from rubber bands or in the form of colored laces will look nice.
- To completely highlight the outfit of a little fashionista at a festive party, you can use accessories such as a clutch in the shape of a seashell or a soft handbag in the shape of a fish.
- Girls often imitate older women. Therefore, you cannot leave both the neck and ears of the little mermaid without decorations. It’s good if you make beads yourself to match bracelets and rings. Beads made from “pearl” mother-of-pearl beads would also be appropriate. It is better to use earrings or clips that are the same as neck jewelry from the same set.
- The girl’s hair color can be left natural and curled on her head, decorated with hairpins, a tiara or a hoop, etc. And if your daughter is ready to experiment, then for the holiday you can buy a wig or kanekolons, and also color the strands with colored crayons.
Beautiful make-up
But when you have already decided on a complete look for the carnival, then you can move on to the most important step - sewing the costume. Next, three images of the little mermaid will be provided in different versions.
Master class on how to sew felt souvenirs
Nowadays it has become very fashionable to sew toys for children who have just been born or when they are one year old. Usually they do this in the form of a name and some kind of plot. I suggest you watch this video, just for those who don’t know how to properly sew together the parts of felt toys, this video will help you figure it out, watch all the stages of work:
Well, and of course, if you dream of sewing any fairy-tale hero or cartoon characters, then be sure to use this video instruction, based on it you can subsequently make absolutely any animals or people, the main thing is to find and print the template of the one you plan to sew:
Sweatshirt suit
Another version of the costume is less elegant, but easier to make and is suitable not for a matinee, but, for example, for an amateur performance where professional costumes are not required.
For the goldfish, you will need a red, orange or yellow hoodie and felt in the same shades, as well as fleece or felt in white and black. From red, yellow and orange felt, cut out circles with a diameter of about 7 centimeters and sew them onto the front of the sweatshirt, overlapping and unevenly. They will imitate scales.
From white, black and orange felt, cut out three circles for the eyes - the largest circle is white, a slightly smaller black circle and a small orange circle. Sew them on each other and on the hood. Sew a felt fin between the eyes in the center of the hood, and sew a tail from the same material onto the back of the jacket. A funny goldfish costume is ready. By the way, you can wear a fluffy short skirt in gold or orange under a sweatshirt.
Using the same principle, you can sew felt circles onto a yellow T-shirt, sew a tail on the back, and use a thin knitted orange hat as a headdress. You can also sew eyes and a fin onto it.
Procedure
The step-by-step instructions are perfectly illustrated with photos of the “Fish” craft. To get a similar toy, you need:
- Cut out four oval parts from polystyrene foam, measuring 22*15 cm, 22*15 cm, 19*12 cm and 15*10 cm. Glue them together, forming a kind of pyramid.
- Cover the resulting stand with blue crepe paper, and decorate the sides with ruffles made from the same.
- Attach the candies with skewers.
- Decorate the base with anemones made from candy, foam, mesh and crepe paper.
- Cut out the body of the fish from polystyrene foam, and from gold paper - a semicircle with a diameter of 16 cm.
- Form a cone from the semicircle, glue its edges and put it on the sharp part of the fish body, securing it with tape.
- Lay out the scales of four circles of “Golden Lily” type candies connected by a copper thread.
- Make a tail and fins from mesh and organza. Use skewers and toothpicks for fastening.
- Make a crown from golden cardboard and beads, and a mouth from red organza.
- Cut out the eyes and eyelashes from black and white cardboard.
- Attach all the made parts to the fish, and the fish itself to the base.
- Decorate the work with decor made of copper wire and beads.
We complement the image with accessories
Even if the child comes to the party in ordinary clothes, a headdress with a fish will create the desired image. Or it will complement the suit and become its finishing touch.
To make such an accessory, you will need a headband for the base, colored felt and glue. If there is no felt, colored paper or cardboard will help. Cut out the double-sided parts, unfold them, place the rim on top where the parts fold and glue them together.
To add volume to the fish, use a filler, such as cotton wool or padding polyester. Rhinestones and sequins are useful for decoration.
For the Goldfish you need to make a crown. If you have any gold fabric left over from your dress, use it. The crown can be circular or just in front, with a simple ribbon at the back.
Cut out a piece of cardboard that can be rolled into a crown.
Cover the workpiece with fabric or glue it with a glue gun. Glue the crown along the seam, make holes on the sides and tie an elastic band.
If you have gold foil cardstock, use it to make a crown. Glue a crown shape to the front of the round hoop base. A similar material can be made from fabric.
You can use a headband as a base and attach a crown to it: flat or voluminous
It is important to use golden material and keep the design consistent with the dress
A few crown patterns to inspire your ideas:
The pattern can be repeated in a circle to create a circular crown without a protrusion at the front. Buy plastic rhinestones or cut out ovals and rectangles from cardboard to decorate the crown.
Accessories are required
You yourself know that sometimes even a small detail plays an important role in creating an image. The headdress is not a necessary element of the fish costume, but it will be like a finishing touch. And if you and your child come to the holiday in casual clothes, the desired image will be created by a headdress.
Glue, colored felt and a headband for the base are all you need to make this accessory yourself.
Colored cardboard or thick paper can easily replace felt if you don't have it on hand. Draw the necessary details on paper, cut them out and attach them to felt (or cardboard). Cut out the parts, 2 pieces of each, glue or sew them, and place a headband on the folds. Depending on the material taken, use regular or hot glue to connect the headband to the bases.
There is another option for a headdress. Pay attention to the following photo.
By the way, golden hair will be very useful for a fish. It will be very impressive if you buy a golden-haired wig.
You do everything according to the previous example, only this time add volume to the fish using filler (cotton wool, holofiber or padding polyester). Use sequins and rhinestones as decoration.
Variety of fish species
Taking the fish theme as the basis for your carnival costume, you can take advantage of numerous images of underwater inhabitants. Fish come in all sorts of colors - this is a significant detail if you decide to sew the decoration yourself. For a boy, you can choose dark shades:
A girly fish outfit can be sewn with your own hands from bright fabrics:
But this is not all the advantages of this decoration. Colors can and should be combined with each other. This means that you can choose as many shades as you can think of to make one fish costume. Be sure to consult with your child about what kind of fish he wants to become. Show photos of outfits, choose colors and styles together.
What is the suit?
The “Golden Fish” outfit looks very impressive. For a little girl, it can be sewn from bright, rich, yellow-orange fabrics. An excellent option for a boy would be Flounder's outfit from the cartoon "The Little Mermaid". Little children adore Princess Ariel and her little friends living in the underwater kingdom. You can create a fabulous pike costume for a girl with your own hands. Whichever option you like, the main thing is that the decoration should be harmonious and realistic. You can't get by with a mask on your face when creating this look. It will be necessary to meticulously work on the smallest details. A girl's outfit should consist of:
- from a dress or skirt with a blouse;
- headdress, crown;
- holiday makeup.
Choosing material for a suit
It all depends on how much money you are willing to invest to make your childhood dream come true. To make the image complete and as close as possible to the original, you need to think through all the details.
What materials may be needed to sew a little mermaid outfit:
- Large beckons. It is better to choose beckons the size of a five-kopeck coin. This finishing material will be an ideal option for simulating scales.
- Small beckons. From small beckons you can make a belt that will create a clear boundary between the tail and the body.
- Foam rubber. This material will become the basis for creating shells that form the bodice of the upper part of the suit.
- Shiny fabric or satin ribbon. The foam rubber patch will be made from this material.
- Knitted mesh or nylon. Used to connect the tail and bodice.
- Fabric for sewing a tail silhouette. Depending on the further decoration of this part, the fabric is selected.
- An ordinary fishing net can also be used to decorate the entire costume or a separate part of it.
- Shells, starfish and even pebbles brought from the sea can also become part of the Little Mermaid's New Year's costume.
More budget options require a completely different range of necessary materials. Large scale decoys can be replaced with large circles cut from reflective building material. Small decorative elements with beads, ribbons, New Year's tinsel. A wig should be a must-have accessory. You can buy a ready-made costume element and make a wig from tinsel yourself.
https://youtube.com/watch?v=4s6HLL03CEg
Step-by-step instructions for creating an adult goldfish costume
The role of the magic fish at the New Year's party can go not only to the child, but also to one of the teachers. You can create a costume for an adult, just like for a child, using a tight-fitting dress of golden or yellow-orange color with 34 sleeves as a basis.
The step-by-step manufacturing process looks like this:
- On the front side of the finished dress, wavy lines are drawn with a dried piece of soap, which will later become scales.
- The second stage is the patch of shiny gold sequins and stripes drawn with chalk.
- The collar and sleeves of the dress are also trimmed with several rows of shiny sequins. To achieve maximum resemblance to a fairy-tale character, several layers of shiny organza are sewn onto the sleeves, which will act as fins.
- Several layers of organza or taffeta are sewn to the bottom of the dress, imitating a fish tail.
- A crown made of felt and attached to hairpins is used as a headdress. For greater similarity, two layers of organza are sewn to the bottom of the crown in the manner of a wedding veil.
- An adult “fish” can wear golden high-heeled shoes on his feet.