What is decoupage?
This is an amazing technique that allows you to give ordinary objects an unusual look using an ordinary picture or a special napkin.
This is an inexpensive way to make the interior of your own apartment or house especially cozy and memorable.
This is a great way to give your favorite but shabby items a new life.
This is a great way to spend time with your family.
The decoupage technique for beginners is not as complicated as it might seem when looking at the lovely creations, most of all reminiscent of luxurious items of palace utensils or pretty handicrafts of artisans of the 18th-19th centuries, inherited from great-great-grandmothers and retaining their enchanting beauty.
Well, speaking without emotion, the artistic technique of decoupage is a method of decoration using a picture glued to the surface and coated with varnish on top for durability.
The name of the craft comes from the French verb “to cut,” as the image was simply cut or torn out of a postcard, newspaper, or other printed items.
Creating a pattern from napkins
The following materials are used for decoupage:
- napkins;
- special cards sold in craft stores;
- drawings from the Internet or printed photographs;
- images from wrapping paper, magazine clippings, postcards.
You can glue any pictures, but not all of them fit perfectly, and it takes a long time to select the pattern.
The following parameters should be taken into account:
- The main criterion is the size of the image, which should be in harmony with the size of the workpiece. Having mastered the technique of processing printouts, it is easy to change the format of patterns in different graphic editors.
- The second factor is that the source material does not match the color palette. A successful combination of the colors of the design and the remaining decor is a significant part of success, which is solved with the help of a graphic program.
- Sometimes illustrations do not match in image and style. The wrong choice of motive spoils the effect of the work performed. It is necessary to choose pictures that correspond to the idea that has arisen.
- Sometimes napkins contain unnecessary elements that have to be removed.
An ideal illustration for decoupage looks like this:
- It has no unnecessary components and is successfully combined in color and size. It is advisable to carefully select the source paper material.
- Bright and distinct, suitable for the image and style. The idea contained in it must express certain information. You should not combine different artistic techniques, for example, aging techniques with modern photographs.
- Beginners are advised to choose a picture whose motif could be painted on.
- The background should match the individual elements.
A little history
This type of creativity first appeared in the Middle Ages, when practical German artisans began to decorate the furniture they produced in this way.
But the design style reached its first heyday in the 18th century, when Italian and French masters imitated expensive inlays made of wood or leather in this way.
Note!
- DIY gifts for February 23rd - a large selection of ideas for creating unusual gifts for Defender of the Fatherland Day
- What to give a 2-year-old boy - a list of the best options for an interesting and useful gift (120 photo ideas)
- Papier-mâché - TOP 120 photo reviews of original products. Detailed instructions for beginners on creating beautiful crafts
A little later, the technique became popular among poorer segments of the population. At the end of the 19th and beginning of the 20th centuries, the decoupage technique conquered all of Europe and moved to America, where it acquired the form of a craze.
The development of new technologies, an increase in production and consumption pushed handicrafts into the background, and for a long time it was in some oblivion. But now it is coming back into fashion.
Choosing a style
The composition will look harmonious if all its details are consistent in the same style. In this case, the work will take on a finished and perfect look.
Let's look at the features of the most popular styles in decoupage.
Provence
The trend was born in the south of France as opposed to the classic style of bustling cities. Simple, natural, rustic, cozy, sunny, soulful - adjectives that fully characterize Provence.
The main subject of the images: rural landscapes, rural farmstead, delicate wildflowers, sprigs of lavender, sage, pets, chickens, roosters, owls, kitchen utensils, still lifes, gifts of nature.
The colors used are gentle, pastel, natural: bluish-gray, white, lilac.
Gifts and home decorations decorated in this style will give a feeling of warmth, care, and simplicity.
Vintage
Items in this style are designed in accordance with the once fashionable “antique” trends. In appearance, they should be of considerable age and convey the atmosphere of a past era.
In vintage, the main thing is the individuality of the concept, strict adherence to the displayed style of the past, unusually elegant and graceful lines and curves. Floral ornaments, roses, images of animals and insects are used.
The color scheme usually serves one color. The tones are muted, dim, calm.
Vintage works are characterized by creating the effect of natural materials, and the most often used are: wood, leather, lace, and aged metal.
Shabby chic
Young and popular decorative style. Born in the late 80s of the last century in Great Britain. Literally translated – “shabby chic”. Combines elements of Provence, vintage and rococo. Things in this style look used, faded, defective and at the same time high quality and solid, creating the appearance of antiques.
Objects are painted in light pastel colors: white, ivory, soft pink, blue, and rubbed in places. As a rule, several layers of paint are visible, as if the item was painted more than once.
Main motifs: roses, angels. Of the ornaments, only barely noticeable checks and stripes are allowed.
Items designed in the shabby chic style are often used during wedding photo shoots.
Khokhloma
The native motifs of Russian folk crafts, familiar from childhood, look fabulous and luxurious.
Khokhloma is characterized by the use of several rich shades, most often red, gold, black; wonderful ornate ornaments made of small details, smooth lines and shapes. The main motifs are plant-based: flowers, berries, peas, spikelets, stems give the feeling of a clear, fresh autumn day.
Gzhel
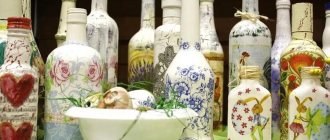
Incredible, snow-white Gzhel with frosty blue patterns can turn simple glass vessels and ceramic dishes into elegant porcelain items.
It cannot be confused with anything. Color range: from white to dark blue. Among the motifs: simple pictures, landscapes, floral patterns, birds.
Gzhel and Khokhloma are ideal for decorating picturesque Easter and Christmas compositions for yourself and as a gift.
It is not at all necessary to adhere to a certain style. You can find or create your own decoupage motif.
An ideal job looks like this: the image is suitable in size, color scheme, harmonizes with the background, and has no unnecessary details.
Step-by-step instructions for implementation
Having conceived the image, decided on the style and selected the necessary materials, you can begin practical work.
The decoupage process looks like this step by step:
- sanding;
- degreasing (for glass and metal);
- padding;
- attaching a picture;
- background application and finishing;
- varnish coating;
- sanding;
- final varnish coating.
Coating with primer is one of the most important stages, with the help of which it is possible to change the color and topography of the surface. The goal is to achieve a uniform, streak-free surface. Only a perfectly smooth, light-colored wooden product can avoid this procedure. Apply the primer correctly, slowly, in several thin layers.
It is worth starting to cover the next layer when the previous one has already dried. This rule also applies to the application of paints and varnish.
Gluing a paper napkin is the most responsible and painstaking action in the decoupage process. We will tell you in detail about the method of gluing using a stationery file, which is loved by many craftswomen for its simplicity, convenience and minimal risk of tearing the napkin.
- We place a fragment of the napkin with the excess layers removed “face down” on the file.
- Pour water onto the napkin and wait until it is completely wet, carefully smoothing the curled edges with a brush. There is no need to spare water. The napkin should float in the puddle. When wet it will stick to the file.
- We drain the water. We apply the image on the file to the surface, smooth it out and remove the bubbles. We carefully tear off the file. If the napkin follows, use a brush to press it together with the file to the surface and try again.
- While the napkin is wet, coat it with glue, doing this from the middle to the edges. We do this with the flat side of the brush softly and gently. We remember the fragility and thinness of the material.
- After complete drying, coat the product with varnish. The more layers of varnish, the better for the protection and appearance of the work.
Craftsmen lay up to 100 layers, achieving an excellent surface. At a minimum, the product must be coated with 5 to 8 layers.
Materials
The decoupage technique for beginners does not require large financial investments. At first, the craftswoman will need decoupage cards; they are denser than ordinary napkins and are guaranteed to stick without holes, tears or folds. Yes, it’s more convenient and easier to work with them.
In the future, when the technique of decoupage with your own hands is mastered almost perfectly, you can even use paper napkins from the store or newspaper sheets (such crafts look especially good in retro or simple city style).
An acrylic primer will help ensure better adhesion between the base and the design, and it will also eliminate minor surface defects.
Glue. To begin with, you can use the most ordinary PVA, but over time, such a craft can turn yellow from the inside and even crack, so in the future it is better to buy acrylic glue or adhesive varnish, which can be applied to the base and used as a final coating.
The varnish will help fix the picture and give the homemade product durability. It is best to use water-based acrylic varnish. It does not have a strong odor, washes well and dries quickly.
Note!
- Kinusaiga technique - TOP-140 photos of the best ways to create crafts using the Kinusaiga technique with your own hands + instructions for beginners
- Do-it-yourself passe-partout - a master class with step-by-step do-it-yourself schemes. Making tips + photos of the best examples
- Decoupage with napkins: TOP-150 photos of ways to decorate with napkins. Simple instructions for beginners at home
Acrylic paints are useful if you want to make a colored base or beautifully inscribe the selected image on the surface. To begin with, you can buy two or three colors, one of which will be the base color, and the rest will become an accent to underline the design.
3D decoupage of a vase using clay
For this work you will need:
- vase;
- acrylic paints, brush;
- glue and varnish for decoupage;
- polymer clay;
- napkin with the selected image.
First you need to prime the vase with white paint, when dry, open it with a thin layer of paint of the desired color.
Cut out fragments from a napkin for volumetric parts. Separate the top colored layer of the napkin and glue the white part of the napkin onto the vase.
Make an outline of the selected objects from polymer clay, glue it onto the vase, and place a colored layer of napkin on top. Open with varnish. You can decorate as desired.
We recommend reading:
Door decor - 130 photos of exclusive ideas and options. Instructions on how to make decor with your own hands (video + master class)- Beautiful DIY kitchen decor - a review of the best ideas. Original and modern design TOP-150 photos
- DIY wall decor - a review of the best and original ideas. 135 photos of ready-made solutions, all implementation features + instructions
Tools
The technique of decoupage from napkins will require preparing a small set of tools for comfortable work. It will include synthetic brushes for painting and underpainting, as well as for varnishing the finished product (it is better to purchase one wide flat and one thin brush, and later buy what you need), a spatula for sealing cracks (if any), sandpaper for leveling and cleaning surfaces, small pieces of foam sponge for applying primer or background.
Features of decorating wood
Decoupage on wood has its own nuances:
- if the surface is not new, it is necessary to remove the remnants of old coatings with a grinding machine or sandpaper;
- the surface must be intact and smooth; cracks and chips must be repaired with putty;
- sometimes the structure of the wood is not hidden under a layer of primer; in this case, you need to plan the decoration so that it blends harmoniously with the grain of the wood;
- if you do not plan to leave a wood grain, apply a primer.
After the primer has dried, you can begin decorating as usual.
The basis
Wooden cutting boards or straight plywood boxes and drawers will be useful as a basis for the first experiment.
Although you can use plastic, iron, porcelain or glass surfaces of any shape and size.
But in this case, it is necessary to take into account that all these smooth materials give poor adhesion to other materials, and the rounded or convex shapes of the object for decoration are difficult even for experienced needlewomen.
So it’s better to start decorating Easter eggs using the decoupage technique after gaining experience in creating crafts in this area.
Pictures of the decoupage technique will help you decide on your first creations and select everything you need for creativity.
Types of decoupage
Different decoupage techniques will help you elegantly design different types of surfaces.
What to use to create volumetric decoupage
For the basis of three-dimensional crafts, you can use a variety of materials, the most popular are:
- clay (allows you to easily create decorative elements; does not require specific skills to work);
- eggshell (with this material the product turns out to have a mosaic texture);
- modeling or texture paste (the material is waterproof, fits well on any surface);
- cotton wool (good for modeling small objects).
Reverse decoupage
The reverse technique allows you to place an image on transparent objects. In this case, the design is applied to the inside facing outwards.
The principle of creating such decor is the same as that of direct decoupage, but it will require much more attention and concentration. But a decorated table or vase will definitely impress your household or guests.
Interesting ideas for creating three-dimensional crafts
On the Internet you can find a lot of photos of volumetric decoupage on various themes, in different styles, with different decorative elements. You can decorate almost any object using this creative technique.
We recommend reading:
- Paper for decoupage - an overview of all types. Instructions on how to choose and use the right material using the decoupage technique (120 photos + video)
- Decorating furniture with your own hands - an overview of the best methods. 100 photos of the best options for modern furniture decor
- DIY furniture decoupage: TOP-150 photos of original ideas. Step-by-step instructions + master class with examples
Good ideas are considered to be made using the following technique: a variety of boxes, wall clocks, paintings and panels, decorating coffee tables, stools, flower pots, vases, cooking boards, bottles, postcards on various topics...
Decopatch
This technique differs from the first two types of creativity with paper and glue. In this style, the entire surface is covered with a pattern (or patterns), leaving no free space at all.
Very often the main image is complemented by patterns or ornaments that resemble patches. Therefore, sometimes such decoupage is compared to patchwork.
But it will be very difficult to rip up the area you don’t like and redo it. So the principle “measure seven times, cut once” will have to be followed 100 percent
Decoupage on cardboard: decorating master class
There are absolutely no boundaries in decoupage. The most important thing is imagination. Turn on your imagination and new possibilities for exquisite design will open up for you. For example, purchase fabric materials, textured waterproof wallpaper and self-adhesive film. Remember that today the assortment is very large!
Moreover, nothing prevents you from connecting your child, who will be able to independently color a future gift for grandparents, friends, teachers, anyone you wish. All you need for this is plain paper, paint, glue or a glue stick.
1. Cover the box well with monotone paper so that there are no gaps or gaps.
2. Ask your children to arm themselves with brushes and paint in any possible way as they want. You can also dip your child’s hands in paint and leave handprints; you can simply offer to draw little people or various animals, or write the names of loved ones.
3. Adding acrylic varnish will add shine.
Artistic decoupage
This technique is often called smoky decoupage. To create it, artistic drawing skills will be useful, since in it you will have to blur the edges of the pictures with the help of paints, gently combining it with the base.
If you are not sure that this technique will work out the first time, you can first practice on a sheet of paper, simply attaching a picture and finishing it with paints.
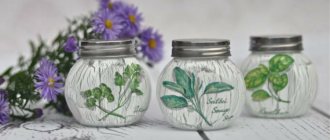
Decoupage a flower pot with structural paste
A very interesting option for decorating a flower pot in style is volumetric decoupage with structural paste. To create such a craft you need:
- Degrease the flower pot well.
- Prime with white acrylic paint in 2 layers.
- Cut out elements for decoration from a napkin and separate them into layers.
- Glue the elements of the pictures onto the pot and apply acrylic varnish.
- Using a syringe, apply structural paste along the contour of the elements.
- Cover the entire product with acrylic paint, then varnish.
Basic Rules
A master class on decoupage technique will show the entire sequence of actions. It is not as complicated as it seems at first: the surface is primed, covered with paint, glue and an image are applied to it, and all this is varnished.
But before that, it’s better to learn the basic rules that will help you make a good craft the first time.
It is necessary to paint the entire surface that will be visible. For example, for a flower pot you will have to take care of painting the bottom and inside all the way to the ground, and maybe a little deeper. And if you plan to give the pot without flowers or greenery, then you will have to cover all surfaces with paint.
If imperfections are visible in the paint, you will have to repaint the entire surface, achieving the ideal tone.
Light background colors will help make the image more realistic and expressive. In addition to white, all pastel shades will look great.
Before applying each subsequent layer, the craft must be dry. Rushing through the creative process is a great way to ruin everything.
Small pictures are easier to apply. Therefore, for the first work it is better to use them. Before gluing, you should once again make sure that the picture is suitable for the selected area in size, color or subject. To do this, it is simply leaned against the base.
The glue is applied from the center to the corners, thoroughly covering the entire surface. The pattern is carefully smoothed out, straightening out all the folds.
How to make Easter decoupage eggs
Take ready-made decoupage pictures for printing and simply print them on a laser printer. As a rule, a laser printer produces good and water-resistant printing. After wrapping the egg in the design, apply PVA glue and wait until the image on the egg dries completely. This procedure usually takes from 5 minutes to a couple of hours. It all depends on the shape and quality of the glue.
To speed up the process, you can use a table lamp or a regular table lamp. We erase all inaccuracies and excess paper with a sandpaper and then treat the egg with varnish. If necessary, the procedure can be repeated in a couple of layers until completely dry. After this, you should decorate with acrylic paints and make Easter patterns and writing. Once the egg has dried, it can be used for Easter paraphernalia.
Some advice from experienced craftsmen
Thick paint is harder to apply than liquid paint, so don’t be afraid to thin it. A couple of thin layers will be preferable to one thick application.
Slow drying in natural conditions will help the product retain its attractiveness longer.
You can't apply too much varnish.
Sandpaper will help correct most imperfections.
Following these simple rules and tips will help you achieve even quite complex decor, such as the technique of decoupage of bottles, glass jars or eggs.
A photo of the decoupage technique will help you see what has already been done by craftswomen and choose a suitable craft for beginning needlewomen.
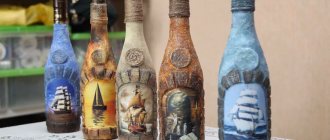
How to get build-up on a glass bottle?
Creating volumetric elements using this technique is not uncommon. There are many ways to create build-up on glass containers. The best way is to glue polymer clay onto it. Thanks to this clay, any elements that the master wants appear on the bottle.
He can sculpt anything from polymer clay, animals, a sea anchor, or just convex balls.
Instructions:
- Glass containers, polymer clay and a means for softening it are prepared.
- The master makes with his own hands the growths that he wants to see on the bottle.
- The clay is mixed in advance with a special substance that softens its structure.
- After this, the growths can be attached to the surface of the jar, gluing them with “Moment”.
- The material should be baked in the oven. The temperature should not be lower than 130 degrees.
Tip: To make three-dimensional patterns, you can use putty. It forms the outline of the desired figure, after which the figure should be filled.
Photo of decoupage technique
Beautiful decoupage of furniture as an interior decoration technique
- Date: 02/21/2015
- Rating: 38
What is furniture decoupage? This:
- A technique that can be used not only by a master, but also by any housewife.
- Several techniques that allow you to decorate new furniture or restore old ones.
- An interior transformation process that takes no more than 3-4 hours.
- An accessible way for everyone to transform a faceless piece of furniture and fit it into a specific interior as effectively as possible.
- An opportunity to show your creativity, to reflect a piece of your own soul.
Furniture decoupage will help decorate your new or restore old furniture, thus making it original and stylish.
A more precise definition is that the decoupage technique is a technique for decorating surfaces using appliqué.
There are various decoration techniques using appliqués:
- Regular. Most often, the technique is used by beginners because it does not require special artistic skills. Simply select a suitable design, cut it (preferably cut it off by hand) along the contour and apply it to the surface with glue.
- Artistic decoupage on furniture with additional effects. The design can be supplemented with hand or screen painting, craquelure or patina effect. Fragments cut from fabric or leather, thin lace, wallpaper, and other materials look great on furniture.
To obtain a high-quality result, it is recommended to carefully approach each stage of work. The following instructions tell you how to properly perform the furniture decoupage technique.
Stages of preliminary work on applying cut-out designs to furniture
Examples of decoupage.
It is better to carry out the work of applying applications in strict sequence.
The technique allows the use of any images. For beginners, it is better to take thin napkins or special decoupage cards. Masters use retro postcards.
Applications from newspapers or magazines look stylish; you can decoupage furniture using pieces of geographical maps or reproductions. It is very fashionable this season to decoupage furniture using photographs from a family album. You can find special films on the market.
They are convenient because the images on them do not need to be fixed with a special varnish, as is the case with napkins, posters or postcards.
Beginners who are doing this kind of work for the first time are recommended to learn how to cut out an image along the contour. This can be done with regular or curly scissors. In the latter case, the decoupage on the furniture will be clearer, because the figured outline will be clearly visible in the drawing.
It should be remembered that the more small details there are in the design used, the more difficult it is to cut it out.
Therefore, experts recommend not cutting out the design, but tearing it off with your hands: this way, the edges will fit more naturally into the main background. After gluing, the edges of the thick postcard can be sanded with fine sandpaper.
It is recommended to pre-soak the napkins, and if this is not possible, thin their edges with tape.
It is better to first do decoupage using special thin napkins, and do the finishing touches by hand using acrylic paints.
When the motif to be applied to the furniture is chosen, they begin to prepare the base. Glass is well degreased. If the surface is wooden, it is first freed from old paint or varnish, sanded well and coated with acrylic varnish.
You can use the same paint: it will not only level the surface, but also color it in the desired tone. At the same time, you can tint the image. An ordinary tea bag will do: it will give the paper a noble “old” yellowness.
You can use watercolor paints with a lot of water.
Important: both the surface and the shaded pattern must dry thoroughly.