If you have seen handmade oak furniture at least a few times, then you understand how different it is, both in appearance and in durability, from modern options made from cheap substitutes. After all, solid wood products are different not only in their beautiful appearance, but also in their strength and durability. Natural wood has always been and will be a sign of good taste and sophistication; even solid pine furniture, if it is beautifully made, will look better than artificial materials.
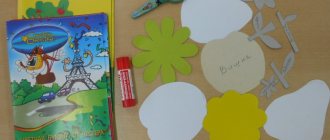
Making crafts near Lukomorye green oak: step-by-step description
Making green oak for Lukomorye
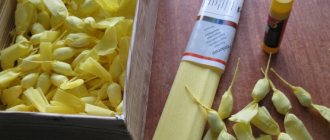
Step 1. Cover living leaves with acrylic varnish in two layers (or colorless varnish in an aerosol) and dry. It is advisable to place the leaves vertically so that the leaves look natural and not perfectly even.
Step 2. Glue the acorns with a hot glue gun to their caps.
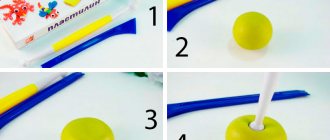
Step 3. We twist the green oak frame from wire. At the base of the frame we leave several wires – “roots” – untwisted. With their help we will attach the tree to the base.
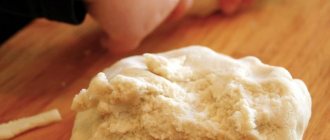
Step 4. Turn the paper bag inside out and roll it into a tube. We insert the wire inside the tube. This is an oak trunk.
Step 5. Make the roots of the oak tree and its branches from a paper bag.
If you use a paper bag from coal to make an oak trunk, then its base must be torn into 6 strips approximately 6 cm long. Each strip must be twisted so that it looks like an oak root.
We tear the top part of the bag into about 8 strips (the number of strips should be equal to the number of branches on the oak wire frame you made). We wrap strips of wire oak branches, crumpling and twisting the paper onto them.
We fix the paper on the wire frame using a glue gun. We also glue leaf cuttings and acorns using hot glue. We mask the attachment points with paper folds.
This is what your oak from Lukomorye will look like in our craft!
Features of manufacturing furniture from solid wood
Handcrafting wood crafts is a complex and labor-intensive process that requires quite a lot of equipment to make the result look really beautiful. It is worth noting that making furniture from solid wood is a job that only professional carpenters do. But if a person has a desire, then he can master any profession, the most important thing is to study diligently.
To work with oak, in order to be able to make beautiful furniture, you need a lot of equipment:
- Drill and set of drills for wood (their sharpening is different)
- Jigsaw and miter saw
- Manual frezer
- Set of clamps
- Hand electric plane
- Sander
- Tape measure, caliper, corner
- Glue and finishing varnishes
This is the minimum set of tools to start making solid wood furniture with your own hands. In addition, if you want to make cylindrical, conical parts and shaped surfaces, then you will additionally need a lathe. And this is only to make crafts no larger than a chair or stool, since table tops and other large areas of wood are first glued together from bars, and then processed on a jointer and thicknesser so that their surface is even.
Solid oak plates made using a lathe
Of course, some tools can be excluded from this list, but in this case, to make beautiful oak furniture with your own hands, you will need much more time. And besides, your crafts will look quite primitive.
It is also worth mentioning that oak is a very hard wood, so when buying drills, plane knives, and heads for a milling cutter, you need to choose the highest quality options. Otherwise, the first time they hit a knot, they will simply become unusable.
Origami
Cutting out of paper is the easiest way to embody any hero. Use colored paper, pieces of felt, and toy eyes to make the toy more complex and beautiful.
Turn her into a puppet by gluing a popsicle stick on the back: now you can give performances! And if you work hard, you can add moving parts: let the elephant move its trunk, the fox wave its tail, and the cat wash itself with its paw.
Make a craft in the form of a fairy-tale house from a shoebox, decorate and furnish it with furniture cut out of paper. Place Snow White and the Seven Dwarfs in it.
Origami will develop accuracy and fine motor skills: start with simple shapes, gradually becoming more complex.
Step-by-step photo lesson:
To create an oak tree, take a brown sheet of paper and cut out a 15 x 9 cm rectangle. Fold it in half along the long side. Then we will draw the silhouette of our tree. It must certainly have a thick crown and a small number of branches.
Carefully cut out the crown of the tree along the drawn contour.
Now let's draw an arc closer to the fold of the sheet. This will be a hollow in the middle of the tree.
Let's open it. The result was a wonderful piece of three-dimensional oak made of paper. However, it should also be decorated with leaves.
To make the leaves look beautiful on the tree, choose paper in yellow and orange tones. We cut them out in large quantities. You can make them in different sizes.
We begin to glue our leaves onto the tree branches. You can glue one oak leaf near the hollow, and the other at the base of the tree.
Here you have a wonderful paper craft in the form of a three-dimensional oak tree.
Such a craft can be placed on a flat surface, and so that it stands firmly and does not fall from gusts of wind, you can make a stand for it from thick cardboard. If you wish, you can also cut out an owl on a branch from paper and glue it to the back of the tree in place of the hollow.
How to choose a place for flowerpots?
The most common location for pots is the porch of a house. Planters with lush flowering living decorations will decorate the entrance, emphasizing the architectural style of the house.
The second most popular installation location is occupied by terraces, gazebos, and wells.
For private buildings with a wide blind area, it would be appropriate to place flowerpots along the house - they will emphasize the line of the foundation and make it more contrasting.
When choosing a location, you should follow some tips:
- Oversized forms will look awkward in a small area, just as small pots will get lost in a spacious area.
- When installing flowerpots, their mobility plays a role: portable types should be lightweight, and stationary ones should be positioned in such a way that the plants feel comfortable in them.
- When selecting structures, it is recommended to pay attention to the material of the architecture. For example, tubs are suitable for wooden log houses, while garden flowerpots cast from concrete will be inappropriate.
Option #3. Christmas wreath
In Western countries, houses are often decorated with such wreaths. They look really beautiful, and therefore you should definitely consider the original option of making a wreath from branches.
Christmas wreath made of branches
To begin, prepare:
- willow branches;
- decorative tape;
- cones;
- scissors;
- special wire (it is called floral wire);
- garden shears;
- lotus seed pods;
- twine;
- St. John's wort branches.
Preparing everything you need
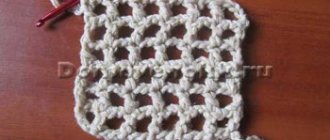
Step 1. First, cut a piece of wire and wrap it around several branches (you need to make it in a dense layer).
Branches are wrapped with wire
Step 2. The second beam is created in a similar way.
Formation of the second beam
Step 3. One longer bundle is made from two blanks.
Step 4. To make the fixation more reliable, you can cut another piece of wire.
Another piece of wire is wound
Step 5. The workpiece is bent and given the shape of a wreath (look at the photo below).
The blank is given the shape of a wreath
Step 6. Fix the workpiece with wire. You need to act carefully so that the wire does not stand out against the background of the branches.
The wreath is fixed with wire
Step 7. The cones prepared in advance are attached to the workpiece using the same wire.
Preparing and attaching pine cones
Step 8. The composition is decorated with seed pods and St. John's wort branches. To make the fixation more reliable, use a heat gun.
Additional decor is added
Step 9. A couple of branches of St. John's wort are attached to where the willow branches join.
Attaching St. John's wort branches
Step 10. Take the tape and cut a piece of it to the required length. The wreath is wrapped with ribbon, a knot is tied, and the ends are trimmed (but so that they hang down a little).
The wreath is wrapped with ribbon
Step 11. Another piece of tape is cut off and wrapped around the same area. If you want, you can additionally make a large bow. That's it, the wreath is ready, now it will become a great decoration for your home!
Additionally, you can make a small bow
Video - Original crafts from dry branches
How to grow a miniature oak?
Determine where the oak tree will grow. Choose a wide container with a shallow depth (3–50 cm). When the tree begins to grow, it is transplanted into a larger pot. Avoid plastic; the best choice would be fireclay or ceramics. Place drainage at the bottom.
Peculiarity! Transplantation is carried out in the spring every 2-4 years. The need for this is determined by the roots: if they have filled the pot, the tree needs a new place.
How to do root pruning?
Remove long roots with pruning shears. Trim thick superficial roots at an angle. The beveled ends look organic at ground level. Carry out pruning when replanting - once every 2-4 years. Remove grown roots, leaving small to medium roots 10-15 cm long.
Formation
In the second year of life, when the oak tree has grown, it is given the desired shape. The procedure is carried out in early spring or autumn, when it has dropped its leaves. Cut off any excess branches with pruning shears, bend the remaining ones with wire.
Formation rules:
- Think about how the bonsai should look, make a sketch, and be guided by it as you work. Use a vertical or slanted style. Curved, grotesque shapes are not suitable for oak. Buy clamps, flexible copper wire.
- Proceed to wrapping the trunk and branches. Pull the wire from bottom to top in a spiral.
- Secure the end with a fork in the place where the branch grows from. Make one turn around the trunk, then wind the wire parallel, around the branch towards the tip. Bend the edge of the wire down.
- Prevent damage to the bark by placing strips of rubber or fabric under the wire.
- To set the position of the branch to the left, wind clockwise, to the right - vice versa.
- When bending, proceed carefully, work with both hands, keeping your thumbs on the inside.
- Secure branches that are designed to be more bent with clamps.
- Work until the entire bonsai is covered.
The wire structure is designed for a period of 1 month to six months. Control it otherwise it will damage the developing bark of the plant. When the desired shape has been achieved, leave the oak for 2 years. If you remove the structure earlier, it will return to its previous position.
Important! From the end of February to the beginning of spring, trim large branches and shoots in accordance with the designed sketch. Do this annually. Remove young shoots at any time.
Fertilizer
Use organic and special fertilizers. They will help strengthen the standard, it will be thicker. Frequency – once a month. Don't fertilize too often. The plant will give an unacceptable effect: it will stretch, create large internodes, and large foliage.
Material extraction
The extraction of bog oak in large quantities today is only possible in Russia, Belarus and Ukraine. “Ironwood,” as it was called in the old days, is mined from the bottom of reservoirs during the minimum water level in the river. To search for precious material, the area is explored over many kilometers. In places where its deposits are supposedly located in the water, scuba divers begin working. They have to manually feel each trunk.
Each trunk is lifted ashore using modern technology. The weight of the tree can reach 50 tons. After lifting, the material is moved to the crosscutting area, its condition is assessed and processing begins immediately. After such “re-preservation” it can deteriorate in a fairly short period.
Step-by-step master class oak made of beads
The sequence of formation of a mighty tree from branches
Before proceeding with the next steps, try to connect the branches together not evenly, lower the branches down a little with each fastening. We make them in this sequence, connect the branches together and secure them with tape.
We leave three branches one at a time.
We make branched branches - two out of two and two out of three; three out of seven and one out of five.
We collect the tree from small branches, wrapping it tightly with tape and beautifully bending the resulting clusters.
Upon completion of assembly, we separate the wire to the sides for stability.
Option #2. Vase of twigs
There is nothing complicated in making such a vase. A plastic bottle (although you can use a shampoo bottle, juice carton, etc. instead) is cut to the required height; Prepared branches are broken off to the same size.
Next, a base is cut out (a kind of backing to which the branches will be glued), for which a sheet of thick paper is suitable. The backing is attached to the bottle with glue or double-sided tape. Next, double-sided tape is glued to the paper, and on it, in turn, is a piece of fabric (it needs to be cut according to the size of the bottle).
Vases decorated with branches
On a note! The branches are laid vertically, it is important that the latter has the same length as the circumference of the bottle.
Unique gilded vases
PVA glue is applied to the fabric on the bottle, after which masking tape with twigs is applied. For extra security, you can tie everything with twine, after which all that remains is to paint it in the required color. You can decorate such a vase with various insect figures, decorative flowers made from ribbons, etc. At the end, put a bouquet in the vase and enjoy the beauty made by yourself!
Ideas for crafts from tree branches
On New Year's Eve, it's time to create a stylish door wreath
Oak leaf and oak tree cutting templates
Oak is a beautiful and powerful tree, with a recognizable silhouette and shape of leaves, so it can be easily made from colored paper in the form of a three-dimensional craft or applique. Carved oak leaves from paper can be used to create autumn bouquets, home decoration, or used in scrapbooking to design notebooks, cards and albums. If a child loves Pushkin’s fairy tales, you can make a large paper oak tree with him, decorate it with a gold chain (also made of paper) and “populate” it with the inhabitants of Lukomorye.
Artificial staining of oak
There are instructions on the Internet on how to make bog oak with your own hands using ammonia. But freshly cut oaks differ significantly in their qualities from those that have lain under water for centuries. When processing at home, there is a high risk that the wood will “lead”, so you need to be extremely careful with finished products.
Suppliers who use artificial staining claim high physical and mechanical properties of the material and guarantee ideal colors. The cost of such material differs slightly. But, in fact, the quality of such material is noticeably lower. No matter what technologies they use to stain a tree, it will never acquire the same qualities as a natural fossil oak that has undergone natural transformation processes. Only a specialist can distinguish real staining from artificial staining, which is what unscrupulous sellers take advantage of, greatly inflating prices for “fake” products.
Using bog oak
In order to create products from bog oak, it must be properly dried and stored. International and state standards for ordinary wood are not suitable for bog oak. Special requirements affect its cost. Properly soaked and dried bog oak is expensive, which reduces the demand for it. Unfortunately, illiterate miners of this value, neglecting all the rules, throw the trunks in the sun or leave them in open-air areas for the winter, store them on barges, etc. As a result, most of the material becomes unusable and is used for firewood, and the remainder, which can be used elsewhere, is sold at a low price.
In the 90s, there were many cases when hundreds of cubic meters of bog oak were lifted from the water, sent wet abroad by wagons, and as a result it went into the furnace, because... upon arrival was not suitable for manufacturing products. Because of this, Western investors have lost interest in running such a business for a long time. Sometimes some of the raised trunks were thrown back into the reservoir. It is extremely difficult to return such material to normal condition when re-lifted.
Even in our time, there are very few specialists who can properly process wood. But if no mistakes are made, products made from bog oak truly become masterpieces of art in the hands of skilled craftsmen. For centuries, stunning and unique things were created from it - a variety of furniture, boxes, caskets and figurines - and was called “black gold”. Wealthy people could even afford parquet flooring for exorbitant amounts of money. Carving on bog oak was trusted only to trusted “blacksmiths”. Oak sets adorned the best houses, and men walked pompously with pipes made from this tree. Making it into veneer or covering it with varnishes, plastics and synthetic resins is absurd.
Bog oak is a valuable material that cannot be replenished, like any fossil. Hundreds of years must pass for new specimens to appear. But they will no longer be environmentally friendly due to environmental pollution. A thoughtless, superficial attitude towards the material leads to a reduction in stocks, but for now there is time to purchase products from centuries-old trees. They will serve more than one generation and will inspire awe among true connoisseurs of the natural beauty that nature has created.
Unique characteristics
The oak lives its first life on the shore, the second in the water. The priceless wood is environmentally friendly - it got into the water in the pre-industrial period. After spending at least 300 years under water, bog oak acquires silver and fawn shades. And after 1000 years, the wood becomes almost black, although there are specimens with a purple tint, which allows the products to look even more original. This occurs due to the lack of oxygen supply due to the layer of sand and silt under which the tree rests, and high pressure. At this time, special chemical reactions take place and a natural preservative, tannin, is produced. Oak acquires amazing properties - it becomes hard, almost like stone and resistant to rotting and drying out, and no varnishes or paints are used in the manufacture of products - its texture and color are perfect.
Assembling a craft near Lukomorye green oak from prepared parts
— Using a glue gun, we glue the element prepared in the second stage with a sandy shore and sea onto the cardboard—the basis of the entire craft—in the right corner.
— Glue on a rug with grass. Using scissors, we adjust its edge to the curves of the sandy shore.
— We attach the oak (see the first stage) to the base with grass. To do this, we pierce it through and insert a wire into the hole. We secure the wire by bending it from the bottom.
— We wrap the chain around the oak tree. We place a mermaid and a scientist cat on the oak tree. We fix everything with hot glue using a glue gun.
— We mask the shortcomings with pebbles, if there are any. The shortcomings include sloppy places and places where the joints do not match exactly. We also mask the junction of the shore line with the grass with stones.
- The ends of the cardboard - the bases of the craft - are tinted with paints.
This is what you will get at this stage (see photo - top view of the craft).
What you need
Growing a miniature oak is a complex and time-consuming process. Massive, rough texture, large leaves cause some difficulties. But if you follow the rules, you can achieve the desired result.
To form a bonsai you will need:
- a small file with a blade no more than 15 cm;
- scissors with blunt ends;
- scissors with long thin blades;
- pruner;
- concave cutters;
- plastic tray or other container;
- plastic grille.
Auxiliary materials: copper wire, stones, moss. Copper wire is used to work with the trunk and branches of a tree, stones perform a decorative function. Moss regulates soil moisture and prevents it from being washed away when watering.
Gardening stores have kits for growing bonsai trees.
We make Koschey: there King Koschey languishes over gold
The composition with Koschey in the craft about Lukomorye consists of three elements: a chest of gold, Koschey and magic flowers.
Element 1. The chest “with gold” is a painted trash can from a broken garbage disposal machine. Inside the chest is a wad of gold foil. The coins are made from play dough and have rhinestones glued to them.
Element 2. Koschey is a kinder gargamel. Koshchei's crown is made of modeling dough. The raincoat is made of lining fabric. The edges of the lining fabric are treated with a regular lighter to prevent them from falling apart. The design on the lining fabric is painted with acrylic paint.
Element 3. Magic flowers. We take dried flower cups on a high stem (we find them in the forest in advance and dry them). We glue rhinestones on them.
We glue three elements and stones under the oak tree with hot glue using a glue gun.
Our craft about Lukomorye was supplemented by another sketch to the lines of A.S. Pushkin.
Option number 4. Beautiful lamp made of branches
We offer another master class on creating an original autumn lamp.
Original lamp made from branches
To make it you need:
- dry branches (it is important that the length/size is different);
- old lampshade;
- acrylic paints;
- vase;
- heat gun;
- alcohol;
- lamp, wires to it;
- glitter;
- tassels;
- cones;
- basis for future construction.
What you need for work
Step 1. The vase is treated with alcohol, after which branches are glued to it using a heat gun.
Branches are glued to the vase
Step 2. Branches are gradually added, but it is important to leave a small area without them.
A small gap should be left without branches
Step 3. The lamp in the lampshade is lowered into the glass vase.
The lamp is lowered into a vase
Step 4. Branches are glued to the area without branches that was left earlier.
Step 5. Next, the lamp is decorated with cones. The order is arbitrary.
Lamp decor with pine cones
That's it, the original lamp is ready for further use!
Step 6. If desired, the branches can be additionally painted. In our example, this is done with white acrylic paint.
The vase is painted white
This is what the craft looks like after painting.
This is what a finished vase of branches looks like
Step 7. If the vase will be used in winter, then it is better to use silver paint to paint the pine cones and branches; Additionally, you can use glitter for decoration.
Applying silver paint
Step 8. Fans of the Scandinavian style can apply several shades at the same time. For example, pink and white are a great combination for this composition.
You can combine different colors
Photo of the finished vase
Finishing of products
As decor, elements of artistic carving look organically on the surface of solid wood facades.
The texture and natural pattern of oak cuts do not require painting - it is recommended to use a treatment that will highlight the beauty of natural wood
By finishing furniture items, not only their appearance is improved, but also their service life is increased, as the wood becomes protected from external influences. The final processing is carried out in three stages.
Table 5. Finishing steps
| The manufacture of solid wood furniture should begin with choosing an idea and forming an idea of the appearance of the future product. You can get inspiration from videos, thematic magazines and articles. | |
Tip 2: visualize the idea | To visualize an idea, you can use special computer programs or sketch a sketch on paper. It is worth performing several options so that you can choose the best one. A sketch drawn by hand allows you to determine the shape and general appearance of the product. |
Tip 3: calculating the number and size of parts | Product detailing includes a list of main elements, parts, their sizes, methods and places of fastening. The assembly sequence of the product is determined. First, the frame is assembled, then the supporting elements. After this, the remaining parts are built up. |
Tip 4: Careful selection of material | When selecting material, not only the attractiveness of the texture, but also the direction of the fibers is taken into account. The type of wood cut is also taken into account. Radial cut material is recommended to be used for the manufacture of facades and front parts of products, since it is least susceptible to shrinkage, swelling and warping. |
Tip 5: Carefully measure each piece before cutting | It is advisable to take the measurement several times - an error of 5 mm can ruin all the work. |
Tip 6: Carefully configure your tools | Incorrect adjustment of cutting angles, poor adjustment of the width and depth of the groove, depth and thickness of the tenon lead to undesirable results - poor assembly of the product and mismatch of individual structural elements. It is advisable to have a sample piece. |
| Illustration | Description |
Video - Finishing wood
If you have seen handmade oak furniture at least a few times, then you understand how different it is, both in appearance and in durability, from modern options made from cheap substitutes. After all, solid wood products are different not only in their beautiful appearance, but also in their strength and durability. Natural wood has always been and will be a sign of good taste and sophistication; even solid pine furniture, if it is beautifully made, will look better than artificial materials.
Methods for joining furniture parts
If you look closely at solid oak furniture, you will not find any visible screws or other metal fasteners on it. The point is, in order not to spoil the appearance of the furniture, only internal fastenings are used. For beginners, it is best to use rebated fastenings or double-sided wood pins.
The seam connection is very simple, a protrusion is made at the end of one spare part, and a hole of the appropriate size is made on the one to which it will be attached. With this fastening method, accuracy is important, because if you make the protrusion larger, it can simply split the workpiece, but if you make the hole larger, the part will simply wobble. When working, you also need to monitor the depth of the hole; it should be several millimeters more than the ledge, since otherwise you will have gaps at the joint.
Double-sided wood pin, the easiest way to connect wooden parts. But it is not suitable for all nodes. After all, to use it, the part must be able to rotate freely. You cannot attach the top of a table or stool using pins, but you can quickly and easily attach the legs or vertical stands to the flower bed. To use a double-sided pin, simply drill a hole on the parts to be fastened, and simply rotate one of them to tightly fit the parts together. For DIY furniture, this is the easiest way to securely and beautifully connect parts.
Physical properties of oak wood
- Density – 570-690 kg/m3 (dry wood), in an air-dry state reaches 700 kg/m3
- Ultimate compressive strength along the fibers – 55.9 MPa
- Ultimate strength at static bending – 87.3 MPa
- Elastic modulus – 12.2 GPa
- Natural humidity – 60%
- The end hardness of oak is 57.3 N/mm2
- Radial hardness – 48.2 N/mm2
- Tangential - 52.8 N/mm2.
- Texture – partly porous, has radially arranged rays