In the fall, you may need a “seasonal” carnival costume for your kindergarten - after all, there will probably be an autumn festival there! A non-standard costume - carrots - will look original and bright on any little girl. Of course, you can purchase a ready-made carnival outfit in a regular or online store. But does it make sense to spend money if creating it yourself is very easy? In addition, you can use the creative act as an educational moment: let the child help you, compose a fairy tale about this vegetable, learn poems about it. This is a great opportunity to chat with your baby on an educational topic: what other vegetables does she know, what can be made from carrots... A smart mother will always find something to interest her! And your daughter will be pleased to wear the “work” if its creation is associated with your attention for her.
DIY carrot costume for a girl
Autumn is coming, and children's holidays aimed at a specific theme will soon begin.
It's hard to choose the perfect outfit for your baby. In this article we will show you how to make a carrot costume for a girl with your own hands.
Let's sew a carrot suit with our own hands from 2 parts.
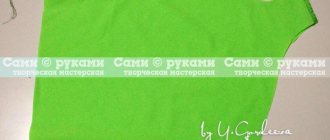
The top is a bright green blouse. It can be sewn with long or small sleeves. Decorate the jacket with a carrot applique. Take traditional patterns, without complicated details.
The bottom will be made in the form of a dressed up airy skirt made of light tulle.
This material is easy to work with: without any special skills, in a couple of hours you will sew a skirt according to the instructions.
Take a bright orange tulle, an elastic band no more than 2 cm wide.
We calculate the amount of tissue (The structure of tissues of living organisms is studied by the science of histology)
.
We need a skirt for the baby, fluffy and dressed up. Advice: choose tissue (medical system of cells and intercellular substance, united by a common origin, structure and functions)
with medium hardness, hard tulle causes discomfort, and soft tulle is difficult to work with because it does not hold its shape.
To make a carrot costume for a girl with our own hands, we will take from forty to sixty tulle strips, 15-20 cm wide and half a meter long.
If you received tulle with a width of 1.6 m, then we will get about 20 pieces of 1 meter. For 60 strips you will need 3 meters of material.
For a longer skirt:
- determine the length (plus 5-6 additional cm for the knot);
- decide how full the skirt will be (40-120 stripes).
With parameters and amount of tissue (The structure of tissues of living organisms is studied by the science of histology)
agreed. Get out your scissors, needles and thread.
- We cut the tulle into similar strips, size 50*20 (dimensions can be changed as desired).
- The elastic band must have a waist size plus 2-3 cm.
- The ends of the rubber band are fastened to each other. Place it on a high chair or armchair.
- Let's start sewing the skirt. We take a piece of tulle and place it on an elastic band in the form of a knot. Don't tighten the knot too much.
- We proceed with all the stripes using the same method. The more tulle sections, the more fluffy and airy the bottom of the outfit.
- Sew the ends of the elastic together. Add a greenish satin ribbon for a pop of color.
Your DIY carrot costume is ready!
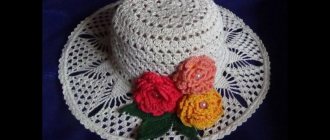
The look should be complemented with an unusual hat in the form of tops. Whatman paper, cardboard or thickened paper will come in handy.
Form a cone, later we will paint it in a carrot color.
Either purchase whatman paper or cardboard of the appropriate color.
Take greenish colored paper and use it to create leaves.
Cut out the leaves and then attach them to the top of the cone.
The outfit is needed for a matinee, where kids have fun and move intensely, it is necessary to create it so that the “tops” hold on and do not fall off.
Attach a ribbon or elastic to the hat, so you will fix it on the baby’s head.
Do you like more complex options? Sew a beret. Carrot fleece and light green satin ribbons will come in handy. The patterns are suitable for a regular beret.
And another option for making a cap is to cover a cone of whatman paper or cardboard with fabric (A collection of different and interacting tissues form organs)
. The gadget will look interesting and beautiful, at the same time it is dense and holds its shape perfectly.
Everything is ready, you can complement it with a greenish or orange gadget. Buy colorful stockings or tights and boots to match the color of your suit.
Your girl will be the most catchy and dressed up at the autumn party!
Other interesting costume ideas
Both girls and boys will happily try on the costume of not only a chef, but also a doctor or hairdresser. They are all sewn according to the same type: an apron (for a doctor it is replaced by a robe) and a headdress. You can also sew an outfit for a girl as a waitress or saleswoman. This outfit will be appropriate both during kitchen work and at a costume ball in kindergarten or school.
If a child wants to be a doctor or orderly, the costume can be complemented with a cloth bag with a red cross embroidered on it or a small white leather suitcase (these are often used for home first aid kits). You can decorate the robe with an applique on a medical theme (a syringe, a thermometer, a schematic image of pills or a bottle of medicine).
An apron and a hairdresser's cap can be decorated with a stylized image of a comb and scissors, and a chef's outfit can be decorated not only with pictures on vegetable and fruit themes, but also with images of cutlery (fork, spoon, knife). If the suit is intended for a boy, you can sew a sausage or a bunch of sausages from oval pieces of pink fabric onto the robe. On the cut of the “sausage” you can embroider fat peas with white thread. So the cook will turn into a butcher.
Another interesting option is a carrot costume. To make a carrot costume with your own hands you will need orange chintz
(for cap and apron). The pockets, straps and ties on the apron belt can be made green. The orange cap can be trimmed with green frills that imitate carrot tops. If the cap is made of white material, it is decorated with a thematic applique - a stylized image of a root vegetable. If the cap is orange, no applique is required, since this cheerful color itself evokes an association with carrots, the image will be recognizable even without a picture.
Sewing a uniform for a preschooler who loves to be on duty in kindergarten and help his mother around the house is definitely worth it. The child will be happy to put on a robe and apron and will soon learn how to manage things while keeping his clothes neat. A primary school student can sew such a costume on his own, under the supervision of his parents or under the guidance of a teacher in a technology lesson. The theme of the “uniform” depends on the desire and imagination of the person who will wear it.
The New Year is getting closer, which means that masquerades and festive events are being prepared in kindergartens and schools. Parents should take care of a costume for their child in advance. The carrot costume is an excellent, original solution. Next, you will learn how to make a carrot costume for a girl with your own hands from paper.
First you need to choose fairly thick but elastic paper that will not wrinkle instantly. We measure the length from the shoulders to the child’s waist and cut out a trapezoid from paper of the same height. When gluing the edges, make sure that the child fits into the costume without difficulty. The trapezoid will be positioned with the wide side down.
We paint the workpiece orange and make the black stripes characteristic of carrots. We are waiting for the product to dry completely. We make round slits on the trapezoid for the arms and securely glue its edges.
Next, cut out a cone from the same paper and paint it in the same way as the main product. Glue the edges together and you get a cap. We make holes along the edges of the cap with a thick needle and insert an elastic band to keep it on the head.
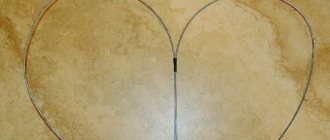
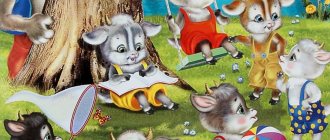
Then we start making green tops. We find bright green fabric and a coil of thick wire. We make their wires a kind of sun, with a circle and rays emanating from it. The structure should be quite durable. Essentially, this will be a kind of frame for the skirt, and it should fit comfortably around the child’s waist. We cut strips from the fabric, which should match in size the distance between the beams of the wire frame. We attach each piece of fabric with threads from one beam to another and to the base of the frame. Well, that’s basically it, the costume is ready.
A carrot costume for a boy can be made according to the same description. We take thick paper, but this time we cut out a trapezoid with a very wide top and a narrow bottom. We measure the length from the child’s neck to the middle of the calf, and this is exactly the length the trapezoid should be.
As with the girly version, we paint the product to resemble carrots and, after complete drying, cut out circles for the arms. Next, glue the edges of the trapezoid together to form the base of the costume.
We will make the tops in the form of a headdress. Just like the frame for the skirt, we will make a frame for the headdress. The diameter of the round base should match the diameter of the child's head. But the rays extending from the circle can be made of different lengths.
Next we need green fabric. We cut out strips from it and wrap them very tightly around all the frame parts. Particular attention should be paid to wrapping the circle, since this part will touch the child’s head. To be sure, it is advisable to wrap the base 3-4 times so that the bare wire does not scratch the child.
What could be simpler than a carrot costume? You can buy a ready-made one or rent it. But there is nothing to compare the emotions from a common cause - jointly making a costume for the Christmas tree.
Carrot costume with tulle base
Quite often, when preparing for a New Year's party, parents of children are required to prepare creative festive costumes for their children, often on a specific theme, and fruit and vegetable costumes are often used at such holidays. We want to offer the first version of a handmade carrot costume for older girls - it will come with a beautiful corduroy skirt. But first things first. Let's start working from the bottom of the suit.
To create a suit, we will need the following materials: a piece of orange tulle (about 2-3 m), an elastic band about 2-3 cm wide, threads. For the top you can use either golf or any T-shirt in orange or soft green. Let's look at the process of creating a tulle skirt:
- Cut the tulle into strips 70x20 cm.
- We measure the size of the baby's waist and cut off a piece of elastic of the same length (don't forget to add a couple of cm of extra).
- We secure the edges of the elastic together with pins and pull it either onto a huge book or onto the back of a chair.
- Take a strip of tulle and fold it in half. We thread the semblance of a loop acquired in this way under the elastic band and wrap it in a loop, and push the end of the tulle through this loop. We tighten the finished loop and align it so that the strip is in the correct vertical position.
- We proceed in the same way with the remaining tulle stripes. If you have a desire, you can experiment and try to create a tutu skirt. To do this, you need to place the strips tightened with a loop at a slight angle to the elastic band.
Advice. To make the skirt look fluffy, use as many tulle stripes as possible, but do not overdo it, otherwise it may turn out to be an “accordion”.
- If desired, you can add a little greenish tulle stripes, as well as various devices like a bow made from a ribbon (you can either tie it around an elastic band, or sew a ribbon already tied with a bow onto an elastic band).
The top for a New Year's suit can be an ordinary greenish T-shirt without different inscriptions and drawings. Only one detail remains - the headdress. The most common option is to use an ordinary children's hoop without decorations, onto which a small carrot-shaped decoration made of paper/fabric is glued (The structure of tissues of living organisms is studied by the science of histology)
.
You can try a more complicated option - from a small piece of fabric (the structure of tissues of living organisms is studied by the science of histology)
, gathered with an elastic band, we make a hat, and on its upper part we sew an imitation of greenish carrot tops. Job completed!
Master class “Carrot”
Tatyana Ponamareva
Master class “Carrot”
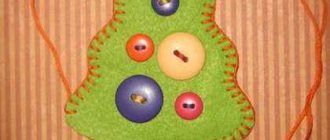
I bring to your attention another master class on making vegetables. Today I want to teach you how to sew carrots from felt .
For work we will need:
— templates for carrot parts made of cardboard ;
- felt in orange and green colors;
Let's start making carrots .
carrots from felt according to the templates .
2) Sew the carrot by hand or on a sewing machine.
3) Turn out the resulting cone.
4) We sew a line with a thread, using small stitches, so that the assembly is uniform.
5) Fill the blank with holofiber.
6) Having filled the cone with filler, we tighten its edge and tie it tightly into a knot.
7) Next, we decorate the carrot with embroidery . I used yellow thread for this.
 The carrots are decorated , all that remains is to sew on the tops. We take a detail of the tops, try to move the petals so that the tail is thicker. And carefully, using threads in the color of green, we sew the tops to the carrots .
This is the carrot I got . I hope you enjoy my master class .
Enjoy your creativity and good mood!
Abstract of the educational activity for modeling “Carrots for a bunny” with children of primary preschool age Age group: junior mixed-age group Venue: MKDOU No. 8 village. Vostretsovo "Teremok" Type of lesson: integrated Duration.
Summary of the modeling lesson “Carrots for the Bunny” (first junior group) Goals: expand children’s understanding of vegetables (carrots). Develop a friendly attitude towards others. Learn to roll plasticine.
Modeling in the first junior group on the topic “Carrots” Purpose of the lesson: Continue to teach children how to roll sausages out of plasticine, develop an interest in working with plasticine, and develop fine motor skills. Master class “Butterflies” Master class “Butterflies using origami technique” The art of origami came to us from distant Japan. We have all known small paper ones since childhood. Master class “Maslenitsa” On February 26, a competition for the best scarecrow of Maslenitsa was held in our city. Burning an effigy is an ancient Russian tradition when it was required to carry out. Master class “Flip Flops” Dear colleagues, I would like to offer you a master class on making a souvenir for our mothers “flip flops”. We will need: colored cardboard,...
Modeling lesson in the second junior group “Carrots for little bunnies” (drawing with plasticine) Modeling lesson in the second junior group “Carrot for little bunnies” (drawing with plasticine) Program tasks O: form a holistic picture.
Source
Paper carrot costume
First you need to choose paper suitable for the job - it must be quite thick and at the same time elastic, so that when the baby moves, kinks are not created on the suit. We measure the distance from the shoulder to the girl’s waist and then cut out the base for the suit in the form of a trapezoid using the made cardboard blank. We place it with the wide side down. Then you can glue the edges (you need to do this very carefully).
After the base is completely “approved”, you can start painting it (we use, of course, paints for painting). The main color is orange, then we add a few dark horizontal stripes for color and authenticity of the look.
Carefully cut holes for the arms in the trapezoid. All that remains is to create a cap for the head. We use the same cone-shaped paper as a base, paint it orange and glue the cap together. To keep it firmly on your head, we attach an elastic band to it. To do this, you need to make two small holes on the sides of the headdress and thread them through the elastic band.
We add the tops to the cap, using a small thickness of wire as a base (we form a base from it in the form of a circle with “rays” extending from it) and small pieces of greenish tissue (The structure of tissues of living organisms is studied by the science of histology)
, which we sew onto this base. All that remains is to attach the wire to the cap. The costume is ready!
Advice. Instead of paper, you can use foam rubber, which will serve as a lovely soft base for a suit and, by the way, may even be the most comfortable for your baby.
The foam base is made in exactly the same way as the cardboard one. And an ordinary greenish scarf can serve as tops. If you don’t have a suitable ready-made gadget, try to sew a small frill or scarf on your own. This doesn't have to be difficult. Instead of decorating the neck, you can create a headdress that imitates the tops of a cap, hoop, etc.
How to make carrots from cardboard
1. Draw the outline of a carrot on red cardboard. 2. Carefully cut out the silhouette of the carrot along the pencil outline. 3. Make several cuts along the contour of the carrot. We stretch the orange thread and make a knot for fixing. 4. We begin to wrap the cardboard element in the shape of a carrot with orange knitting thread along the entire length on both sides at the same time. We fill the empty spaces with thread to get voluminous carrots. 5. On green cardboard we draw long stems for our carrot-shaped craft. 6. Cut out the carrot stems along the contour. 7. We begin to wrap the stems with bright green knitting thread from the wide part. Then move on to one thin stem. We wrap it and return to the wide part. Let's move on to the next stem. We do this with all the elements to completely cover each area with green thread. 8. Glue the stems to the back of the carrot. We use office glue. You can also use hot glue from a gun. He will be able to connect two elements together more reliably.
Source
Why carrots?
A fancy dress helps a child develop imagination, fantasy, and imaginative thinking. And with what can you compare the pleasure from the acquired result - a bright New Year's suit, which literally no one will have.
With the help of a carrot suit, you can introduce your baby to a healthy diet, popularize a healthy lifestyle, explain the benefits of vegetables and the amount of vitamins they contain. Even if the baby has never eaten carrots before, after working together on creating a New Year's costume, he cannot help but fall in love with the vegetable.
In addition, this is a universal outfit: a carrot suit is suitable for a girl and a boy. After all, its bottom, the rhizome, can be created as a skirt and panties or a cape.
Sew bright carrots
In this master class I will tell you how to sew a carrot. I received an order from a kindergarten; I needed 14 pieces for boy bunnies. I'll tell you how to sew one.
We will need: orange fabric, green fabric (in this case with polka dots) and filler (I took padding polyester).
Also threads, thin cord and a sewing machine. You can, of course, do it with your hands, but it’s very difficult.
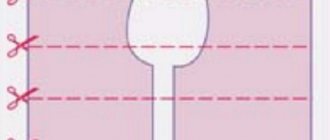
So, the first step: we make a pattern from cardboard. A triangle of the desired shape and size of carrot. I have it 20x9 cm. And two “fingers” 9.5x4 and 6.5x4 cm, for making green carrot branches.
On the orange fabric, on the wrong side, we trace a triangle and apply the same triangle to its long side again and trace it. It turns out to be a quadrangle.
We cut out this part taking into account the fabric at the hem, approximately 1 cm.
To make the carrot more realistic, I painted brown stripes on the fabric. To do this, I took fabric paint.
I drew it and ironed it. If you don’t have fabric paint, you can do it with regular paints or felt-tip pens, but keep in mind that such a product cannot be wetted or washed. You can embroider stripes with brown thread. But for a large number of products, this technique is not suitable, as it is too labor-intensive.
Sew the fabric from the nose of the carrot to the base. The result is a cone.
Then we prepare the carrot tails.
Take the green fabric and trace the pattern. We will need to circle the small part once, then place it next to it and circle it again.
Then for the second tail again. And circle the second, larger detail twice.
Then cut, taking into account the hem.
And sew along the contour.
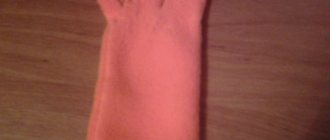
Then the products must be turned out and ironed.
They turned out like these - similar to the fingers of gloves.
Next, we connect all the parts: in the orange part, in the place of the hem, we put the cord and start stitching, placing our leaves in the inside.
The result is that all the parts are connected.
Then, we stuff our beautiful carrots with padding polyester. And tighten it with a string. It turned out to be an excellent bond. And there was no need to manually connect and tighten the product.
Source
Where to get ideas?
The source of inspiration will be the carrot itself. You can take a vegetable and look at it together with your baby. By bringing the baby into contact, the mother will be able to consolidate his knowledge about the taste and usefulness of carrots.
You can read books together, watch cartoons, look through drawings.
You can also prepare delicious dishes, bake a carrot cake, so that the child will probably realize that the carrot is a real hero worthy of attending the New Year's party.
Pre-Step Thought - Interactive conversation about carrots and their benefits. Let the child outline the vegetable, what color it is, its shape, what its components are, and how it differs from other vegetables. And the main question is how he imagines the carrot suit.
Procedure for making carrots
1. First, let's make a carrot pattern. It will consist of the following parts - carrot leaves and the carrot itself. Draw these two parts of the carrot on a piece of paper and cut them out.
2. To cut out the carrots, we need a sheet of orange felt. Let's redraw the outlines of the carrot pattern onto it and cut it out without adding seam allowances.
3. To cut out the leaves for the carrots we will need bright green felt. Let's redraw the outlines of the leaves onto it, and then cut it out.
4. Fold the orange carrot piece so that the sides of the piece are aligned. Sew these sides together using orange thread using a blanket stitch.
5. Sew the narrow end of the carrot with the same orange threads using a basting stitch, and then pull this thread so that the narrow end of the carrot is gathered. Secure the thread by making a knot.
6. Turn this part of the carrot right side out and straighten it well.
7. Stuff the carrots with padding polyester toy filler. You can use other fillers, for example, synthetic fluff or holofiber.
8. Now you need to sew along the edge of the wide end of the carrot. For this we will also use orange threads. Sew the edge of the carrot with a basting stitch, tighten the thread and make a securing knot.
9. The next stage of making carrots is making a bunch of leaves to decorate the top of the carrot. Let's take a green piece of leaves and a needle with a green thread threaded into it. We sew green threads along the bottom edge of the leaves and tighten them - we will get a bunch of green leaves.
I made him out of what was...
As a result, the child himself will say that for a carrot suit two main colors are needed: an orange bottom to create the rhizome, and a greenish top.
Probably in a girl’s wardrobe there will be things of this color: an orange dress, a sundress or a skirt and a greenish jacket, a hat, a scarf, a headscarf, a bow. All this, including imagination, can be used in the manufacture of a suit.
Bottom of the suit
It’s not difficult to sew a carrot suit with your own hands. You can find examples of works and even patterns for them, as well as annotations and tips on cutting a model and sewing a suit.
To make the bottom of the suit, in other words, the rhizome itself, you can use any shape. You can throw the existing outfit without modifications or trim it with a reddish, yellowish or orange garland.
Foam rubber can serve as the basis for a large suit. A cone-shaped carrot bottom is made from a piece of the desired size in length and width.
You can put cross-linked tissue on top (a medical system of cells and intercellular substance, united by a common origin, structure and functions)
or a fluffy skirt, sundress or full-length cape.
You can insert an elastic band at the bottom and tighten it a little. Or the tissue (a medical system of cells and intercellular substance, united by a common origin, structure and functions)
is cut from below on both sides with a wedge, similar to the root of a vegetable.
We sew a fleece carrot for a hare in 7 steps
To start making carrots with green tops we will need:
2. Green fleece for tops.
5. Holofiber or synthetic fluff.
6. Pattern paper.
Cut out a triangle-shaped pattern from paper. I made it the right size for my bunny. Apply, trace and cut out. Step by step description.
Cut out and leave seam allowance.
We connect the edges of the carrots using a sewing machine.
Turn it inside out. I use sushi chopsticks.
We sew along the edge with threads and pull the top of the carrot together. Leave room for the tops to be inserted there.
Let's leave the carrots alone for now.
The next step is to cut the tops from green fleece. For clarity and convenience, I drew a pattern with dimensions on paper. Height 7 cm, width 8 cm. Each branch is 1.5 cm wide.
On the cut out square we cut strips 1.5 cm wide.
I drew an axis in the center of the strips. Now it will be convenient to cut each strip.
Roll it into a tube, insert it into a carrot and sew it up.
Magic material - foam rubber
Foam rubber is a good material for making the base of a suit. The fundamental step of the work is the correct cut of the material. It is important that the cut space is completely level at the required angle.
All-purpose adhesive “Moment-1” is suitable for gluing. Having spread it on both sides, let it dry for 5-7 minutes, and then lightly press and twist so that the glue is evenly distributed and sets. Everything needs to be done quickly and carefully.
Work on gluing foam rubber should be done by an adult so as not to harm the baby’s health.
All that remains is to cover the suit with fabric (A collection of different and interacting tissues form organs)
.
Greenish tops
To make the carrot costume complete, you can use a ready-made item from the girl’s wardrobe or any fabric as greenery (the structure of the tissues of living organisms is studied by the science of histology)
sew a frill, scarf, bow in the desired color.
The tops can be placed on the head as a greenish cap, bow or hoop with visually similar leaves, which can be made from any material: tissue ( The structure of tissues of living organisms is studied by the science of histology)
, cardboard, greenish garlands.
Step-by-step instructions with patterns and photos
In our master class we will look at how to sew such voluminous vegetables from felt as: cabbage, carrots, beets, eggplant, strawberries and tomatoes.
Step 1: patterns
We enlarge the patterns to the desired size and print them out; you can simply trace them from the monitor onto a sheet of paper, just like when you were a child you would transfer pictures through a window.
From fabric of the appropriate color, we cut out the parts, taking into account the seam allowance.
Step 2: Tomato
Step 3: Strawberries
Glue artificial greens to tomatoes and strawberries:
Step 4: Beets
Step 5: Carrots
We sew the edges of the main part, fill it with filler, gather the top together, and sew on the leaves.
Step 6: Eggplant
We sew the eggplant in the same way as described in Steps 2-4. We try not to lose the pear shape. We sew the leaves in such a way (photos 5 and 6) that they remain slightly gathered.
Step 7: Cabbage
Step 8: "bed"
If you haven’t run out of patience yet, then to complete the collection, we’ll make a vegetable bed. For this we need brown felt and a box or small drawer.
We measure and cut out a rectangle of the required size from felt fabric, fold the fabric in half and sew its bottom and side sides, and then stuff it with synthetic padding, sew up the side and place the “beds” in a box in several rows:
Our mini-garden is ready!
Today we made such wonderful, beautiful, appetizing vegetables from felt with our own hands. Did you like it?
Making toys with your own hands is a special skill, but not everyone is given it. Making felt products is attractive because it does not require special skills. It is enough to show a little imagination and attentiveness, as a result of which you will get wonderful things, for example, felt carrots.
Hand-sewn vegetables and fruits can play the role of educational material, decorative element and toy all at once. And if you sew a whole basket of vegetables, you can easily play with your child in the store or garden, learning along the way the shape, color and vegetables themselves, because their assortment is quite large.
Carrot costume for the little ones
It became stylish to arrange photo shoots. Young mothers especially love to do this. You can imagine your own long-awaited baby in any form.
It’s not difficult to create a carrot costume for a girl with your own hands. It can be knitted with orange yarn or sewn from any fabric (The structure of tissues of living organisms is studied by the science of histology)
an ordinary carrot envelope.
Use a hat with pom-poms as tops.
Elegant headband with carrots for girls
For a harvest festival or for an autumn-winter carnival, a carrot-shaped hoop will be relevant. Also, carrots can be used separately, as a children's toy or brooch for a bunny costume. You can easily find fert and other materials in handicraft stores in your city.
To create a carnival hoop in the shape of a carrot we will need:
Step-by-step description of the work:
DIY carrot costume
At the annual matinees celebrating the New Year, our beloved children are recommended to wear some kind of costume. Well, mom has to decide which specific suit to choose for her beloved child and where to get it. Naturally, the most common option is to purchase a ready-made carnival outfit or rent it. But since true needlewomen do not find the usual ways, we suggest that you do it yourself, for example, sewing a children’s carrot suit.
How to create a do-it-yourself carrot costume for a girl?
Agree that a carrot suit for a girl must have a skirt. Does anything look more elegant than a colorful and fluffy tulle skirt? And, by the way, you don’t even need a sewing machine to create it. So, stock up:
- a piece of orange tulle 2-2.5 m long;
- wide elastic band 2-3 cm wide;
- scissors;
- thread with a needle.
- Cut the tulle into similar strips measuring 75x20 cm.
- Measure your daughter's waist size and transfer this measurement to the elastic band, adding another 2-3 cm.
- Secure the edges of the elastic together with pins. Then place the rubber band on the back of a small chair.
- We begin to form a skirt for a carrot carnival costume: we fix the tulle strip on an elastic band with a knot, without tightening it too tightly. We continue in the same spirit around the entire circumference of the elastic band. The more strips of tulle you attach, the fluffier the skirt will be.
- The ends of the elastic must be sewn together with threads.
The most languid part of the suit is ready.
The skirt can be additionally decorated with a bow or a layer of fabric (The structure of tissues of living organisms is studied by the science of histology)
from opaque tissue
(The structure of tissues of living organisms is studied by the science of histology)
.
For the top part of the suit, you just need to choose an orange or greenish T-shirt or golf. If there are inscriptions or a sketch ahead, they can be covered with an applique in the shape of a carrot.
As a headdress, simply use the girl’s existing hair hoop. It is necessary to attach a carrot made of colored paper or fabric to it (The structure of tissues of living organisms is studied by the science of histology)
.
It’s easy to create an orange hat from a rectangular piece of orange fabric (The structure of tissues of living organisms is studied by the science of histology)
, assembled with an elastic band. We decorate the upper part of the headdress with “tops” made of greenish material.
A DIY carrot costume for a girl is ready!
How to sew a carrot suit for a boy?
If you have a child, then his carnival costume will consist of an apron depicting a carrot. So, prepare:
- orange satin 1.5 m long;
- padding polyester – 1.5 m;
- a piece of fleece or felt 20 cm long;
- Velcro;
- orange satin braid 2 cm wide.
- First, on orange fabric (the structure of tissues of living organisms is studied by the science of histology),
we cut out 2 similar parts of the apron, not forgetting about two straps 30-35 cm long and 7-9 cm wide. Due to them, the suit will be attached to your child. - Remove similar parts from padding polyester. Then secure the parts of the apron made of satin and synthetic padding with pins or a seam with a needle forward.
- Sew the blanks using a sewing machine around the perimeter, retreating 5 mm from the edge.
- Then sew both straps to the upper part of the apron.
- Apply Velcro to the straps in places where they will later be attached to each other.
- We place both parts of the carrot apron on top of each other inside out and attach with pins.
- Then we attach the parts using a machine seam along the perimeter, retreating 7-10 mm from the edge. After finishing the work, carefully use scissors to shorten the allowances by 3 mm.
- Then finish the edges of the apron around the perimeter with bias tape. Don't forget to add Velcro to the straps.
The carrot apron is ready! If desired, decorate the front of the suit with zigzag stripes of brown thread corresponding to the vegetable.
All that remains is to make a hat for the little boy’s carrot costume. We sew it from a rectangle measuring 50x20 cm, which is first lined with padding polyester and decorated with brown zigzag stripes. We close the rectangle into a cylinder by sewing together the small sides. The top edge of the hat must be gathered and sewn, and the bottom edge must be folded and processed by machine. We decorate the resulting hat with tops made from felt or fleece strips.
How to sew a carrot dress
sew a carrot costume yourself. If you make it in the form of a dress gathered at the bottom with a sharp hood, you will get both a suit with a silhouette reminiscent of a carrot and quite practical clothes for everyday wear. Victoria's master class will help you with this.
Materials and tools:
- Cotton knitted velor orange – 1 m,
- Orange threads,
- Tailor pins,
- Hand needle and waste thread for basting,
- Sewing machine (regular foot + overlock foot).
Knitted velor is a very beautiful, but also difficult fabric to work with.
Due to the fact that two parts of fabric can stretch differently during sewing, it is better to baste the parts by hand first. Therefore, you will need a lot of thread for basting. Manufacturing :
1. The carrot costume is based on a dress from the children's fashion magazine Ottobre 4-2014 (model No. 13). According to the pattern of this model, cut out the main parts from orange velor: the front, the back, two parts of the sleeves and two parts of the skirt. The front part of the skirt contains recesses for pockets.
2. Additional details of the dress are two cuffs, two back burlap pockets, two front burlap pockets, two rectangles of pocket facing, a long piece for tightening the hem of the skirt. In addition, from the same fabric it is worth cutting out one piece for a sharp hood, which will be sewn only along the nape line (this hood is not in the dress from the magazine, but its sharp template is easy to design yourself).
3. Fold the hood piece in half, right side inward, and pin it at the nape of the neck.
4. Additionally, secure this line with a basting stitch and remove the pins. Turn the outer edge of the hood inside out twice, secure the fold with pins, and then also with a basting stitch.
5. Using a straight seam at intervals of 3, sew the nape line and, changing the foot to an overlock foot, process the allowances of this seam with an overlock stitch. Sew the folded outer edge of the hood with a straight seam. This is what a sharp hood for a carrot costume should look like:
6. Attach the sleeves to the front piece with pins.
7. Then attach the back to this structure, securing the fabric with pins. Go along all four lines with a basting stitch and remove the pins.
8. Using a straight machine stitch, sew the sleeves, front and back pieces. Then use an overlock stitch to finish the edges of the fabric and, turning the product to the front side, sew all four seams along the front side with a straight seam.
9. Attach the hood to the cut of the neck. To do this, as a standard, use pins first and then a hand basting stitch. In this case, the edges of the hood intersect over the front of the dress - this is the most convenient way to sew on a hood.
10. Sew the hood with a straight stitch, then overlock the edges of the fabric. Sew a seam along the front side, folding the seam allowance on the wrong side down toward the body of the dress.
11. To continue working, you need to attach pockets to the front of the skirt. Attach the facing piece folded in half (cut to cut) to the cut of the pocket and secure with a basting stitch. Place the front pocket burlap on top of the facing (face to face) and attach with pins and then a basting stitch.
12. Sew a straight stitch along this curved line, and then straight stitch along the right side.
13. On the wrong side, pin the back pocket burlap to the front pocket burlap (face to face). Then sew the burlap pieces together using a straight stitch and finish the edges with an overlock stitch.
14. Use pins to secure the pocket on the top and side lines of the skirt to make further sewing easier. Replace the pins that were just discussed, as before, with a basting stitch.
15. On the front of the skirt, fold four folds and secure them - first with pins and then with a basting stitch.
16. Place the front piece of the skirt to the front of the dress, right sides facing in, and sew them together using a straight stitch. Finish the edges with an overlock stitch, and then topstitch along the front side, first turning the allowances on the wrong side up. In the same way, attach the back part of the skirt with pre-made pleats to the back half of the dress.
17. Turn the product inside out. Use pins and then a basting stitch to secure the side lines that go into the sleeve lines. Sew these lines with a straight stitch and topstitch the edges with an overlock stitch. Sew the cuff parts together to form two “donuts”. After this, fold the cuffs in half.
18. Attach the cuff to the edge of the sleeve (cut to cut) and secure with pins.
19. Sew the cuffs to the sleeves using a straight seam, and finish the edges of the fabric with an overlock stitch.
20. In the same way as you sewed the sleeves, sew the cinching panel to the bottom edge of the dress.
That's all, the children's velor dress is ready! Making a carrot costume is quite simple. And most importantly, such an outfit will serve not only one holiday, but will also brighten up ordinary everyday life with its unusualness. Happy crafting!
In order not to forget the address of the page and share with friends, add it to your social networks:
Do you want to know news about competitions or master classes?
Tags: Children's clothing (knitting and sewing), Carnival costumes
Attention! It is better to write urgent questions in the comments on the website (form at the bottom of the page) or, better yet, directly by email. There are no notifications about comments from the VKontakte form! This form is more for feedback. 
Discussion: 2 comments
- Svetlana:
November 1, 2022 at 08:01 pmThe carrots turned out great, bravo to the authors!
Answer
- Zhanna:
November 2, 2022 at 07:37 pm
Thanks for the MK, it was very useful. My daughter had the sweetest carrot at a matinee in kindergarten)))
Answer