History of the spread of papier-mâché technology
France launched papier-mâché products into mass production in the mid-17th century; collectible dolls, sets, and decor were produced using this technique. However, later during excavations, military household items of the Chinese army were found. These include helmets and overhead protection for the body of warriors.
The age of the finds surprised everyone - they were made in the 200s BC. Archaeologists are confident that the birthplace of papier-mâché is China. Later, objects made using this technique were found in Japan and Persia.
What is done using papier-mâché technique?
In the modern world, with the development of technology, this technique has begun to be forgotten. But earlier it was used in the manufacture of furniture, lamps, boxes, snuff boxes, hats, jewelry, masks and theatrical scenery.
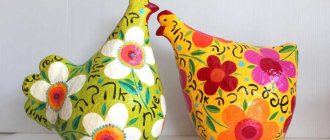
Today, photographs of papier-mâché crafts represent various figurines and decorative items, less often they have any functionality. But sometimes modern designers use papier-mâché in the manufacture of non-standard interior items.
What are the ways to make objects from papier-mâché?
You can make papier mache crafts with your own hands using three well-known methods:
- according to the shape of an object: in order to repeat the desired shape, special blanks are usually layered onto the object
- modeling from paper "clay"
- from plates made of paper under press
bear
For this sculpture it is better to use the sculpting technique.
- When creating this masterpiece, it is better to use a wire frame prepared in advance by a teacher or teacher.
- Previously prepared paper is gradually applied to the frame, and gradually applying layer by layer, the desired figure is sculpted.
- Or another option is to prepare a figure into which the same mixture is poured and left until completely dry.
- After which the form is carefully disassembled and all that remains is to paint the resulting sculpture.
- Whenever using technology, it is best to use a brush in order to get your hands and work area less dirty, after laying down oilcloth or cling film.
Be sure to walk students through the rules for using all material.
How to make papier-mâché according to the shape of an object
Each of us made crafts from papier mache as children. The master class that we all received back in school consisted of making a plate and then painting it. To repeat the shape of an object:
- you need to take old newspapers or thin paper and tear it into small pieces
- prepare a bowl of glue or paste (a mixture of one tablespoon of potato starch and 500 ml of cold water)
- dip pieces of newspaper into liquid and stick to the selected surface in several layers
- leave the form until completely dry
- carefully remove the form from the resulting object
- open the item with varnish or matte paint
Crafts from papier mache for beginners are most often made in this way. It is difficult to make a mistake in this process and the object always turns out to be the desired shape.
Master class on making a papier-mâché mask
- Apply cream to your face and apply plastic wrap. Make breathing holes in the area of the nostrils and secure the film with a hoop or bandage.
- Tear the napkins and soak them in warm water.
- Apply 2-3 layers of napkin pieces and dry slightly.
- Apply another 9-10 layers, each coated with glue. Every 2-3 layers must be dried, you can use a hairdryer.
- Remove the blank and remove the film from the face.
- Trim the excess edges and make holes for the eyes.
- Carefully cover the workpiece on both sides with gauze.
- Dry.
- Putty and polish.
- Paint the mask, make decoration.
- Attach an elastic band or ribbon of the required length.
How to make papier-mâché using modeling
This method is chosen for the manufacture of objects of complex shapes for which it is impossible to select a template. How to make a craft from papier mache by analogy with clay products:
- make paper dough from pieces of paper and paste solution, which will have a consistency similar to dough or clay
- mold the desired shape from paper dough and leave it to dry for a day in a dry, bright place
- coat with acrylic primer
Bunny
We make a bunny in the same way:
- We glue the balloon, leave it until completely dry and form the head.
- To do this, take any plastic, coat it with a thin layer of paste dough (just a little thicker) and leave it to dry.
- Next, moisten the loaf of the head with water and glue it to the main part using the same dough. We make the ears from dough and glue them using dough and toilet paper.
- After complete drying, make a small hole in the bottom of the craft, pierce the ball and carefully remove it.
- And the last step is to paint the resulting figure in any way possible.
How to make papier-mâché from plates
Crafts using the papier mache technique can be made from plates that are made of paper. To do this you need:
- glue together several layers of paper of the same size
- make a base for a future craft from the resulting material
- make paper dough and apply it to the base to consolidate the result
- coat with acrylic primer
A puppet theater can be organized in every home. To stage a mini-play, parents will need to come up with a small script, and children will need to show talent as puppeteers. To begin with, you can limit yourself to puppet characters made of paper. Let's say there is a role of a frog in a puppet show. You can make a frog head using origami technique. And after that, the child will only have to put it on his hand and voice it. The process of creating such a toy is shown in our master class.
To make a frog we will prepare:
- square of green paper;
- a pair of plastic eyes with adhesive base;
- glue.
To make our frog we will use a green square measuring 21x21 cm. First, fold it in half.
After this, you need to perform another transverse fold, but in a different direction.
Now you need to narrow down the preparation of the future frog. To do this, first bend the bottom edge to the center line.
We bend the top side down.
Fold the resulting rectangle in half. This will subsequently be the upper and lower parts of the frog's head.
On one of them (the top one) we will begin to form the eyes. To do this, first bend one of the corners into a triangle.
The other corner needs to be bent symmetrically. At this stage, let's slightly rotate the blank of the future frog.
Now this part needs to be folded up.
The sides need to be folded towards the middle. This way we can form the protruding eyes of our frog. We do this on the right side first.
The same fold must be performed on the left. We received 2 raised parts, onto which we will later glue the eyes.
You need to decorate the sides. To do this, bend the small protruding corners.
Then we tuck them inside.
Now let's work on the lower part of the frog. To do this, first turn the workpiece over.
We'll fold its bottom edge up.
The side corners also need to be bent.
Tuck them in, creating an inner fold on each side.
So we formed 2 pockets into which you can insert your fingers and hold the frog.
But the bottom pocket needs to be secured a little. To do this, bend the top edge down in the form of a narrow strip.
From this strip we bend the corners on the sides.
This will allow us to tuck this strip inside, thanks to which the lower pocket will be fixed.
At the top of the frog we bend the corners up.
Let's use glue and slightly fix the base of the upper pocket.
All that remains is to glue the plastic eyes. If you don't have such eyes, you can draw a frog.
Our hand toy in the shape of a frog is ready.
How to choose material for making papier-mâché
Step-by-step production of papier-mâché begins with the selection of basic materials. It depends on what item you plan to make:
- thin paper (old newspapers, toilet paper, tracing paper, parchment) can be used to make small items
- cardboard is used to make large crafts that require a solid base
The fastening mixture can be made from glue, starch or flour paste. PVA glue must be diluted with plain water in a 1:1 ratio. Flour paste can be made from 100 grams of flour and 400 grams of water.
Basic materials and tools
1.Paper:
- newspaper
- office
- toilet
The fact is that there are two ways to obtain a paper layer on a form: a set of layers with pieces of paper and applying a homogeneous mass. Sometimes both techniques are combined in one work.
a) We tear the paper into pieces. The smaller the product, the smaller the size of the pieces. Just don’t cut it into equal squares!)
Attention! The first and second layers are always placed on water; this is a layer that allows you to separate the dried work from the form. We put all subsequent ones on glue. You can glue each piece or apply a layer of adhesive with a brush to the entire product at once.
A little life hack: alternate layers of paper of different colors. This way you will know exactly what layer you are using!
Apply 2-3 layers and let dry thoroughly.
b) You can make a mass from toilet paper.
Don’t use cheap, gray stuff, it doesn’t dissolve well in water and contains small debris! Take a high-quality one, single or multi-layer, it unravels easily and does not form lumps.
At the same time, the mass will acquire the desired color shade if the paper has been tinted.
- Pour 250 ml of PVA glue into a bowl. If it is very thick, then add water. We tear the paper along the perforations and add one leaf at a time to the glue. Knead until a homogeneous, thick, dough-like mass is obtained. You will need about half a roll, approximately 40 grams if you weigh it.
- Add to the mixture 1 tablespoon of liquid soap and 2 tablespoons of refined vegetable oil as a plasticizer. Let's knead!
- Add 50 grams to the mixture. starch and 100 gr. premium wheat flour. We lightly moisten our hands in oil and continue to knead the mass like dough, sprinkling the table with flour, until smooth. It shouldn't stick to your fingers.
- If you plan to store it for a long time, then add 1 teaspoon of lemon juice to the batch and store it in the refrigerator, wrapped in plastic.
2. We use any wallpaper glue, PVA, or flour paste.
It is better to buy PVA glue in buckets at construction stores. If it is too thick, you can always thin it slightly.
It’s easy to make a paste yourself from flour:
- Boil 1 liter in a saucepan. water. While the water is boiling, dilute it in 0.4 liters. cold water, add flour and stir well with a spoon. You should get a saturated cloudy solution, but not very thick!
- Pour our solution into boiling water with constant stirring. Be careful not to get scalded!
- After cooling, filter the resulting jelly through a sieve. Store in the refrigerator and in a closed jar.
3. Single-color plasticine. You can buy a ready-made sculptural one, but it will be cheaper to take a colored one and mix all the colors until smooth. We will make a model from it.
4.Containers for glue and water.
5. Flat brushes made of bristles of different sizes and thin round brushes, kolinsky or synthetic, stacks.
6. Rags (rags), foam sponges.
7. Scissors, a knife with removable blades, medium and fine sandpaper (zero).
8. Plaster. The papier-mâché technique requires a base on which layers of paper will be applied. Most often, a form is used, in or onto which layers of paper coated with glue are placed. If you need a large number of identical products, then it is best to use plaster molds, as they will absorb excess moisture and the product will dry out faster!
9.Metal culinary foil, gouache or acrylic paints, tempera, decorative cords, rhinestones, sparkles, beads, silicone moldings, toothpicks.
Based on the materials, it seems that everything is ready to begin!
Ideas for crafts from papier-mâché
Using this technique you can make many amazing things for your home:
- pots for house plants of different sizes and designs
- original flower vases
- base for wall clock dial
- candlesticks
- lamp shades
- caskets
- piggy banks
- dishes for fruits and pastries
In addition, papier-mâché can be used to make a beautiful cover for a notebook or diary, bowls for jewelry, and even decorations themselves. Also, many interior designers make shaped moldings on windows, around mirrors and doors from papier-mâché.
Crafts from a balloon or ball
- For this craft, take a small helium ball or inflatable balloon.
- We coat it with vegetable oil, apply the first layer of paper with paper soaked in water, and then apply the required number of layers, lubricating each other with adhesive material.
- After completing all the manipulations, let the structure dry, then pierce the model and carefully remove it.
- Using this technology, you can make a snowman, only the balls must be of different diameters.
Also, using the technology with balloons, you can create a beautiful composition for Easter.
How to make a papier-mâché doll
Most often in our time, the papier-mâché technique is used to make dolls. Most often they are made not from paper dough, but according to the shape. To create the base, choose the softest and most pliable material, for example, plasticine. From it you can sculpt such small details as eyes, ears, lips.
The mold is then covered with a solution of tiny pieces of very thin paper and paste. This is practically jewelry work; it requires precise movements and correct timing to fix the material.
Sometimes an existing doll is selected for production and pasted over with a composition using the papier-mâché technique. Dolls and other items with small parts often take several days to dry.
It’s not for nothing that the papier-mâché technique has been used for so many centuries. With its help, it is possible to make so many useful, functional products. It allows you to realize all creative ideas and is accessible to everyone.
The advantage of this technique is that most of those who use it succeed in all their crafts the first time. If you do everything according to the instructions, failure can be avoided. Be sure to try it to see this theory for yourself.
Master class: DIY Baba Yaga's hut
It can also be made from a mass whose recipe you just learned or use another one. This is how the house of this fairy-tale character will turn out.
But for this you need to work hard, but first prepare:
- a bottle of suitable size and shape;
- napkins;
- stack;
- PVA glue;
- ruler;
- pencil;
- mass for papier-mâché.
Cover the bottle with napkins using PVA glue.
Using a pencil and a ruler, mark the logs, doors, and windows on it. Starting from the bottom, papier-mâché paste is glued in strips. Decorate both sides at once, forming circles in the form of log cuts. Using a stack, make stripes on doors and logs so that they convey the texture of wood. Make smaller details of the door. Let the house dry for 24 hours. Make a window and shutters from papier-mâché mixture. Using a stack, decorate them with carvings. We begin to make the attic, in the photo it is pink.
Such elements need to be made above the window and above the door, then we design the roof. Having made a row on one side and the other, leave it to dry, only after that make another tier. Then complete the third row and pipe. Use a stack to create a brick pattern here, then give these elements a roundness. There will be another row at the top of the pipe. Then we decorate the wall with fly agarics made of polymer clay. Leave the house to dry completely. After that you need to paint it. Baba Yaga's hut is ready.
