Natalya Tsutserova
Master class “New Year’s decorations made of threads”
Master class : New Year's decorations made of threads .
Tasks:
— Introduce a new technique for making New Year’s decorations from threads .
— Develop interest in making New Year's toys
Materials:
- polystyrene foam or thick cardboard.
- woolen threads (different colors)
- sparkles, beads, accessories, etc.
New Year holidays are coming soon . My master class can inspire you to make New Year's toys and garlands. What I offer can be used not only for Christmas tree decorations. And as a gift for friends and relatives, it can be used as a garland or interior decoration .
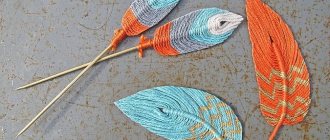
1. To begin with, you can take polystyrene foam.
If there is no foam, I glued together several layers of thick cardboard.
Place the toy template and cling film. So that the finished craft does not stick
2. Stick tailor’s pins along the outline.
3. Unwind a few meters of thread, put it in a bowl and moisten it generously with PVA glue. Moreover, the thicker the thread you choose, the stronger the finished Christmas tree toy will be.
4. Tie the end of the thread to one of the pins. Pull the thread along the contour and wrap it around the knotted pin again.
5. Start folding the thread in loops or randomly and fill in the outline of the star. Fill the whole toy evenly, cut the thread. Be sure to steal a New Year's toy . You can use anything that glitters, manicure sprinkles, beads, beads, etc. In general, whatever your heart desires. Leave the craft to dry for two days.
6. Then remove the foam pins and remove the toy.
Master class on thread applique “By the Stream” Thread applique can be used from the younger group, depending on the complexity of the design and technique. This application is intended.
Master class “Bow for decorating a gift” We often prepare homemade gifts for our friends and loved ones. And to make the gift image complete, I bring to your attention a simple one.
Master class “Flowers for interior decoration” Large flowers for interior decoration made of paper. Dear colleagues, I want to share with you a master class on making large flowers.
Master class on making crafts from threads “Pumpkin - Queen of Autumn” This material will be useful for educators, additional education teachers and creative parents of preschool children.
Master class “Painting from threads “Church of the Ascension of the Lord” The technique of thread applique was used to complete the work. The work was carried out in several stages. First, an image was selected.
Master class “Doll made from threads “Martinichka”” Master class “Doll made from threads “Martinichka”” Teacher-master: Shaibulatova Svetlana Petrovna Venue: Sovetsky regional local history center.
Master class “Easter card” made of woolen threads Objectives: - educational: be able to create a composition from woolen threads, decorate the product with various materials; — developing: to develop.
Master class on making a talisman doll from threads (senior group) Irina Barinova. Master class on making a doll - amulets from threads. (senior group) Today I would like to bring to your attention a master.
"Little doll." Thread craft. Master class You would like to make such a doll with your own hands. It is not hard. Let's prepare skeins of wool, scissors, glue, and colored beads for work. If.
Master class on creating a soft toy “Chicken” from threads. The photo shows crafts that the children created with their own hands under my guidance. The age of children is from 6 to 8 years. That kind of thing.
—Categories
- FAITH AND RELIGION (50)
- Icons (4)
- Prayers (5)
- Signs and superstitions (19)
- Church rituals (5)
- Church posts (4)
- Church holidays (20)
- CHILDREN (14)
- Children's poems and riddles (1)
- Games and activities with children (4)
- Tips for parents (7)
- LEISURE (15)
- Games, riddles and illusions (7)
- Tests (8)
- LIVING WORLD (53)
- Wild animals (5)
- Pets (34)
- Inhabitants of rivers and seas (3)
- Nature (7)
- Birds (5)
- STARS (19)
- Fortune telling, rituals, mysticism (10)
- Horoscopes, numerology (5)
- Conspiracies and rituals (4)
- HEALTH (63)
- Traditional medicine (29)
- Healthy and harmful foods (13)
- Doctor's advice (25)
- BEAUTY (40)
- Hair, hairstyles (4)
- Fashion (2)
- Beauty secrets (7)
- Losing weight (3)
- COOKING (218)
- Jam (7)
- Desserts and baked goods (60)
- Blanks (23)
- Snacks (29)
- Cooking tips (2)
- Meat (19)
- Drinks (4)
- New Year's dishes (23)
- Vegetables (9)
- Holiday dishes (6)
- Fish (9)
- Salads (6)
- Soups (1)
- PERSONAL (136)
- From my life (13)
- My creativity (96)
- My Love Story (24)
- Native Vladivostok (3)
- VISUALITY (204)
- Patterns and pictures (95)
- Templates and stencils (109)
- NEW YEAR (233)
- New Year's bottles (2)
- Christmas trees (8)
- New Year's costumes (6)
- Christmas crafts (157)
- New Year's predictions (2)
- New Year's toasts and congratulations (4)
- New Year traditions and rituals (10)
- Christmas balls (9)
- New Year's decor (33)
- Snowflakes (6)
- EASTER (40)
- Easter ideas (3)
- Easter crafts (31)
- Easter eggs (6)
- USEFUL KNOWLEDGE (66)
- New in the country (2)
- Cheat sheet for LiRu (45)
- You need to know this (19)
- USEFUL TIPS (93)
- Attention, scammers! (1)
- Tips for car enthusiasts (2)
- Tips for tourists (4)
- Tips for Dummies (2)
- Tips for all occasions (6)
- Economic advice (5)
- POETRY AND PROSE (34)
- Parables and fairy tales (4)
- Russian language (2)
- Poems (27)
- HOLIDAYS (41)
- All holidays (25)
- Congratulations and cards (10)
- PAINTING (136)
- Stained glass painting (22)
- Painting (26)
- Spot painting (75)
- HANDCRAFTS (1198)
- Beads (6)
- Embroidery (49)
- Cross stitch (3)
- Ribbon embroidery (7)
- Knitted clothes (28)
- New Year's knitting (8)
- Various knitting (48)
- Knitting.Patterns (23)
- Knitted toys (7)
- Knitted napkins (8)
- Knitted secrets (9)
- Knitted jewelry (10)
- Knitted flowers (10)
- Bottle decor (76)
- Interior decor (68)
- Decoration (96)
- Decoupage (57)
- Ideas for needlewomen (148)
- From waste material (93)
- From paper (1)
- Made from natural materials (75)
- Modeling (98)
- Modeling from plastic and HF (3)
- Salt dough modeling (1)
- Master classes (608)
- Paper crafts (59)
- Various crafts (195)
- Wedding (6)
- Candles and candlesticks (20)
- Plates (5)
- Braid and cord (33)
- Paper flowers (10)
- Flowers made from ribbons and fabric (10)
- Flowers made of plastic and HF (6)
- Handmade flowers (67)
- Edible flowers (2)
- Sewing (103)
- GARDEN (37)
- Vegetables (3)
- Tips for summer residents (14)
- Indoor flowers (13)
- Garden flowers (9)
- Berries and fruits (1)
- THIS IS INTERESTING (0)
- Great love stories (1)
- Celebrities (8)
- Interesting stories (1)
- Interesting facts (8)
- Psychology (1)
- HUMOR (18)
Shiny ball made of thread and PVA glue
- several balloons
1. Pour PVA glue into a bowl and dilute it with a small amount of water.
* If the glue runs out and you are not finished yet, you can add more water.
2. Inflate the balloons. Their size directly affects the size of your future New Year's balls.
3. Prepare a white thread, tie one end to the tail of the ball and start wrapping the thread around the entire ball. Cover the surface of the ball as much as possible.
4. Dip the ball wrapped in thread into a bowl of PVA glue and water and start turning it so that the glue is absorbed into the thread from all sides.
5. Before the glue dries, sprinkle glitter on the ball.
6. So that the ball can dry, you can hang it on a stretched thread using a paper clip or place it on a jar (without a lid).
7. After 24 hours, remove your Christmas decoration and use scissors or another object to burst the ball inside. Carefully pull out the ball; it will be slightly glued to the thread.
* By making several of these shiny balls, you can decorate your Christmas tree or interior. If you get a few branches, you can hang New Year's balls on them, decorating the branches with tinsel.
“Sweet” teapot as a gift | Country of Masters
Teapot-candy bowl. General form
The lid moves to the side, but does not come off at all. View from the handle
And with candies
Hello, all residents of the Country!
This is my first job in decorating gifts. It was given to the class teacher by my daughter on September 1, 2012.
It's a bit crooked, of course. But the work caused indescribable delight.
Based on the work on creating balls from threads https://stranamasterov.ru/node/25926
You can use the MK for creating a teapot https://stranamasterov.ru/node/413632?c=favorite_1707
PS (for those who are interested):
1. Ball base . Take a balloon, inflate it small, and tie it. Next are cotton threads and PVA glue. I poured the glue into a small jar (I used it from a child's cottage cheese jar), made holes at the very bottom on both sides opposite each other, threaded threads through them and wound them around the ball in a chaotic manner. A day later the ball was removed. I outlined the lid with a pencil and did not cut it off completely. I glued the tape along the contour.
2. Handle . I used a plastic bottle (transparent) as a basis. I cut out a rectangle (1x10) and also wrapped it with PVA thread. And I left it, I didn’t remove the threads from the plastic, then I simply bent the ends inward or outward (about 1 cm on each side) and glued it (or you can sew it with threads) to the base of the teapot. I glued some ribbon for decoration.
3. Spout . I used an ordinary teapot as a basis. The main thing is that its nose is narrow at the beginning and widens at the base. I smeared the spout of the teapot with Vaseline (cream, oil, etc.), carefully applied cling film, thereby forming a spout, twisted and turned it, so that it would be easier to remove later. And I wound threads with glue on this base. The place where the spout is attached to the kettle was made tighter. Left it to harden. Then I removed the film and voila - here it is the nose.
4. For stability, the teapot (ball) stands on a stand, also made from a strip from a plastic bottle.
DIY Christmas balls made of threads
- thick threads (for knitting, for example)
- a plastic bowl or cup for glue (or another container in which you can make a couple of small holes)
1. Inflate the balloon to the desired size and tie a tail. If you want to make it more round, press it down with your hands.
2. Use a needle and thread to pierce a plastic bowl or cup. This should be done as close to the bottom as possible. You can also simply dip the thread into a container of glue.
3. Pour PVA glue into a container and dilute it with a small amount of water to save glue.
4. Slowly pull the thread through the glue container and begin to wind the ball with it. Since you will be removing the ball after the glue dries, it is better to leave a little space near the tail in advance to pull it out.
5. Once you have wrapped the ball tightly, cut the thread. You can leave a small tail to make a loop and hang the ball on the Christmas tree, for example.
6. Leave the ball to dry. In the natural way it will take 24 hours or a little more. You can speed up the process by placing the ball near the radiator or drying it with a hairdryer.
7. When the glue has completely hardened on all sides, pierce the ball and carefully pull it out.
8. If desired, you can decorate the ball. Try painting it, gluing plastic or paper snowflakes, sequins, or covering it with sparkles.
Another option:
Elephant Toothpaste Experiment - ScienceBob.com
More science videos on the Science Bob YouTube channel
You will need
- A clean 16 oz (473 ml) plastic soda bottle or water bottle.
- 20 volume hydrogen peroxide solution (20 volume solution is a 6% solution, which is stronger than what you will find in most pharmacies. Commonly used to lighten hair and can be found in many beauty supply stores. You can use 3% - There is hydrogen peroxide in pharmacies, but the reaction will be slightly less)
- 1 tablespoon (15 ml - one package) dry yeast
- 3+ tablespoons (15 ml) warm water
- Liquid dishwashing soap
- Food coloring
- small cup
- Funnel
- Safety glasses
- Help for adults
NOTE: Foam may spill out of the bottle, so be sure to do this experiment on a washable surface or place the bottle on a tray.
WARNING: Unreacted hydrogen peroxide may irritate the skin and eyes. Read the safety information on the hydrogen peroxide bottle and be sure to wear safety glasses.
What to do
- Using a funnel, carefully pour 1/2 cup (118 ml) hydrogen peroxide into the bottle.
- Add about 10 drops of your favorite food coloring to the bottle.
- Add about 1 tablespoon (15 ml) of liquid dish soap to the bottle and shake lightly to mix.
- In a separate small bowl, combine warm water and yeast and stir for about 30 seconds. It should be about the consistency of melted ice cream - add a little more warm water if necessary.
- Now the adventure begins! Using a funnel, pour the yeast mixture into the bottle and watch the foaming begin!
Can I touch the foam? The reaction usually destroys the hydrogen peroxide, so what's left is mostly soapy water and yeast. However, there may be unreacted peroxide present, which can be irritating to the skin and eyes. For this reason, it is recommended not to touch the foam.
(If you use 3% hydrogen peroxide, which can be found at most pharmacies, the foam is safe to touch.)
How it works?
The foam is great! The foam you've made with this classic Elephant's Toothpaste reaction mixture is special because every tiny bubble of foam is filled with oxygen. The yeast acted as a catalyst; a catalyst is used to speed up the reaction. It quickly separates the oxygen from the hydrogen peroxide. Because he did it so quickly, he created many, many bubbles. You notice that the bottle is heating up. Your experiment caused a reaction called an exothermic reaction—meaning it not only creates foam, but it also creates heat! The resulting scum is simply water, soap, and oxygen, so you can scrub it off with a sponge and pour any excess liquid left in the bottle down the drain.
This experiment is sometimes called "elephant toothpaste" because it looks like toothpaste coming out of a tube, but there is no foam in your mouth!
Try this experiment:
This project is a DEMONSTRATION. To conduct a real experiment, try answering the following questions:
- Does the amount of yeast change the amount of foam produced?
- Will the experiment work if you add dry yeast without mixing it with water?
- Does bottle size affect the amount of foam produced?
Science Bob
How to make a ball of thread: gift wrapping
- a large ball of thread
- acrylic paint and brush
- scissors or stationery knife
- a long piece of tape.
1. Inflate the balloon and wrap it with thread as tightly as possible. In some places, add a little PVA glue to secure the thread.
* The main thing is to wrap the ball so that nothing is visible through the thread. You can cover all the threads with a thin layer of PVA glue.
2. Using a brush, apply acrylic paint to the thread. You should not skimp on paint, because in addition to color, it also holds the threads together well.
3. Hang the ball to dry overnight. If you have nowhere to hang it, you can put it on the neck of the jar.
4. When the paint has dried, burst the ball and pull it out of the “cocoon”.
5. Cut the resulting cocoon in half using scissors or a stationery knife. To make this easier, wrap the ball with one thread of a contrasting color and start cutting along this line.
6. Using a screwdriver, make several symmetrical holes on both sides of the cocoon.
7. Place gifts wrapped in beautiful paper inside.
8. Pull the ribbon crosswise through the holes and tie it in a bow at the end.
Linen candy/cooker bowl. Master Class
So, as promised, I’m showing you my tutorial on sewing a candy/sugar bowl.
It all started when I embroidered a cupcake on linen canvas.
For the cupcake I used antique Japanese melange blue thread.
These threads have a story. I got them from a grandmother who was a needlewoman. It so happened that I had never met her and knew absolutely nothing about her. But, I was lucky enough to become the owner of all her handicraft supplies.
When I still lived with my parents, our neighbor Aunt Sveta often came to see us and knew that I really loved embroidering. And she also had friends who didn’t know what to do with their grandmother’s big bag of thread. They wanted to throw it out. But Aunt Sveta didn’t let them throw it away and brought the whole bag to me.
You can’t imagine how much there was there... Various unfinished embroideries, and rags with printed patterns, and a lot of new (in the sense of not started or even printed) skeins of Leningrad floss.
And skeins of Japanese melange (the manufacturer and a bunch of other hieroglyphs are printed right on the packaging) - I really like these threads!
But the quality of the Leningrad floss leaves much to be desired... The threads are thin and without shine (dull). Now the threads are not the same at all - much better quality. That's why I rarely use those old threads.
But if it suddenly turns out that exactly this shade is needed, then I print out a “new-old” skein and embroider with it.
In general, I carefully store and use all of my grandmother’s stock (unfortunately, I don’t even know her name)!
Let's continue. I embroidered a cupcake. I cut out a square piece (13x13cm) from the embroidered canvas and sealed it with dublerin.
I prepared all the necessary materials: a rag with an embroidered motif, pieces of plain linen, a piece of linen with a pattern, 2 types of lace and bindweed in two shades (+ another piece of padding polyester and a patch).
I sewed blue bindweed onto the canvas with the cupcake.
I cut everything by eye! I sewed a linen rectangle on both sides (along the width of the square).
Then, I sewed long rectangles on the other sides.
I trimmed off the excess fabric. The result was a square 30x30cm.
I stitched blue lace onto the square, thereby marking the center of the future candy/cracker bowl.
I cut out a 30x30 cm square from linen with a pattern. I also cut out padding polyester of the same size. I connected them with pins. I stitched on a blue bindweed and a patch. Next, onto the square with the cupcake, along the intended fold, I basted future ties made of dark blue lace. This square was covered with a square with a patch (face to face). I stitched around the entire perimeter, leaving room for turning. I turned it inside out, straightened the corners well, and sewed up the hole with a hidden seam.
Christmas tree made of threads. Option 1.
- cling film or wide tape
1. Make a cone out of cardboard. To find out all the ways to make a cone for a Christmas tree, go to our article
“Paper cone”
.
2. Wrap the cone in cling film or wide tape.
3. Pour PVA glue into a bowl (you can dilute it with a little water).
4. Dip the thread into the bowl of glue and begin wrapping it around the cone, starting from the top of the head. The thread should not be squeezed too hard - there should be enough glue left on it to attach well to the cone.
5. Leave the craft for 24 hours to allow the glue to dry, or you can use a hair dryer to speed up the process.
6. After the glue has dried, carefully remove the thread tree from the cone.
7. You can start decorating your Christmas tree. Any decorations are suitable for this - sparkles, sequins, buttons, beads, pompoms, etc. You can also place an electric candle under the tree to make it look even more beautiful.
Bouquet of yarn. Almost a master class
Hi. How are you doing?? Even though it’s November, the days are sunny and there’s something to be happy about. And I have a long post today, so make yourself comfortable. So, it was my godmother/girlfriend’s birthday recently.
While thinking about what to give as a gift, I dismissed the option of a tea set and decided to give materials for needlework, my friend is a needlewoman. And in order not to go with a little bag of thread, I came up with the idea of making a bouquet of yarn.
And what? There are bouquets made from sweets, bouquets made from soft toys, even bouquets made from stationery - why not from yarn? I rushed to study the network about this - I really didn’t find anything, so I read a tutorial on making bouquets from toys (the principle is the same), turned on my imagination and made a small gift for my godmother)
This is how the bouquet turned out. It occurred to me that maybe someone would also want to please their knitter friend with a similar bouquet (maybe with a hint “I’ve been wanting a knitted hat for a long time”))), so I’ll do a small master class, or rather just a description of how I did it. Maybe someone will need it)) So. We start by preparing the necessary ingredients and components. I’ll say right away that I made it from what I had and used publicly available materials for the bouquet, since I’m not very mobile. You couldn’t go far with Alena, or rather her stroller, so I used what I could buy at the nearest market. And I needed
DIY thread tree. Option 2.
- cling film or wide tape
- a garland with lights.
1. Make a cone out of paper. Make small cuts at the bottom, leaving 2 cm between them. The cuts are needed so that you can stretch the thread between them.
2. In a bowl, dilute PVA glue with water.
3. Begin to saturate the thread with glue and wrap it around the cone, threading the thread through the cuts and wrapping the entire cone. Leave the glue to dry.
4. When everything is dry, carefully remove the string tree from the cone. To make this easier, cut off the edge of the base of the cone (where the cuts are). Start slowly turning the cone until it comes unstuck.
5. Glue, sew or staple the ribbon to the bottom of the tree.
6. Place a garland of lights inside the tree. If the light bulbs are small, then they can be secured inside the tree using thin wire or Christmas tree decorations that have wire fastenings. You can also use paper clips.
Here is another photo instruction:
Freezes, crashes, doesn’t load: common Internet problems that hurt us
Astronauts broadcast live in space, and we still put up with freezing Internet at home. We survived: communication in orbit is better than in someone’s apartment. Below are the top problems with the Internet that can drive anyone crazy. Most, by the way, are solved by replacing the router and adequate service from the provider
.
1. The movie froze at the most important moment
The matter is moving towards the finale: the Night King almost reached Bran - and suddenly stopped. Or at the Battle of Hogwarts, Harry Potter had already gone to surrender to the Dark Lord - but your Internet surrendered instead. And from the next room a child’s cry is heard: the cartoons are also frozen.
Perhaps there is simply not enough speed for all devices. This means the simplest solution: your Internet needs a different tariff so that the speed becomes higher and the quality is more stable.
If the tariff is already super-fast, but problems remain, take a closer look at your router. If you connected to the Internet five years ago, then most likely your router is an old generation - the 802.11g standard, which does not transmit more than 54 Mbit/s and cannot operate at a frequency of 5 GHz. Which means an upgrade is needed.
If you don't understand anything right now, that's okay. Still, you are not a communications engineer and should not understand hertz and standards. Trust the specialists from Dom.ru
. They know how to not only connect the Internet and TV set-top boxes, but also cope with any problems with the Internet in no time.
2. Missed an important video call
You reread the report, put on a clean shirt, check that your pajama pants are not visible to the camera, click “Join Call” - and nothing. There seems to be a connection, but it seems that its path is longer and more thorny than Frodo’s hike to Mordor!
Or you were preparing for an interview for a cool remote job, but were unable to get in touch due to poor internet. The reason is clear, but the first impression is spoiled: remote work, but the network no longer works.
Experienced remote workers (and employees at Pikabu too) advise in such a case to keep mobile Internet on hand, which is enough to reschedule an online meeting in an emergency or warn the interlocutor about the problem in the messenger.
Well, when you are not in a hurry, diagnose the problems of your PC. If the problem is definitely not in your gadgets, contact your provider and find out what is the cause of the connection problems. Perhaps during your important call there was a breakdown or urgent technical work was carried out.
3. Tank kaput - “thank you” to the slow Internet
“I aim the gun slowly—boom!” Is this what your last fight looked like because the internet was stupid? It seems like I was connected to a high-speed tariff after problems with movies and calls, but still there are problems at every step. You can’t even relax: online games freeze endlessly. And again crying from the nursery!
If the speed is again not enough, it’s time to use heavy artillery - a router that will pull the Internet up to 600 Mbit/s. For example, D-Link DIR-2150
. You can connect up to 10 devices to this monster.
There is no need to remember complex names of router models. The provider’s specialists will advise you and select the appropriate equipment. Tell us how many devices use Wi-Fi, whether there are periods of increased load (watching 4K video streaming, online games, video calls) and what you would like in general. They will understand you, choose a solution and will not burden you with terms and details. Unless you ask.
4. There are blind spots at home.
Imagine, you decided to follow the example of the happy owners of cozy balconies: you made repairs, insulated the floors, installed soft chairs and even brought in a ficus tree. And now everything is ready. You go out onto the balcony to brag to your mother that you did everything with your own hands, but a strange expression froze on her face. She does not like? No, you don’t have internet on your balcony.
We don’t suggest doing any redevelopment, but it’s worth checking exactly where your router is located and what coverage area it has. Modern access points
provide a stable signal over an area of up to 80 square meters.
m. If your home is larger or, say, you want Wi-Fi throughout your entire summer cottage, look at the Wi-Fi Mesh TP-LINK Deco M4 system
. Two routers will cover an area of up to 260 square meters with stable Internet. m. and operate at frequencies of 2.4 GHz and 5 GHz.