Initially, an organizer meant a small book or notepad containing a calendar, a pen, and sometimes even a calculator. And it served for keeping records, maintaining contacts and organizing things, and, above all, for time management, since recording questions for orientation simplifies the work.
Nowadays, an organizer can be understood as any item that in one way or another helps in systematizing and organizing something.
Organizer for underwear
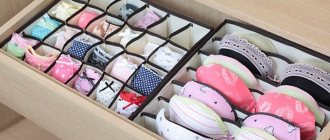
Since underwear is a personal toilet item, it requires timely care and mandatory order in the place where it is stored - in which an organizer for underwear will be a great help. It will be convenient to use and will reduce the time for getting ready in the morning and cleaning on Saturday.
There are many variations in functionality and purpose, and in shape and color. Some are designed for storing turning tools, others for bed linen, underwear, etc.
Making an organizer for underwear with your own hands is not as difficult as it might seem at first glance, since all the materials necessary for assembly can be purchased at any hardware store, and this matter does not require any special skills, it will be enough not to have problems with coordination and even understand a little geometry.
How to make a hair dryer stand
From plastic bottles
The simplest and absolutely inexpensive option is a holder made from unnecessary drink bottles. Both milk and lemonade ones will do. It is enough to measure the length of the hair dryer and cut the cylinder of the required length with ordinary scissors or a knife.
For convenient placement of the device handle, you can make a rectangular or shaped cutout on the front or side. The edges of the cuts need to be melted using an iron or soldering iron to avoid injuring your hands.
It is best to place such a device on the wall using a hook or self-tapping screws.
You can decorate the holder using fabric, paint, rhinestones or stickers.
From metal wire
The magazine devices are made in the form of a spiral of elastic wire. If you have the same wire in the garage, you can make the holder yourself.
To work you will need:
- wire;
- welding;
- self-tapping screws;
- round pipe or log.
First you need to bend 2 wire rings using a pipe or a wooden round.
Next, we attach both rings to a vertical base by welding. The distance between them should be 2–3 cm less than the length of the hair dryer to the handle.
The wall part can be made of wire, folded in half so that there is an “eye” on top for fastening with self-tapping screws. Or you can create a real masterpiece “forged” in country style or lace in Provence style.
From plywood
Wood and plywood are the most fertile materials for creating decor. Why not make a hair dryer holder out of them? It can also be a rectangular basket that can accommodate not only a hair dryer, but also a bunch of other useful little things.
You can create a carved masterpiece. Or this cute little fence to decorate the bathroom of a country house.
From drain fittings
If, after installing the plumbing system and drainage equipment, you still have extra splitters, then you can put them to use. They make excellent holders for hair dryers, combs and other useful little things.
There’s no need to do anything here; just mount the splitter on a shelf or wall and decorate it to your liking.
Fabric laundry organizer
It’s easy to make a fabric laundry organizer with your own hands. For this you will need: fabric (it is advisable to take it with a reserve so that there is always a couple of centimeters left for adjustments), a needle (or even better, a sewing machine), threads (it is advisable to select threads from the same material as the fabric), buttons (depending on what type of organizer will it be).
How to sew a laundry organizer with your own hands.
The technology is as follows: we cut off the required piece of fabric for the base, and prepare smaller pieces of fabric, a very good ratio of 1:6 (1 large piece: 6 small pieces, when folded, the large one will be approximately the same size).
Take a thread and a needle, you need to alternately sew small pieces to a large one so that you get pockets.
The organizer is ready, 6 pockets are great for storing underwear. You can place it almost anywhere by sewing a couple of loops, you can hang it on the door or in the closet.Hanging Organizer Ideas with Pockets
An interesting and useful item can be used in all rooms of any apartment.
Bathroom .
A similar thing in the bathroom will be a good solution for placing combs, shower and hair products, foams, creams, gels; Children's room Here, in general, everything can be hung with lovely little things. Near the desktop they will serve to place notepads, scissors, pencils or markers, near the bed and in the play area - to place small toys; Hallway. In the hallway you can compactly place light scarves and hats, fluffy mittens and gloves. Shoe creams and brushes will also be placed here, and the shoes themselves will take up much less space; Bedroom. Next to the bed you can find a place to place glasses, medicines, watches, phones, chargers; Living room. Near the armchair and sofa it is convenient to place an organizer with glasses, a TV remote control, a newspaper with crossword puzzles;
Kitchen. In the kitchen, such storage can be used to store cutlery, spices, and place decorative elements.
There are no creation rules for organizers. They can be made from any fabric, have any color, be of any shape.
Cardboard laundry organizer
Another version of the organizer made from cardboard boxes. In order to make a laundry organizer from boxes with your own hands, we will need: glue (it is advisable to take a hot glue gun), tape or adhesive tape (for additional fixation), you will actually need cardboard or boxes made of it (three-layer would be preferable), fabric for To give it an attractive look, a stapler may come in handy.
Step by step instructions. First, we need to determine what size organized laundry storage we want, since further actions depend on this. How many cells will there be, what sizes and shapes.
After we have determined the dimensions for ourselves, we begin preparation. You need to cut pieces of cardboard of suitable sizes for further gluing, prepare a base (a large piece of cardboard to which the cells will be attached).
Since such an organizer is more suitable for a drawer or chest of drawers, be sure to take into account the size of the drawer.
In order for our homemade laundry organizer to look decent, we cover all parts with fabric, it is advisable to choose light colors, not synthetic fabric, so that the organizer has an aesthetic appearance and is not harmful to the laundry.
Synthetic fabrics tend to release harmful substances over time, which will definitely have a negative impact on health. It is advisable to glue the middles from the inside, and sew well along the contour.
Then you need to alternately glue all parts of the cardboard to the base. Starting from the sides, we gradually glue the cell partitions. Additionally, we fasten all the parts with a stapler; on the staples, you need to bend the edges inward so that they do not spoil the linen.
At the same time, there are many companies in the world aimed at producing and selling household goods, including a laundry organizer.
The variety of sizes and shapes is amazing. And all of them are aimed at simplifying human life.
Master class: crochet toiletry organizer
For knitting a practical hanging toiletry pocket 27cm x 59cm. you will need:
— mercerized cotton 250 gr. (100 gr. - 260 m.);
First, knit a rectangle with dimensions: 27 cm - width, 59 cm - height.
To do this, cast on 67 air loops and knit 3 rows with single crochets. Next, knit 74 rows with double crochets.
Now, without tearing off the thread, knit the first pocket.
The organizer's pockets should be large enough to accommodate combs, toothpaste and other toiletries.
Having turned the product, knit 32 single crochet stitches (the stitch needs to be knitted in half of the stitch of the previous row).
Knit 3 rows. There are still 32 columns in the row.
Next, knit the pocket with a pattern - 20 rows. The pattern diagram is below.
To finish knitting the pocket, knit 2 rows with single crochets. Break the thread.
For the side of the pocket, knit 21 single crochets - 3 rows.
You need to start knitting from the last row of the pocket.
In the picture: 2 rows are knitted.
In the 4th row, single crochet, join the side part and the pocket together.
In the 4th row, single crochet, join the side part and the pocket together.
Knit the second side part of the pocket in the same way.
Knit the second pocket like the first. Can be a pattern. I knitted with double crochets through air. loop.
Counting 32 double crochets from the bottom edge of the organizer, knit 2 rows with single crochets across the entire width.
Then 17 rows with double crochets through air. loop. You can choose a different pattern.
Connect the sides of the pocket with the organizer using single crochets.
This pocket will be divided into two by a sewn button.
At the top of the organizer, place 2 pockets, which you knit like this:
- tie 6 single crochets into a slip loop;
- 2nd row: 12 single crochets (add 6 single crochets evenly);
- 3rd row: 18 single crochets (add 6 single crochets evenly);
- 4th row: 24 single crochets (add 6 single crochets evenly);
- 5th row: 30 single crochets (add 6 single crochets evenly);
- 6th row: 36 single crochets (add 6 single crochets evenly);
- 7th row: 42 single crochets (add 6 single crochets evenly);
- 8th row: 48 single crochets (add 6 single crochets evenly);
- 9th row: 60 single crochets (add 6 single crochets evenly);
- 10th row: 66 single crochets (add 6 single crochets evenly);
- 11th row: 72 single crochets (add 6 single crochets evenly);
- 12th row: 78 single crochets (add 6 single crochets evenly);
- 13th row: 84 single crochets (add 6 single crochets evenly);
- 14th row: 90 single crochets (add 6 single crochets evenly);
- Row 15: 96 single crochets (add 6 single crochets evenly).
Knit the second pocket in the same way.
Fold the edge of the pocket and steam. Let dry.
Attach the pockets to the organizer with half-columns (connecting posts).
At the beginning of knitting, you knitted 3 single crochets, remember? Fold them inside out and knit a row in half-stitches.
This is necessary in order to insert an aluminum rod (a wire that does not bend). Organizer for items that create a certain heaviness. The weight will be even with this wire!
Stepping back 10 posts from each edge, attach the cord.
Sew bows to the small pockets. The middle pocket has buttons (the button in the middle divides the pocket into two).
Photos of DIY laundry organizers
And there is room for flowers!
There are a lot of flowers in your house, the window sills are occupied and there is no room on the floor for green residents. In order to compactly place the flora and not go out of budget, the flower garden is planted on homemade shelves.
Usually, inexperienced craftsmen do not know how to start and what to make a flower stand from. The imagination pictures a structure made of wood or iron. This is a good option if you have extra money, because metal products, especially forged ones, are not cheap.
But from improvised materials they make flowerpots, flowerpots and stands not only for apartments, but also for summer cottages.
For an apartment, men are able to make a modular structure from a metal pipe and plywood. They cut out pieces of wood of any shape, drill holes along the diameter of the tube, string it on it and secure it with special fasteners.
If you are confused by possible difficulties, you should watch the video, and they will tell you in detail and show you how to make a stand out of pieces of wood.
But for the balcony and summer cottage, non-traditional materials are used. From plastic bottles, plastic sewer pipes, old buckets, shoes, bicycles, chairs, car tires they create such works that you can only marvel.
At dachas there is a lot of material, for example, logs, which can be laid, hollowed out, earth filled into the hole and flowers planted.
What to consider when operating
It is recommended to place the accessory close to a power source and next to a mirror. To improve the aesthetics of the fastening, you can choose a design with a hidden type of installation. And when installing on suction cups, you must check the tightness. If moisture gets between them and the surface of the base, the holder will soon slip off.
When choosing a chrome finish, remember that you will have to take care of the product by rubbing it regularly. Otherwise, it is advisable to buy matte models.
Metal holders are reliable, but you must first check for scratches and defects. And finally, choose high-quality products from trusted manufacturers, and it is better to make purchases in specialized stores.
Wall-hung toilet with installation: recommendations for selection and installation
Decorative screens for a heating radiator: overview of types of grilles and do-it-yourself installation
Hygienic shower for toilet: types and step-by-step installation guide
Mounting method
- A wall holder for a hair dryer or a stationary mount with dowels is attractive due to its reliability in operation, since such a design can withstand any load. The disadvantage is that it is not always possible to install such a mount in the bathroom wall. There is a possibility that the installation of the structure will damage the surface of the walls, be it tiles or plastic surfaces. To avoid such problems, choose another option.
- Vacuum mounting or suction cups do not cause any damage to the wall or other surface. It has the same functions as the stationary one. But its main purpose is limited by the weight of the device being held. That is, his choice must be in strict accordance with the weight of the hair dryer that he must hold. In addition, during its operation or cleaning the room, you must avoid applying unnecessary force, otherwise it will need to be reattached.
- The floor-mounted hair dryer holder does not need to be attached to the surface. It can be easily moved to any place, and its stylish appearance will perfectly complement the design of the room. It is a long metal leg with a wide, stable base at the bottom; the main part of the device is located on top - a plastic or metal spiral-shaped retainer for a hair dryer.
Homemade holder
For those with creative potential, there is the opportunity to create a hairdryer holder for the bathroom with your own hands. This will not take much time, but an exclusive accessory with sufficient functionality will appear.
For manufacturing you will need a PVC pipe, which must be cut to the required length and fixed in the chosen location. For example, attach it to the wall or simply install it in free space. All that remains is to use your imagination and give the product an aesthetic appearance that matches the style of the bathroom.
How to choose?
When choosing a holder for a hair dryer, you need to take a closer look at the base material. As noted above, various metals are used to create products. It is worth paying attention to the stainless steel model. Its surface is resistant to corrosion and is also easy to clean.
An important point is the type of fastening. It is best to choose stationary options, as they are more reliable and safe to use.
Vacuum models are not particularly durable; over time, they begin to detach from the surface on their own.
How to make a hair dryer stand
From plastic bottles
The simplest and absolutely inexpensive option is a holder made from unnecessary drink bottles. Both milk and lemonade ones will do. It is enough to measure the length of the hair dryer and cut the cylinder of the required length with ordinary scissors or a knife.
For convenient placement of the device handle, you can make a rectangular or shaped cutout on the front or side. The edges of the cuts need to be melted using an iron or soldering iron to avoid injuring your hands.
It is best to place such a device on the wall using a hook or self-tapping screws.
You can decorate the holder using fabric, paint, rhinestones or stickers.
From metal wire
The magazine devices are made in the form of a spiral of elastic wire. If you have the same wire in the garage, you can make the holder yourself.
To work you will need:
- wire;
- welding;
- self-tapping screws;
- round pipe or log.
First you need to bend 2 wire rings using a pipe or a wooden round.
Next, we attach both rings to a vertical base by welding. The distance between them should be 2–3 cm less than the length of the hair dryer to the handle.
The wall part can be made of wire, folded in half so that there is an “eye” on top for fastening with self-tapping screws. Or you can create a real masterpiece “forged” in country style or lace in Provence style.
From plywood
Wood and plywood are the most fertile materials for creating decor. Why not make a hair dryer holder out of them? It can also be a rectangular basket that can accommodate not only a hair dryer, but also a bunch of other useful little things.
You can create a carved masterpiece. Or this cute little fence to decorate the bathroom of a country house.
From drain fittings
If, after installing the plumbing system and drainage equipment, you still have extra splitters, then you can put them to use. They make excellent holders for hair dryers, combs and other useful little things.
There’s no need to do anything here; just mount the splitter on a shelf or wall and decorate it to your liking.
Basic principles for choosing the right hair dryer holder
When choosing holders, it is imperative to focus on your own preferences and take into account a whole range of factors.
The main provisions in the general principle of choosing a device can be defined as the convenience and practicality of using such a stand and the possibility of its placement:
Material of manufacture. Metal products are coated with a special anti-corrosion coating, and plastic ones are affordable, but it is best to choose silicone devices that are flexible and have an original design.
Stand size. The dimensions of the chosen design must fully correspond to the dimensions of the existing hair dryer, which will ensure its safety of use and ease of storage; this combination will help improve the aesthetics of the bathroom arrangement.
Mounting type. Stationary models can be installed on different horizontal surfaces, and wall-mounted devices can be conveniently placed next to a mirror or sink for storing heavy and professional hair dryers.


